Elegant Networking in Flutter with Chopper
Learn how to easily create REST API calls and parse JSON data from the internet using the Flutter networking library Chopper. By Kevin D Moore.
Flutter comes with basic networking and JSON serialization modules. These modules work but require a lot work to download JSON from the internet.
If you come from an Android or iOS background, you may be familiar with the Retrofit library on Android or the AlamoFire library on iOS. These libraries do the heavy lifting so you don’t have to do as much work. Wouldn’t it be nice if you had something similar for Flutter?
With the Chopper networking library, you do! Built to resemble Retrofit, this library makes it much easier to get JSON data from the internet.
In this tutorial, you’ll build a movie listing app that builds data modules and creates network calls. Along the way, you’ll see how Flutter implements:
- Calling network APIs.
- Parsing JSON data.
- Showing JSON data in a ListView.
- Displaying network images.
Getting Started
Download the starter project by using the Download Materials button at the top or bottom of the page.
This tutorial uses Android Studio with the Flutter plugin. You can also use Visual Studio Code, IntelliJ IDEA or a text editor of your choice with Flutter at the command line. Make sure you have the Flutter plugin installed before you open the starter project.
You’ll build on the starter project to load a list of popular movies and show each movie in a card view inside of a listview. First, open the starter project. Then, open the pubspec.yaml and get the dependencies by clicking the Pub get button in the top-right corner.
Build and run the app. You’ll see a sample card like this:

The final project will look like this:
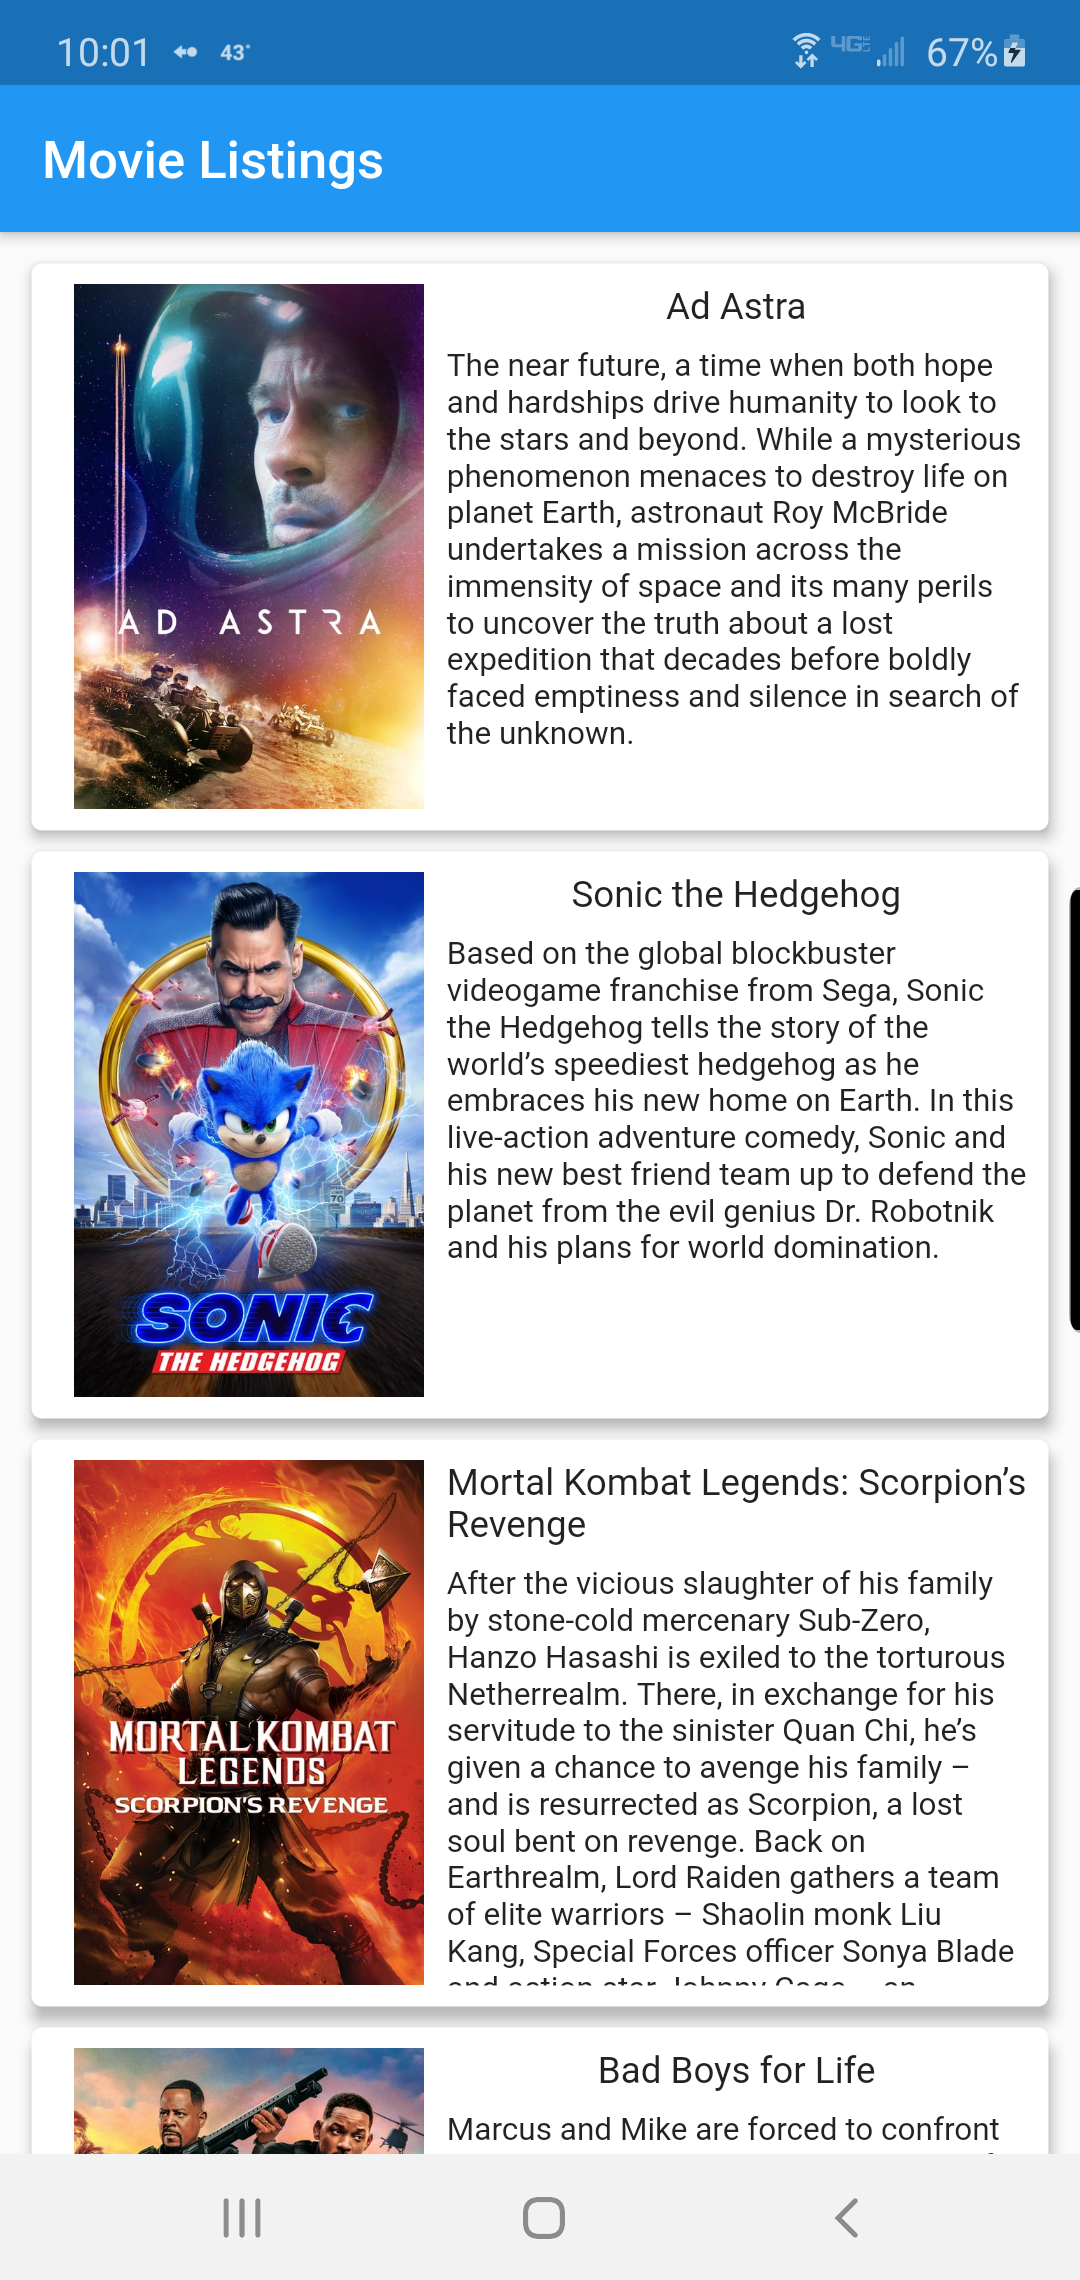
Movie Listings
Since you want to show a list of the most popular movies, use The Movie Db website which has an API built for that purpose. You need to sign up for a TMDb account to use their API. If you decide you want to use their data in a published app, they ask that you attribute TMDb as the source of your data.
Head to The Movie Db site. Click the Join TMDb link in the upper right corner.

Fill in the fields to sign up for an account. Then, click Sign up.

You’ll receive an email to verify your account. Once that’s done, sign back in. Then, tap your account icon in the top-right corner and choose the Settings menu item:

Now, choose the API menu item in the settings Panel:

Choose click here in the Request an API Key section:

Then, click either the Developer or the Professional link.

Change the Type of Use to Mobile, fill in the API Information and submit:
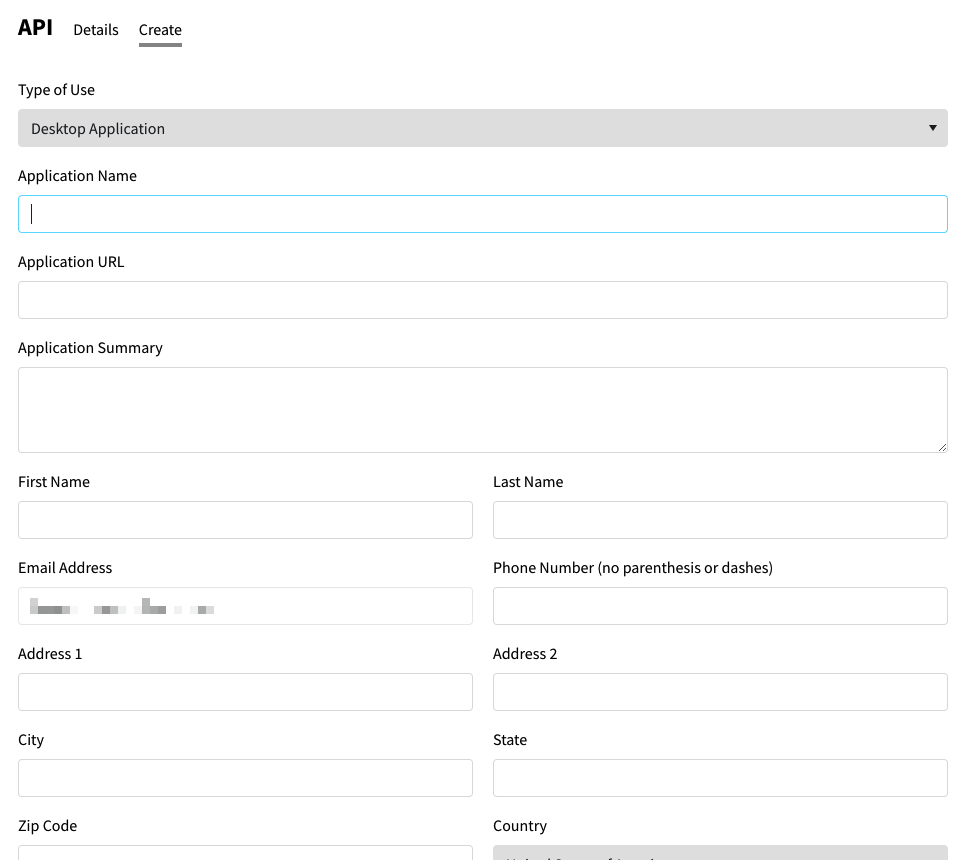
It doesn’t matter if you put in placeholder information for now – you should be automatically approved.
Once your app is approved, click the Details section. The API Key and the API Read Access Token, v4 auth, are the important sections. You’ll use the v4 auth token later in the project.

Using the Popular API
You’ll use the Popular Movie API found at Popular Movies Docs. To get the list of the most popular movies, you need to make a call to https://api.themoviedb.org/3/movie/popular with either your api_key or, as you’ll see later, your auth token. You can see the schema and example data displayed in the Popular Movies Docs API documentation under the Responses section:

Now, click the Try it out tab. Copy your API key from settings key into the api_key field. Then, press Send Request.

Here’s a sample of the data returned from calling the popular REST API. REST stands for REpresentational State Transfer. It’s an API architectural design pattern.
This particular call uses the GET method with the popular URL.

As you can see, you have the current page, total results, total pages and an array of movies, or results. You’ll need to use these JSON fields in your model classes.
Libraries
You’ll use several libraries:
-
choppermakes the REST API call. -
json_annotationmarks your models as serializable. -
providermakes your Chopper service available in your list. -
logginglogs your network requests.
If not already open, open the pubspec.yaml file in your project. Under the cupertino_icons library, add the following, aligning with cupertino_icons:
  chopper: ^3.0.2
  provider: ^4.0.5
  json_annotation: ^3.0.1
  logging: ^0.11.4
Developer Libraries
Developer libraries are used during development and aren’t shipped with the app. You’ll use these libraries to generate the code that does most of the work for you:
-
build_runnergenerates code. -
chopper_generatorgenerates Chopper related code. -
json_serializablegenerates JSON serializable code for your models.
Continuing in pubspec.yaml, under the flutter_test library, add the following, making sure these libraries aline with flutter_test and not sdk::
  build_runner: ^1.9.0
  chopper_generator: ^3.0.4
  json_serializable: ^3.3.0
As you should anytime you update pubspec.yaml, click the Pub get link to get dependencies. You can also choose Tools ▸ Flutter ▸ Flutter Pub Get to download all the libraries.

Models
Before you download movie listings, you need a place to put the data. You could use a map of strings, as the default JSON parsing does, or you could put it into a class that makes getting to the data easy.
In the Project tab, go to the lib ▸ models folder. Right-click the models folder and choose New ▸ New Dart File. Name the file result.dart.
Add the following:
// 1
import 'package:json_annotation/json_annotation.dart';

// 2
part 'result.g.dart';

// 3
@JsonSerializable()
class Result {
  // 4
  double popularity;
  // 5
  @JsonKey(name: 'vote_count')
  int voteCount;
  @JsonKey(name: 'video')
  bool video;
  @JsonKey(name: 'poster_path')
  String posterPath;
  @JsonKey(name: 'id')
  int id;
  @JsonKey(name: 'adult')
  bool adult;
  @JsonKey(name: 'backdrop_path')
  String backdropPath;
  @JsonKey(name: 'original_language')
  String originalLanguage;
  @JsonKey(name: 'original_title')
  String originalTitle;
  @JsonKey(name: 'genre_ids')
  List<int> genreIds;
  @JsonKey(name: 'title')
  String title;
  @JsonKey(name: 'vote_average')
  double voteAverage;
  @JsonKey(name: 'overview')
  String overview;
  @JsonKey(name: 'release_date')
  String releaseDate;

  // 6
  Result({this.popularity, this.voteCount, this.video, this.posterPath, this.id,
      this.adult, this.backdropPath, this.originalLanguage, this.originalTitle,
      this.genreIds, this.title, this.voteAverage, this.overview,
      this.releaseDate});

  // 7
  factory Result.fromJson(Map<String, dynamic> json) => _$ResultFromJson(json);

  // 8
  Map<String, dynamic> toJson() => _$ResultToJson(this);
}
Here’s a description of the class:
- It imports the JSON annotation library for annotations like
JsonSerializableandJsonKey. - The part directive lets you include a file called result.g.dart. This file doesn’t exist yet and will be generated for you.
- Using
JsonSerializabletells the json_serializable package to generate the code in result.g.dart. This code serializes and deserializes JSON. - It defines a double field called
popularity. - Use the
JsonKey nameproperty to define the JSON key field and your related code field, for example,vote_countandvoteCountrespectively. This lets you name the JSON field differently than your field. - It defines the constructor that recieves the defined fields.
- Then it defines a
factoryconstructor that creates a newResultinstance using your soon to be automatically generated JSON deserializer. - Finally, it defines a function to return a JSON map of the
Resultclass, also known as serializing the class.
Look at the moviedb page you referenced earlier with a sample get popular movies response. You’ll see each of these fields matches those returned in the JSON string in the sample response.
Now, create the top-level popular class. Right-click the models folder and choose New ▸ New Dart File. Name the file popular.dart.
Then, add the following:
import 'package:json_annotation/json_annotation.dart';
import 'package:movies/models/result.dart';

part 'popular.g.dart';

@JsonSerializable()
class Popular {
  int page;
  @JsonKey(name: 'total_results')
  int totalResults;
  @JsonKey(name: 'total_pages')
  int totalPages;
  List<Result> results;

  Popular({this.page, this.totalResults, this.totalPages, this.results});
  factory Popular.fromJson(Map<String, dynamic> json) => _$PopularFromJson(json);

  Map<String, dynamic> toJson() => _$PopularToJson(this);

}
This is similar to the Result class and defines the Popular class top-level elements. Using the JSON array data, it creates a list of results.