MVVM with Combine Tutorial for iOS
In this MVVM with Combine Tutorial, you’ll learn how to get started using the Combine framework along with SwiftUI to build an app using the MVVM pattern By Rui Peres.
Apple’s newest framework Combine, alongside SwiftUI, took WWDC by storm. Combine is a framework which provides logical streams of data which can emit values and then optionally end in a success or error. These streams are at the core of Functional Reactive Programming (FRP) which has become popular over recent years. It has become clear that Apple is moving forward, not only with a declarative way of creating interfaces with SwiftUI, but also with Combine to manage state over time. In this MVVM with Combine tutorial, you’ll create a weather app that takes advantage of SwiftUI, Combine and MVVM as the architectural pattern. By the end of it, you’ll be comfortable with:
- Using Combine to manage state.
- Creating bindings between your UI and your ViewModel with SwiftUI.
- Understanding of how all these three concepts fit together.
By the end of this tutorial, your app should look like this:

You’ll also explore the pros and cons of this particular approach and how you could tackle the problem differently. This way you’ll be better prepared for whatever comes your way! :]
Getting Started
Start by downloading the project materials using the Download Materials button at the top or bottom of this tutorial. Open the project located inside the CombineWeatherApp-Starter folder.
Before you can see any weather information, you must register at OpenWeatherMap and get an API key. This process shouldn’t take you more than a couple of minutes and, by the end, you’ll see a screen similar to this:

Open WeatherFetcher.swift. Then update WeatherFetcher.OpenWeatherAPI with your key inside struct OpenWeatherAPI, like so:
struct OpenWeatherAPI {
  ...
  static let key = "<your key>" // Replace with your own API Key
}
Once this is done, build and run the project. The main screen shows you a button to tap:

Tapping “Best weather app” will show you more detail:

Right now it doesn’t look like much, but by the end of the tutorial, it’ll look a lot better. :]
An Introduction to the MVVM Pattern
The Model-View-ViewModel (MVVM) pattern is a UI design pattern. It’s a member of a larger family of patterns collectively known as MV*, these include Model View Controller (MVC), Model View Presenter (MVP) and a number of others.
Each of these patterns addresses separating UI logic from business logic in order to make apps easier to develop and test.
It helps to look back at the origins of MVVM to understand the pattern better.
MVC was the first UI design pattern, and its origins track back to the Smalltalk language of the 1970s. The image below illustrates the main components of the MVC pattern:
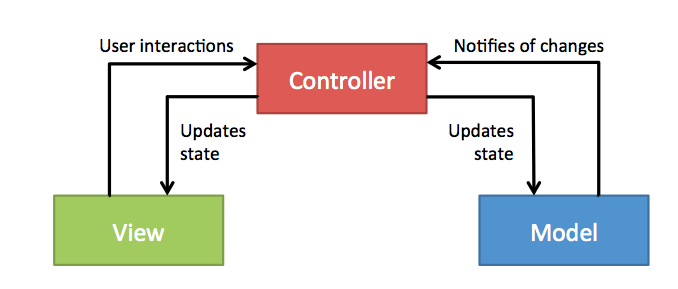
This pattern separates the UI into the Model that represents the application state, the View, which in turn is composed of UI controls, and a Controller which handles user interactions and updates the model accordingly.
One big problem with the MVC pattern is that it’s quite confusing. The concepts look good, but often when people come to implement MVC, the seemingly circular relationships illustrated above result in the Model, View and Controller becoming a big, horrible mess.
More recently, Martin Fowler introduced a variation of the MVC pattern termed the Presentation Model, which was adopted and popularized by Microsoft under the name MVVM.

At the core of this pattern is the ViewModel, which is a special type of model that represents the UI state of the app. It contains properties that detail the state of each and every UI control. For example, the current text for a text field, or whether a specific button is enabled. It also exposes the actions the view can perform, like button taps or gestures.
It can help to think of the ViewModel as the model-of-the-view.
The relationships between the three components of the MVVM pattern are simpler than the MVC equivalents, following these strict rules:
- The View has a reference to the ViewModel, but not vice-versa.
- The ViewModel has a reference to the Model, but not vice-versa.
- The View has no reference to the Model or vice-versa.
If you break these rules, you’re doing MVVM wrong!
A couple of immediate advantages of this pattern are:
- Lightweight Views: All your UI logic resides within the ViewModel, resulting in a very lightweight view.
- Testing: You can run your entire app without the View which greatly enhances its testability.
At this point, you might have spotted a problem. If the View has a reference to the ViewModel but not vice-versa, how does the ViewModel update the View?
Ah-ha!!! This is where the secret-sauce of the MVVM pattern comes in.
MVVM and Data Binding
Data Binding is what allows you to connect a View to its ViewModel. Before this year’s WWDC, you would have to use something akin to RxSwift (via RxCocoa) or ReactiveSwift (via ReactiveCocoa). In this tutorial, you’ll explore how you can achieve this connection using SwiftUI and Combine.
MVVM With Combine
Combine is not actually necessary for bindings to happen, but this doesn’t mean you can’t harness its power. You can use SwiftUI on its own to create bindings. But using Combine allows more power. As you’ll see throughout the tutorial, once you are on the ViewModel side, using Combine becomes the natural choice. It allows you to cleanly define a chain that starts in your UI, way down to a network call. You can achieve all this power easily by combining (pun intended) SwiftUI and Combine. It’s possible to use another communication pattern (e.g. delegation), but by doing so you are trading the declarative approach set by SwiftUI, and its bindings, for an imperative one.