Documenting in Xcode with HeaderDoc Tutorial
Learn how to automatically generate HTML documentation for your iOS code using HeaderDoc. By Andy Pereira.
When Xcode 5 and iOS 7 were announced, a small addition was mentioned that most people might have missed: HeaderDoc.
HeaderDoc is a command line tool that you can use to automatically generate nice HTML documentation for your code – as long as you structure your comments in a particular way.
In addition, Xcode parses HeaderDoc-style comments behind the scenes to automatically present your documentation in quick look panels.
In this HeaderDoc tutorial, you will learn how to:
- Write HeaderDoc-style comments
- Preview your documentation in Xcode
- Generate HTML documentation from your comments
- Learn about a third-party tool to make documentation even easier (VVDocumenter-Xcode)
Let’s get documenting!
Getting Started
Download the starter project for this tutorial, and build and run. It should look like this:

This is a simple little test project that includes two main helper classes:
- Car: Contains a few properties, and a method to “drive” a car and run a block upon completion
- MathAPI: Contains a helper method to add two numbers
Right now, these files are barely documented. Let’s see how you can use HeaderDoc to make creating documentation for these classes super easy.
HeaderDoc Comments
HeaderDoc is a tool that you can either run from the command-line, or is automatically run by Xcode. Basically it scans your files for comments made in a particular style.
There are three styles of comments that HeaderDoc scans for:
Option 1:
/// Your documentation comment will go here
Option 2:
/**
 * Your documentation comment will go here
 */
Option 3:
/*!
 * Your documentation comment will go here
 */
Note that these are similar to “normal” comments, except that there’s an extra / in option 1, and an extra character in the first line of options 2 and 3 (* and !, respectively).
Note: In options two and three, there is an additional asterisk on each line in-between the required opening and closing lines. This is purely aesthetic, and is not required.
Note: In options two and three, there is an additional asterisk on each line in-between the required opening and closing lines. This is purely aesthetic, and is not required.
All three syntaxes will produce the same result, if done in Xcode.
Since we could start a small war over which way is the “best” way to document your code, we’ll stick with the following rules for the purposes of this tutorial:
- For large comment blocks, use the style used in Apple’s documentation (/*!)
- For single line comments, use the triple forward slash syntax (///) comment to save room
HeaderDoc Tags
Once HeaderDoc finds a comment in one of the above styles, it will search that comment for tags for more information. You will use tags to mark-up your code.
A tag starts with the @ symbol and a keyword, followed by a space, and a string that contains a description relative to that keyword (such as @param foo). There are two levels of tags:
- Top-Level Tags: These are tags that declare the type of thing you are commenting (Headers, classes, methods, etc.)
- Second-Level Tags: These tags help to give more detail about the specific thing you are commenting.
An example of a top-level tag is @typedef, which you use to indicate typedefs for things like enums, structs and function pointers.
HeaderDoc is pretty good at adding Top-Level tags automatically via the context, so they are generally optional. In this tutorial, you’ll focus mostly on Second-Level tags.
Let’s take a look at some helpful Second-Level tags:
- @brief: Quickly describes the data type, method, etc. that you are documenting.
- @abstract: Equivalent to @brief.
- @discussion: Similar to @abstract and @brief, but it allows multiple lines. It’s not required to actually write this keyword out; but it is good to use for clarity’s sake.
- @param: The name and description of a parameter to a method, callback or function.
- @return: A description of what a method or function returns. (You can also use the equivalent @result)
This is by no means all of the tags, and you can find all of the available tags in the HeaderDoc User Guide.
For the sake of this tutorial, all comments will be placed in the header files, just to keep the implementation files clean.
Documenting Properties
Let’s start by documenting a few properties.
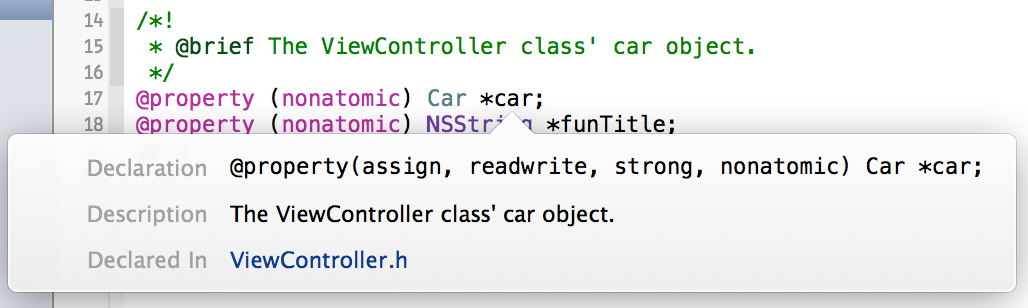
Back in Xcode, in the DocumentationExamples project, open ViewController.h. You’ll see two properties that are lacking some documentation. Just above the declaration for the car property, add a comment block so that it looks like this:
/*!
 * @brief The ViewController class' car object.
 */
@property (nonatomic) Car *car;
Now, build your project. When it finishes, hold the option key, and click on the car variable name. You should see a popover with your comment.
Troubleshooting: If your popover didn’t contain your comment, you may not have waited long enough for the project to build. If it has finished, try restarting Xcode, just to make sure.
Troubleshooting: If your popover didn’t contain your comment, you may not have waited long enough for the project to build. If it has finished, try restarting Xcode, just to make sure.
Since that was so easy, try adding a documentation comment to the other property in ViewController on your own. It should say something about how this is a title that is supposed to be funny.
[spoiler title="Solution"]
/*!
 * @brief A Title for the car. Make it funny. Seriously.
 */
[/spoiler]
Before you complete the remainder of your documentation, check out another way to view documentation in Xcode. Open the Utilities panel’s Quick Help Inspector. Now click on the “car” variable name. In the Quick Help Inspector, you should see your comment appear:

Now, there are two more classes that need to be documented: MathAPI, and Car.
Documenting Methods
MathAPI includes a method that needs to be commented, so open MathAPI.h.
Examine the method addNumber:toNumber:. It returns a value and takes two parameters. So you’ll need to add a @description tag, two @param tags and a @return tag. Go ahead and create a comment that looks like the following:
/*!
 * @discussion A really simple way to calculate the sum of two numbers.
 * @param firstNumber An NSInteger to be used in the summation of two numbers
 * @param secondNumber The second half of the equation.
 * @return The sum of the two numbers passed in.
 */
+ (NSInteger)addNumber:(NSInteger)firstNumber toNumber:(NSInteger)secondNumber;
Now, Build the project again then option-click on part of the method name to see your handiwork.

Troubleshooting: Many symbols are option-clickable in the Xcode text editor. Make sure you click on the thing you want to get help on. In the above example, you’ll need to click on either “addNumber:” or “toNumber:” to see the correct help.
Troubleshooting: Many symbols are option-clickable in the Xcode text editor. Make sure you click on the thing you want to get help on. In the above example, you’ll need to click on either “addNumber:” or “toNumber:” to see the correct help.
Now, unbeknownst to you, I’ve created a pretty terrible implementation of this method. It will only really work with non-negative numbers. To inform the user of this method of that, you can add a little more information to your comment. In this case, let’s add a @warning tag. Add the following text just above the @return tag:
* @warning Please make note that this method is only good for adding non-negative numbers.
Now, build your project again, and option-click on the method name when it finishes. You’ll see a nice warning to the user.
