How To Export Blender Models to OpenGL ES: Part 1/3
Learn how to export blender models to OpenGL ES in this three part tutorial series! By Ricardo Rendon Cepeda.
Recently, we published Blender tutorial for beginners that showed you how to create your own 3D models in Blender.
But you might be wondering – how can I export Blender models to OpenGL ES?
That’s what this epic three-part tutorial series is all about! You will learn how to make an awesome 3D model viewer for iOS that can display models that you create in Blender.
Here’s how the series will be organized:
- Part 1: Welcome! You’ll start by learning about one of the simplest formats that Blender can export models to – the OBJ file format. Then you will create a general command line tool to parse this file format and generate suitable arrays in C source code for OpenGL ES. You’ll use a cube as an example shape.
- Part 2: In the next part, you’ll learn about the MTL material definition and file format, and then you’ll use this information to add Blender materials to your cube.
- Part 3: In the final part, you’ll implement a simple lighting model for your 3D scene by writing your own OpenGL ES shaders!
This tutorial series assumes you are familiar with OpenGL ES 2.0 and GLKit. If you are new to these or need a refresher, you should first read our tutorial series Beginning OpenGL ES 2.0 with GLKit (required) and OpenGL ES 2.0 for iPhone Tutorial (recommended). Basic knowledge of C++ (or at least C) is also assumed.
This is NOT a Blender or modeling tutorial (see our previous tutorial for that), but each section on Blender has a detailed walkthrough. If you haven’t done so yet, you can download a free copy of Blender here. I recommend version 2.62 if you want the best chance to follow along exactly with the tutorial project. Install it and let’s go!
Getting Started
First, download the starter pack for this tutorial. The contents are grouped as follows:
- /Blender/: This folder contains your Blender scene (cube.blend) and associated texture (/textures/cube.png).
- /Code/: Later on, you will create two separate Xcode projects here—one for your command line tool and one for your iOS app.
- /Resources/: This folder contains all of your model’s files required by OpenGL ES. At the moment you’ll only see cube.png, but you’ll add more files as you go along.
Since this tutorial has many separate components, I recommend you keep your directory organized as such for easy navigation.
A Simple Blender Cube
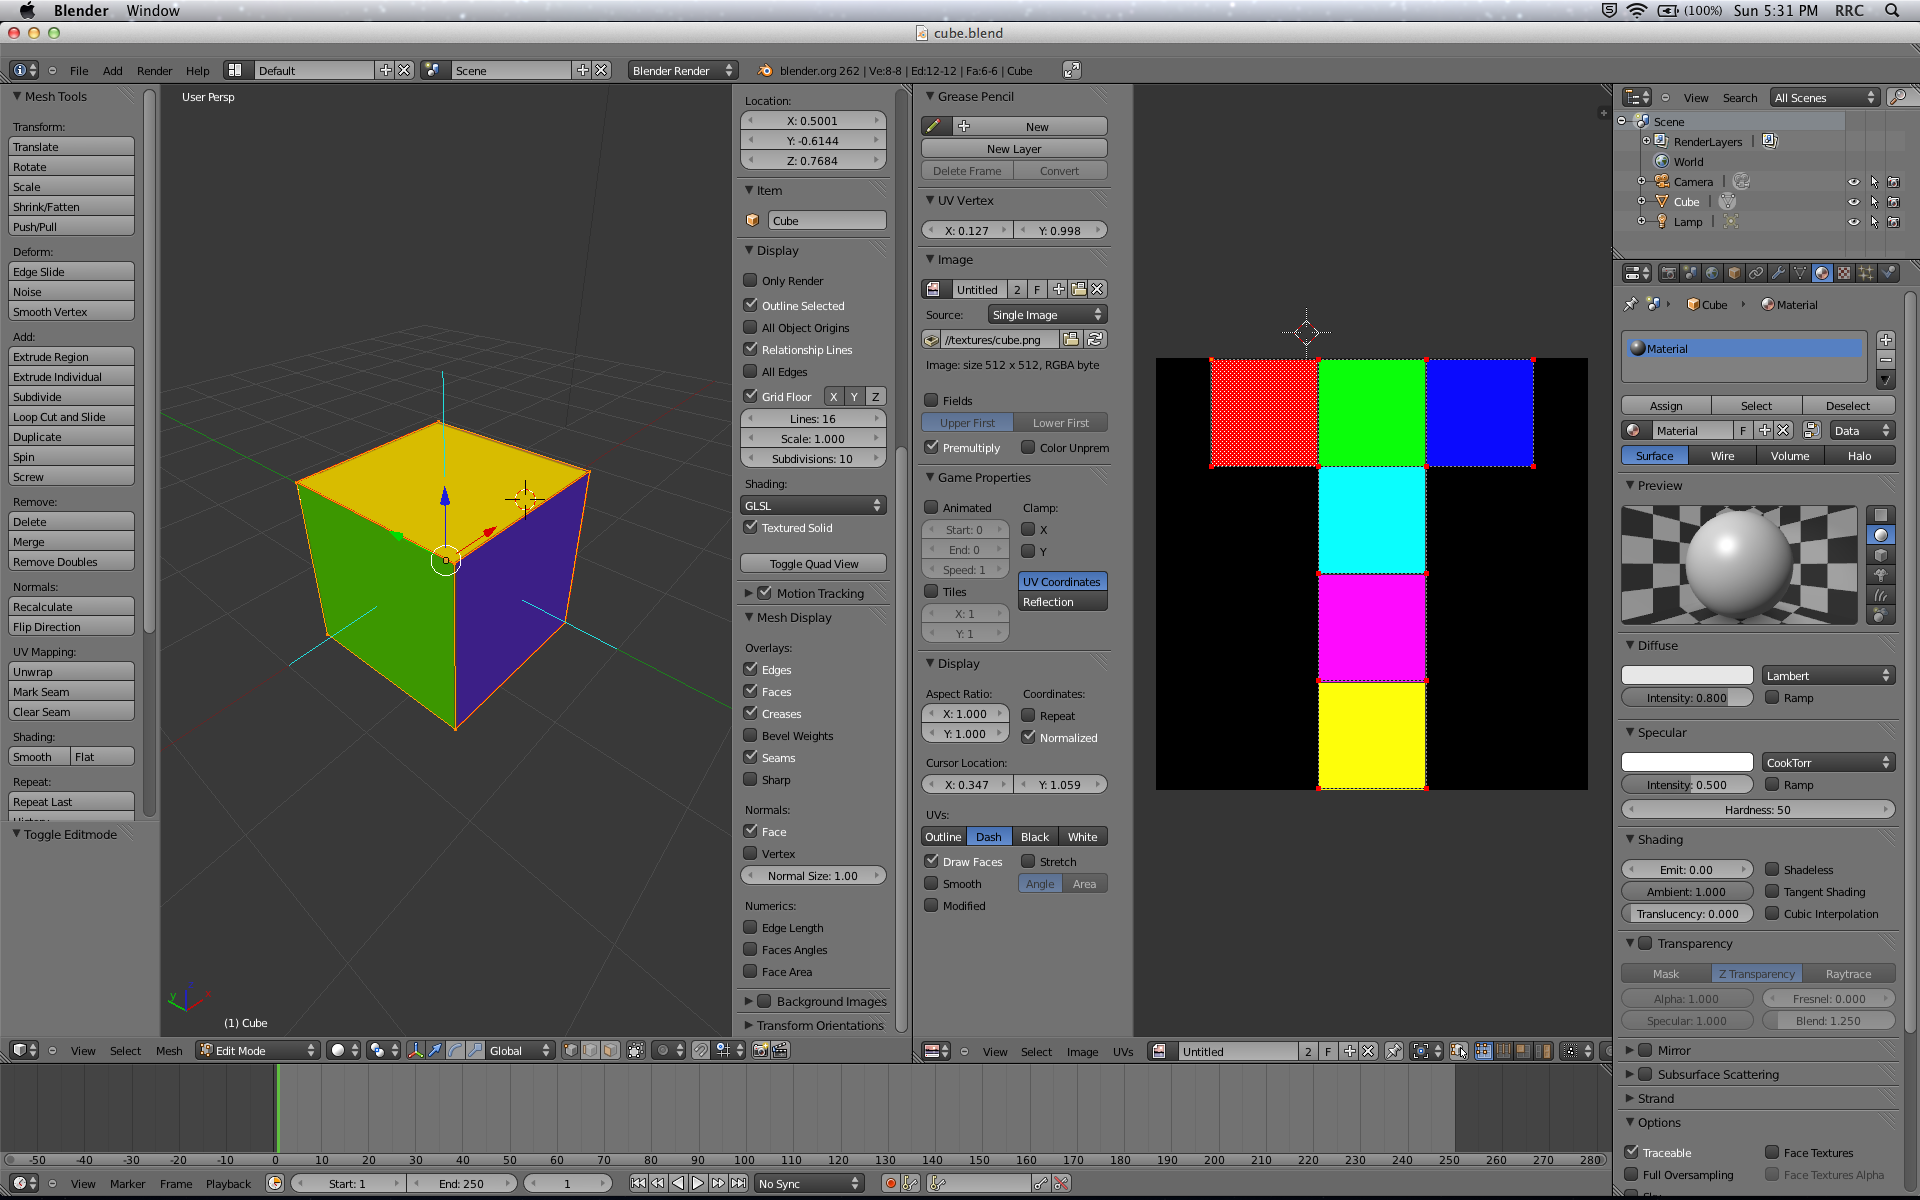
Launch Blender and open cube.blend. Feel free to explore the scene if you’d like, but what you have here is simply the default Blender cube all textured and ready to export. It should look something like this:
You can modify the scene or use your own models at the end of the tutorial, but for now it’s important you stick to the basics in order to fully understand the back-end of 3D objects. If you want to make things more interesting, you can always pretend this is a model of the Wisdom Cube.
The OBJ File Format
3D content exists in several different file formats, with one of the most popular being the .obj definition developed by Wavefront Technologies (now owned by Autodesk). This file format has stood the test of time because it’s open, cross-platform and simple. COLLADA (.dae) is a newer and improved XML-style format that has some similarities to OBJ and is making a big push into the market, but OBJ is here to stay. Blender, Maya, ZBrush and many other graphics and modeling products support OBJ.
The OBJ representation contains geometry data for a 3D model based on vertices. This data is split into the following categories:
- Vertex (v): The position of the vertex in XYZ space.
- Texture Coordinates (vt): The texel (texture element) to sample in UV space. You can think of this as a way to map each vertex to the position on the texture where it should get its color value from. These values range from (0, 0) (bottom left of texture) to (1, 1) (upper right of texture).
- Normals (vn): The surface normal of the vertex plane (triangle) in XYZ space. You can think of this as the vector that points “straight out” from the front of the plane at the vertex. This value is needed to ensure proper lighting.
- Faces (f): A plane triangle defined by three vertices, texture coordinates and normals.
Note: Unlike OpenGL, the OpenGL ES API doesn’t allow rendering with quads (GL_QUADS), so you’ll have to export your model as a set of triangles. This is arguably a better approach anyway, since GPUs are optimized to render triangles—it’s definitely not a disadvantage of OpenGL ES.
Note: Unlike OpenGL, the OpenGL ES API doesn’t allow rendering with quads (GL_QUADS), so you’ll have to export your model as a set of triangles. This is arguably a better approach anyway, since GPUs are optimized to render triangles—it’s definitely not a disadvantage of OpenGL ES.
I will explain each attribute in detail shortly, but first familiarize yourself with their representation in Blender by taking a look at the image below.

Awesome! Now that you’re familiar with the basics, it’s time to export your cube.
Exporting an OBJ From Blender
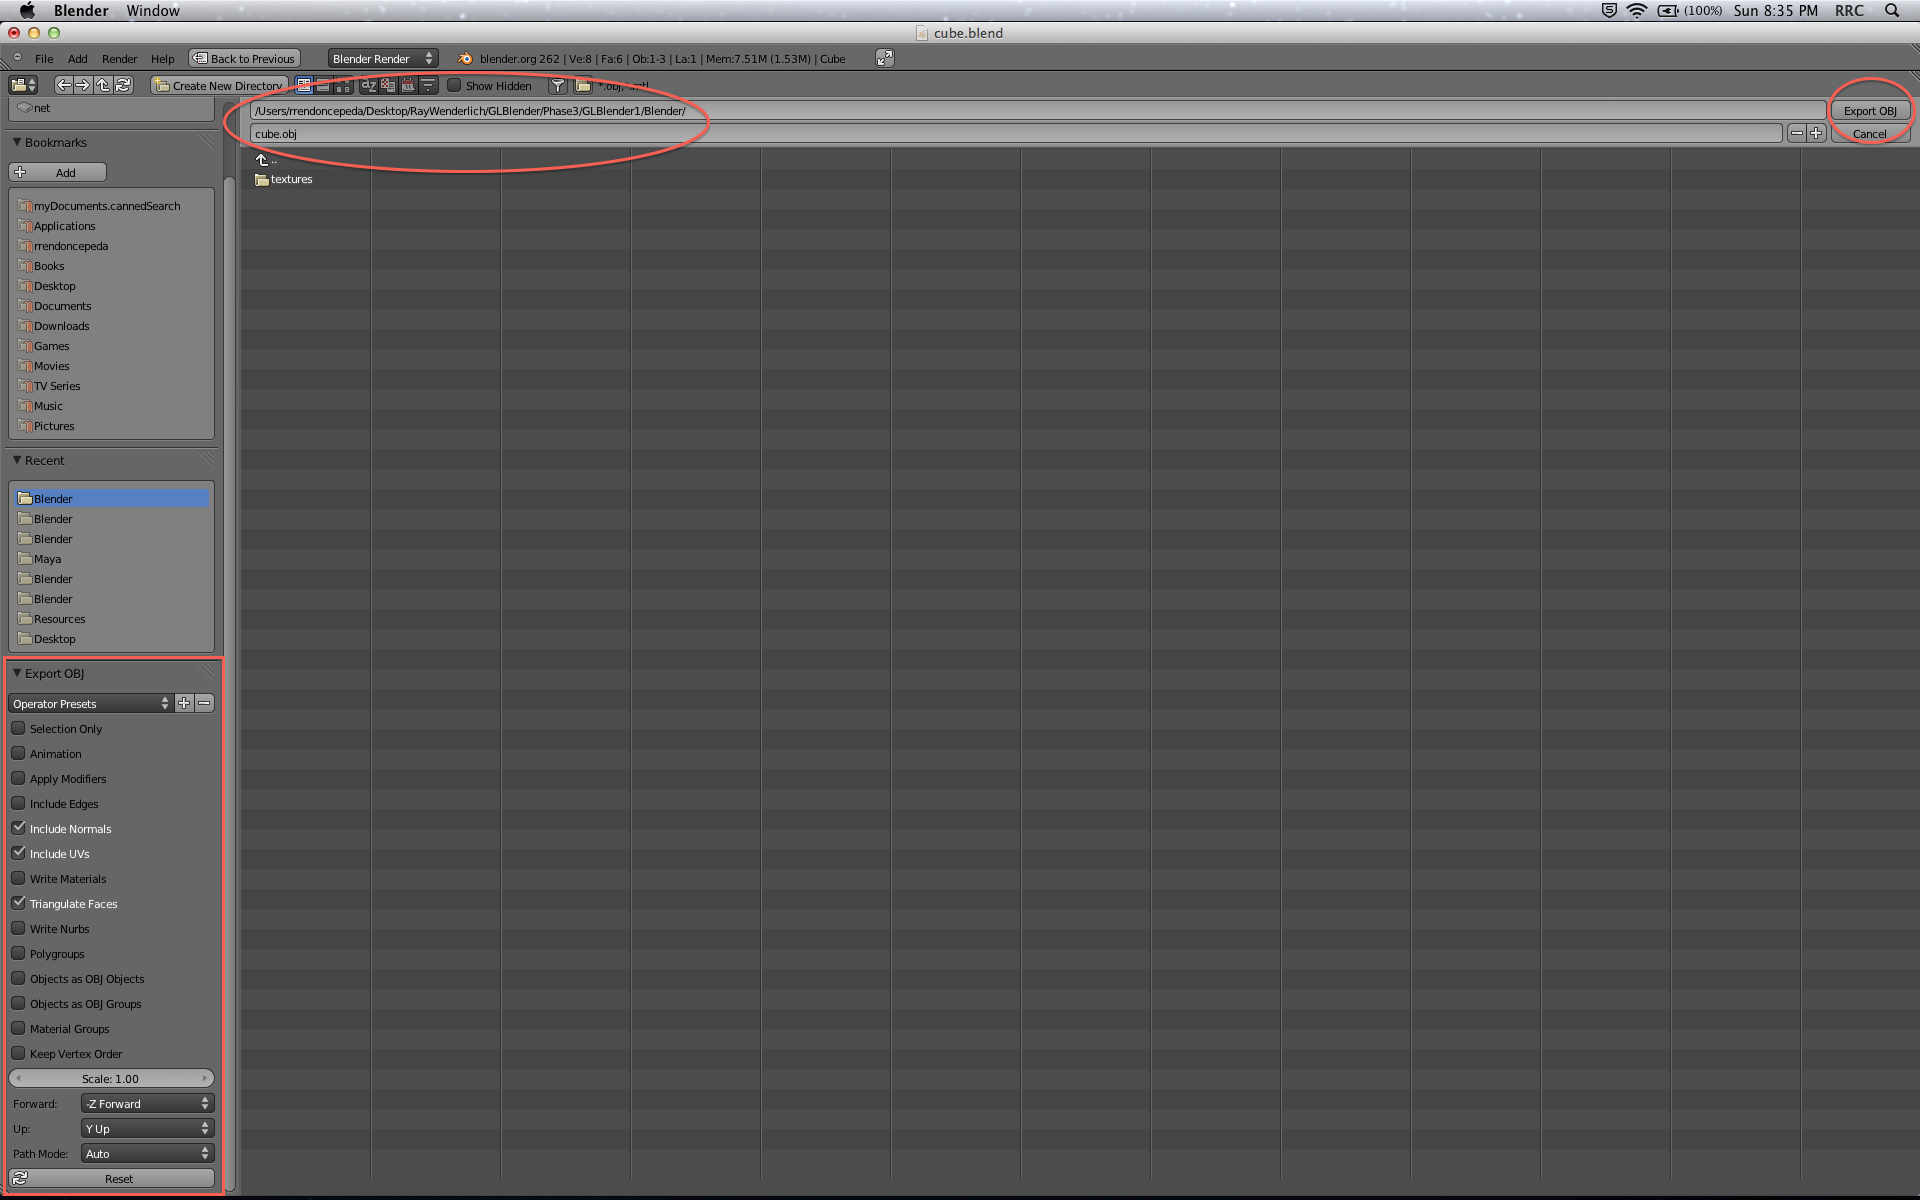
In Blender, with cube.blend open, go to File\Export\Wavefront (.obj). An export screen with many options will appear. Check the following boxes:
- Include Normals
- Include UVs
- Triangulate Faces
Uncheck all other boxes and leave the remaining fields in their default state. Name your file cube.obj and click Export OBJ. You may export or copy your OBJ file to your /Resources/ folder if you wish.
Your cube OBJ is ready! That’s all you need from Blender for now, so you may close the application.
Analyzing Your OBJ File
Before you continue, it’s time for a challenge! Given the information about OBJ files and the geometry of the cube, can you guess how many attributes there will be for each of vertices (v), texture coordinates (vt), normals (vn) and faces (f)?
Hint: A cube has 6 square faces, but each square is made up of two triangles…
[spoiler title="Cube Geometry Attributes"]
Vertices (v): 8
Texture Coordinates (vt): 14
Normals (vn): 6
Faces (f): 12
Good for you if you got this right! If you didn’t—perhaps because you don’t quite understand what these attributes are—keep reading for a diagram and explanation.
[/spoiler]
Using a text editor such as TextEdit, open up cube.obj. Its contents should look like this.
Note: Blender has some known floating point precision errors, so don’t worry if your numbers are a little off in the last few decimal places—for example, vertices #5 and #6 should actually be rounded out to a clean +/- 1.0. Similarly, if some lines are in a different order from the example given, this could be an equivalent representation of the same object, so that’s fine.
However, these floating point errors can also lead to spurious, additional vertices, as Blender mistakenly generates data structures representing two vertices that differ only by a floating point error. This kind of output might make it harder to follow the rest of the tutorial since you will see different counts of data structures parsed.
If you want the best chance of matching the exact output in this tutorial, use Blender version 2.62. The important thing is that your faces (f) match the solution above. If they don’t, try opening up an unmodified cube.blend file and exporting the OBJ file again. If it’s still not working, just replace your OBJ file with the one above.
As you can see, OBJ files are well-organized and easy to read. Their generic structure for your export settings is:
# List of vertices (v) with XYZ coordinates.
v  1.0x   1.0y   1.0z
v  ...X   ...Y   ...Z

# List of texture coordinates (vt) with UV coordinates.
vt 0.5u   0.5v
vt ...U   ...V

# List of normals (vn) with XYZ coordinates.
vn 0.0x   1.0y   0.0z
vn ...X   ...Y   ...Z

# List of faces (f) with v, vt, and vn data (three points ABC per face).
f  1v/1vt/1vn   2v/2vt/1vn   3v/3vt/1vn
f  v/vt/vnA     v/vt/vnB     v/vt/vnC
Using the texture cube.png for visual aid, this is what the OBJ data represents (shown for ease of comprehension, not in order of the file output):

- Vertices (v): These are the corners of the cube, shared amongst many faces, where edges meet each other in 3D. If you were to fold up the 2D texture into a 3D cube and attach all the seams properly, you would have 8 vertices—the detached corners in the image above would actually share one of the marked vertices.
- Texture Coordinates (vt): These are the points defining the edges of the textures themselves, if you unwrapped the 3D cube and laid it out flat in 2D. Some textures that adjoin in 3D will also adjoin in 2D, so they still share corners. Other textures that adjoin in 3D will be separate in 2D, producing additional corners, so now these corners need additional coordinates to represent them. If you add it up, looking at the above diagram, you get 14 texture coordinates. If there was no overlap between any of the squares, you would have 24 texture coordinates (6 squares * 4 corners).
- Normals (vn): Normals are for the normal vectors, mathematical structures that point directly away from a point on a surface and thus describe how that surface is oriented in space. For this simple cube, a pair of triangles renders each of the six sides. As each triangle lies side-by-side with its partner on the same plane, they share the same normal, so you only need 6 normals in total to define the cube. You can read more about normals here.
- Faces (f): As mentioned before, OpenGL ES can render triangles but not quads. So every square side of the cube is broken up into two triangles, leaving you with 12 faces.
These counts are for the number of distinct values needed to describe this particular shape, a cube, and would be different for a different shape. So you will need to design your tool to work with the general defining relationships between these geometry elements, while checking it by verifying that the code it generates to describe a cube uses the specific above values.
Phew, that’s a lot of new information! Now that you know how 3D models are exported with Blender and represented by OBJ, it’s time to parse this data for OpenGL ES. That’s right, time to code! Feel free to take a well-deserved break, though.