PaintCode Tutorial: Bezier Paths
In the third and final part of our PaintCode tutorial series, learn how to create dynamic, movable arrows with curved bezier paths! By Felipe Laso-Marsetti.
Learn how to create dynamic curved arrows!

Learn how to create dynamic curved arrows!
Welcome to our third and final part of our PaintCode tutorial series!
PaintCode is a neat app where you can draw user interfaces like in Photoshop – but instead of generating an image, it generates Core Graphics code.
In the first part of the series, you learned how you could use PaintCode to create beautiful resizable and recolorable buttons.
In the second part of the series, you learned how to create your own custom progress bar design using PaintCode, and then integrate it into your app.
In this third and final part of the series, you’ll create an interactive quiz app. One side of the app will have a list of questions, and the other side a list of answers.
The user must match up each question with the correct answer by dragging an arrow from the question to the answer. In the process of doing this, you’ll learn how to create dynamic, resizable shapes using bezier paths.
If you’ve already completed Part 1 or Part 2, you can use your project from that tutorial as a starting point for this tutorial. However, if you don’t have your original project, or want to jump right in and get started, then download the Part 3 Starter Project.
Without further ado, open up PaintCode to get started on your last — and coolest — dynamic UI control!
Getting Started
Open a new PaintCode document and name it DynamicArrow. As before, you’ll need to shrink the canvas size and change the background color to something suitable for your control.
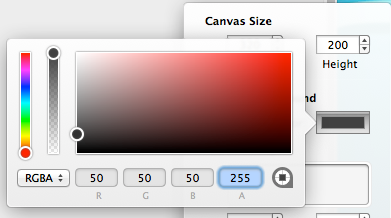
Click the Canvas button at the bottom right of the main view and change the width and height to 320 and 200 pixels, as shown in the screenshot below:

Change the color of the canvas by clicking the Underlay color swatch. Enter RGB values of 50 50 50, as shown below:
To make the arrows, you’ll need to use the Bezier tool, which allows you to use anchor points and handles to control the shape of the curve.
Drawing the Bezier Arrow
Click the Bezier tool on the top toolbar, as highlighted in the screenshot below:
![]()
Click once on the canvas to place your first point for your shape. Start on the left side of the canvas, in order to leave enough room for the rest of the arrow you’re about to draw.
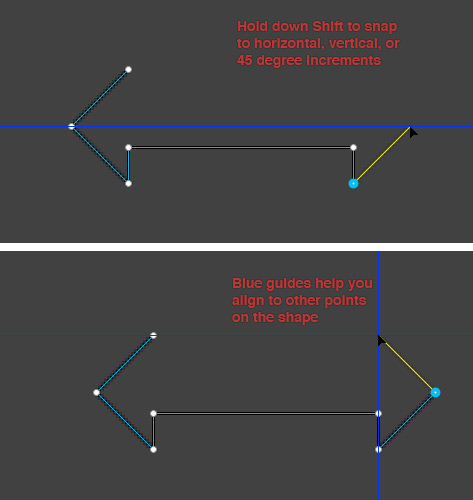
Hold down the Shift key to lock the line at a 45 degree angle and move your cursor down and to the left to place the next point, as shown in the image below:

Continue your way around the arrow shape, clicking once on the canvas to place each point. If you continue to hold down Shift, PaintCode will snap the lines to 45-degree increments, helping you keep them perfectly aligned horizontally, vertically, or inclined at 45 degrees.
Blue guide lines will appear to help you align each corner with the others, as shown in the two images below:
Close the shape by releasing Shift and clicking once more on the first point you created. Notice how your cursor changes to a little hand when you hover over the starting point, as illustrated below:

Note: Make sure you aren’t holding down Shift when you close the shape; otherwise you’ll get an open shape since the last two points won’t connect.
Note: Make sure you aren’t holding down Shift when you close the shape; otherwise you’ll get an open shape since the last two points won’t connect.
Once you have a rough shape, you’ll need to move the points around a bit. If the dots representing the points aren’t showing up already, double click anywhere on the shape to make them appear so you can edit them.
To edit the coordinates of a point, either drag it to the correct location, or click on the point to select it and set the X and Y values on the left panel.
Adjust the coordinates of the bezier points in your shape to match those in the image below:
![]()
Note: If you choose to align the points by dragging them around, the resulting coordinates may occasionally be off by about 0.5. After you’ve moved all of your points around, double-check your point coordinates to make sure they match the image above.
Note: If you choose to align the points by dragging them around, the resulting coordinates may occasionally be off by about 0.5. After you’ve moved all of your points around, double-check your point coordinates to make sure they match the image above.
If you haven’t been saving your work all along, now would be a good time to do just that! :]
Now you can set the color, fill, stroke, and gradients of your arrow shape.
Adding Gradients and Colors to the Bezier Arrow
Select your shape, click the drop down menu next to Fill, and choose Add New Gradient…. Select the left gradient stop and set the Stop Color drop down to Fill Color 2. Then click the color swatch next to the drop down and set the RGB values to 140 160 192.
Similarly, set the right gradient’s Stop Color drop down to Fill Color and the color value to 56 68 98, as shown in the image below:

Next, select Stroke Color from the drop down menu next to Stroke. In the resulting color dialog, set Base Color to Fill Color, change the operation to Apply Shadow, and drag the Amount slider over to 70%, as shown below:

Note: Basing your stroke color on the fill color means that if you ever change the fill color of your shape, the stroke color will automatically update to a darker shade of the fill color. Neat!
Note: Basing your stroke color on the fill color means that if you ever change the fill color of your shape, the stroke color will automatically update to a darker shade of the fill color. Neat!
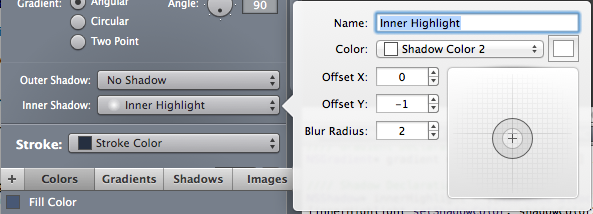
Add a highlight to your shape by selecting Add New Shadow… from the drop down next to Inner Shadow. Set the RBG values of your shadow to 255 255 255, Offset Y to -1, and Blur Radius to 2, as shown below:
Add a shadow by selecting Add Shadow… from the Outer Shadow drop down. Give the shadow RBGA values of 0 0 0 62, Offset Y to -1, and Blur Radius to 2, as shown below:
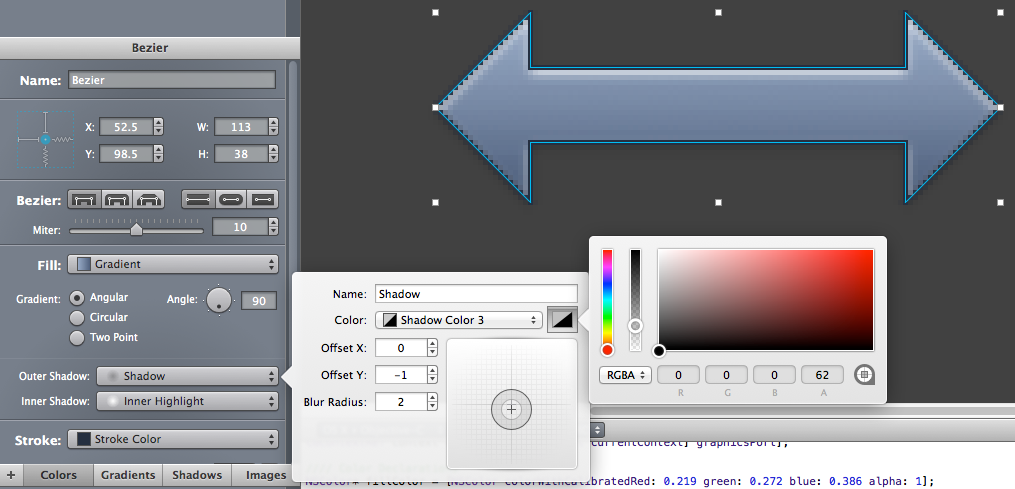
The styling of your arrow is done. The only thing left to do is give the arrow some handles for the user to manipulate when they use it in your app.