Introduction to Google Cardboard for iOS
Dive into the world of virtual reality with Google Cardboard VR and learn how to use the iOS SDK to embark on a worldwide 360 vacation! By Lyndsey Scott.
Sign up/Sign in
With a free Kodeco account you can download source code, track your progress, bookmark, personalise your learner profile and more!
Create accountAlready a member of Kodeco? Sign in
Sign up/Sign in
With a free Kodeco account you can download source code, track your progress, bookmark, personalise your learner profile and more!
Create accountAlready a member of Kodeco? Sign in
Contents
Introduction to Google Cardboard for iOS
25 mins
Update 10/3/16: Updated for Swift 3.
Many of the biggest tech firms in the world are investing heavily in virtual reality technologies: Facebook spent $2 billion to acquire Oculus Rift; Disney invested $65 million into a VR film company called Jaunt; Microsoft introduced its HoloLens this year and is selling the device to developers for $3000 apiece.
Apple spent $32 million to acquire the engineers from Metaio and $345 million to acquire PrimeSense, two companies of VR innovators, and pre-orders for Sony’s Playstation VR sold out even quicker than they’d expected, proving there’s a strong consumer market for VR.
Of all the exciting new VR technology being introduced, however, Google Cardboard VR has made virtual reality most accessible to the hobbyist. In fact, with just a low-cost Google Cardboard VR headset, a smartphone and your iOS skills, you can go farther than you ever thought possible.
In this intro to Google Cardboard VR tutorial, fellow jetsetters, you’ll embark on a worldwide 360° vacation by clicking through multiple 360° vacation images and pausing/playing your way through a 360° vacation video.
Note: This Google Cardboard VR tutorial assumes you know the basics of iOS and Swift development. If you’re new to iOS development and Swift, check out our “Learn to Code iOS Apps with Swift Tutorial” series first.
Note: This Google Cardboard VR tutorial assumes you know the basics of iOS and Swift development. If you’re new to iOS development and Swift, check out our “Learn to Code iOS Apps with Swift Tutorial” series first.
Getting Started
Download the starter project and open Vacation 360.xcodeproj in Xcode. In the 360 images folder in the Navigation Bar on the left-hand side of your Xcode console, you’ll see three 360° panorama images you’ll eventually display in the app. In Main.storyboard, you’ll find a VacationViewController containing a few labels, two empty UIViews and some constraints.
The interface may not look like much yet, but you’ll eventually change these two UIViews into Google Cardboard photo and video VR views. Build and run your app; you won’t see much except for the labels describing the behaviors you’ll implement in this Google Cardboard VR tutorial.
Starter app screenshot
Installing the Google Cardboard VR SDK
Before you start coding your Google Cardboard VR app, the first step is to install the Google Cardboard VR SDK with CocoaPods. Or rather, if you’ve never used CocoaPods before, the first step is to install CocoaPods and the second is to install Google Cardboard VR using CocoaPods.
As described in Joshua Green’s great tutorial on How to Use CocoaPods with Swift, install CocoaPods and the Google VR SDK using the following steps.
Open Terminal, then execute the following command:
sudo gem install cocoapods
Enter your computer’s password when requested. To install the Google VR SDK in the project, navigate to the Vacation_360 starter project folder by using the cd command:
cd ~/ComputerLocation/Vacation_360
Next, create a Podfile for your project:
pod init
Then open the Vacation_360 folder, open the Podfile with a text editor and replace all of its current text with the following:
target "Vacation 360" do
    pod 'GVRSDK'
end
This tells CocoaPods that you want to include the GVRSDK, i.e. the Google VR SDK, as a dependency for your project. Save and close Podfile. Then in Terminal, in the same directory to which you navigated earlier, enter:
pod install
That’s it! You’ve installed Google’s VR SDK. As the log output states, “Please close any current Xcode sessions and use `Vacation 360.xcworkspace` for this project from now on.”
As with any app in which you install CocoaPods, you’ll be working from the .xcworkspace file instead of the .xcodeproj from this point forward.
Because the Google VR SDK is an Objective-C framework, you’ll have to use an Objective-C bridging header to access it from your Swift code. Go to File\New\File…, select iOS\Source\Header File and then click Next. Name it Vacation 360-Bridging-Header, select the Vacation 360 folder for the Group, then hit Create.
Next, select the Vacation 360 project in the Project Navigator, then select Vacation 360 under TARGETS. Go to Build Settings, look for Objective-C Bridging Header under the Swift Compiler – Code Generation section and enter “Vacation 360/Vacation 360-Bridging-Header.h”.
As you might have guessed, this tells the compiler where to look for your bridging header.
Replace the contents of Vacation 360-Bridging-Header.h with the following:
#import "GVRPanoramaView.h"
#import "GVRWidgetView.h"
#import "GVRVideoView.h"
Now you have access to the three Google Cardboard VR SDK classes you’ll be using in this tutorial.
Start packing those bags; Vacation 360, here we come! :]
Hula, hula!
Coding the Groundwork
The Google Cardboard VR SDK has three VR view types: GVRCardboardView, GVRPanoramaView, and GVRVideoView. GVRCardboardView is by far the most powerful of the three, since in VR mode it lets you determine the user’s head and eye positions, layout 3D audio, and dynamically alter the landscape. Unfortunately, GVRCardboardView requires complex OpenGL rendering beyond the scope of this tutorial; but GVRPanoramaView, Google VR’s image viewer, and GVRVideoView, Google VR’s video viewer, are more than adequate vessels for an international adventure.
Before you start diving into the Google VR methods, you’ll have to lay some groundwork. First, you’ll connect and load the Google Cardboard 360° panoramic photo and video views.
Navigate to Main.storyboard and select the transparent UIView directly under the Click through Sindhu Beach, Grand Canyon, & Underwater Photos label. In the Utilities menu on the right hand side of Xcode, navigate to the Identity Inspector, then in the Custom Class section, enter “GVRPanoramaView” in the Class field. Similarly, select the UIView directly below Play/Pause “Living with Elephants” Safari Video by Photos of Africa and enter “GVRVideoView” in the Class field.
Using the Assistant Editor, control-drag from these two views in Interface Builder to the top of the VacationViewController class in VacationViewController.swift and create Outlets. For GVRPanoramaView, use the name imageVRView and for GVRVideoView use videoVRView. Similarly connect the label outlets to the top of VacationViewController. Name the top label imageLabel and the bottom label videoLabel.
Next, make the media file URLs accessible by defining them in an enumeration. Directly under the IBOutlets, define enum Media as follows:
enum Media {
  static var photoArray = ["sindhu_beach.jpg", "grand_canyon.jpg", "underwater.jpg"]
  static let videoURL = "https://s3.amazonaws.com/ray.wenderlich/elephant_safari.mp4"
}
In this enumeration, photoArray holds the file names of the 360° images stored in the bundle and videoUrl holds the URL of the 360 video you’ll display. The photoArray is variable and not constant so you can alter the array to easily cycle through the images later on.
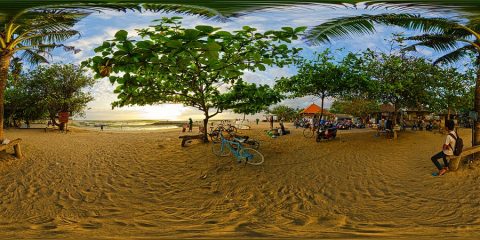
Monoscopic 360° of Sindhu Beach, Indonesia by Eggy Sayoga

Monoscopic 360° of Sindhu Beach, Indonesia by Eggy Sayoga
Set the initial photo and video by adding the following in viewDidLoad() just below super.viewDidLoad():
imageVRView.load(UIImage(named: Media.photoArray.first!),
                            of: GVRPanoramaImageType.mono)
videoVRView.load(from: URL(string: Media.videoURL))
You load imageVRView‘s UIImage with Media.photoArray.first! while passing the type GVRPanoramaImageType.mono to indicate that the image is monoscopic.
Then you load videoVRView with an NSURL created from the Media.videoURL string.
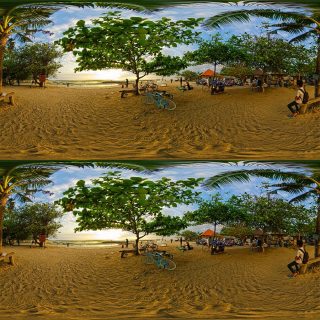
There are two format types for 360° images and videos: stereoscopic and monoscopic – stereo and mono for short. Although both formats render 360° media by converting a rectangular panorama into a spherical layout, the stereoscopic format adds some depth to the viewing experience by including two slightly offset images or videos, one stacked above the other, that mimic the viewer’s perspective.
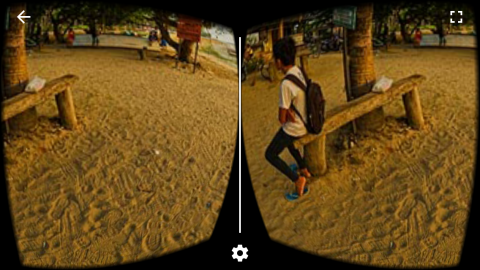
In VR mode, even monoscopic media appears stereoscopic. Photo by Eggy Sayoga

In VR mode, even monoscopic media appears stereoscopic. Photo by Eggy Sayoga
Monoscopic media features the image or video from a single point of view. Google Cardboard VR supports both formats, but displays either format as stereoscopic. When viewing either format in fullscreen VR mode, the viewer shows two side-by-side images or videos slightly offset from one another. You can find the ideal specifications for both mono and stereo here.
Stereoscopic 360° of Sindhi Beach, Indonesia by Eggy Sayoga

Stereoscopic 360° of Sindhi Beach, Indonesia by Eggy Sayoga
Build and run the app without your Google Cardboard VR headset to see what these views provide with minimal configuration. You’ll see the 360° image in the top view and, as long as you’re connected to the internet and thus able to load from the web URL, you’ll see the 360° video in the bottom view.
Rotating the device will rotate both embedded views. Tap the info symbol at the bottom left corner of either VR view and you’ll be directed to a Google Cardboard VR help webpage. Tap elsewhere on the VR views, and nothing will happen.
In order to enable the fullscreen mode and fullscreen VR mode, you’ll need to enable the corresponding buttons on the GVRPanoramaView and GVRVideoView. Add the following below the line in viewDidLoad() where you load imageVRView‘s image:
imageVRView.enableCardboardButton = true
imageVRView.enableFullscreenButton = true
Next, add the following below the line where you load videoVRView‘s video:
videoVRView.enableCardboardButton = true
videoVRView.enableFullscreenButton = true
Build and run again; two new buttons should appear on the bottom right of each VR view. Tap the outer right button, i.e. the Fullscreen Button, on either VR view, and the view will resize to fit the full screen. While in full screen, tap the back button on the top left corner to return to the main view.
Next tap the inner right button, i.e. the Cardboard Button, and a view should appear with instructions on how to connect your viewer. To view the media in fullscreen VR mode, insert your device into your Google Cardboard VR headset as instructed such that the top of the device is on the left side of the viewer and the bottom is on the right:
(1) Main embedded view (2) Fullscreen view (3) Google Cardboard instruction view
To get the full immersive VR experience from this tutorial, I suggest you use a Google Cardboard compatible device. You can purchase a headset on the Google Cardboard website for as little as $14.95.
Or you can even make your own! To do this, just sit back and order a pizza. … What? You’re still VR-less 30 minutes later? Oh right – you also have to cut up that box, add some lenses, a magnet, velcro, and a rubber band to MacGyver your way into your worldwide vacation. The do-it-yourself instructions are available at that same Google Cardboard website link towards the bottom of the page.
You can build your own Google Cardboard!
But if you’re content with viewing a 360° panorama from your device without being fully immersed, this tutorial will still work for you without a viewer.


