Using Framer to Prototype iOS Animations
Learn how to use Framer to quickly and easily prototype iOS Animations. By Lea Marolt Sonnenschein.
Considering how important interaction design is to apps, static prototypes are like a puzzle with pieces missing.
So why doesn’t everyone create interactive prototypes instead? Well, it can take a lot of time to prototype user interactions using a tool like After Effects. It’s hard to spend so much time when you might throw it away the next day.
Enter Framer: an easy-to-use tool for developers and designers to create interactive prototypes. Framer makes it quick to prototype interactions, iterate on the fly, and bring back the magic!
In this Framer tutorial, you’ll recreate this lovely navigation header animation created by Voleg:

In this tutorial, you will focus on prototyping the animation for the menu expanding/collapsing, as that’s the most interesting part. Let’s get started!
Getting Started
First, download and install the following software (you can use the free trials for the purposes of this tutorial):
- Framer: Version 68+ http://framerjs.com/
- Sketch: Version 39.1+ http://www.sketchapp.com/
Open Framer, and you’ll see the following welcome screen:

Click the Animate example project to get a feel for the IDE:
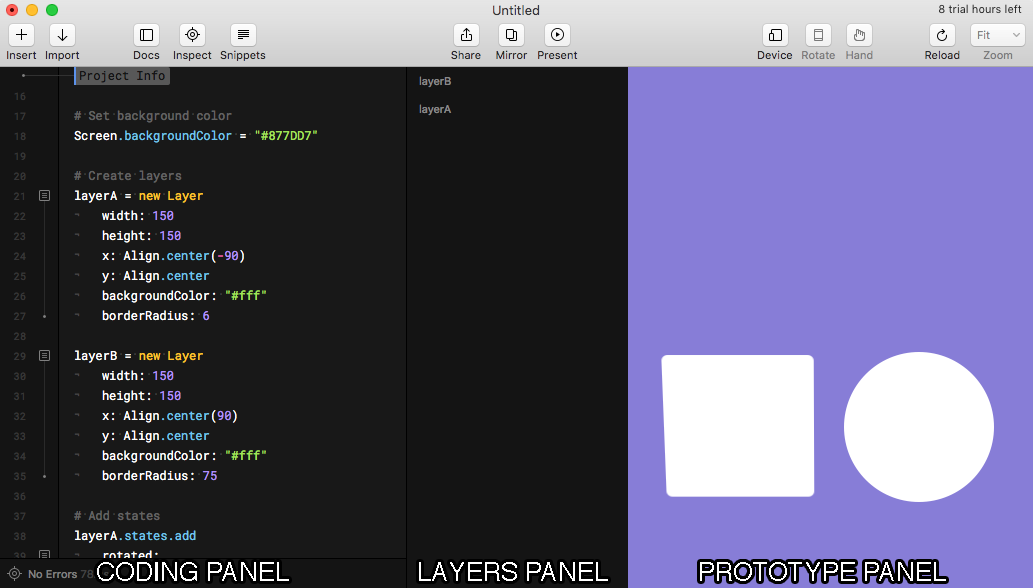
On the left is the Coding Panel; on the right is the Prototype Panel. The Layers Panel sits in the middle.
Feel free to look through the code to get a preview of what’s coming, but don’t worry if you don’t understand it for now. Close this example project, you’re going to create a new one.
Creating a New Prototype
Create a new file in Framer, by going to File\New. Then, click the Insert\Layer to create a new Layer.

Click in a blank spot in the code editor to unselect the layer attributes. You should then see your new layer in each panel:
- As code in the Coding Panel
- As a reference in the Layers Panel
- As a grey square in the Prototype Panel
Mouse over the name of the layer in the Layers Panel to see its location on the prototype.

Change the name to square in the coding panel.
![]()
Click on the square next to the left of the line of code to see and modify the layer’s attributes in the Layers Panel and to move it around in the Prototype Panel.

Drag the square to the middle of the prototype, and observe the changes in the Coding and Layers Panels. It should now look something like this:

The changes you make on the layer by interacting with it on the prototype are immediately reflected in the code — and vice versa.
Being able to use either the code or the visual editor to make our changes is a huge advantage of prototyping with Framer as opposed to working with Xcode and Swift.
Delete the existing code, paste the following in the coding panel, and observe the immediate change in the prototype:
square = new Layer
	x: 250
	y: 542
	height: 250
	width: 250
	backgroundColor: "rgba(255,25,31,0.8)"
Pretty neat, right?
Note: You write code in Framer using CoffeeScript, a simple language that compiles into Javascript. If you’ve never used it before, don’t worry – it’s pretty simple and you can learn a lot about its syntax just by following along with this tutorial.
Note that indentation matters in CoffeeScript, so make sure your indentation matches mine or the code won’t work! Indentation is CoffeeScript’s replacement for {}‘s.
Tabs vs spaces matter too. Framer defaults to use tabs by default, so if you see code that uses spaces like this:
Backspace until you hit the left edge, and replace spaces with tabs to get something like this:

When you’re copying and pasting code and moving to a newline, always backspace to the beginning of the line. Otherwise your code might be interpreted as part of something else.
Note: You write code in Framer using CoffeeScript, a simple language that compiles into Javascript. If you’ve never used it before, don’t worry – it’s pretty simple and you can learn a lot about its syntax just by following along with this tutorial.
Note that indentation matters in CoffeeScript, so make sure your indentation matches mine or the code won’t work! Indentation is CoffeeScript’s replacement for {}‘s.
Tabs vs spaces matter too. Framer defaults to use tabs by default, so if you see code that uses spaces like this:
Backspace until you hit the left edge, and replace spaces with tabs to get something like this:
When you’re copying and pasting code and moving to a newline, always backspace to the beginning of the line. Otherwise your code might be interpreted as part of something else.
Your First Framer Animation
Time to make some magic happen! You’ll make a red square turn into an orange circle when it’s tapped.
Add an empty line after your layer definition, then add the following:
square.onTap ->
	square.backgroundColor = "rgba(255,120,0,0.8)"
	square.borderRadius = 150
This makes the shape respond to tap events.
Click on the red square, and it will turn into an orange circle.

The biggest advantage of prototyping with Framer, rather than Xcode and Swift, is the ability to interact with your prototype immediately after you make your change. Removing the time-suck of constantly building and running Xcode projects greatly improves your prototyping speed — and your ability to iterate quickly through your designs.
All right, I know what you’re thinking. Snoozeville! The transition is too sudden, and the user can’t return to the red square. That’s easy to fix.
Instead of specifying what happens to the square layer on a tap, create a new state.
Replace the code you just added with the following:
# 1
square.states.add
	orangeCircle:
		backgroundColor: "rgba(255,120,0,0.8)"
		borderRadius: 150

# 2
square.onTap ->
	square.states.next()
Let’s review this section by section:
- This defines a new state
orangeCircleforsquare. This new state sets the layer’sbackgroundColorto orange and itsborderRadiusto 150. You can see a full list of properties you can set on layer’s in the framer.js documentation. - This configures the tap event so that
squarewill transition to its next state.
Click the square to see how the transition has improved:

Your shape now animates to the orangeCircle state and animates back to the square’s original state. That’s because you’ve added states to a layer loop, so the state after orangeCircle is the default state.
Let’s try adding another state. Add this line right below section 1:
square.states.add
	greenRounded:
		backgroundColor: ("green")
		borderRadius: 50
Now, tap the square in the prototype panel and you’ll see it loop between all three states:

With just a few lines of code, and barely any setup, you’ve created a slick animation!
Think you’re ready for something harder and way cooler, like an actual UI?
