Vapor 4 Authentication: Getting Started
In this Vapor 4 tutorial, you’ll learn how to implement user authentication for your app using both bearer tokens and basic authentication headers. By Natan Rolnik.
Adding Support for Token-Based Sessions
The starter project already contains the model and routes that allow users to sign up and fetch dinner information. The sign-up routes are ready, but you still need to implement user creation and token-based sessions.
Adding the Token Model
To start, select the Models folder, press Command-N to add a new Swift file, and name it Token.swift. Then replace the boilerplate with the following code:
import Vapor
import Fluent

enum SessionSource: Int, Content {
  case signup
  case login
}

//1
final class Token: Model {
  //2
  static let schema = "tokens"

  @ID(key: "id")
  var id: UUID?

  //3
  @Parent(key: "user_id")
  var user: User

  //4
  @Field(key: "value")
  var value: String

  //5
  @Field(key: "source")
  var source: SessionSource

  //6
  @Field(key: "expires_at")
  var expiresAt: Date?

  @Timestamp(key: "created_at", on: .create)
  var createdAt: Date?

  init() {}
}
Here’s what you’re doing in this code:
- You declare the
Tokenclass, which implements Fluent’sModelprotocol. - You implement the static variable
schema, which Fluent uses to find the correct table in the database. You also implementid, which is the object’s ID in the table. - You add a field to store the user ID, with a relationship to the
Usertable, to link every token to a user. - You add a field to store the value of the token itself, which clients will store and send in later requests.
- To save the source of this session, you add a field for the
SessionSourceenum declared a few lines above when the user signs up and logs in. Eventually, this will work for other social logins as well. - To allow expiring tokens, you add an
expiresAtdate field and another date field for the token’s creation date.
Adding Initializers to Tokens
To allow users to create new tokens, this model needs an initializer. You’ll add this next.
Add the following below the empty init():
init(id: UUID? = nil, userId: User.IDValue, token: String,
  source: SessionSource, expiresAt: Date?) {
  self.id = id
  self.$user.id = userId
  self.value = token
  self.source = source
  self.expiresAt = expiresAt
}
This is a standard initializer, which sets all the properties defined at creation. Notice the usage of the $ sign when setting the user. By doing this, you access the wrapper itself instead of the wrapped value and set the token’s user_id based on the userId, which is a UUID.
Build and run the server. When the server starts, Vapor prints the path of the working directory, where you’ll find the .sqlite file, to the console. Using Finder or the terminal command line, open this location, then open DiningIn.sqlite in your SQLite browser:
The four tables present in the starter project.
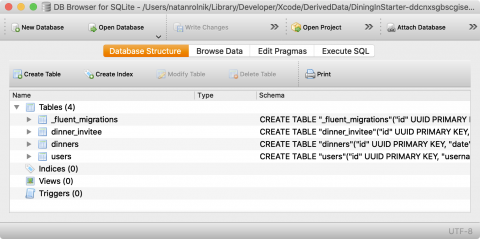
The four tables present in the starter project.
There are four tables: users, dinners, a table linking them and another table that Fluent uses to manage migrations.
However, the tokens table doesn’t exist yet. It’s time to create it.
Creating the Migration
To create the tokens table in the database, you need to create a Migration and run it. One option is to run it manually via the command line, while the other is to automatically run migrations when the server starts. The latter option is already present in configure.swift.
Add a file named CreateTokens.swift to the Migrations folder. Then replace the boilerplate with the following code:
import Fluent

// 1
struct CreateTokens: Migration {
  func prepare(on database: Database) -> EventLoopFuture<Void> {
    // 2
    database.schema(Token.schema)
       // 3
      .field("id", .uuid, .identifier(auto: true))
      .field("user_id", .uuid, .references("users", "id"))
      .field("value", .string, .required)
      .unique(on: "value")
      .field("source", .int, .required)
      .field("created_at", .datetime, .required)
      .field("expires_at", .datetime)
      // 4
      .create()
  }

  // 5
  func revert(on database: Database) -> EventLoopFuture<Void> {
    database.schema(Token.schema).delete()
  }
}
Here’s what you’re doing in this code:
- You declare a struct that conforms to the
Migrationprotocol. - In
prepare(on:), you create aSchemaBuilderfrom thedatabasewith theschemadeclared by theToken. - You add the fields based on their key, type and constraints. Notice how the
user_idfield has a reference to theidfield in the users table. - You call
create()to execute the operation of adding the table to the database. Notice the lack of thereturnkey in this method, which is new from Swift 5.1 in single expression function bodies.create()returns a future of typeVoid, which is exactly whatprepare(on:)expects. - The second required method,
revert(on:), should do what its name says: Apply the opposite changes from those you made in the previous method. You create the sameSchemaBuilder, but now calldelete()and return this operation.
Migration protocol: name, of type String. The default implementation generates a string from the struct or class name, but having it as a property allows you to set a custom name. The name should be unique for each migration.Running the Migration
Once you’ve defined the migration, you need to add it.
Open configure.swift and, after you call the last app.migrations.add(...), add the freshly-created migration:
app.migrations.add(CreateTokens())
Now, build and run, then open or refresh the SQLite browser. You’ll now see the tokens table!
The tokens table is now present, with all the fields defined in the migration.
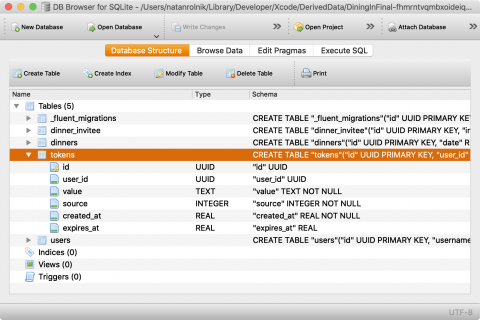
The tokens table is now present, with all the fields defined in the migration.
Allowing Users to Sign up
Now that the server is ready for token-based sessions, you can start writing the methods that handle signup and login requests. The signup request returns a User, which needs to include the session token generated upon signup.
Worry not, you’ll add this now!
Creating a New User
The response to a signup or login request should include both the user information and the generated token. This is exactly why the NewSession struct exists.
Open Controllers/UserController.swift and scroll down to create(req:).
The first thing to do is to change the return type. At the end of the line, replace EventLoopFuture<User.Public> with this:
EventLoopFuture<NewSession>
The first three lines of this method do a validation of the request body, decode the body into UserSignup, then create a new, not saved, user object by calling User.create(from: userSignup).
Jump to the definition of User.create(from:) (Command-click or Control-Command-click create) or just open Models/User.swift and scroll to the bottom. You’ll see this method currently throws an Abort(.notImplemented) error.
Replace this line with the following code:
User(username: userSignup.username,
  passwordHash: try Bcrypt.hash(userSignup.password))
You’re creating a new user object with a username and a password.
As a basic security practice, servers must never store the passwords as plain text, but should hash them instead. This is what the second line does, using Bcrypt.