Vapor 4 Authentication: Getting Started
In this Vapor 4 tutorial, you’ll learn how to implement user authentication for your app using both bearer tokens and basic authentication headers. By Natan Rolnik.
Authentication is the process of identifying your users and verifying they are who they claim to be. This is separate from authorization, which sounds similar but actually handles protecting user data and making sure other users can’t access it.
How can you make sure your server confirms a user’s identity at every request while keeping high standards of performance and security?
In this tutorial, you’ll learn how to leverage Vapor 4’s authentication model to identify and persist users. When you’re done, you’ll know what the most common authentication techniques are for server-side apps and how to implement two of those techniques with Vapor 4.
Getting Started
Use the Download Materials button at the top or bottom of this page to download everything you need for this tutorial.
The sample app for this tutorial is DiningIn, which lets people host dinners and invite friends to join them.
In the download materials, you’ll find two folders containing the starter and final projects. There are also two files, which contain calls to all the endpoints the server will have at the end of this tutorial. They’ll help you test the calls when you add the methods to the starter project.
DiningIn-API.paw works with Paw, a native API tool for macOS. If you’re used to Postman or you develop on a Linux machine, then the other file is for you.
Additionally, a SQLite browser will help you see the data the server saves. SQLite Browser is an open-source option that works well for this tutorial.
Setting up the Authentication Project
Open the DiningInStarter directory and either double-click Package.swift or enter, in your favorite terminal app, the following command:
open Package.swift
Xcode will open your project and automatically use the Swift Package Manager (SwiftPM) to start fetching the dependencies declared in Package.swift.
Looking at the Project
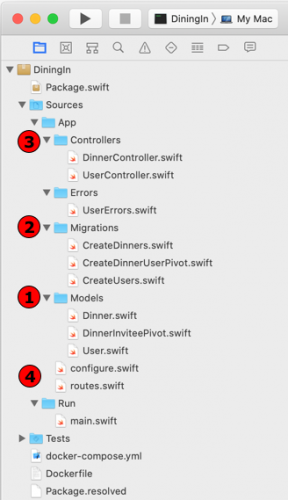
While SwiftPM does its job, take a few moments to familiarize yourself with the files located in the Sources/App directory.
The DiningIn starter project’s file tree
The DiningIn starter project’s file tree
Start by looking at the classes defined in the Models directory:
- User: Represents a user entry in your server’s database.
- Dinner: Represents a scheduled dinner.
- DinnerInviteePivot: Links dinners and invited users.
When looking into these class properties, notice how Vapor 4 uses property wrappers, a new feature in Swift 5.1. The @ID, @Field and @Timestamp wrappers, among others, play an essential role for Fluent, Vapor’s database framework.
Now, open the files in the Controllers folder to get a sense of how Vapor 4 handles routing.
Next, open the Migrations directory and check how you add a new table and its columns to the database. Also, pay attention to how each property has additional attributes, like constraints or references to other tables.
Finally, open configure.swift to see the initial configuration of the server: database initialization, middleware and configuring the database migrations described in the previous paragraph.
Running the Starter Project
By now, SwiftPM has finished downloading all the dependencies. Click the Run button in Xcode or press Command-R to make sure the project compiles successfully.
Before moving to the hands-on part of the tutorial, it’s important to go over some theory. There are fundamental differences between a client-side app and a server app when dealing with users.
Later, you’ll learn how to model the data to allow the server to accept user registrations while also identifying the current user making the request.
Why Authentication and Authorization Are Essential on the Server
When you make client-side apps, you’re usually dealing with a single logged-in user. The app needs to be aware of only one current user and execute requests for that user alone.
However, when designing a server’s architecture, you need to think differently. Your server receives requests from all your users, so it’s aware of all users, and it has access to all their data.
Therefore, it must have a way to certify, for every request, the following two things:
- Authentication: Each user is who they claim to be.
- Authorization: Users can only access their own data and no one else’s.
You can compare the client app to a building where each resident has a storage room inside their own apartment. They own their own unit, and they’re only aware of their own storage, because they’re physically separated. They’re on different floors and in their own apartments.
The same is valid for a client-side app — the database and related files run in different installations, and they’re not necessarily aware of other users.
Each client has its own database to store user’s data
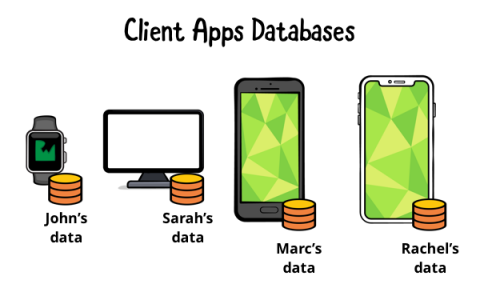
Each client has its own database to store user’s data
On the other hand, your server is like a shared mail room. An employee receives packages and writes down the recipient’s ID. Whenever anyone wants to get their packages, the employee checks the ID, verifies they are who they claim to be, checks where the package is stored and delivers it.
The same is true for the server’s role when dealing with users’ data.
The server stores all users’ data in a larger and more scalable database. Only the server should access it.
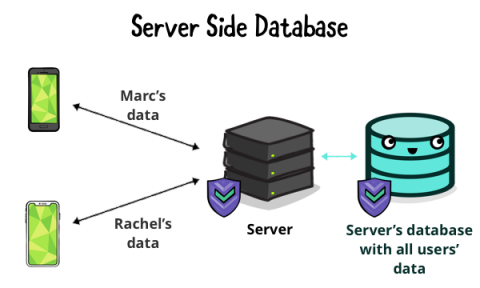
The server stores all users’ data in a larger and more scalable database. Only the server should access it.
Authentication Mechanisms
It’s important to have an overview of the available authentication options, even though this tutorial will only cover two of them.
- Session Authentication: Upon login, the server generates a Session ID that the browser stores in a cookie. Every request the browser issues contains the Session ID; the server validates this cookie on every request. This mechanism is “stateful” — the server needs to keep track of the state of the session to validate it.
-
Basic Authentication: This consists of sending the username and the password encoded in base 64 as the
Authorizationheader. The value of the header looks likeBasic <encoded username:password>. In theory, the server could use this method for every request. However, the client shouldn’t send the password over the network, even encoded, unless necessary. A good practice is to use Basic Authentication to log the user in, then to request a token. -
Bearer: In this format, every request has an
Authorizationheader where the value isBearer <token value>. The client sends the token in every request to identify the user. Each logged-in device, even for the same user, will have a different token. The advantage of this approach is that the requests don’t contain the password. Plus, the server or client can revoke the tokens, which logs out the sessions related to that token. This is useful if someone steals a device or compromises the tokens. - JSON Web Tokens (JWTs): A stateless version of the Bearer token. The server doesn’t keep a record of the token. Instead, it uses the encrypted data the JWT provides for every request.
- OAuth: An open standard for authorization. It allows an authorization server, which might be a third party like Facebook, Google or GitHub, to provide access to another server’s resources on behalf of a user.
This tutorial will not cover sessions, JWTs or OAuth. It will focus on basic and bearer authentication.