Requesting App Ratings and Reviews Tutorial for iOS
In this tutorial, you’ll learn about requesting app ratings and reviews in your iOS applications using SKStoreReviewController and other available APIs. By Sanket Firodiya.
Sign up/Sign in
With a free Kodeco account you can download source code, track your progress, bookmark, personalise your learner profile and more!
Create accountAlready a member of Kodeco? Sign in
Sign up/Sign in
With a free Kodeco account you can download source code, track your progress, bookmark, personalise your learner profile and more!
Create accountAlready a member of Kodeco? Sign in
Sign up/Sign in
With a free Kodeco account you can download source code, track your progress, bookmark, personalise your learner profile and more!
Create accountAlready a member of Kodeco? Sign in
Contents
Requesting App Ratings and Reviews Tutorial for iOS
20 mins
In this tutorial, you’re going to learn about requesting ratings and reviews in your iOS apps. Starting with iOS 10.3, Apple introduced the new SKStoreReviewController
class to standardize this interaction. In this tutorial, you’ll learn how to correctly implement this API, as well as learn some tips on how to maximize your chances of getting great reviews from your happy users.
Why Do Ratings and Reviews Matter?
With more than a million apps on the iOS App Store, there are literally hundreds or thousands of apps in any given app category. It’s becoming more difficult for users to know if an app is worth downloading and trying out.
Users have also become used to relying on ratings and reviews when making purchase decisions, whether it’s buying products on Amazon, finding restaurants, booking hotels or watching movies. It’s, therefore, crucial your potential users have access to as much information as they need before downloading your app. High ratings and lots of reviews also leave a positive impression on these potential users and increase the likelihood they will install your app.
Another aspect in which ratings and reviews help is to improve your ranking on the App Store. According to a study done by Forrester, 63% of apps are discovered through App Store searches. How do you get your app to rank higher and stand out in such a crowded marketplace? Research done by App Radar suggests the number and average of ratings, as well as the number of reviews, has a strong influence on how your app ranks in App Store search results.
In order to improve your app’s discoverability in the App Store, as well as increase the number of users who install your app once they reach your app page, it’s important your app has a significant number of ratings and reviews.
Before you get started, you might still be wondering the importance of having a built-in prompt asking your users to rate your app? In order to show you how effective it can be, let’s take a look at another popular app on the App Store — Instagram.

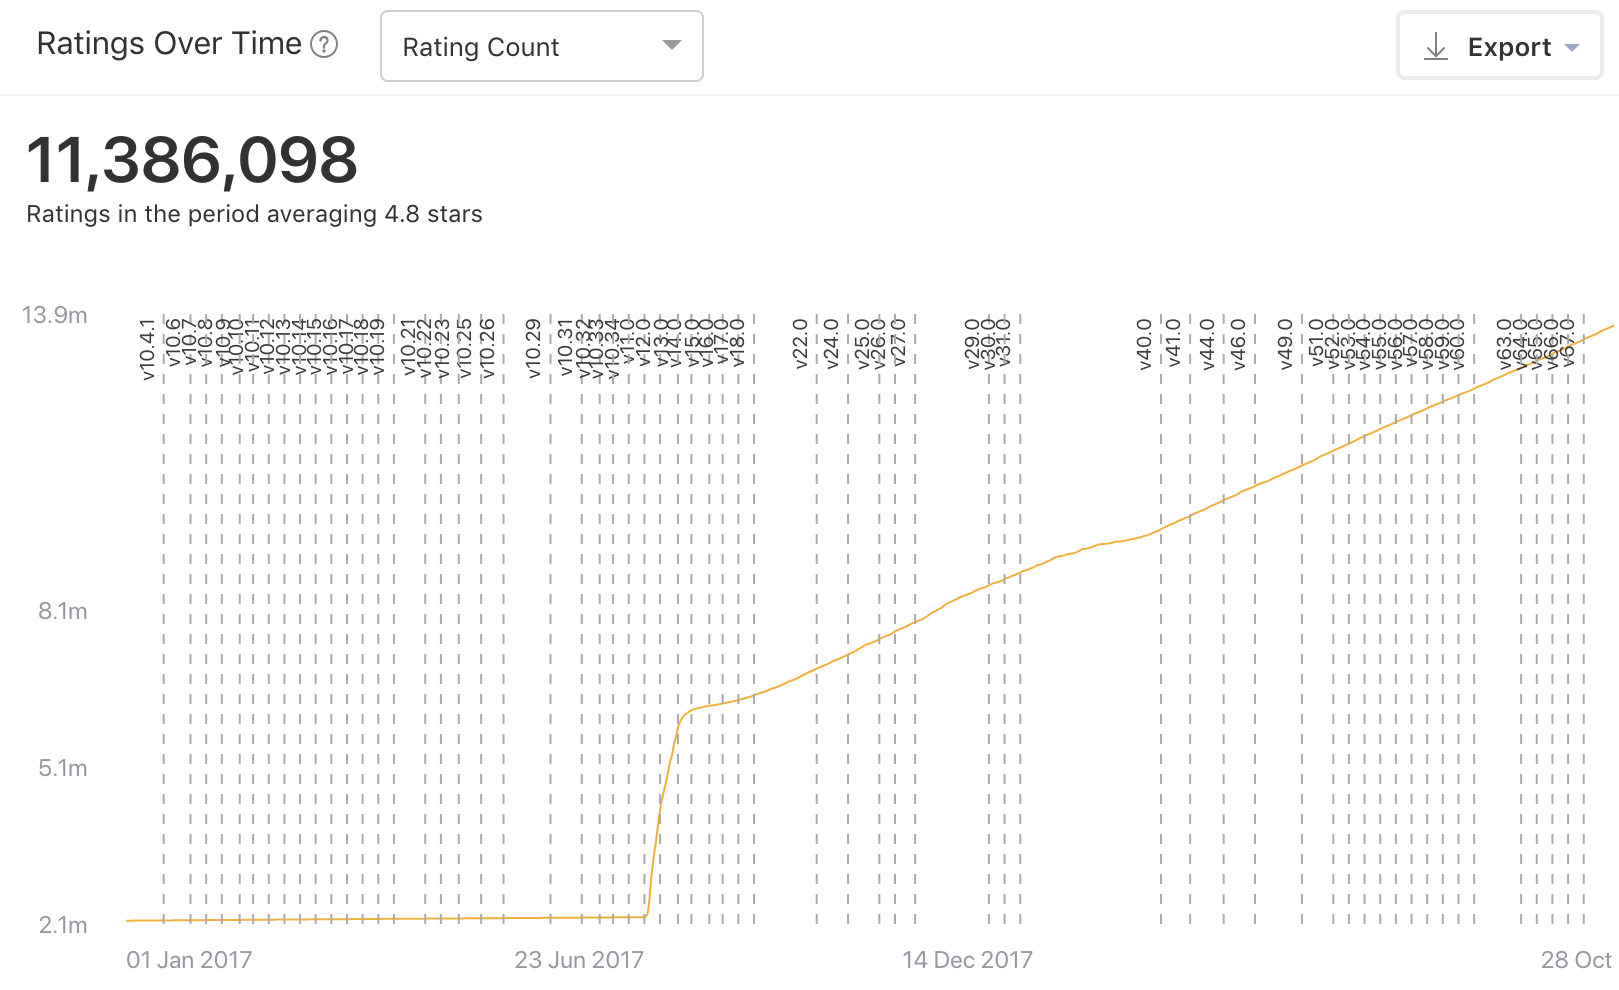
Image generated by Appbot.co
As you can see in the graph above, something happened in August 2017, but what could it have been? This Medium post from Clément Delangue points out that Instagram added the SKStoreReviewController
into its app around this time — just look at the impact it had!
Next up, you’ll see how you can achieve similar results with your users as well.
Getting Started
In this tutorial, you’ll take an app that presents a searchable list of bird sounds and use SKStoreReviewController
to prompt users to rate the app.
To get started, click the Download Materials button at the top or bottom of this tutorial. In the downloaded folder, navigate into the Chirper-Starter folder and open Chirper.xcodeproj in Xcode. Build and run the app, and you’ll see the following:
Requesting App Ratings
Get started by adding a new file to the project. Right-click on the yellow Chirper folder in the project navigator and select New File…. Select Swift File from the presented options, click Next and name it AppStoreReviewManager.swift.
Paste the following into your newly created file:
import StoreKit
enum AppStoreReviewManager {
static func requestReviewIfAppropriate() {
}
}
You’re doing a few important things here:
- Importing the StoreKit framework. StoreKit allows you to do many things related to the Apple Stores such as managing In App Purchases, checking Apple Music capabilities or displaying product recommendations inside your app. In this tutorial, however, you’ll use it to trigger the review prompt.
- Create an enum called
AppStoreReviewManager
. You’ll use this as a namespace to wrap the static functions and properties within. Enums are useful for this because you can’t initialize them if they declare no cases.
Next, you need to ask StoreKit to request a review from the user. You can do this by using static SKStoreReviewController.requestReview()
. Add the following to requestReviewIfAppropriate()
:
SKStoreReviewController.requestReview()
In order to test that it works, call this method when the user plays a sound. Open BirdSoundTableViewCell.swift and call your new function at the end of startPlaying(with:)
:
AppStoreReviewManager.requestReviewIfAppropriate()
Build and run the app. Tap the Play button on one of the sounds. You will see a prompt asking you to rate the app!
Hooray! With just that one line of code you were able to request the user to rate your app! :]
SKStoreReviewController Limitations
Apple does enforce certain limitations on how you use this API:
- No matter how many times you request the review prompt, the system will show the prompt a maximum of three times in a 365-day period.
- Calling the method is not a guarantee that the prompt will display. This means that it’s not appropriate to call the API in response to a button tap or other user action.
- The system must not have shown the prompt for a version of the app bundle that matches the current bundle version. This ensures that the user is not asked to review the same version of your app multiple times.
- Development: Shown every time the you request the prompt.
- Test Flight: Prompt is never shown.
- App Store: Shown with the limitations described above.
Finding the Right Time to Request a Rating
Choosing where and when to display this prompt is critical to your success using this API.
The moment the system shows the prompt to the user can have great effect on the result when requesting app ratings. For example, you shouldn’t ask for a review while the user is in the middle of a task. Also, if you track app crashes, you should make sure to wait a day or more before requesting a review.
Instead, you should make a big effort to ask for ratings when the user is happy. For instance, after the user has returned to your app repeatedly, completed a level of your game or finished a video call, etc. Whichever engagement metric you choose to track and trigger the rating prompt, make sure that the user has had a chance to experience the full value proposition of your app — that way, a positive review is a more likely result.
BirdSoundTableViewCell.didPlayToEndTime(_:)
.Adding Review Request Logic in the Sample App
In the sample app, you’ll use a strategy where you will ask users for a rating once they have played at least three recordings. This number is deliberately low so that you can test the concept. In a real-world app, you would want to keep this number much higher for a similar user action.
Open AppStoreReviewManager.swift and replace requestReviewIfAppropriate()
with the following:
// 1.
static let minimumReviewWorthyActionCount = 3
static func requestReviewIfAppropriate() {
let defaults = UserDefaults.standard
let bundle = Bundle.main
// 2.
var actionCount = defaults.integer(forKey: .reviewWorthyActionCount)
// 3.
actionCount += 1
// 4.
defaults.set(actionCount, forKey: .reviewWorthyActionCount)
// 5.
guard actionCount >= minimumReviewWorthyActionCount else {
return
}
// 6.
let bundleVersionKey = kCFBundleVersionKey as String
let currentVersion = bundle.object(forInfoDictionaryKey: bundleVersionKey) as? String
let lastVersion = defaults.string(forKey: .lastReviewRequestAppVersion)
// 7.
guard lastVersion == nil || lastVersion != currentVersion else {
return
}
// 8.
SKStoreReviewController.requestReview()
// 9.
defaults.set(0, forKey: .reviewWorthyActionCount)
defaults.set(currentVersion, forKey: .lastReviewRequestAppVersion)
}
Breaking down the code above:
- Declare a constant value to specify the number of times that user must perform a review-worthy action.
- Read the current number of actions that the user has performed since the last requested review from the User Defaults.
- Increment the action count value read from User Defaults.
- Set the incremented count back into the user defaults for the next time that you trigger the function.
- Check if the action count has now exceeded the minimum threshold to trigger a review. If it hasn’t, the function will now return.
- Read the current bundle version and the last bundle version used during the last prompt (if any).
- Check if this is the first request for this version of the app before continuing.
- Ask StoreKit to request a review.
- Reset the action count and store the current version in User Defaults so that you don’t request again on this version of the app.
UserDefaults
to eliminate the need for using “stringly” typed keys when accessing values. This is a good practice to follow in order to avoid accidentally mistyping a key as it can cause hard-to-find bugs in your app. You can find this extension in UserDefaults+Key.swift.
Putting It All Together
Build and run the app. This time, if you play a sound, it won’t immediately show the review prompt. Play the sound two more times and, only then, the app will present you with the rating prompt. You’ll also notice that the prompt won’t show again no matter how many recordings you play.
Click on the Chirper project icon in the Project navigator, then Chirper again under the list of presented targets. Update the value in the Build field to update the value of CFBundleVersion
in your apps Info.plist.
Build and run the app. Again, play more recordings. Once the .reviewWorthyActionCount
value exceeds three again, the version check in step 7 will succeed and, because you’ve changed the bundle version, you’ll be prompted again to give another rating for the new version of your app.
Manually Requesting a Review
So now you know how to prompt your users to provide a rating while using your app, you’ll move onto exploring how to let your users manually review the app if they wish to without having to wait for AppStoreReviewManager
to decide if they should or not.
App Store Product Page URL
First of all, you need to know the url for your app on the App Store. If your app is already live, then this is pretty easy; you can search for your app in Google and copy the url. Alternatively, you can find it on the App Store and tap the … button on the product page to reveal a Share App… option that allows you to copy the link to your clipboard.
If you’re still building the first version of your app and haven’t yet released it on the App Store, don’t worry; as long as you have already set up your app using App Store Connect, then you’ll still be able to get the link before you even submit your final to App Store Review. To find this link:
- Log in to App Store Connect
- Select My Apps
- Click on the app in the list App Information, where you will then find a link to View on App Store at the bottom of the page.
- Create an instance of
URLComponents
with the product page URL that you found earlier. URLComponents is a struct that assists with parsing and constructingURL
objects in a safe manner. It’s often good practice to useURLComponents
instead of just appending strings together. - Set the array of query items to contain a single item with the name and value to match the requirements that will trigger the App Store to open the prompt.
- Create a
URL
object based on the components that you modified in the last step. - Ask the shared
UIApplication
instance to open the given URL.
.
.
The URL you end up obtaining will look something like this:
https://itunes.apple.com/us/app/rwdevcon-conference/id958625272?mt=8
Before you continue, you’ll clean up the URL a little bit as some components are not required and can change over time. You can exclude the country code, app name and query parameter from the URL so that the above example would become the following:
https://itunes.apple.com/app/id958625272
The exact URL above is already included in the sample project, in SettingsViewController.swift. If you want to substitute the URL for your own app, go ahead and change the productURL
constant, otherwise leave it as it is and you’ll be reviewing the RWDevCon app. Be kind!
Writing a Review
Now that you have a product URL for your app, you can use this to take your users directly to the Write a Review action in the App Store. All you have to do is append a query parameter with the name action
and the value write-review
to the product page URL; then, open it on an iOS device to go directly into the App Store app.
Add this functionality to the sample app!
Open SettingsViewController.swift and add the following code to writeReview()
:
// 1.
var components = URLComponents(url: productURL, resolvingAgainstBaseURL: false)
// 2.
components?.queryItems = [
URLQueryItem(name: "action", value: "write-review")
]
// 3.
guard let writeReviewURL = components?.url else {
return
}
// 4.
UIApplication.shared.open(writeReviewURL)
The code above runs when the user taps the Write a Review cell in the Settings screen of the sample app. Going over the code:

Build and run the app onto your device. Tap the Settings icon in the nav bar and then Write a Review. You’ll be taken from the sample app and into the App Store where you’ll see the following screen:
Sharing Your App
When users are really enjoying your app, they might want to share the great experience they are having with their friends and family. Because there isn’t currently an easily discoverable way to share a link of your app directly, and you already have a link to your app’s product page, you might as well provide your users with a convenient way to share the link. After all, the more users you have, the merrier you will be!
You’re going to use a dedicated API for this called UIActivityViewController
. To do so, open SettingsViewController.swift and add the following code to share()
:
// 1.
let activityViewController = UIActivityViewController(
activityItems: [productURL],
applicationActivities: nil)
// 2.
present(activityViewController, animated: true, completion: nil)
UIActivityViewController
works by accepting an array of “activity items”. It will then present a system interface with options to launch other apps installed on the device that have registered their own support for any of the provided activity item types.
In the code above, you provide the URL
object that represents the App Store product page and then modally present the activity view controller. Any apps or actions that can accept text or links will then be presented to you so that you can share the link however you like! You can even AirDrop it to another device to immediately open the App Store if you’d like.
Build and run your project onto either a physical device or simulator (the simulator will present fewer options) and you should see something like the following:
These are additional ways to improve the rating of your app and get happy users to spread the word about it!
Where to Go From Here?
You can download the completed version of the project using the Download Materials button at the top or bottom of this tutorial.
You have learned all about requesting app ratings and reviews for your app and how to do it at the right time. To take this even further, add SKStoreReviewController
to your apps in the next update that you release. Hopefully, you will see an uptick in the number of reviews and ratings and more traffic to your app on the App Store.
To learn more on this topic, these are few other good resources:
- Requesting App Store Reviews
- Best Practices and What’s New with In-App Purchases
- Ray Wenderlich screencast on SKStoreReviewController
- App Store: Ratings, Reviews, and Responses
I hope you’ve enjoyed this tutorial; if you have any questions feel free to leave them in the discussion below! :]
All videos. All books.
One low price.
A Kodeco subscription is the best way to learn and master mobile development — plans start at just $19.99/month! Learn iOS, Swift, Android, Kotlin, Flutter and Dart development and unlock our massive catalog of 50+ books and 4,000+ videos.
Learn more