Swift Algorithm Club: Graphs with Adjacency List
Learn how to implement directed and undirected graphs in Swift using adjacency lists. By Vincent Ngo.
Every month, Kelvin Lau, Chris Pilcher and I feature a data structure or algorithm on this site. If you want to learn more about algorithms and data structures, follow along with us!
In this tutorial, you’ll learn the basics of graph theory, then create an adjacency list in Swift 3.
Getting Started
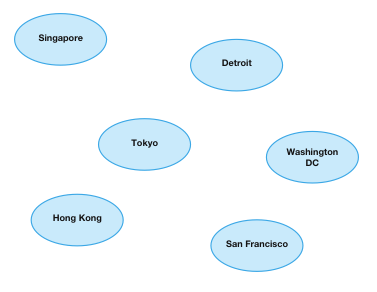
A Graph is a useful data structure to capture relationships between objects, made up of a set of vertices paired with a set of edges.
In the graph below, the vertices represents the circles, and the edges are the lines between them. A vertex connects to other vertices by edges.
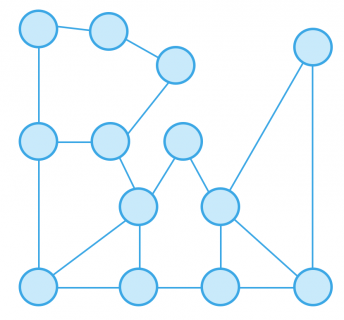
Graphs can come in a variety of shapes and sizes.
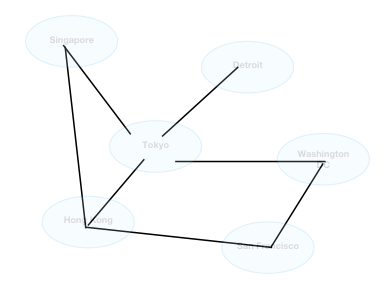
Weighted Graph
Take an airline for example. Imagine a network that shows varying routes for flights. Let the vertices represent the cities and the edges represent a possible route from city to city. Now you can associate a weight to every edge. From this network you can decipher the cheapest flights from San Francisco to Singapore.
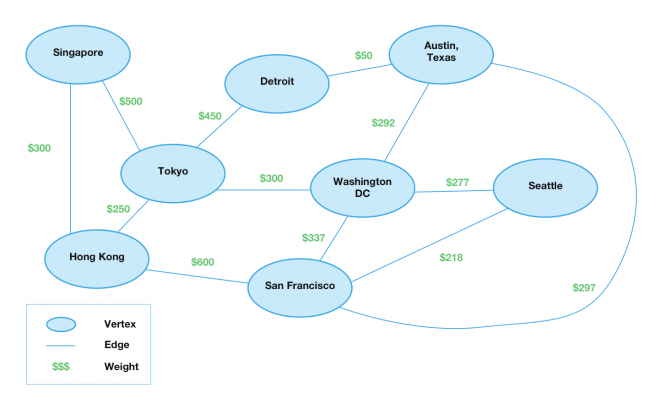
The graph above represents a weighted graph where each edge has a numerical value.
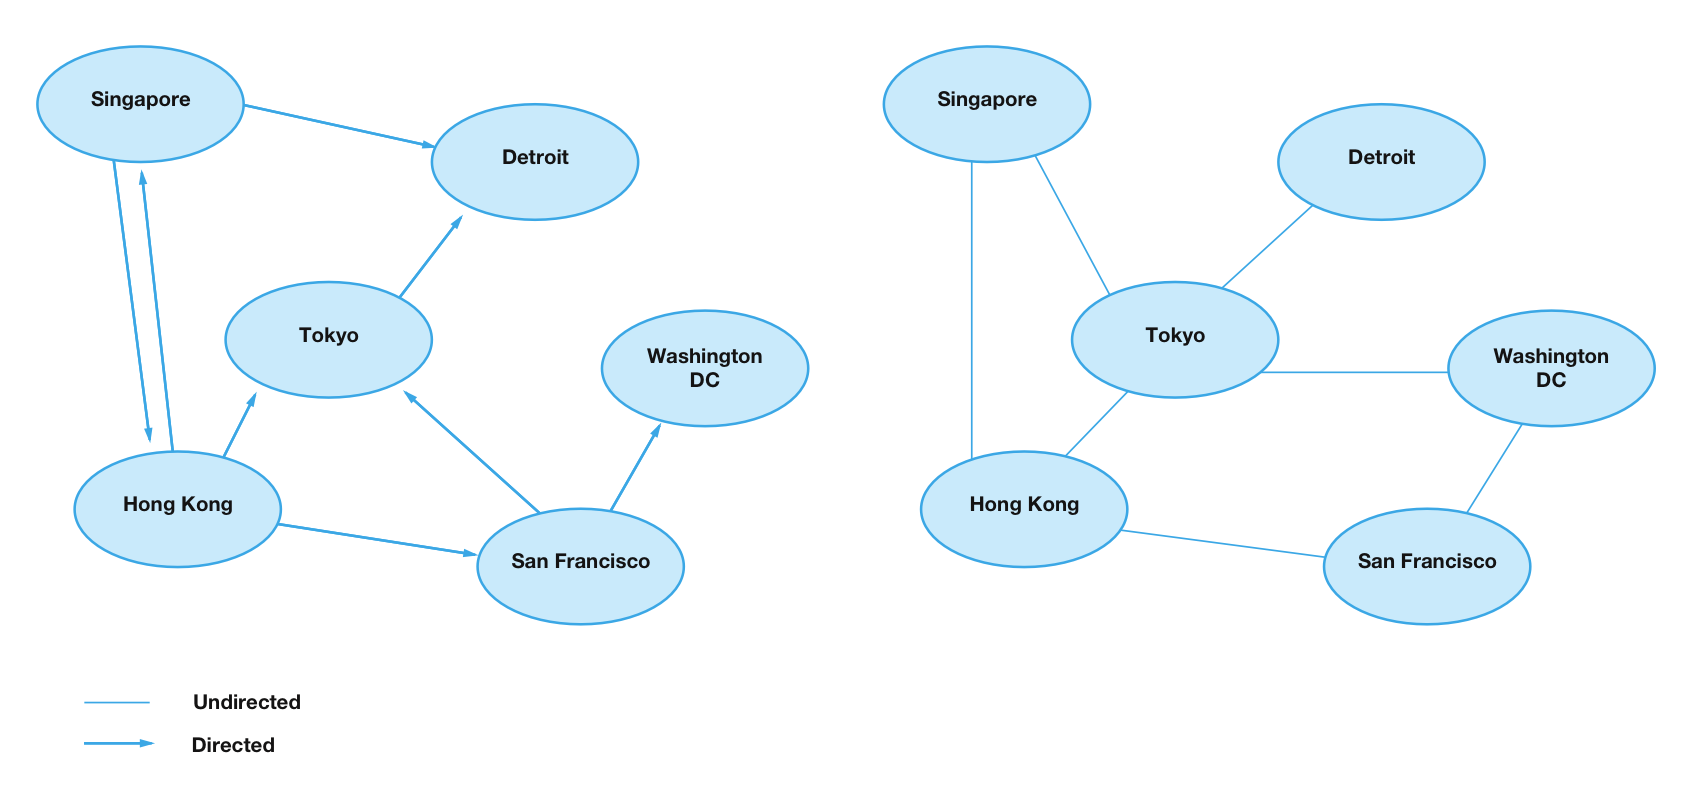
Directed and Undirected Graphs
A graph could also have direction. The first graph is a directed graph, where edges have direction. Imagine a flight from Toyko to Detroit, but no flight from Tokyo to Washington D.C.
A directed graph can also be bidirectional, where two vertices have two edges going back and forth. For example a flight from Singapore to Hong Kong, has a flight back as well.
The latter graph is an undirected graph, where there is no direction. In a way an undirected graph is just a directed graph that is bidirectional.
You may have come across trees or linked-list data structures. They are a more simplified version of graphs.
Representing a Graph
The two common ways to represent a graph is through an adjacency matrix or adjacency list. To get started with graphs, you will learn to create an adjacency list.
Adjacency List
The basic idea of an adjacency list is you store every single vertex. Each vertex will hold an adjacency list. This describes the outgoing edges.
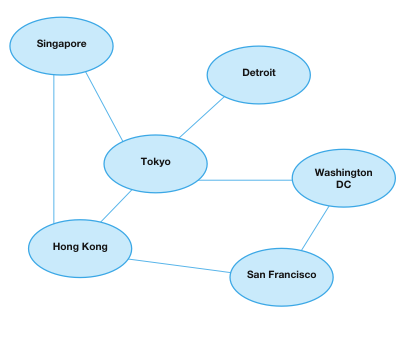
The adjacency list below describes the flight network graph above.

As you can see the Singapore vertex has two edges associated with it. There are outgoing flights from Singapore to Toyko or Hong Kong.
Approach
You can develop the adjacency list in many different ways. A few popular approaches are:
- Storing an array of arrays. The outer array represents vertices, providing an index. The inner array contains edges.
- Storing an array of linked-lists. With this approach, each index in the array represents a vertex. Each value in the array stores a linked-list. This is ideal if you need fast insertion or deletion times.
- Storing a dictionary of arrays. This is the approach you’ll take in this tutorial. Each key in the dictionary is a vertex, and each value is the corresponding array of edges.
Implementing the Adjacency List
Start by creating a new Swift playground called Graphs. In the Project Navigator (View\Navigators\Show Project Navigator, or ⌘-1), create a new file called Vertex.swift under the Sources group.
Vertices
The first thing that graphs need is a vertex. Add the following struct declaration in Vertex.swift:
public struct Vertex<T: Hashable> {
  var data: T
}
You’ve declared a struct named Vertex. The vertex holds a generic type called data. So now the vertex can represent pretty much any relationship, whether it’s airline flights, a person, or street addresses.
Next since you are storing a vertex as a custom key in a dictionary, it has to conform to the Hashable protocol. Add the following code below:
extension Vertex: Hashable {
  public var hashValue: Int { // 1
      return "\(data)".hashValue
  }

  static public func ==(lhs: Vertex, rhs: Vertex) -> Bool { // 2
    return lhs.data == rhs.data
  }
}
Going over the code above:
- For
Hashableconformance you must provide ahashValueproperty. -
Hashableinherits from theEquatableprotocol. You must also add an equal-to operator for the custom type.
Now add the following code within the same file:
extension Vertex: CustomStringConvertible {
  public var description: String {
    return "\(data)"
  }
}
The CustomStringConvertible protocol allows you to define a custom output. You will use this to verify your adjacency list later.
Edges
Now to connect every vertex to another vertex, there needs to be an edge between them! Create a new file called Edge.swift under Sources group.
First add the following enum to Edge.swift
public enum EdgeType {
  case directed, undirected
}
The goal of the enum is to describe whether an edge between two vertices is a directed path, or undirected path.
Now add the following code after:
public struct Edge<T: Hashable> {
  public var source: Vertex<T> // 1
  public var destination: Vertex<T>
  public let weight: Double? // 2
}
Going over the properties in Edge:
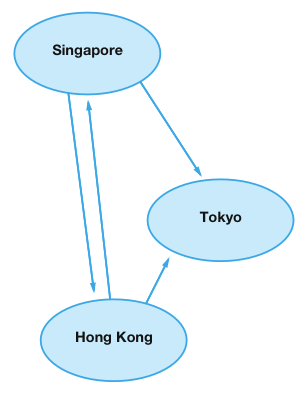
Take this graph as an example. The flight between Singapore and Hong Kong has two edges between the pair of flights. This means the flight goes both ways. But, there is only one edge between Singapore and Tokyo. There are only flights that go from Singapore to Tokyo but not back.
- There are many ways to represent an edge depending on your implementation. For this edge, it’s property includes two vertices,
sourceanddestination. The reason is because graphs can be directional. Two vertices are bidirectional, would need two edges between the pair of vertices.Take this graph as an example. The flight between Singapore and Hong Kong has two edges between the pair of flights. This means the flight goes both ways. But, there is only one edge between Singapore and Tokyo. There are only flights that go from Singapore to Tokyo but not back.
- An edge could also have a numerical weight. This is useful for future algorithms. You may want to find out how much it costs to fly from Hong Kong to Tokyo.
Like in the Vertex struct, add the following code in Edge.swift:
extension Edge: Hashable {

  public var hashValue: Int {
      return "\(source)\(destination)\(weight)".hashValue
  }

  static public func ==(lhs: Edge<T>, rhs: Edge<T>) -> Bool {
    return lhs.source == rhs.source &&
      lhs.destination == rhs.destination &&
      lhs.weight == rhs.weight
  }
}
Edge conforms to the hashable protocol. For similar reasons to the Vertex struct.