Entity Component System for Unity: Getting Started
In this Unity tutorial you’ll learn how to efficiently leverage the Entity Component System for more performant gameplay code. By Wilmer Lin.
Creating an Entity
At the top of EnemySpawner.cs, add the following using directive to import the resources needed for ECS:
using Unity.Entities;
Then define this field:
private EntityManager entityManager;
An EntityManager is a struct to process Entities and their data.
Next, fill the Start method with these lines:
private void Start()
{
    // 1
    entityManager = World.DefaultGameObjectInjectionWorld.EntityManager;

    // 2
    Entity entity = entityManager.CreateEntity();
}
- All Entities, Components, and Systems exist in a World. Each World has one EntityManager. Though very verbose, this line simply grabs a reference to it.
-
Then you invoke
entityManager.CreateEntityto generate your first Entity.
Save the script and enter Play mode in the Editor.
In the Hierarchy, notice that…nothing happened! Or did it?
Since ECS entities are not GameObjects they don’t show up in the Hierarchy.
To view your Entities, you need to use a particular interface called the Entity Debugger. You can find it by selecting Window ► Analysis ► Entity Debugger.

Dock the window, or keep it accessible, since you’ll refer to it often while working with ECS.
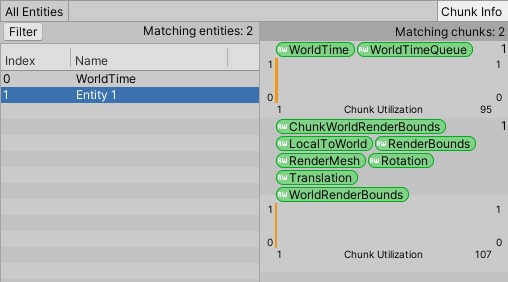
In Play mode, the Entity Debugger window shows the various behaviors, or Systems, running on the Default World in the left-hand panel.

Highlight All Entities (Default World) and you’ll see two Entities appear in the middle panel: WorldTime and Entity 1. You’ll find information about their corresponding chunks of memory in the right-hand panel.
Now, select WorldTime, which the World creates by default. The Inspector shows the game clock.

Select Entity 1. Here it is! This is your first custom-built entity!

Ok, it’s not much to look at right now. :]
Entities are empty when created. You need to add data for them to be meaningful.
Adding Components
In one approach, you can populate your Entity with Component data strictly using code.
Entities are separate from Monobehaviours. Thus, they need their own libraries for transforms, math and rendering.
Looking back at EnemySpawner.cs, using Unity.Mathematics; is already there. Add these two as well:
using Unity.Transforms;
using Unity.Rendering;
Below that, reserve some fields for the enemy’s mesh and material:
[SerializeField] private Mesh enemyMesh;
[SerializeField] private Material enemyMaterial;
Now, modify the Start method to look like this:
 private void Start()
 {

	entityManager = World.DefaultGameObjectInjectionWorld.EntityManager;

	// 1
	EntityArchetype archetype = entityManager.CreateArchetype(
		typeof(Translation),
		typeof(Rotation),
		typeof(RenderMesh),
                typeof(RenderBounds),
		typeof(LocalToWorld));

	// 2
	Entity entity = entityManager.CreateEntity(archetype);

	// 3
	entityManager.AddComponentData(entity, new Translation { Value = new float3(-3f, 0.5f, 5f) });

	entityManager.AddComponentData(entity, new Rotation { Value = quaternion.EulerXYZ(new float3(0f, 45f, 0f)) });

	entityManager.AddSharedComponentData(entity, new RenderMesh
		{
			mesh = enemyMesh,
			material = enemyMaterial
		});
 }
Here’s what this script does:
In this case, Translation, Rotation, RenderMesh, RenderBounds and LocalToWorld form the archetype.
In this example, the enemy drone receives a translation of (X: -3, Y:0, Z:5) and a y-rotation of 45 degrees, while also assigning the mesh and material to the RenderMesh data.
- After getting a reference to the EntityManager, you define an
EntityArchetype. This associates certain data types together.In this case,
Translation,Rotation,RenderMesh,RenderBoundsandLocalToWorldform the archetype. - Next, you pass the archetype into
entityManager.CreateEntity. This initializes the Entity. - You then use
AddComponentDataandAddSharedComponentto add data and specific values.In this example, the enemy drone receives a translation of (X: -3, Y:0, Z:5) and a y-rotation of 45 degrees, while also assigning the mesh and material to the RenderMesh data.
Select EnemySpawner in the Hierarchy and fill in the missing mesh and material. Next, drag the RoboDrone mesh from Models into EnemyMesh in the Inspector. Then drag DroneHologramMat from Materials into the EnemyMaterial.

In Play mode you’ll see a single drone appear on-screen.

At runtime, no extra GameObjects appear in the Hierarchy. The enemy drone is also not selectable in the scene view. This is an Entity, so its properties are only visible in the Entity Debugger.
Select Entity1 from the Entity Debugger and pop over to the Inspector to see its data.

In the Entity Debugger, the data types on the right now reflect the EntityArchetype. Unity groups memory chunks with similar archetypes together for faster reading and writing.
ConvertToEntity
Of course, this is a lot of code to make a simple 3D object. Generating an Entity from scratch via script is the pure ECS approach. While valid, it can be a little tedious to repeat each time you want something to appear on-screen.
Unity streamlines this process with a hybrid ECS approach. First, you define some data on a GameObject. Then at runtime an Entity with identical data replaces it.
First, remove most of the logic from Start, leaving only the first line:
private void Start()
{
    entityManager = World.DefaultGameObjectInjectionWorld.EntityManager;
}
Then enter Play mode, pause playback and check that Entity 1 no longer appears in the Entity Debugger.

Now, exit Play mode. It’s time to try the hybrid ECS approach!
Navigate to RW/Prefabs and select the EnemyDrone prefab. Click Open Prefab and add a Convert to Entity component by selecting Add Component ► DOTS ► Convert To Entity.

In the Conversion Mode, select Convert And Destroy. This removes the original GameObject and leaves an Entity in its place at runtime.
Save the prefab.
Next, drag the EnemyDrone from RW/Prefabs into the Hierarchy. Position and rotate it anywhere you like on-screen.
Now, enter Play mode. The GameObject mysteriously vanishes from the Hierarchy, but the enemy remains visible in the Game camera. In the EntityDebugger, you now have an Entity named EnemyDrone with parameters matching the GameObject that created it.

If you exit Play mode, the GameObject should reappear in the Hierarchy. Like magic!
In hybrid ECS, your GameObject acts as a placeholder for setting up basic transforms and rendering data. Then at runtime, Unity turns it into an Entity.
MoveForward Component Data
Next, you need to have the enemy fly forward, because, let’s face it, without that being a tank is no fun. You’ll accomplish this by creating some data and reserving a Component to represent the enemy’s forward speed.
First, make a new C# script, MoveForwardComponent.cs, in Scripts/ECS/ComponentData:
using Unity.Entities;

public struct MoveForward : IComponentData
{
    public float speed;
}
Instead of inheriting from Monobehaviour, Component data must implement the IComponentData interface. This is an interface for implementing general-purpose components, but it’s important to note that any implementation must be a struct.
You only need one simple public variable here, and Unity recommends grouping fields with data that will almost always be accessed at the same time. It’s ok, and more efficient, to use lots of small separate components rather than building up a few bloated ones.
The struct’s name, MoveForward, doesn’t need to match the filename, MoveForwardComponent.cs. You have more flexibility with ECS scripts than with Monobehaviours. Feel free to store more than one struct or class in each file.