Geofencing API Tutorial for Android
In this geofence tutorial, you’ll learn how to use Android’s Geofencing API to build an app with custom geofences. By Fernando Sproviero.
Building the Geofence Request
Add this method in ReminderRepository.kt to build the request:
private fun buildGeofencingRequest(geofence: Geofence): GeofencingRequest {
  return GeofencingRequest.Builder()
      .setInitialTrigger(0)
      .addGeofences(listOf(geofence))
      .build()
}
You use setInitialTrigger() to set the desired behavior at the moment the geofences are added. Setting the value to 0 indicates that you don’t want to trigger a GEOFENCE_TRANSITION_ENTER event if the device is already inside the geofence that you’ve just added.
You also use addGeofences() to add your geofence to the request.
Building the Geofence Pending Intent
Next, add this lazy property:
private val geofencePendingIntent: PendingIntent by lazy {
  val intent = Intent(context, GeofenceBroadcastReceiver::class.java)
  PendingIntent.getBroadcast(
      context,
      0,
      intent,
      PendingIntent.FLAG_UPDATE_CURRENT)
}
Here you’re creating a PendingIntent. A PendingIntent is similar to a normal Intent, except rather than happening immediately it will happen sometime in the future. Think of it as a promise to a friend that you’ll do something for them later.
In this case, when the GEOFENCE_TRANSITION_ENTER event is triggered, it’ll launch GeofenceTransitionsJobIntentService to handle the event. This service will be explained later.
Checking for Errors
There might be times where it’s not possible to add a geofence — when you are trying to add the 101st geofence, for example. Review the error strings below to see some of the more common issues that can arise when working with geofences. It is good practice to check for these errors and let the user know (or at least log the error).
Open strings.xml and add the following strings:
<string name="geofence_unknown_error">
  Unknown error: the Geofence service is not available now.
</string>
<string name="geofence_not_available">
  Geofence service is not available now. Go to Settings>Location>Mode and choose High accuracy.
</string>
<string name="geofence_too_many_geofences">
  Your app has registered too many geofences.
</string>
<string name="geofence_too_many_pending_intents">
  You have provided too many PendingIntents to the addGeofences() call.
</string>
Now, create a file called GeofenceErrorMessages.kt with the following content:
package com.android.raywenderlich.remindmethere

import android.content.Context
import com.google.android.gms.common.api.ApiException
import com.google.android.gms.location.GeofenceStatusCodes

object GeofenceErrorMessages {
  fun getErrorString(context: Context, e: Exception): String {
    return if (e is ApiException) {
      getErrorString(context, e.statusCode)
    } else {
      context.resources.getString(R.string.geofence_unknown_error)
    }
  }

  fun getErrorString(context: Context, errorCode: Int): String {
    val resources = context.resources
    return when (errorCode) {
      GeofenceStatusCodes.GEOFENCE_NOT_AVAILABLE ->
        resources.getString(R.string.geofence_not_available)

      GeofenceStatusCodes.GEOFENCE_TOO_MANY_GEOFENCES ->
        resources.getString(R.string.geofence_too_many_geofences)

      GeofenceStatusCodes.GEOFENCE_TOO_MANY_PENDING_INTENTS ->
        resources.getString(R.string.geofence_too_many_pending_intents)

      else -> resources.getString(R.string.geofence_unknown_error)
    }
  }
}
Here, you’ve added a Kotlin object with a method that takes in an error code and returns a more user friendly string representation of the error.
Open ReminderRepository.kt again and change the add() method’s failure listener to this:
// 4
.addOnFailureListener {
  failure(GeofenceErrorMessages.getErrorString(context, it))
}
Now, you are returning the error strings you created earlier.
Handling Transitions
Previously, you created a PendingIntent and set a class to handle the GEOFENCE_TRANSITION_ENTER event. Remember that promise you made earlier? Now you’re going to follow up on that promise by writing a class to handle it.
Creating the Transitions Intent Service
Create the file GeofenceTransitionsJobIntentService.kt and add the following code:
package com.android.raywenderlich.remindmethere

import android.content.Context
import android.content.Intent
import android.support.v4.app.JobIntentService
import android.util.Log
import com.google.android.gms.location.Geofence
import com.google.android.gms.location.GeofencingEvent

class GeofenceTransitionsJobIntentService : JobIntentService() {

  override fun onHandleWork(intent: Intent) {
    // 1
    val geofencingEvent = GeofencingEvent.fromIntent(intent)
    // 2
    if (geofencingEvent.hasError()) {
      val errorMessage = GeofenceErrorMessages.getErrorString(this,
          geofencingEvent.errorCode)
      Log.e(LOG_TAG, errorMessage)
      return
    }
    // 3
    handleEvent(geofencingEvent)
  }
}
- You obtain the
GeofencingEventobject using the intent. - If there’s an error, you log it.
- Otherwise, you handle the event.
Add the handleEvent() method to your new class:
private fun handleEvent(event: GeofencingEvent) {
  // 1
  if (event.geofenceTransition == Geofence.GEOFENCE_TRANSITION_ENTER) {
    // 2
    val reminder = getFirstReminder(event.triggeringGeofences)
    val message = reminder?.message
    val latLng = reminder?.latLng
    if (message != null && latLng != null) {
      // 3
      sendNotification(this, message, latLng)
    }
  }
}
- You first check if the transition is related to entering a geofence.
- If the user creates overlapping geofences, there may be multiple triggering events, so, here, you pick only the first reminder object.
- You then show the notification using the message from the reminder.
Now add the getFirstReminder() method code:
private fun getFirstReminder(triggeringGeofences: List<Geofence>): Reminder? {
  val firstGeofence = triggeringGeofences[0]
  return (application as ReminderApp).getRepository().get(firstGeofence.requestId)
}
Here, you get the first triggered geofence and use its requestId to find the associated reminder object from the repository.
Add the following companion object:
  companion object {
    private const val LOG_TAG = "GeoTrIntentService"

    private const val JOB_ID = 573

    fun enqueueWork(context: Context, intent: Intent) {
      enqueueWork(
          context,
          GeofenceTransitionsJobIntentService::class.java, JOB_ID,
          intent)
    }
  }
Create the file GeofenceBroadcastReceiver.kt and add the following code:
package com.android.raywenderlich.remindmethere

import android.content.BroadcastReceiver
import android.content.Context
import android.content.Intent

class GeofenceBroadcastReceiver : BroadcastReceiver() {
  override fun onReceive(context: Context, intent: Intent) {
    GeofenceTransitionsJobIntentService.enqueueWork(context, intent)
  }
}
Finally, the receiver and service must be declared in the AndroidManifest.xml, so add them just before the application closing tag:
<receiver
  android:name=".GeofenceBroadcastReceiver"
  android:enabled="true"
  android:exported="true" />
<service
  android:name=".GeofenceTransitionsJobIntentService"
  android:exported="true"
  android:permission="android.permission.BIND_JOB_SERVICE" />
Testing the Geofences
I bet you are anxious to test what you’ve coded so far!
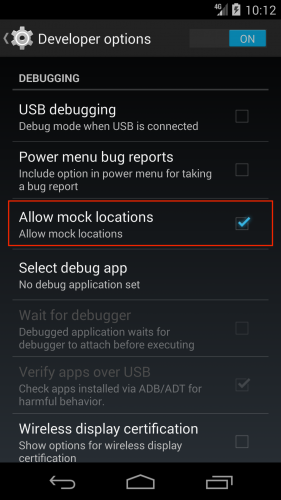
But, before that, it’s important to mention that, during development, it’s rather difficult to test this. Just imagine creating a few geofences separated by hundreds of feet or miles. You would need to walk or drive a lot! To address this, you can mock your location.
Mocking the Location
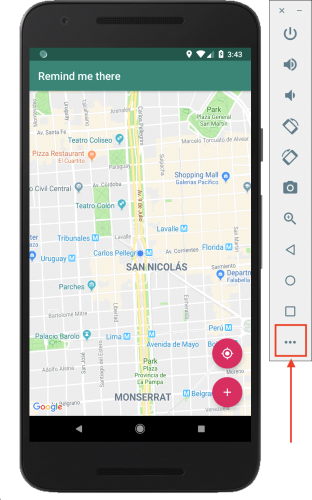
For quick and easy testing, you can use an Android emulator and modify its location coordinates. With an emulator running, open the extended controls by clicking the … button at the bottom of the menu:
Modify the coordinates to something else, for example, a latitude and longitude near your current actual location, and press SEND:

After a few seconds, you’ll see the user location updated in the map:

|

|
Creating a Reminder and Getting the Notification
Now that you know how to easily mock your location:
- Build and run the app.
- Create a reminder on your current location.
- Modify your coordinates so that your current location is outside of the geofence.
- Now, modify your coordinates so that your current location is inside the geofence.
- Wait a few seconds and you’ll get a notification with the message you set.
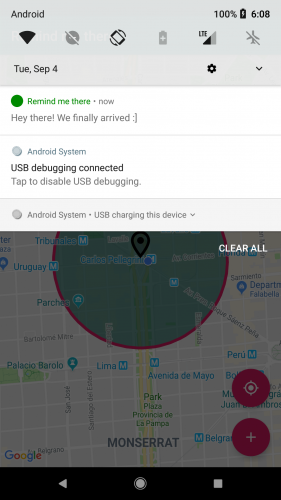
Congratulations, you’ve added your first geofence reminder!