iOS Accessibility in SwiftUI Tutorial Part 2: Organizing

In this accessibility tutorial, you’ll organize the accessibility information of a SwiftUI app by restructuring its accessibility tree. By Audrey Tam.

5 (3) · 1 Review

Download materials
Save for later
Share

Accessibility matters. Making sure every UI element has a meaningful label is a good start, but you’ll probably need to organize some of the accessibility information, to help VoiceOver users understand and navigate your app.

In Part 1 of this article, you fixed the accessibility of a simple master-detail SwiftUI app by creating informative labels for various types of images. In this part, you’ll fix the accessibility of a more interactive app by organizing the accessibility information in a way that differs from what your non-VoiceOver users see: You’ll restructure your app’s accessibility tree.

In this part of the article, you’ll learn how to:

  • Improve VoiceOver information by reordering, combining or ignoring child elements.
  • Streamline VoiceOver navigation with headings.
  • Provide context for a SwiftUI control like Slider.

You’ll also learn how color contrast ratios affect accessibility and how improving accessibility can lead to improvements to your app’s visual UI.

The future is accessible, and SwiftUI will help you make it happen!

Note: This article assumes you’re comfortable with using Xcode to develop iOS apps. You need Xcode 11 to use SwiftUI. To see the SwiftUI preview, you need macOS 10.15. Some familiarity with SwiftUI will be helpful. Check out our article SwiftUI: Getting Started if you need a refresher. You’ll also need an iOS device to hear the effect of some of your work. Part 1 of this article includes detailed instructions for using VoiceOver on a device and in the Accessibility Inspector.

Getting Started

Get started by downloading the materials for this article — you can find the link at the top or bottom of this article. Open the ContrastPicker project in the begin folder. Build and run the app in an iPhone simulator.

ContrastPicker list view

Note: The colors are randomly generated, so your colors and ratio values will be different.

This app displays sample text in different text colors on different background colors. The sample-text-on-background element is a button. Tapping this button shows a modal sheet that lets the user edit the colors to increase the color contrast ratio:

Color contrast editor modal sheet

Swipe down to dismiss the modal sheet.

Note: I originally wrote this app with a NavigationLink to the ColorPicker view. I changed to a modal sheet because, at the time of writing this article, NavigationLink blocks the .accessibilityElement(children:) behavior that you’ll learn about in this article.

Color Contrast Ratio

Color contrast plays an important role in accessibility. Strong contrast between UI elements in your app makes it easier for all your users to see your content.

The amount of contrast between foreground and background colors falls under Guideline 1.4 Distinguishable of the Web Content Accessibility Guidelines (WCAG) 2.0

Make it easier for users to see … content including separating foreground from background.

The color contrast ratio measures the contrast between two colors. It’s roughly the relative brightness of the lighter color divided by the relative brightness of the darker color. It’s often expressed as something like 21:1 — this is the largest possible color contrast ratio, between white and black.

The Level AA Minimum guidelines recommend a contrast ratio of at least 4.5:1, although a 3:1 contrast ratio is OK for large-scale text (18pt or larger) or bold text of any size.

The Level AAA Enhanced guidelines recommend higher contrast values — at least 7:1, or 4.5:1 for large-scale text.

Look at the ContrastPicker list view in your simulator: Most items have ratio values less than 4.5, and it’s pretty hard to read items whose ratio value is less than 2.

Calculating Color Contrast Ratio

There are online color contrast calculators, but Accessibility Inspector has its own. However, for any pair of colors, Accessibility Inspector’s Color Contrast Calculator produces a slightly higher value than the WCAG formula used by online calculators. This issue was raised in an Apple forum thread in December 2018. At the time of writing this article, there’s been no official response. I tried a few different color pairs to see if there’s a constant multiplier, but there isn’t one.

Check out the difference for yourself: Open contrastchecker.com in a browser, then use its Foreground and Background color pickers to enter Text and Background hexadecimal values from the app — don’t enter the last two hexadecimal digits FF, as that’s just the alpha value.

Next, reopen the color pickers to get the Red, Green and Blue values that you need to enter into Accessibility Inspector’s Color Contrast Calculator.

Copy hex color values from app to web page. Get RGB integers from web page.

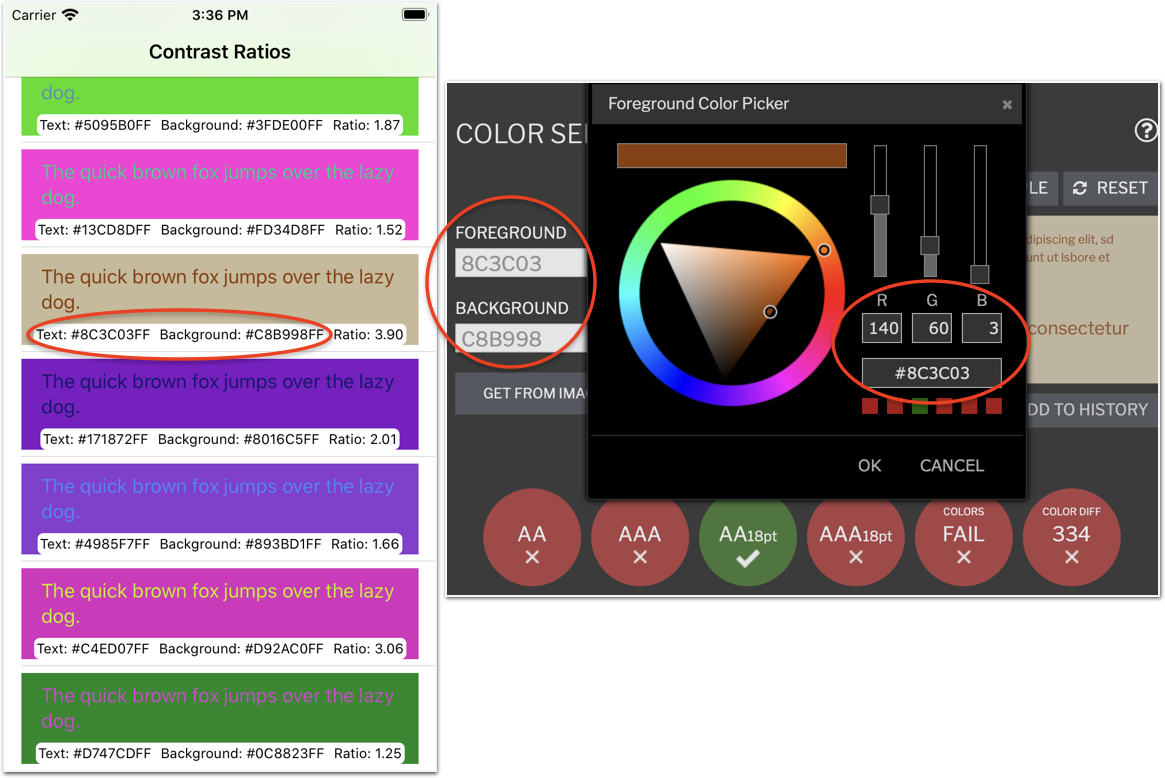
The example uses 8C3C03 for Foreground and C8B998 for Background. These translate to Red 140 Green 60 Blue 3 and Red 200 Green 185 Blue 152.

Now open Accessibility Inspector: Xcode▸Open Developer Tool▸Accessibility Inspector. Then open its Color Contrast Calculator: Windows▸Show Color Contrast Calculator.

Finally, enter the Text and Background Red, Green and Blue values from contrastchecker.com:

Compare Xcode Contrast Color Calculator with contrastchecker.com

In this example, Apple’s contrast ratio 4.3 is slightly higher than the WCAG value 3.93, but both calculators agree this amount of contrast is OK for 18pt text.

ContrastPicker uses the WCAG formula for color contrast ratio, implemented in ContrastModel.swift. The formula uses RGB values between 0 and 1, so its contrast ratio values are slightly different from the online calculators, which use integer RGB values between 0 and 255.

Better Labels for All Users

Each list item displays sample text in a randomly-generated text color against a randomly-generated background color. Below this are the text and background Color descriptions and the contrast ratio. If you’re a sighted person scanning this, it looks OK: You don’t really read the sample text, you recognize the Color descriptions as hex values, and your eyes quickly zoom in on the ratio value at the end.

Now stop and think how this will sound in VoiceOver — actually, use the accessibility inspector’s VoiceOver simulator to listen to it. Select your simulator as the target, then use the Fast-Forward button to navigate to the first item. Click the Play button to auto-navigate this item.

It sounds similar to this:

The quick brown fox jumps over the lazy dog. Button. Text: number D37F5EFF Background: number C80C56FF Ratio: 1.91.

Ugh! VoiceOver reads # as number if the next character is a digit, otherwise it just skips it. If part of the hex number spells something pronounceable like EFF, VoiceOver reads it as a word eff, not as E-F-F. At least, VoiceOver pauses after each Text element, even though there’s no punctuation there.

The first main problem is: This is gobbledygook to listen to. The second main problem is: The most important information — the ratio — comes at the end. Also, VoiceOver users won’t want to listen to the sample text over and over, but they do need to know that this is an edit button.

So how do you fix these problems?

Creating Labels to Reduce Jargon

First, you’ll fix the color descriptions. Instead of the Color element’s built-in description, you’ll add a listener-friendly description property to ColorModel.

In ContrastModel.swift, add this computed property to struct ColorModel:

var accDescription: String {
  "Red \(rInt), Green \(gInt), Blue \(bInt)."
}

You’ll replace the hex value with the three red, green and blue integer values. The punctuation will cause VoiceOver to pause in the right places.

Here’s a light-bulb moment 💡: These values are as useful for sighted users as they are for VoiceOver users, so why not display them in the UI? But the accDescription string would take up too much room. You can get away with just R, G and B for the visual display, and you don’t need punctuation.

So, add another computed property to struct ColorModel:

var description: String {
  "R\(rInt) G\(gInt) B\(bInt)"
}

And now put these descriptions to work. In ContrastListView.swift, in struct ListCellView, replace the contents of the HStack with this code:

Text("Text \(contrast.text.description)")
  .accessibility(label: Text("For Text color "
  + contrast.text.accDescription))
Text("Bkgd \(contrast.bkgd.description)")
  .accessibility(label: Text("on Background color " 
  + contrast.bkgd.accDescription))
Text("Ratio " + contrast.ratio())

You’ve replaced the colorView.description with your new ColorModel descriptions, and provided more descriptive accessibility labels for the text and background colors. You’ve also removed the colons from the displayed text, to help it fit better, but also so VoiceOver doesn’t pause between Ratio and the ratio value. And you’re displaying an abbreviation for Background. It’s OK; you’ve also specified an accessibility label with the full word Background, so VoiceOver won’t spell out b-k-g-d.

Build and run. The descriptions fit on an iPhone 8 screen:

List view with improved color descriptions

Then listen to VoiceOver:

For Text color Red 163, Green 17, Blue 129 on Background color Red 181, Green 120, Blue 205. Ratio 2.20.

That sounds totally awesome! I could listen to that all day. Except the Ratio part at the end sounds awkward. But you know you’re going to fix that now ;].

Modifying the Accessibility Tree

In this part, you’ll change the order that VoiceOver visits elements and hide elements that provide redundant information. You’ll also group elements to reduce the number of steps for a VoiceOver user or to move some of the information to hints that your VoiceOver users don’t have to listen to.

The elements in your app’s UI form a tree hierarchy of views in container stacks:

Tree of ListCellView's button and color description elements

There’s a corresponding accessibility tree. At the moment, it looks exactly like your app’s UI tree. The framed purple elements are the accessible elements.

The great thing is: The accessibility API gives you the power to modify the accessibility tree, to provide better information and more efficient navigation to your VoiceOver users. And, it lets you do this with no changes to your app’s UI tree.

Note: Apple is actively working on many aspects of its Accessibility API and iOS Accessibility options. A new Xcode or iOS update might fix something, but might break something else. Please report bugs in this article’s forum and in Apple’s developer forums. And please be patient: “Everything will be alright in the end, and if it is not alright, it is not yet the end.” (The Best Exotic Marigold Hotel)

Changing the Order for VoiceOver

The quickest way to get VoiceOver to say the ratio value before the colors is to move the Ratio Text element ahead of the Text and Background Text elements in the HStack.

But suppose you think your sighted users prefer to see the ratio value at the trailing edge, because it’s easy to run your eye down the screen edge, to see all the ratio values. It’s more helpful for VoiceOver users to hear the ratio first, so you need to change the order for VoiceOver, while keeping it the same for sighted users.

This is an opportunity to use accessibility(sortPriority:). You’ll increase the sort priority of the Ratio Text element for VoiceOver, without moving it from where it appears on screen. This modifies the HStack part of the accessibility tree:

Tree showing reordered HStack

First, in ContrastListView.swift, in struct ListCellView, add this modifier to the Ratio Text element:

.accessibility(sortPriority: 1)

The default sortPriority is 0, so increasing it to 1 for the Ratio Text element is enough to make VoiceOver say it before the Text and Background Text elements.

Containing Child Elements

Next, add this modifier to the HStack:

.accessibilityElement(children: .contain)

You can use the accessibilityElement modifier to .contain, .combine or .ignore the accessible child elements in a stack, and you’ll soon use .combine and .ignore. Actually, .contain is its default behavior — it means: Treat accessible child elements as individual elements. But, at the time of writing this article, accessibility(sortPriority:) doesn’t work correctly without it.

Finally, tell VoiceOver to describe the button’s action instead of saying the sample quick brown fox text. Add this modifier to the quick-brown-fox Text element:

.accessibility(label: Text("Edit colors"))

This replaces the button’s label for VoiceOver. Now your VoiceOver users don’t have to listen to the quick brown fox sample text. Instead, they’ll hear what tapping this button does.

Note: If you prefer, just replace the Text element’s The quick brown fox ... with Edit colors. Then you don’t need a separate accessibility(label:), and the button is immediately visible to non-VoiceOver users. Thinking about what’s good for VoiceOver users can help improve your app for all your users!

Now build and run, and listen to VoiceOver say Edit colors. Button., then read Ratio … for Text color … on Background color ….

Using VoiceOver on a Device: Swipe Right

In the accessibility inspector, when you click the auto-navigate (Play) button, the VoiceOver simulator reads the accessible element labels one after the other, continuing through all the list items. But on a device, a VoiceOver user must swipe-right after VoiceOver says Ratio … to hear for Text …, then swipe-right again to hear on Background ….

Again, you need to run your app on a device, to find out how it really behaves and sounds for a VoiceOver user.

If necessary, adjust the iOS Deployment Target, change the Bundle Identifier organization, and select a Team under Signing & Capabilities.

On your device, check your Settings▸Accessibility▸Accessibility Shortcut is set to VoiceOver.

Build and run the app on your device. Triple-click the side button to start VoiceOver. Tap one of the Edit-color buttons, then swipe right: VoiceOver reads the ratio value and stops. Swipe right to hear the text color value, then swipe right again to hear the background color value.

Combining Child Elements

To reduce your VoiceOver user’s workload, you’ll combine the elements in the HStack, so VoiceOver will read all three labels without stopping to wait for the user to swipe.

Tree showing combined children of HStack

You’ll merge the three HStack children into one, making the HStack the accessible element.

Replace the .accessibilityElement(children:) modifier on the HStack with this:

.accessibilityElement(children: .combine)

The .combine argument of .accessibilityElement(children:) combines all the accessible elements of the HStack into one set of properties, hiding the individual child elements from VoiceOver.

Build and run on your device, turn on VoiceOver, then navigate to the first list item, and swipe-right after Edit colors. Button. VoiceOver says for Text color … on Background color … Ratio … with no further interaction from you.

So less swiping, but this .combine argument breaks the Ratio sortPriority.

Until Apple fixes the way .accessibilityElement(children:) interacts with .accessibility(sortPriority:), you’ll probably opt to move the Ratio Text element to be first in the HStack, to provide more help to your VoiceOver users. But the next section suggests yet another alternative.

Ignoring Child Elements

After all that relabeling, you decide that your VoiceOver users don’t need to hear the text and background colors. It’s enough to tell them just the ratio value for each list item.

But maybe you’re not absolutely sure the ratio value is enough information for VoiceOver users. Just in case, you’ll put the color values into a hint that VoiceOver says after a short pause, if the user doesn’t immediately swipe to the next item.

Note: The main use of .accessibility(hint:) is to tell VoiceOver users what will happen if they activate a control, but it’s also useful for providing succinct labels with additional just-in-case information.

First, add these modifiers to the HStack, below the accessibilityElement(children:) modifier:

.accessibility(label: Text("Ratio " + contrast.ratio()))
.accessibility(
  hint: Text("for Text color \(contrast.text.accDescription),"
    + " on Background color \(self.contrast.bkgd.accDescription)."))

You’re replacing the combined labels with just the Ratio label, and combined the old labels for Text and Background into a hint.

Next, replace the accessibilityElement(children:) modifier, to change .combine to .ignore:

.accessibilityElement(children: .ignore)

This emphasizes that you’re not using the accessibility content of the HStack. If you delete the label and hint, VoiceOver won’t say anything at all for this part of the list item.

Tree showing ignored children of HStack

The accessibility inspector doesn’t read out hints, so build and run the app on your device. Navigate VoiceOver to a color description line to hear Ratio …, pause, then for Text … on Background ….

Note: Your VoiceOver user can turn off hints in Settings▸Accessibility▸VoiceOver▸Verbosity:

iPhone Settings with Speak-Hints turned off

Challenge: Reordering Exercise

For a VoiceOver user, it might actually make more sense to hear the ratio value before Edit colors button: VoiceOver first reads the value, then offers the action. Within the VStack, increase the priority of the HStack, so VoiceOver says Ratio … [pause] Text … before Edit colors button. You’ll modify the accessibility tree to look like this:

Tree showing reordered VStack

Click Reveal to see the solution.

[spoiler title=”Solution”]
First, add this modifier to the HStack, below the accessibilityElement(children:) line:

.accessibility(sortPriority: 1)

You’re ordering the HStack ahead of the Button. The order of modifiers is important: if you set sortPriority before accessibilityElement(children:), it doesn’t change the ordering.

Then add this modifier to the VStack:

.accessibilityElement(children: .contain)

You’re setting up the VStack to pay attention to sortPriority.

Build and run to confirm that this works. Turn on VoiceOver, then swipe right to move to the first item — VoiceOver reads Ratio … first. Swipe right: VoiceOver moves to that item’s button and reads Edit button.
[/spoiler]

You’ve done a great job fixing up the list view. Now to tackle the ColorPicker view.

Making Sense of Sliders

On your device, tap a list item to open its color-editing view:

Color editing view

Turn off VoiceOver on your device. Instead, select your device in the accessibility inspector. Your device should be connected to your Mac, but the app doesn’t have to be running in Xcode.

Now click the Play button to auto-navigate VoiceOver over the view — it sounds like this, but with different numbers:

1.85 Text. Red: 169, 66 per cent, adjustable. Green: 35, 14 per cent, adjustable. Blue: 109, 43 per cent, adjustable. Background. Red: 204, 80 per cent, adjustable. Green: 80, 31 per cent, adjustable. Blue: 225, 89 per cent, adjustable.

Here are the problems:

  1. The contrast ratio value 1.85 has no context.
  2. The Accessibility Inspector doesn’t use the sliders’ labels. This is probably a bug. If it’s fixed by the time you read this article, then skip fix #2 below.
  3. The sliders express their accessibility values as percentages, which aren’t useful in this app’s context. Labels like Red: 169 provide the necessary info, but aren’t adjustable, so you can’t just hide the sliders from VoiceOver.

And here’s what you’ll do to fix these problems:

  1. Add an accessibility label to the contrast ratio Text element.
  2. Duplicate the sliders’ labels in accessibility labels.
  3. Add accessibility values (integers) to the sliders, to hide the percentage values.

Fixing the Contrast Ratio View

The first job is easy: In ColorPicker.swift, in the ZStack, add this modifier to the Text element:

.accessibility(label: Text("Contrast ratio: " + contrast.ratio() + "."))

You’re adding context to the ratio value, as well as some punctuation, to make VoiceOver pause before and after the ratio value. VoiceOver will read out this label instead of the Text element’s content.

Fixing the Sliders

Next, to stop VoiceOver speaking the slider value as a percentage, you’ll add an accessibility label and value to the Slider. But first, SliderBlock needs one more property.

Add the following property to struct SliderBlock. To continue copying code from this article, add this property below the existing four properties.

@Binding var contrast: ContrastModel

The order of properties must match the order of parameters in the SliderBlock initializer.

Now you have to add this parameter to all the SliderBlock elements in the body of struct ColorPicker.

Replace the SliderBlock elements in the “Text” VStack:

SliderBlock(colorString: "Red", colorInt: contrast.text.rInt,
  colorValue: $contrast.text.r, bkgdOrText: "Text", 
  contrast: $contrast)
SliderBlock(colorString: "Green", colorInt: contrast.text.gInt,
  colorValue: $contrast.text.g, bkgdOrText: "Text", 
  contrast: $contrast)
SliderBlock(colorString: "Blue", colorInt: contrast.text.bInt,
  colorValue: $contrast.text.b, bkgdOrText: "Text", 
  contrast: $contrast)

Then replace the SliderBlock elements in the “Background” VStack:

SliderBlock(colorString: "Red", colorInt: contrast.bkgd.rInt,
  colorValue: $contrast.bkgd.r, bkgdOrText: "Background", 
  contrast: $contrast)
SliderBlock(colorString: "Green", colorInt: contrast.bkgd.gInt,
  colorValue: $contrast.bkgd.g, bkgdOrText: "Background", 
  contrast: $contrast)
SliderBlock(colorString: "Blue", colorInt: contrast.bkgd.bInt,
  colorValue: $contrast.bkgd.b, bkgdOrText: "Background", 
  contrast: $contrast)

Finally, add these two modifiers to the Slider element in struct SliderBlock:

.accessibility(label: Text(bkgdOrText + " " + colorString))
.accessibility(value: Text(colorInt + ". Ratio " + contrast.ratio()))
Note: If the Slider label is working in VoiceOver by the time you read this article, then you don’t need to add the accessibility(label:) line.

You’re adding an accessibility label and replacing the default accessibility value. And you’re actually adding more context to these accessibility attributes than you display in your UI for sighted users.

For each slider, you’re telling your VoiceOver user which color — text or background — and component — red, green or blue — the slider changes.

You’re also telling them the updated contrast ratio. Your sighted users can see the ratio change when they move a slider, and use this feedback to decide their next action. And now your VoiceOver users can also use this feedback.

Now that you’ve added accessibility information that includes what’s in the Text element, you don’t want VoiceOver to read it out anymore. So add this modifier to the Text element in struct SliderBlock:

.accessibility(hidden: true)

You’re hiding this Text element from VoiceOver, so it won’t read out its content.

Build and run, then listen to your ColorPicker in Accessibility Inspector with auto-navigate:

Contrast ratio 5.51. Text. Text Red: 224, ratio 5.51, adjustable. Text Green: 245, ratio 5.51, adjustable. Text Blue: 232, ratio 5.51, adjustable. Background. Background Red: 158, ratio 5.51, adjustable. Background Green: 11, ratio 5.51, adjustable. Background Blue: 202, ratio 5.51, adjustable.

That sounds much better, but what’s it like to use? Once again, you’ll need to use VoiceOver on your device to get the real experience.

Using VoiceOver on a Device: Sliders

You’ll need a couple more gestures for ColorPicker:

  • Navigate to a slider, then swipe up or down with one finger to increase or decrease its value.
  • Alternative: Double-tap and hold the slider until you hear three rising tones, then drag the slider in the usual way. Double-tap-and-hold also works for other standard gestures. When you lift your finger, VoiceOver gestures resume.
  • To dismiss a modal sheet or return to the previous screen: Two-finger scrub — make a “z” by moving two fingers back and forth three times quickly.

Triple-click the side button to turn on VoiceOver on your device.

Swipe right until you reach a slider: VoiceOver says Swipe up or down with one finger to adjust the value. So swipe up or down, then listen to VoiceOver tell you the new color and ratio values.

To try out the double-tap-hold-then-slide gesture, rotate your device to landscape orientation — in portrait orientation, the sliders are too short for this gesture to work effectively. This standard slider gesture is probably less useful to a user who’s relying on VoiceOver, as the ratio values change faster than VoiceOver can speak them.

Use the two-finger scrub to return to the list view, then turn off VoiceOver.

Headings for Faster Navigation

ColorPicker has three sections:

  1. The contrast view with the contrast ratio in the text color on the background color.
  2. Red, Green and Blue sliders to change the Text color.
  3. Red, Green and Blue sliders to change the Background color.

It’s easy for a sighted user to move from one slider to any other slider, but a VoiceOver user has to swipe through all the elements in between: Four right swipes to move from Text Red to Background Red.

The tree is a flat hierarchy:

ColorPicker tree: VStack is flat hierarchy

The solution is to organize your elements under headings.

ColorPicker tree: VStack with Ratio, Text and Background headings

Rotating the VoiceOver Rotor

VoiceOver provides an on-screen rotor that lets a user choose to navigate between headings.

To see this in action, open Settings▸Accessibility on your device, then triple-click the side button to turn on VoiceOver. Rotate two fingers on your screen — pretend you’re turning a dial. You’ll see a rotor, and VoiceOver will say the first rotor option. Rotate until VoiceOver says Headings, then lift your fingers. (You can lift your fingers in between rotations.) Flick down to select the next heading, flick up to select the previous heading. Swipe right to move to the first item in the group.

iPhone Settings showing VoiceOver rotor

Triple-click the side button to turn off VoiceOver.

Creating Headings

You’ve already seen that a NavigationView title is automatically a Header. To take advantage of the VoiceOver rotor, you’ll set up your own Header elements for ColorPicker: the contrast ratio Text and the Text and Background labels above the slider sets.

In ColorPicker.swift, add this modifier to the ZStack, and to the Text elements in the two VStacks.

.accessibility(addTraits: .isHeader)

Build and run the app on your device. Navigate to a detail view, then triple-click the side button to turn on VoiceOver.

You’ve already set VoiceOver to navigate between Headings, so flick down to select the next heading. Swipe right to select the red slider. Unfortunately, the slider also uses flick up/down, to change its value, so you must swipe-left to return to the heading, then flick down or up to move to the next or previous heading.

This is still a big improvement for your VoiceOver users to navigate your app: Congratulations! With all these tools in your toolbox, you’ll be an accessibility ninja in no time!

Ninja Swift mascot with toolbox

Where to Go From Here?

You can download the completed version of the project using the Download Materials button at the top or bottom of this tutorial.

You’ve learned a lot more about SwiftUI accessibility in this article. Here’s what you’ve done:

  • Modified your app’s accessibility tree to improve VoiceOver information and navigation.
  • Improved the accessibility of a complex SwiftUI control.

Here are some links for further exploration:

Continue to Part 3, to learn how to adapt your app to some common user accessibility settings.

We hope you enjoyed this article. If you have any questions or comments, please join the forum discussion below!