Android Networking With Kotlin Tutorial: Getting Started
In this tutorial, you’ll get started with Android networking by creating a simple app to retrieve and display a list of GitHub repositories. By Fuad Kamal.
Update note: Fuad Kamal updated this tutorial for Android Studio 3.5.3, Kotlin 1.3.61, and coroutines. Eunice Obugyei wrote the original.
Update note: Fuad Kamal updated this tutorial for Android Studio 3.5.3, Kotlin 1.3.61, and coroutines. Eunice Obugyei wrote the original.
Few apps work in isolation. Most connect to an online service to retrieve data or perform other networking functions. As such, networking plays a critical role in developing Android apps.
In this Android networking tutorial, you’ll create a simple app that connects to the GitHub API to retrieve and display a list of repositories.
During the process, you’ll learn how to:
- Check your network connection status.
- Perform network operations.
- Leverage open source libraries to perform network operations.
- Profile the network performance of your app.
- Use the modern approach to asynchronous programming in Android and Kotlin with coroutines
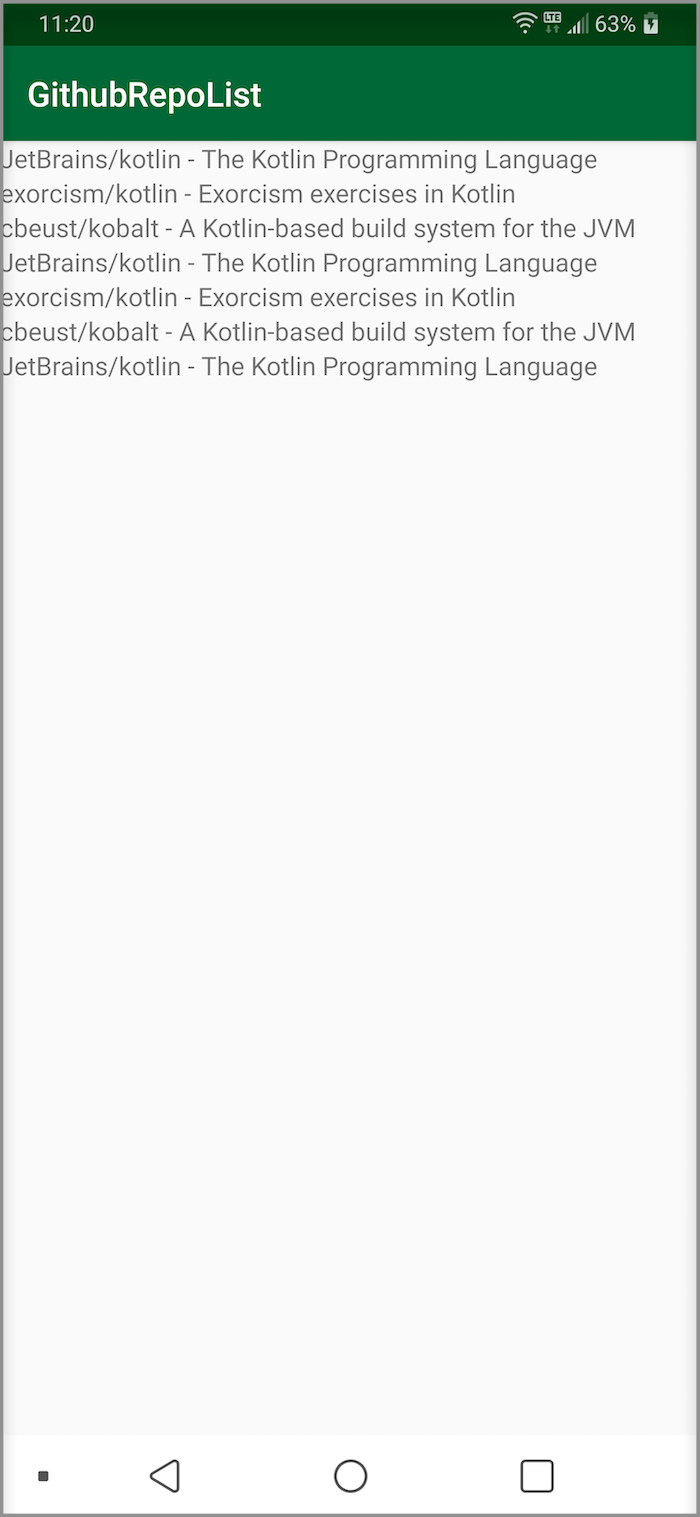
By the end, you’ll have built a GitHubRepoList app that runs a search query against the GitHub API and displays the results:

Getting Started
Download the starter project by clicking the Download Materials button at the top or bottom of the tutorial.
Once your download completes, unzip the file. Open the starter project in Android Studio 3.1.2 or greater by selecting Open an existing Android Studio project from the Welcome to Android Studio window:

You can also use File ▸ Open in Android Studio.
Then browse to the starter directory in the downloaded materials and click Open.
Open MainActivity.kt from the ui.activities package and explore the code. It uses a simple RecyclerView named repoList. RecyclerView contains a hard-coded list of repository names.
Build and run to preview what you have to work with:
Enabling Auto Import
Before adding any Kotlin code, configure Android Studio to insert import statements automatically. This step saves you from having to add individual import statements.
Go to either Android Studio ▸ Preferences on macOS or File ▸ Settings on PC. Then go to Editor ▸ General ▸ Auto Import and check the Add unambiguous imports on the fly checkbox. Check the Optimize imports on the fly (for current project) checkbox, too. Finally, click OK.

Including Permissions
Your app must include certain permissions to perform network operations in Android. Open manifests/AndroidManifest.xml and add the following permissions above the application tag:
<uses-permission android:name="android.permission.ACCESS_NETWORK_STATE"/>
<uses-permission android:name="android.permission.INTERNET" />
ACCESS_NETWORK_STATE checks the network state of the device. INTERNET accesses the Internet.
Making a Network Request
Now that you have your permissions set up, you can move on to making your first network request!
Initiating a Request on a Background Thread
MainActivity.kt defines a value url that contains the first network request. It queries the GitHub API for repositories written in Kotlin that contain the phrase “super mario”. Start with a narrow search at first so you aren’t overwhelmed with too much data. Add the following code below url and inside onCreate():
doAsync {
  Request(url).run()
  uiThread { longToast("Request performed") }
}
Network requests are not allowed on the app’s main thread, also called the UI thread. If you block the main thread, Android causes the app to throw an exception. doAsync() is part of a domain-specific language (DSL) provided by the Kotlin library, Anko. You can include Anko by including following line in app level build.gradle:
implementation "org.jetbrains.anko:anko-common:0.10.8"
Anko provides a way to execute code on a separate worker thread and to return the control flow back to the main thread by calling uiThread().
Reading the URL Content
Open Request.kt and replace the TODO comment in run() with the following:
val repoListJsonStr = URL(url).readText()
Log.d(javaClass.simpleName, repoListJsonStr)
readText() makes the network request by opening an InputStream from url and return as String. Log.d() writes the network response to Logcat.
Please note that readText() does have an internal limit of 2 GB. In most cases, this limit should suffice. But if you anticipate exceeding that amount, there are other options. For example, you can use BufferedReader.forEachLine() or a third party networking library — as discussed later in this tutorial.
Build and run. The UI shouldn’t change, but check the Logcat window at the bottom of Android Studio. It should show a JSON response to the network request. To better see the JSON response, click the Use Soft Wraps button on the left toolbar.

Congrats! You’ve completed your first network request with Android and Kotlin.
Checking the Network Availability
Before you can make a network request, you have to be sure that there is a network available. Your next steps will be to verify the user’s connection.
Confirming Network Connection
Before making a request, you should check whether the user has a network connection. This step will ensure a pleasant user experience. This will ensure your users to signal that internet connectivity is needed and they should turn on data connectivity if the device is not connected to internet.
Add the following to MainActivity.kt:
private fun isNetworkConnected(): Boolean {
  //1
  val connectivityManager = getSystemService(Context.CONNECTIVITY_SERVICE) as ConnectivityManager
  //2
  val activeNetwork = connectivityManager.activeNetwork
  //3
  val networkCapabilities = connectivityManager.getNetworkCapabilities(activeNetwork)
  //4
  return networkCapabilities != null &&
      networkCapabilities.hasCapability(NetworkCapabilities.NET_CAPABILITY_INTERNET)
}
isNetworkConnected() checks that the device has an active Internet connection by:
- Retrieving an instance of
ConnectivityManagerfrom the current application context.ConnectivityManageris used to query the state of network. - Getting a reference to the active network the device is using.
- Getting the capabilities of the active network.
- Checking if the active network can reach the Internet.
Using a Network Connectivity Helper Method
Now replace doAsync{…} in onCreate() with the following:
if (isNetworkConnected()) {
doAsync {
Request(url).run()
uiThread { longToast("Request performed") }
}
} else {
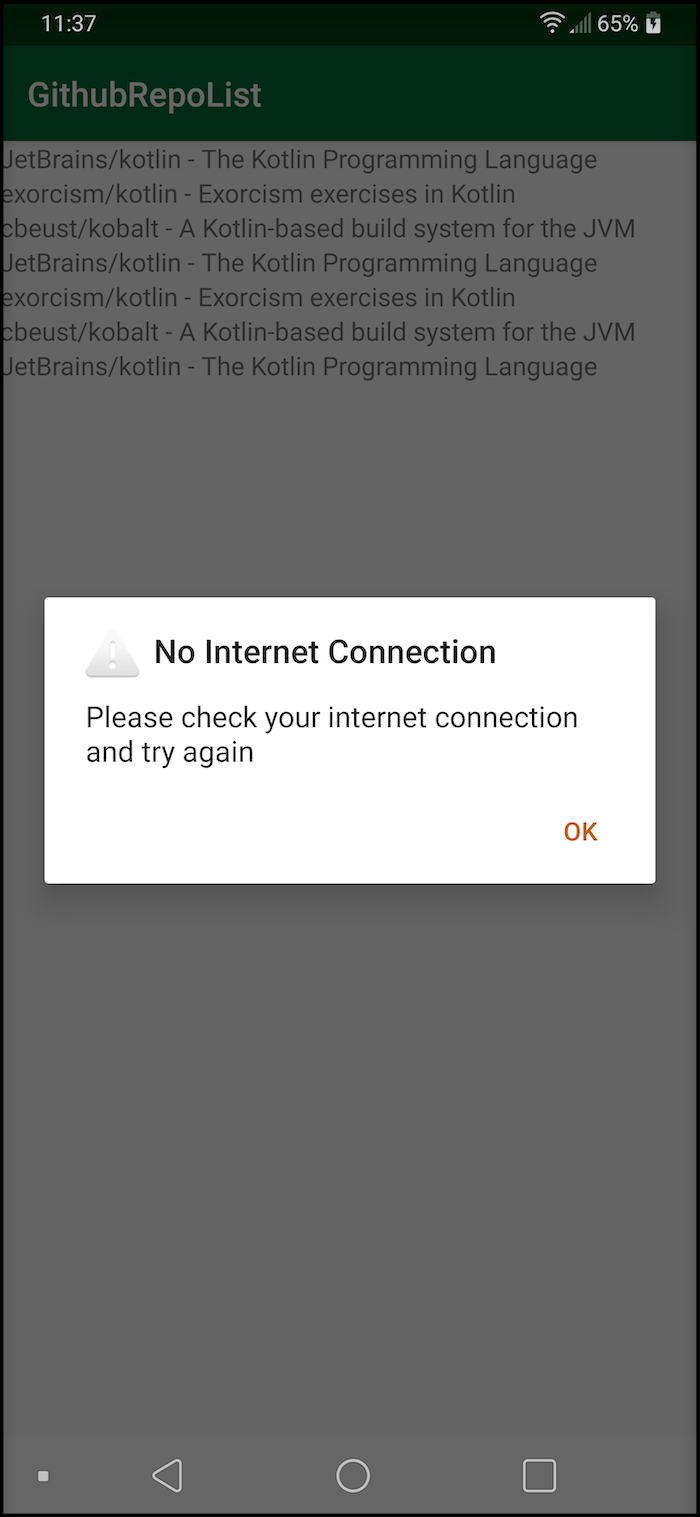
AlertDialog.Builder(this).setTitle("No Internet Connection")
.setMessage("Please check your internet connection and try again")
.setPositiveButton(android.R.string.ok) { _, _ -> }
.setIcon(android.R.drawable.ic_dialog_alert).show()
}
This code first checks whether there is a network connection. If there is, the app makes the network request. If not, it displays an alert to the user.
You can further explore the logic by setting a breakpoint on if. Click the debug button on the toolbar. It’s highlighted in the image below:
![]()
Android Studio will build and run then pause execution at if. You can step over the code by pressing the Step Over button in the debug pane. If your emulator has a network connection, doAsync will execute, and you’ll see the resulting JSON response in the Logcat tab.
Now, disable internet access by toggling Airplane Mode on:

Debug your app again. This time, the control will go into else, and an alert will appear on the emulator:
Be sure to turn off Airplane Mode for the rest of this tutorial. :]