UndoManager Tutorial: How to Implement With Swift Value Types
In this tutorial you’ll learn how to build an undo manager, using Swift and value types, leveraging the Foundation’s UndoManager class By Lyndsey Scott.
Nobody’s perfect. And once you implement UndoManager, your users don’t have to be either.
UndoManager provides a simple way to add undo/redo functionality to your apps. You may also be able to prevent the occasional flaw in your reasoning by keeping things more “local”.
In this tutorial, you’ll build an app called People Keeper to improve your local reasoning with Swift value types and learn how to use that improved local reasoning to achieve flawless undo/redo implementations.
Getting Started
Download the materials for this tutorial using the Download Materials link found at the top and bottom of this page. Build and run the starter app:

The app is pre-populated with some folks you’ve supposedly encountered and wanted to remember. Click on Bob, Joan and/or Sam, and you’ll see that their physical features, likes and dislikes are specified in the cells below the preview.
Tapping Bob in PeopleListViewController (left) opens PersonDetailViewController (right). The screenshot series on the right shows PersonDetailViewController‘s scrolled page contents.
To understand the starter code, click through the project files and read the comments throughout. It’ll be your job in this tutorial to program the ability to add and edit your contacts.
Making Changes
What if Sam shaves his mustache or Joan starts wearing glasses? Or, during a particularly harsh winter, Bob decides that he dislikes everything including the weather? It’s useful to be able to update the people in People Keeper in real time.
Implementing selection behaviors
To start, if you choose a new feature or topic in PersonDetailViewController, the preview should update. To do this, at the bottom of the extension marked by UICollectionViewDelegate and UICollectionViewDataSource in PersonDetailViewController.swift, add:
override func collectionView(_ collectionView: UICollectionView,
                             didSelectItemAt indexPath: IndexPath) {
// 1
  switch Section(at: indexPath) {
// 2
  case .hairColor:
    person.face.hairColor = Person.HairColor.allCases[indexPath.row]
  case .hairLength:
    person.face.hairLength = Person.HairLength.allCases[indexPath.row]
  case .eyeColor:
    person.face.eyeColor = Person.EyeColor.allCases[indexPath.row]
// 3
  case .glasses:
    person.face.glasses = true
// 4
  case .facialHair:
    person.face.facialHair.insert(Person.FacialHair.allCases[indexPath.row])
// 5
  case .likes:
    person.likes.insert(Person.Topic.allCases[indexPath.row])
    person.dislikes.remove(Person.Topic.allCases[indexPath.row])
  case .dislikes:
    person.dislikes.insert(Person.Topic.allCases[indexPath.row])
    person.likes.remove(Person.Topic.allCases[indexPath.row])
  default:
    break
  }
// 6
  collectionView.reloadData()
}
Upon cell selection, the following happens:
- Using a
switchstatement, you execute the case that matches the enumeration value corresponding to the current section. - If the user selects a hair color, set
person‘s hair color to thePerson.HairColorvalue at the selected row of the index path. If the user selects a hair length or eye color, set the hair length or eye color as well. - When the user taps the glasses option,
person‘sglassesBoolean becomestrue. -
facialHairis a set since it can contain multiple items. When the user selects a facial hair style, insert it into the facial hair set. - If the user selects a topic in the
likesordislikessection, add it to thelikesordislikesset respectively. Furthermore, a topic can’t be both liked and disliked, so if the user likes an item, deselect its cell in the dislike section and remove it from the dislike set and vice versa. - Update the preview and selection UI by reloading the collection view.
Implementing deselection behaviors
Next, implement the deselection behaviors. Below the collectionView(_:didSelectItemAt:), add:
// 1
override func collectionView(_ collectionView: UICollectionView,
                             shouldDeselectItemAt indexPath: IndexPath) -> Bool {
  switch Section(at: indexPath) {
  case .facialHair, .glasses, .likes, .dislikes:
    return true
  default:
    return false
  }
}

override func collectionView(_ collectionView: UICollectionView,
                             didDeselectItemAt indexPath: IndexPath) {

  switch Section(at: indexPath) {
  // 2
  case .facialHair:
    person.face.facialHair.subtract([Person.FacialHair.allCases[indexPath.row]])
  case .likes:
    person.likes.subtract([Person.Topic.allCases[indexPath.row]])
  case .dislikes:
    person.dislikes.subtract([Person.Topic.allCases[indexPath.row]])
  case .glasses: // 3
    person.face.glasses = false
  default:
    break
  }
  collectionView.reloadData()
}
Here’s what you’re doing in each delegate method:
- Here, you specify that only the selected facial hair, glasses, likes and dislikes should be deselectable upon repeated tap. Deselection in any other section should only happen when the user selects another item in that same category.
- When the user deselects a facial hair style, likes or dislikes, you remove that deselected item from its respective set.
- When the user deselects the glasses feature, you set the
glassesBoolean tofalse.
Build and run the app. You should now see the desired selection behaviors:

You’ve now proven yourself a worthy commander of this powerful People Keeper technology. You’ve earned the right to wield your new weapon. On that day when a rival developer catches a glimpse of your People Keeper app, one powerful class will rise from the foundation to guard your states and protect against your evil competition…

Introducing UndoManager
UndoManager is a general-purpose undo stack that is capable of simplifying your app’s state management. It can store whatever object or UI states that you’d like to track along with a closure, method or invocation capable of traversing back and forth through those states. Although it simplifies undo/redo when implemented properly, a lesser rival developer will likely implement UndoManager in a way that leads to fatal bugs. The two undo stacks that follow demonstrate a flawed example and a more successful example.
Undo stack example #1
Undo Stack #1
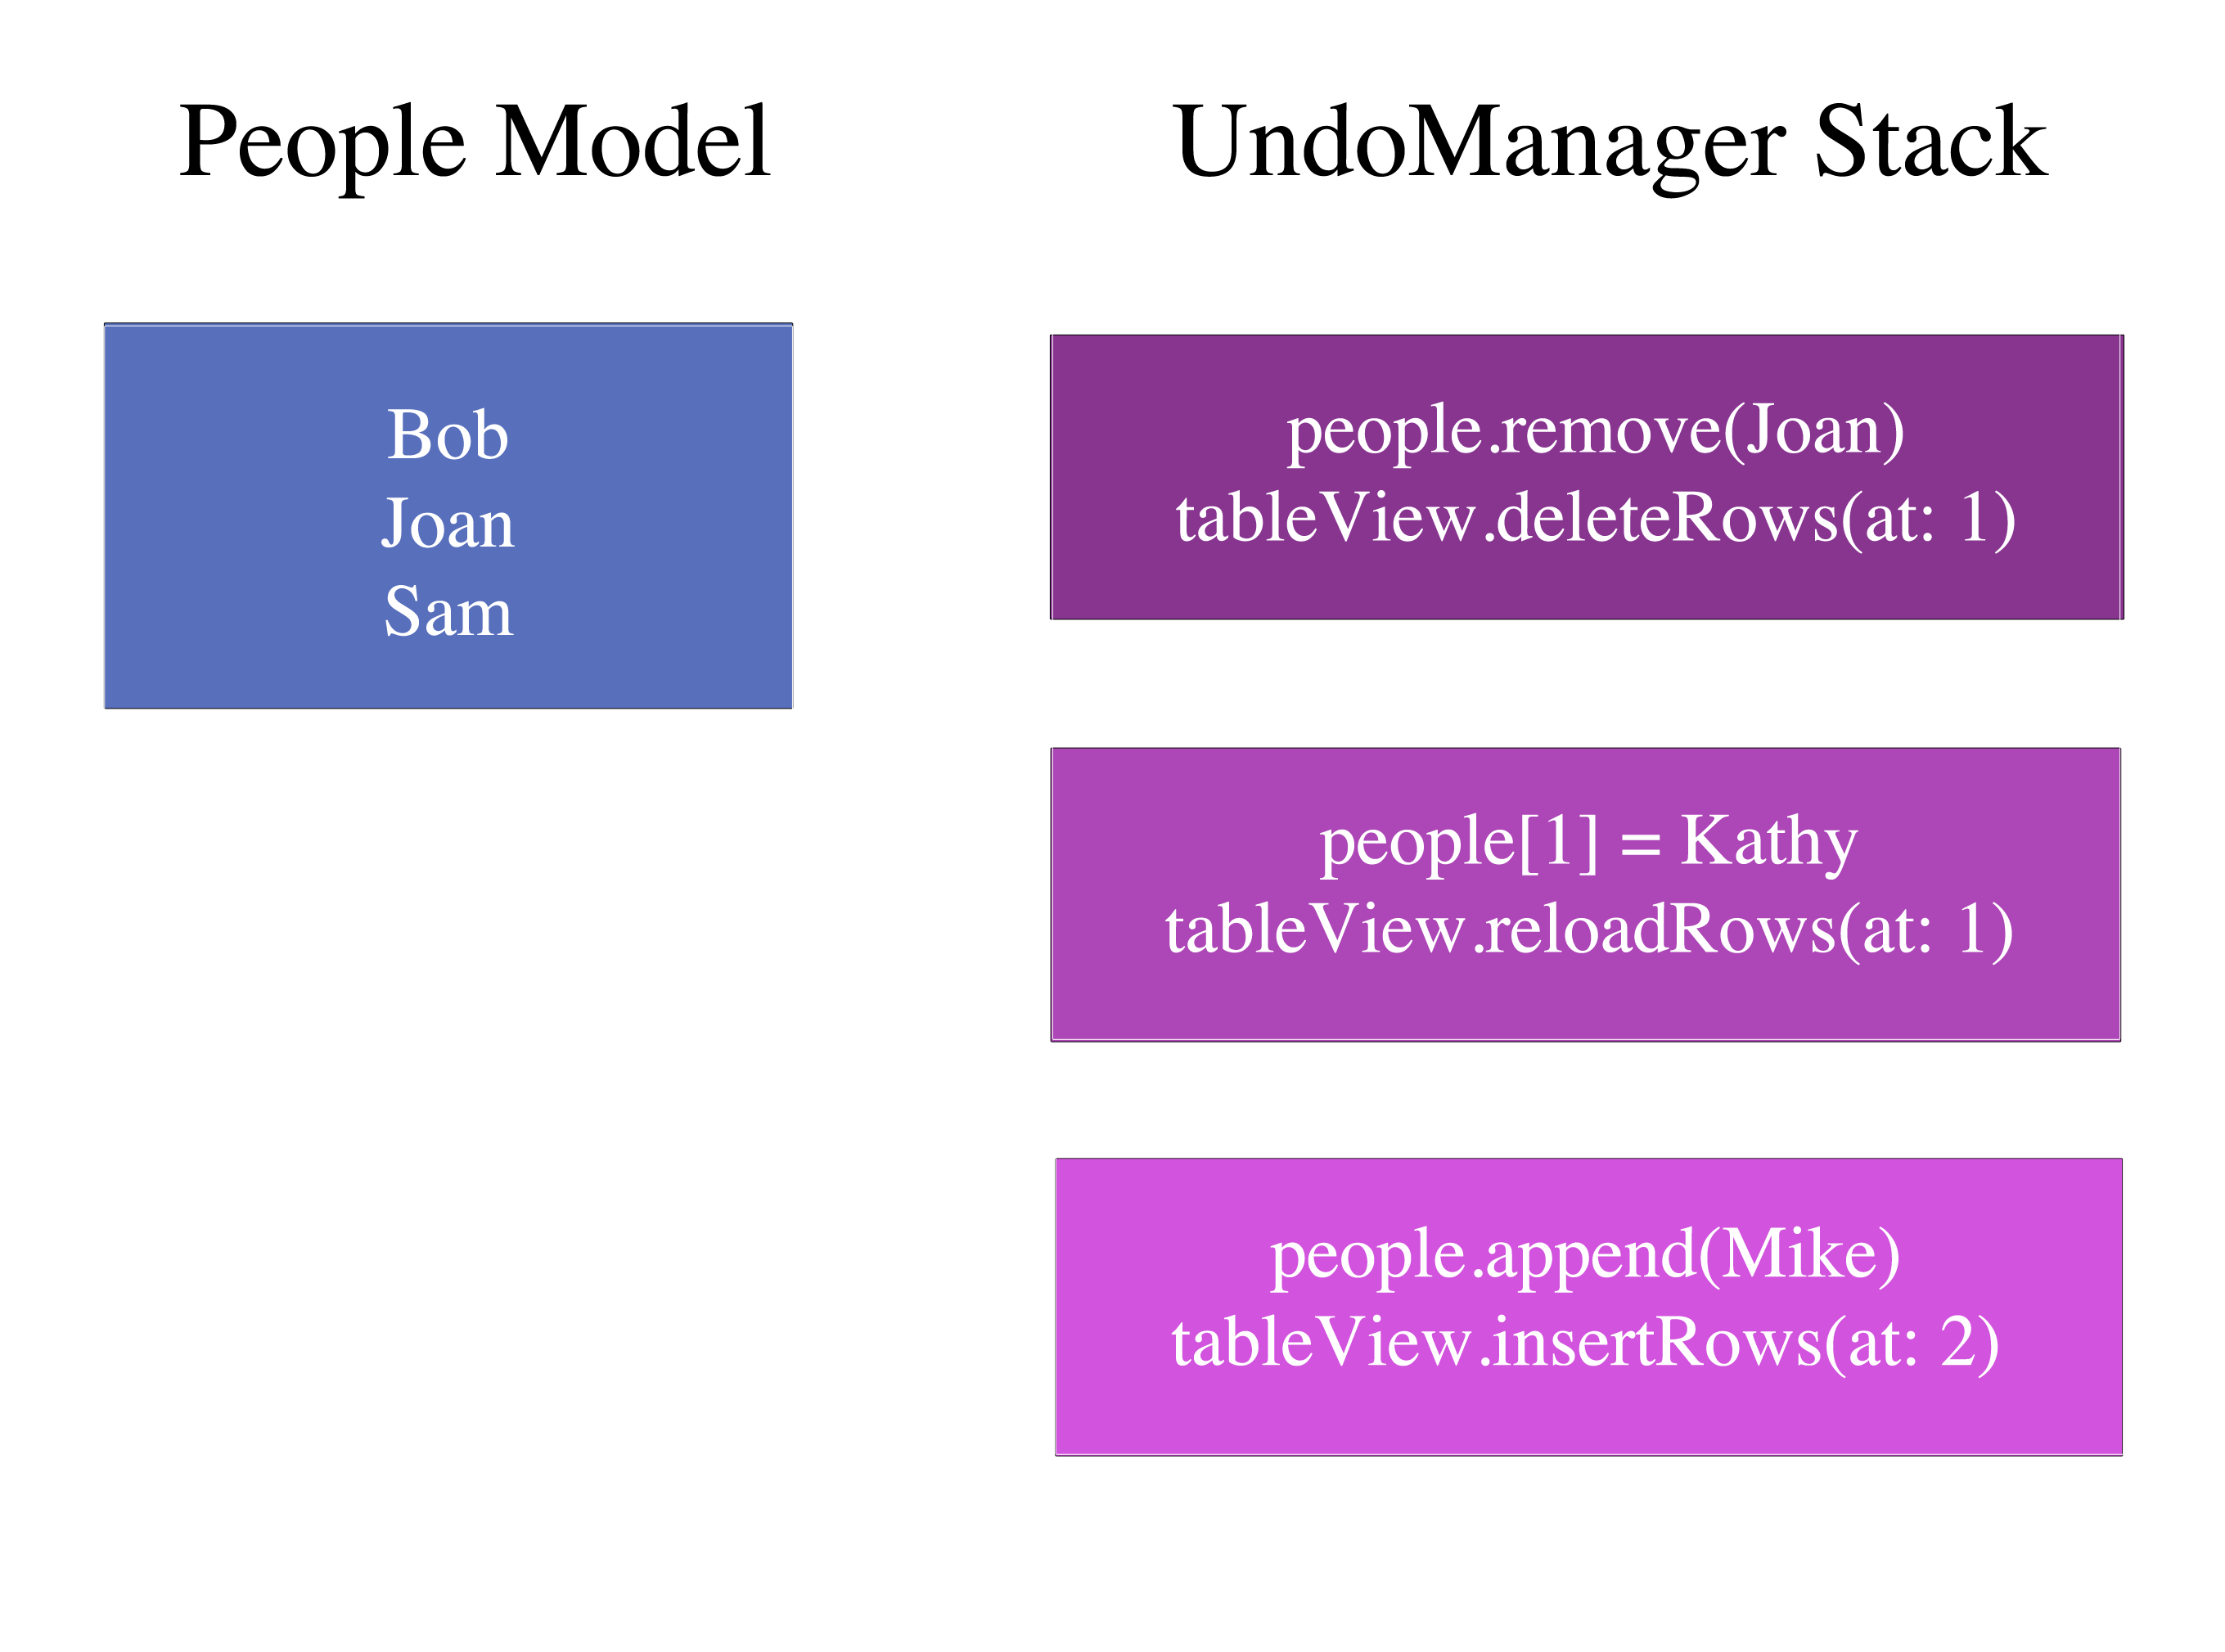
Undo Stack #1
Undo Stack #1 is a sequence of small steps that are each responsible for modifying the model and then the view to match. Though this strategy could work in theory, as the list of operations grows, errors become more likely because precisely matching each change in the model to each change in the view becomes increasingly difficult.
To understand why, here’s an exercise:
[spoiler title="Answer #1″]Bob, Sam[/spoiler]
[spoiler title="Answer #2″]Bob, Kathy[/spoiler]
[spoiler title="Answer #3″]Bob, Kathy, Mike[/spoiler]
- What does the model look like after you pop the first undo operation off the stack?
[spoiler title="Answer #1″]Bob, Sam[/spoiler]
- And the second?
[spoiler title="Answer #2″]Bob, Kathy[/spoiler]
- And the third?
[spoiler title="Answer #3″]Bob, Kathy, Mike[/spoiler]
Whether or not you got those answers right, perhaps you can imagine how multiple insertions and deletions can complicate the index calculation of following insertions, deletions or updates. This undo stack is order-dependent and mistakes can cause inconsistencies between your data model and view. Does this error sound familiar?
Model-view inconsistencies cause NSInternalInconsistencyExceptions.

Model-view inconsistencies cause NSInternalInconsistencyExceptions.
Undo stack example #2
To avoid the error in Undo stack example #1, instead of recording data model and UI changes separately, record entire models:
Undo Stack #2
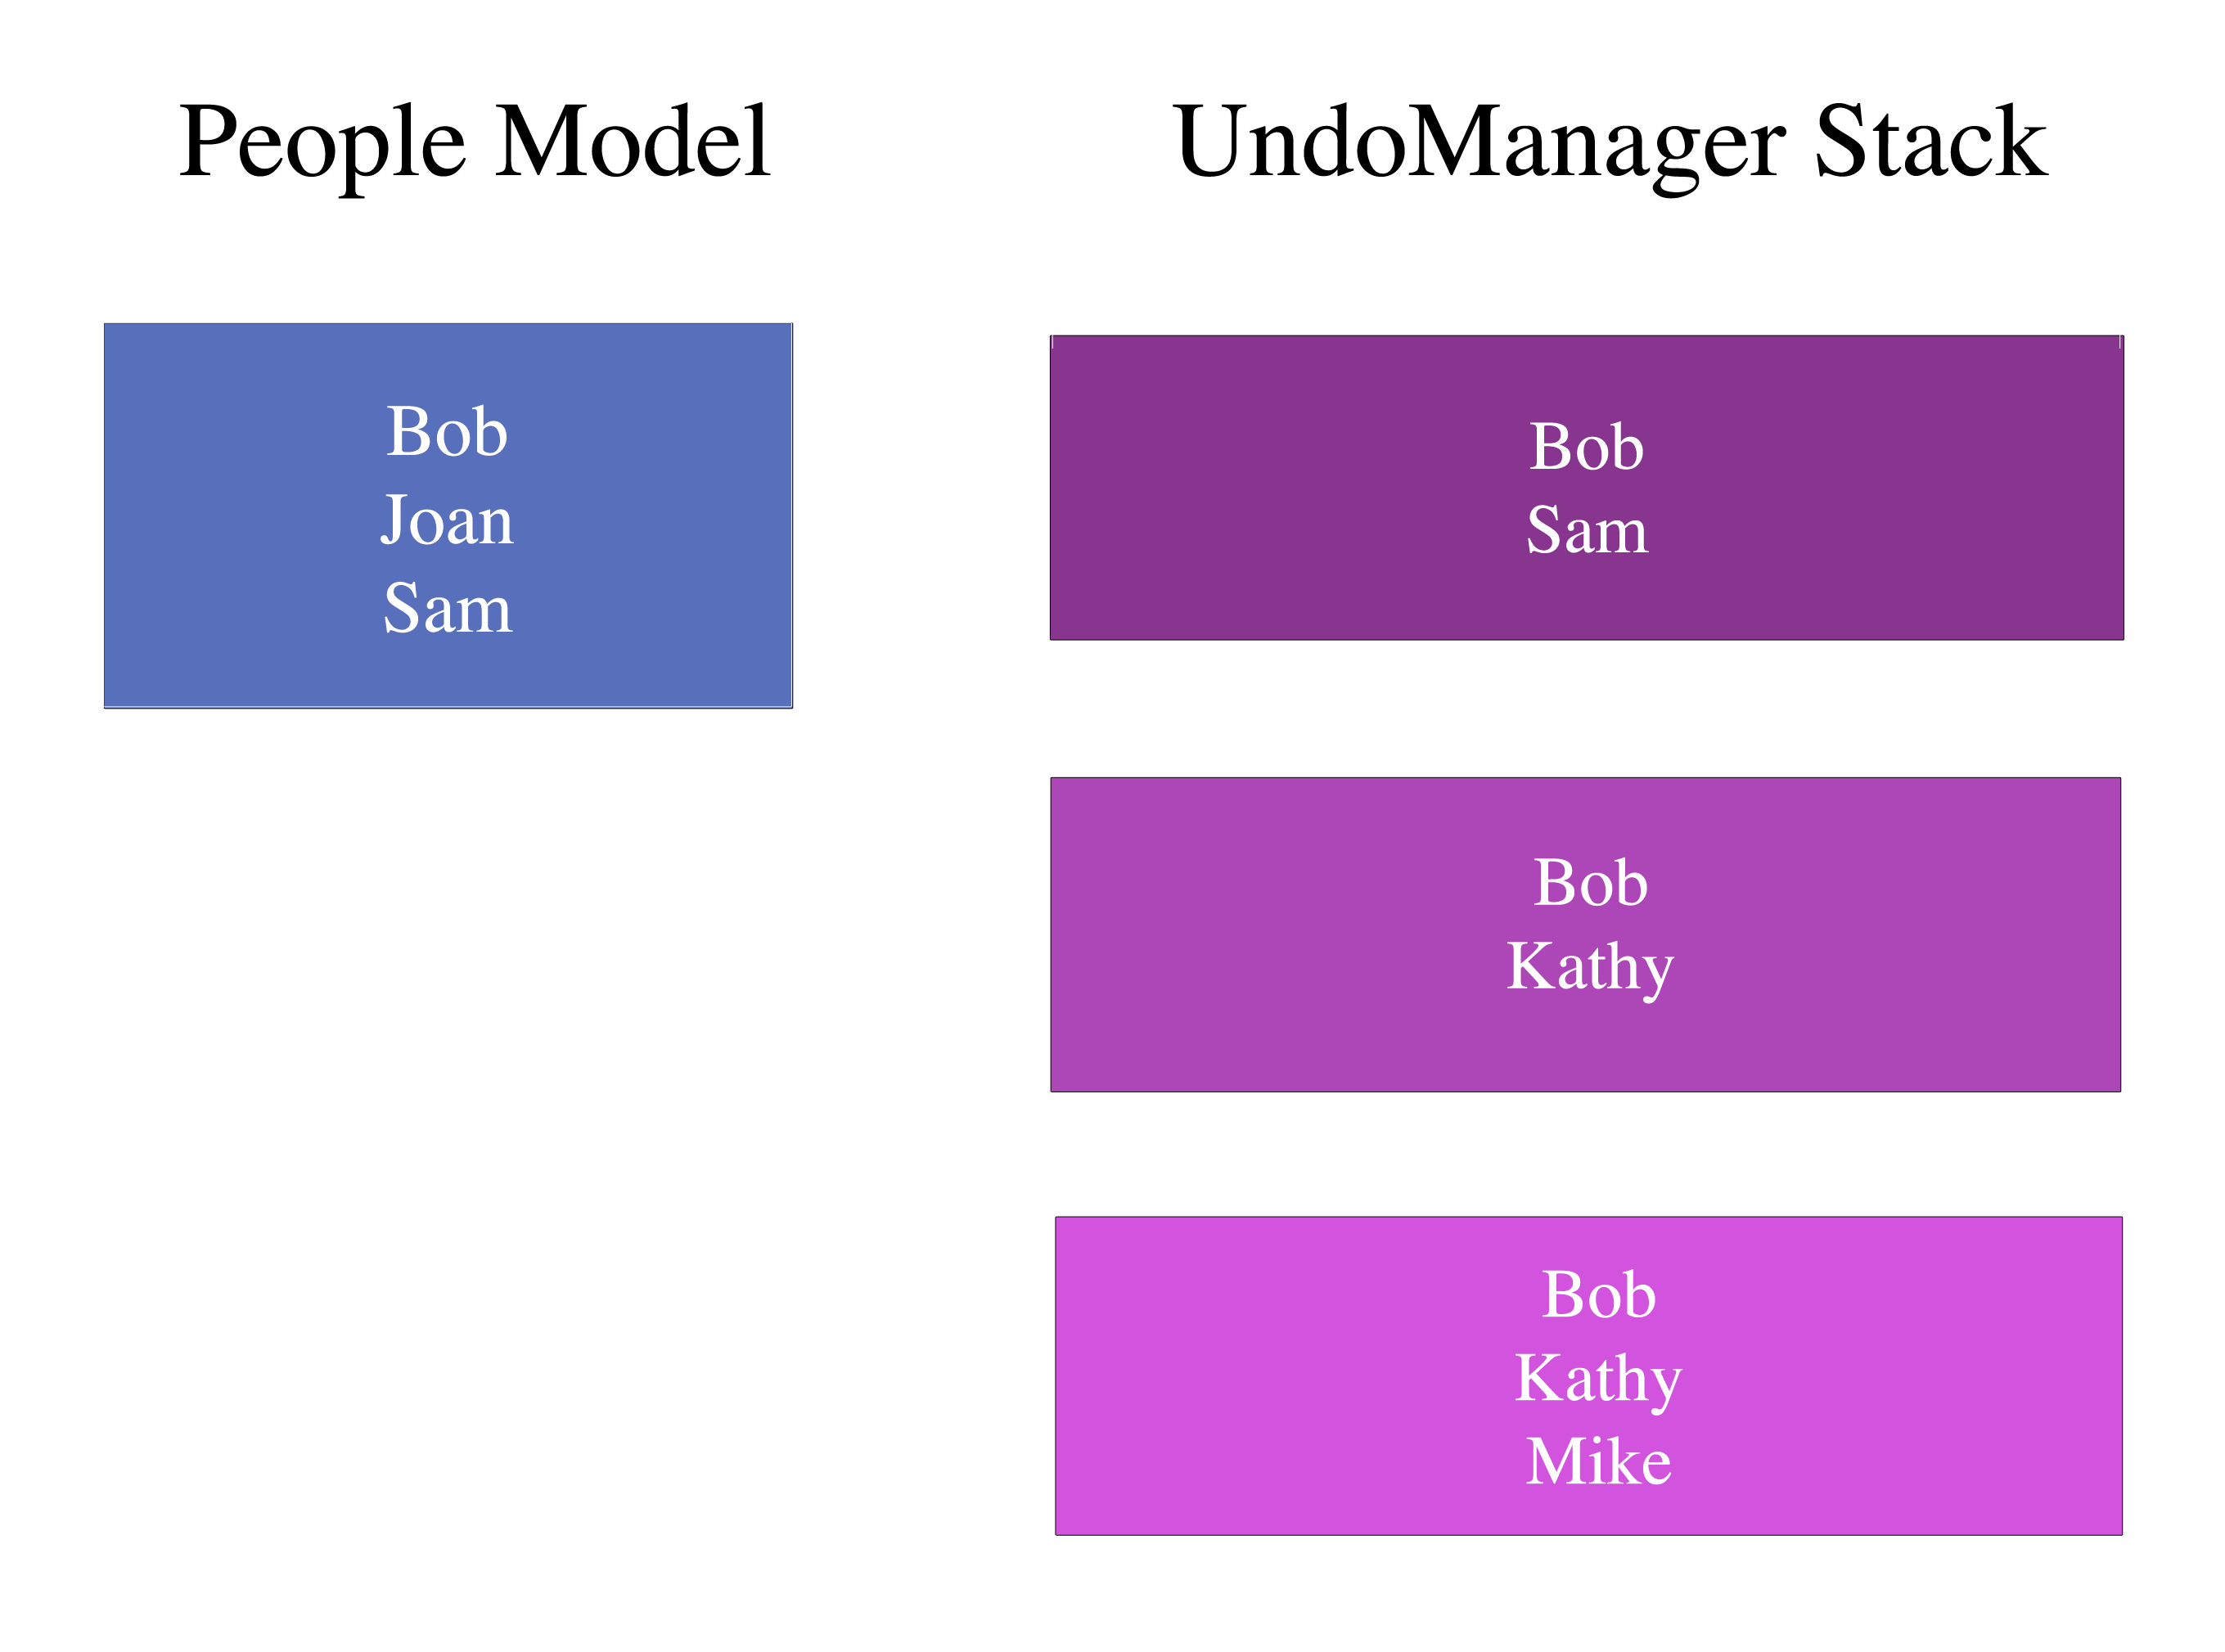
Undo Stack #2
To undo an operation, you can replace the current model with a model on the undo stack. Undo Stacks #1 and #2 do the same thing, but #2 is order-independent and thus less error prone.