An Introduction to Liquid Glass for iOS 26
Apple’s new Liquid Glass design language marks a major shift in iOS 26 UI design. Learn what Liquid Glass is, how it works across SwiftUI and UIKit, and what to watch out for when updating an existing iOS app. By Darryl Bayliss.
In June 2025 during WWDC Apple revealed a big shift to the look and feel of its user interface for its devices. Instead of sticking with the minimalist design it had relied on since iOS 7, Apple revealed it had been working on a new design langauge called Liquid Glass. A brand new way to design Apps across the entire Apple ecosystem. As the name suggests, this new design language encompasses ideas and concepts from the way glass works, using reflections and refractions to create layered applications.
With Liquid Glass now regularly available on devices, most apps need to consider how to adopt this new design language for themselves. In this tutorial you’ll go through some of the scenarios you may encounter when upgrading an iOS App to use Liquid Glass.
What is Liquid Glass?
Liquid Glass is Apple’s attempt to convey their belief that Hardware and Software should be closely entwined. They believe every device should work as one, resulting in a delightful and intuitive experience for the user.
The core part of this is a new design material Apple created, also called Liquid Glass. It mimics glass in the real world and provides translucency between layers, meaning light and colour can be refracted through layers. These layers help build up in Apps to create a sense of depth and complexity. Liquid Glass can also react to the users context, enlarging and disappearing as needed to ensure the user recieves timely information as they navigate through the App.
Below is an example of the Share Sheet in iOS 26. Take note of the light refracting through the sheet, and some of the colors seeping through to help give a sense of depth.
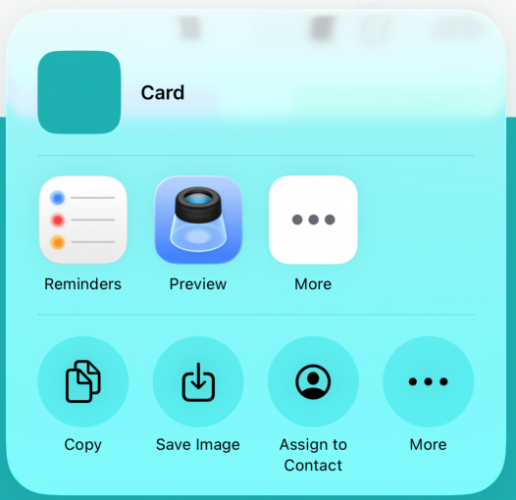
Next, lets look at how to adopt Liquid Glass in your Apps so you can begin to understand how it works yourself.
Getting Started with Liquid Glass
Building an app for iOS 26 requires a minimum of Xcode 26 to use. You can download the latest version of Xcode from the macOS App Store or beta builds via the Apple Developer Portal. Once you are setup with Xcode, make sure to also install the iOS 26 simulator.
When the simulator is installed, build and run your app using it. Once the app opens you should be able to see some differences to the UI. Below is an example of what you could see:
As you can see the tab bar is floating and rounded in the middle. If you were to hold your finger over it it would begin to shine and shimmer. Acting like a piece of glass responding to touch.
This is one of the great things about the way Apple has approached Liquid Glass. They have done much of the hard work for you by ensuring their own components use Liquid Glass. If you’re already using SwiftUI components to build your UI then you’ll benefit from these changes with minimal work required.
The same can be said for UIKit as well. If you’re using UIKit based components then Apple has also done the hard work and your components will automatically use Liquid Glass.
Whilst this will work for the majority of cases, you may find that there are that changes affect your app in ways in which you didn’t intend. At this point you need to go through your App Controls and decide what changes to make. In the next section you’ll learn how to do that.
Reviewing Your App Controls
As part of adopting Liquid Glass you will find parts of your App that look out of place. The controls might be too restricted, or the glass is having an unintended effect. It is at this point you need to go through your App screen by screen and look at how Liquid Glass has affected it. Good things to look out for are:
– Is the padding for a control too tight, do you need to add more?
– Is there a Glass effect that’s overlaying another part of the screen? Does this impact the look and feel of the screen?
– What about your Apps brand? Does it work well with Liquid Glass or does it need some design input to make it work as expected?
– What about Tab Bars and Toolbars? Are these working as they should or do they need updating to work with the new design?
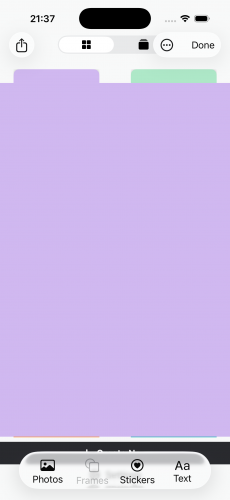
Looking at the App you saw earlier, here is an example of a screen where the Toolbar is a little too restricted after adopting Liquid Glass:
Obviously your users will notice this as it doesn’t look “polished”. It also impacts the touch surface of the Toolbar, where a users touch is restricted to the size of the Toolbar.
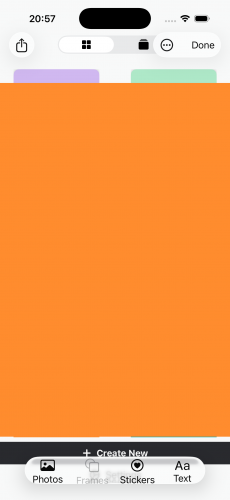
In this case, adding a simple `.padding(10)` modifier to the Toolbar is enough to fix the issue and give the control some space to breathe. Check out the next image below:

With a simple increase in padding the control nows alot more naturally placed and any users have more touch space to play with!
Enabling Compatability Mode for Liquid Glass
Now that you have a good idea how Liquid Glass works as a developer, you may still need to consider the business priorities of your job. It could be you find yourself in a position where Liquid Glass is too time consuming at the moment to support in your app. Fortunately Apple have provided a flag you can use to disable Liquid Glass within your App plist.
To do this, open your `Info.plist` and add the following key `UIDesignRequiresCompatability`. Ensure the type is a `Boolean` and set to `YES`.
Build and run the app using an iOS 26 device. You should notice all traces of Liquid Glass have disappeared!
This is a quick and easy way to push back thinking about Liquid Glass. Be aware though that there could be a time where Apple decides to remove this feature and you will be forced to upgrade your App UI.
Conclusion
In this tutorial you were introduced to Liquid Glass. You learned about how Liquid Glass differs to the minimalist design Apple previously relied on and also how easy it is to adopt Liquid Glass into your app.
You also learnt what to look out for when updating an existing App to use Liquid Glass and what changes you may need to ensure it works smoothly.
To continue learning about Liquid Glass, take a look at the Liquid Glass module in the What’s New in iOS 26 Program.