Overlays in Flutter: Getting Started
Learn Flutter’s own way to display overlays like popUps, modals and dialog boxes with the help of popUpRoutes. By Michael Malak.
Sign up/Sign in
With a free Kodeco account you can download source code, track your progress, bookmark, personalise your learner profile and more!
Create accountAlready a member of Kodeco? Sign in
Sign up/Sign in
With a free Kodeco account you can download source code, track your progress, bookmark, personalise your learner profile and more!
Create accountAlready a member of Kodeco? Sign in
Contents
Overlays in Flutter: Getting Started
25 mins
- Getting Started
- Setting up the Starter Project
- Understanding Overlays
- Viewing the Pop-up Menu to Sort Notes
- Showing Delete Confirmation Dialog
- Adding a Note as an Overlay
- Creating a Custom PopupRoute
- Using Custom PopupRoute when Adding a Note
- Understanding Overlay Widgets
- Opening Note Details Overlay
- Creating Overlay mixin
- Using Overlay Mixin to Edit a Note
- Removing the Overlay on Native Back Press
- Confirming Before Editing Notes
- Where to Go From Here?
Using Overlay Mixin to Edit a Note
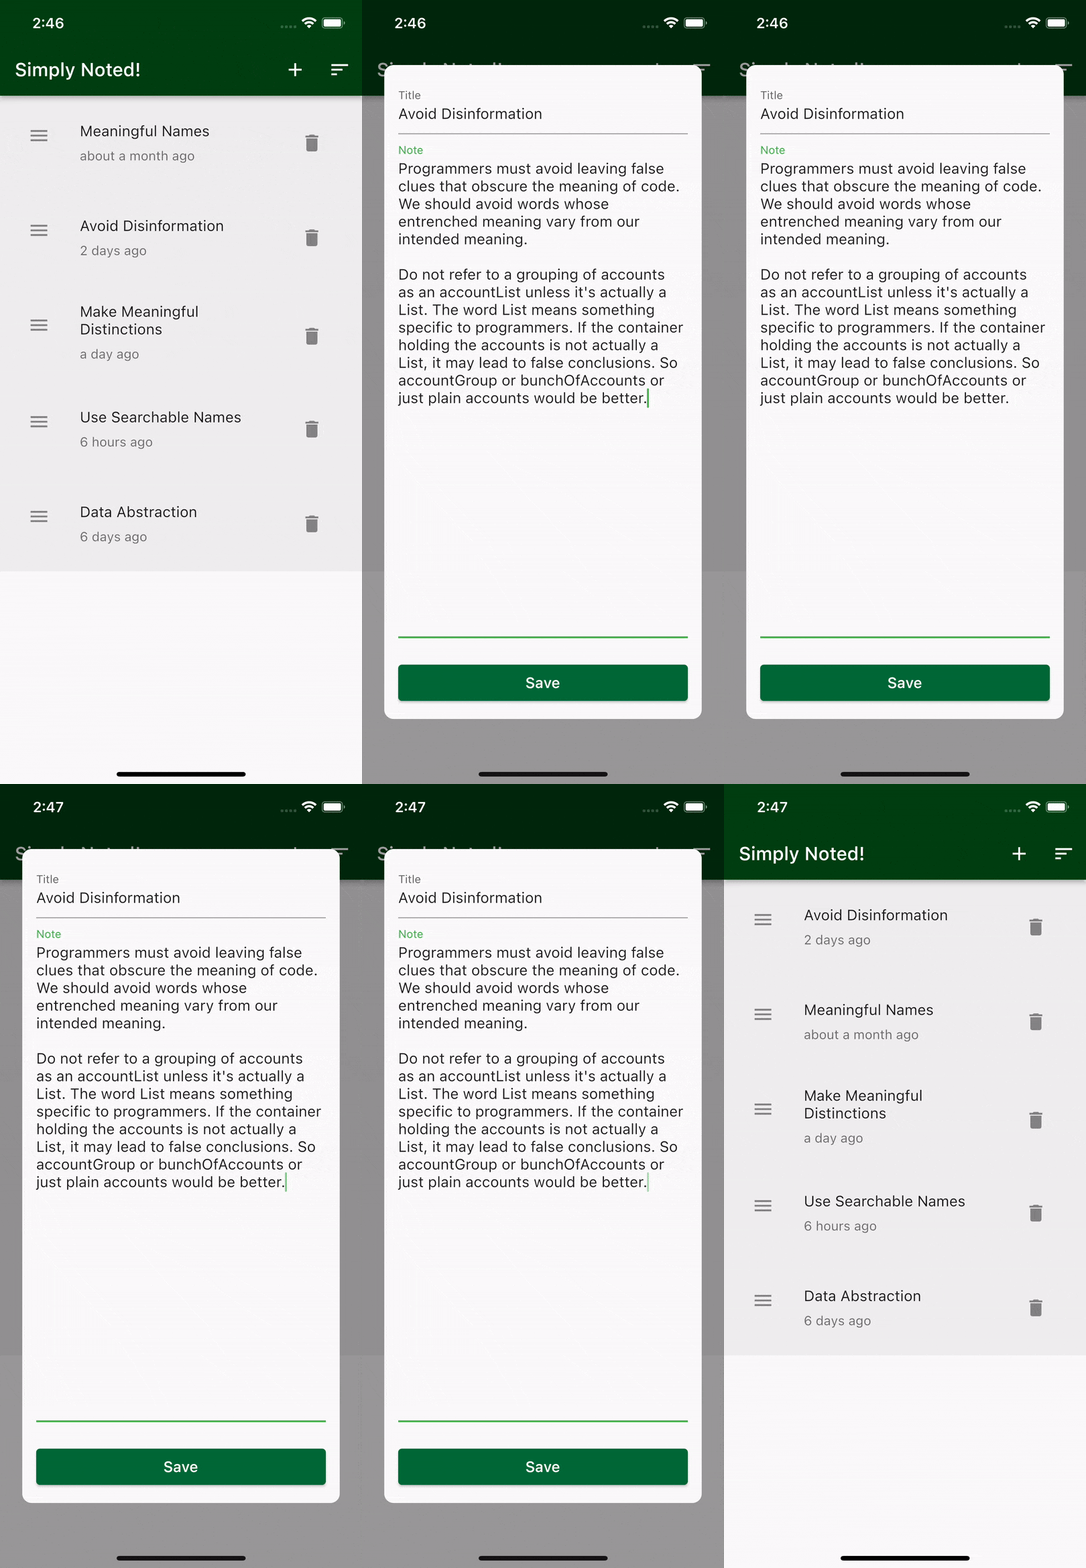
You want to show SaveNotePage widget as an overlay when you tap on a note item. This page will let you edit and save the note.
To achieve this, first go to lib/ui/notes/widgets/note_item_widget.dart, and at the top of the page add an import of your newly created overlay mixin:
import '../../_shared/mixin/overlay_mixin.dart';
Now, you can use the mixin with the _NoteItemWidgetState as the following:
class _NoteItemWidgetState extends State<NoteItemWidget>
    with OverlayStateMixin {
       ...
    }
Here, you are extending your _NoteItemWidgetState class with state of NoteItemWidget and adding the OverlayStateMixin with a with keyword.
Replace the code at /// TODO 4: Create and use OverlayMixin to show SaveNotePage as an overlay with:
void onNoteTap() {
  // 1
  toggleOverlay(
    SaveNotePage(

      // 2
      noteToEdit: note,

      // 3
      onNoteSaved: (editedNote) {
        widget.onEdit(editedNote);
        removeOverlay();
      },
    ),
  );
}
Here’s the breakdown of the code:
- In the
onNoteTap()function you call thetoggleOverlayto displaySaveNotePageas an overlay. - You pass the displayed note as an argument to
noteToEdit. - You implement callback function when you tap the save button which takes the
editedNoteas a parameter. Call thewidget.onEditfunction which will save theeditedNotethat you’ve passed as a parameter. This will save the notes and then remove the overlay by callingremoveOverlayfunction
Build and run. When you click a note item in the list, you’ll see the edit note overlay.
The edit overlay works as expected, but instead of closing the overlay when you tap your device’s back button, the app closes. You’ll solve this next.
Removing the Overlay on Native Back Press
Since you’re not using the Navigator to manage your overlay, the edit note overlay is not closed when you tap back on your device, even though you expect the modal to be closed.
While you’re in lib/ui/notes/widgets/note_item_widget.dart, replace the build function at /// TODO 5: Use [WillPopScope] and [isOverlayShown] to prevent popping the page when used with the Overlay with:
// 1
@override
Widget build(BuildContext context) => WillPopScope(
      onWillPop: () async {
        // 2
        if (isOverlayShown) {
          removeOverlay();
          return false;
        }
        return true;
      },
      child: buildListTile(),
    );
Here’s what you did:
- Wrap
buildListTile()withWillPopScope. The WillPopScope is triggered when a pop action is taking place. This has a methodonWillPopwhich pop’s a widget if the return istrueand prevents the pop if the return isfalse. - Implement
onWillPopcallback that vetos attempts to close theRoute. WhenisOverlayShownis true, you remove the overlay byremoveOverlayfunction and prevent closing the route by returning afalsevalue, otherwise, you allow closing it.
Build and run. Now, when you click back, the edit note overlay should close.
Overlay widget under the hood.Confirming Before Editing Notes
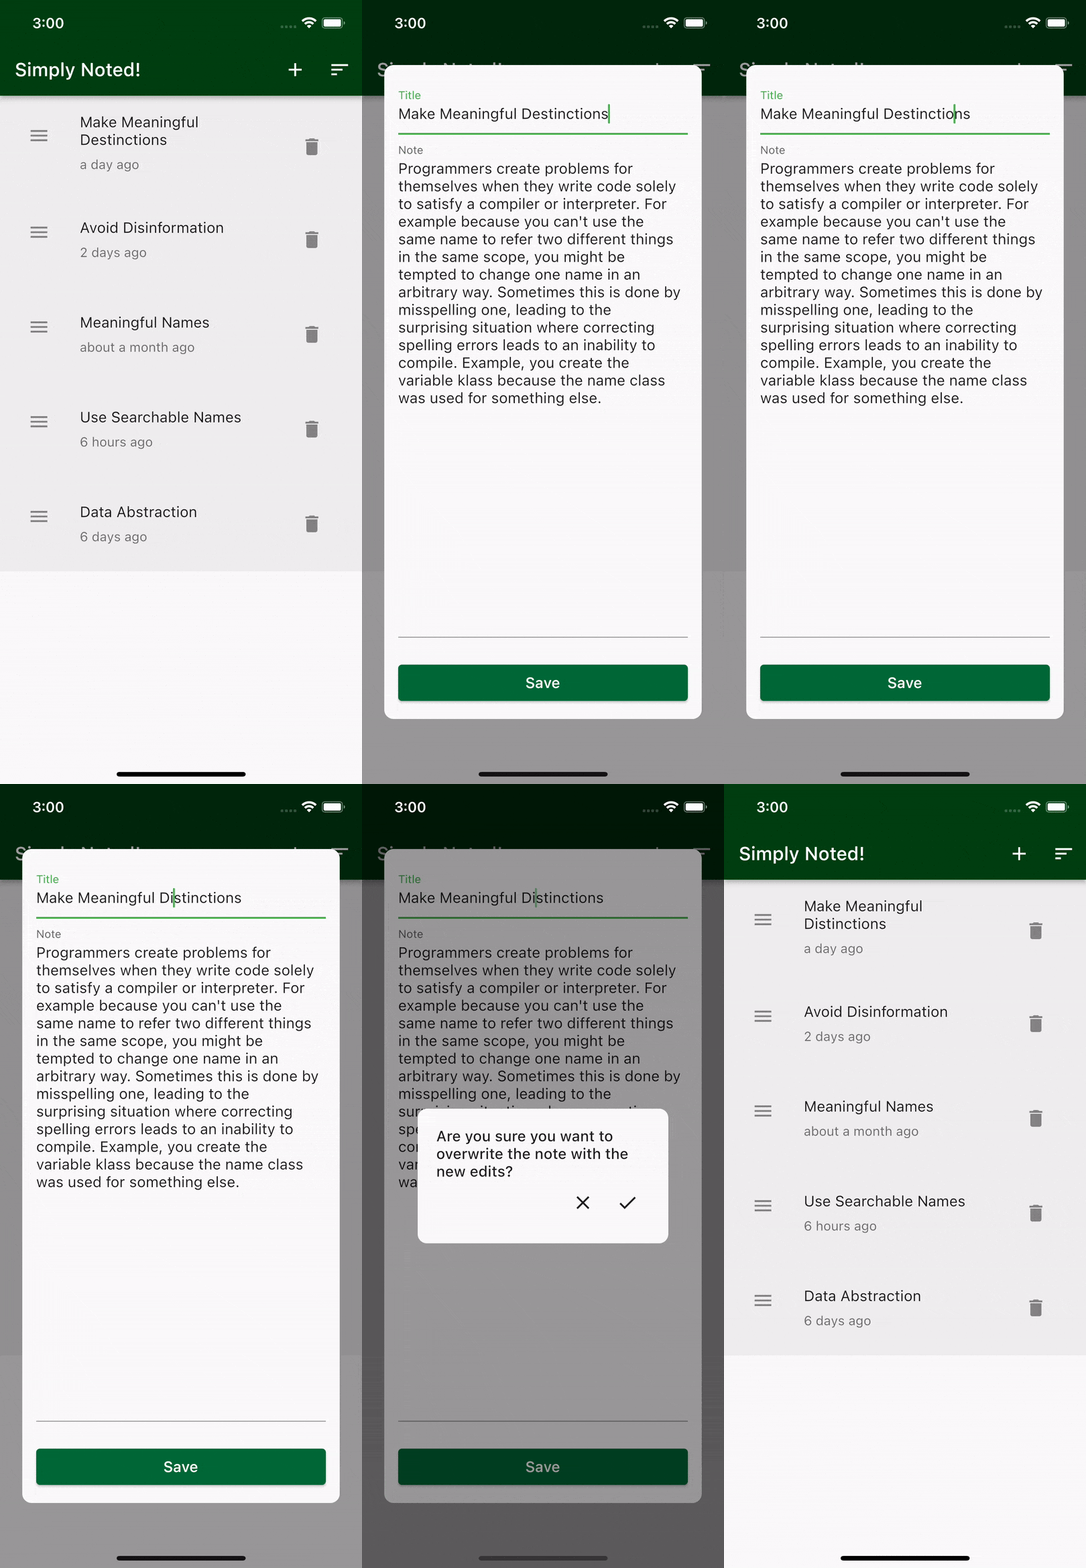
Now that you have already viewed an overlay to edit a note item, you want to show another overlay on top of it to confirm editing before saving it to the cache.
Head to lib/ui/save_note/save_note_page.dart, and add the following imports at the top of the file:
import '../_shared/mixin/overlay_mixin.dart';
import 'widgets/save_note_confirmation_widget.dart';
You can now add OverlayStateMixin to _SaveNotePageState as follows:
class _SaveNotePageState extends State<SaveNotePage> with OverlayStateMixin {
Add the following getters to the body of code>_SaveNotePageState:
// 1
bool get hasChanges {

  // 2
  final isHeaderChanged = widget.noteToEdit?.header != note.header;
  final isTextChanged = widget.noteToEdit?.text != note.text;
  return isHeaderChanged || isTextChanged;
}

// 3
bool get isEditMode => widget.noteToEdit != null;
- Add a getter to get a
boolif the note has been edited. - Detect if either the header or the text body has been modified.
- If
widget.noteToEditis passed to the widget, then it’s in edit mode.
Replace the code beneath /// TODO 6: Check page has edits and show confirmation overlay before saving the edits with:
// 1
if (isEditMode && hasChanges) {
  toggleOverlay(
    SaveNoteConfirmationWidget(
      // 2
      onConfirm: () => widget.onNoteSaved(note),
      onCancel: removeOverlay,
    ),
  );
} else {
  // 3
  widget.onNoteSaved(note);
}
Here’s what’s happening above:
- In the conditionals, if the note is in edit mode and has been modified, you show an overlay displaying
SaveNoteConfirmationWidget. This has two buttons; one to confirm the save and other to cancel the save. - When you tap confirm button, you save the note by calling the
onNoteSavedcallback function and pass the edited note as a parameter. When you tap cancel, you remove the overlay by calling theremoveOverlayfunction. - In case you’re not in edit mode or the note has changes, you trigger
onNoteSavedcallback, the else part of the conditionals.
Build and run. When you edit a note and modify the text, you get a confirmation overlay before you save the edits.
Congratulations again, you have successfully created overlays in Flutter that you can use accordingly.
Where to Go From Here?
Download the completed project files by clicking the Download Materials button at the top or bottom of the tutorial.
You now have a deeper understanding of overlays in Flutter and, more importantly, when and how to use them. When you find the need, you can create your own PopupRoute or implement your own way of handling the Overlay widget.
Check out the following links to learn more about some of the concepts in this tutorial:
-
Flutter docs on
Overlay. - Read more about
AnchoredOverlayfor implementing a more customizable overlay. -
Flutter docs
PopupRoute.
We hope you enjoyed this tutorial. If you have any questions or comments, please join the forum discussion below!


