Sharing Core Data With CloudKit in SwiftUI
Learn to share data between CoreData and CloudKit in a SwiftUI app. By Marc Aupont.
Accepting Share Invitations
Now that you’ve sent an invitation to your second user, you need to set the app to accept the invitation and add the data into the shared store. Navigate to AppDelegate.swift and you’ll see SceneDelegate is empty. Here, you’ll add the code to accept the share.
The first step is to implement the UIKit scene delegate method windowScene(_:userDidAcceptCloudKitShareWith:). When the user taps the link that was shared earlier and accepts the invitation, the delegate calls this method and launches the app. Add the following method to SceneDelegate:
func windowScene(
  _ windowScene: UIWindowScene,
  userDidAcceptCloudKitShareWith cloudKitShareMetadata: CKShare.Metadata
) {
  let shareStore = CoreDataStack.shared.sharedPersistentStore
  let persistentContainer = CoreDataStack.shared.persistentContainer
  persistentContainer.acceptShareInvitations(
    from: [cloudKitShareMetadata], into: shareStore
  ) { _, error in
    if let error = error {
      print("acceptShareInvitation error :\(error)")
    }
  }
}
This code first gets a reference to the sharedPersistentStore that you created in the beginning of this tutorial. New in iOS 15 is acceptShareInvitations(from:into:completion:). persistentContainer calls this method. It accepts the share and adds the necessary metadata into the sharedPersistentStore. That’s it!
Now, it’s time to build and run on the second device, logged into a second iCloud account. If you sent the invitation from a real device, that can be a simulator.
When the app comes up, you’ll notice the shared journal entry doesn’t show up. This is because you haven’t accepted the invitation yet. At this point, if you shared the invitation via text message, open Messages and tap the invitation.

When the dialog asks whether you would like to open the invitation, choose Open.

You now see the shared entry on your second device. Amazing!

Fetching Shared Data
To this point, you’ve created a journal entry and shared it with another user. Once you accept the share on the second device, it’s now part of your shared zone in iCloud. Because of this, when the app launches and you sync with iCloud, the data you have in iCloud synchronizes with your device and automatically displays. However, you don’t have any metadata about the share. The end goal is not only to display shared entries but also to get information about the people participating in the share.
To achieve this, you’ll implement fetchShares(matching:). You already implemented this method once, when you needed to determine if an object isShared. Open CoreDataStack.swift and add the following code to the extension:
func getShare(_ destination: Destination) -> CKShare? {
  guard isShared(object: destination) else { return nil }
  guard let shareDictionary = try? persistentContainer.fetchShares(matching: [destination.objectID]),
    let share = shareDictionary[destination.objectID] else {
    print("Unable to get CKShare")
    return nil
  }
  share[CKShare.SystemFieldKey.title] = destination.caption
  return share
}
The code above does the following:
- Checks whether the object is shared. If it doesn’t have an associated share record, there’s no need to continue.
- Using
fetchShares(matching:), returns a dictionary of the matchingNSManagedObjectID‘s and their associatedCKShare. - Extracts
CKSharefrom the dictionary. - Sets the title of the share, using the caption of the
destination. - Returns
CKShare.
To use this new method, open DestinationDetailView.swift. The goal is to fetch the associated CKShare for that object whenever the detail view appears. Add the following code as one of the modifiers for your List:
.onAppear(perform: {
  self.share = stack.getShare(destination)
})
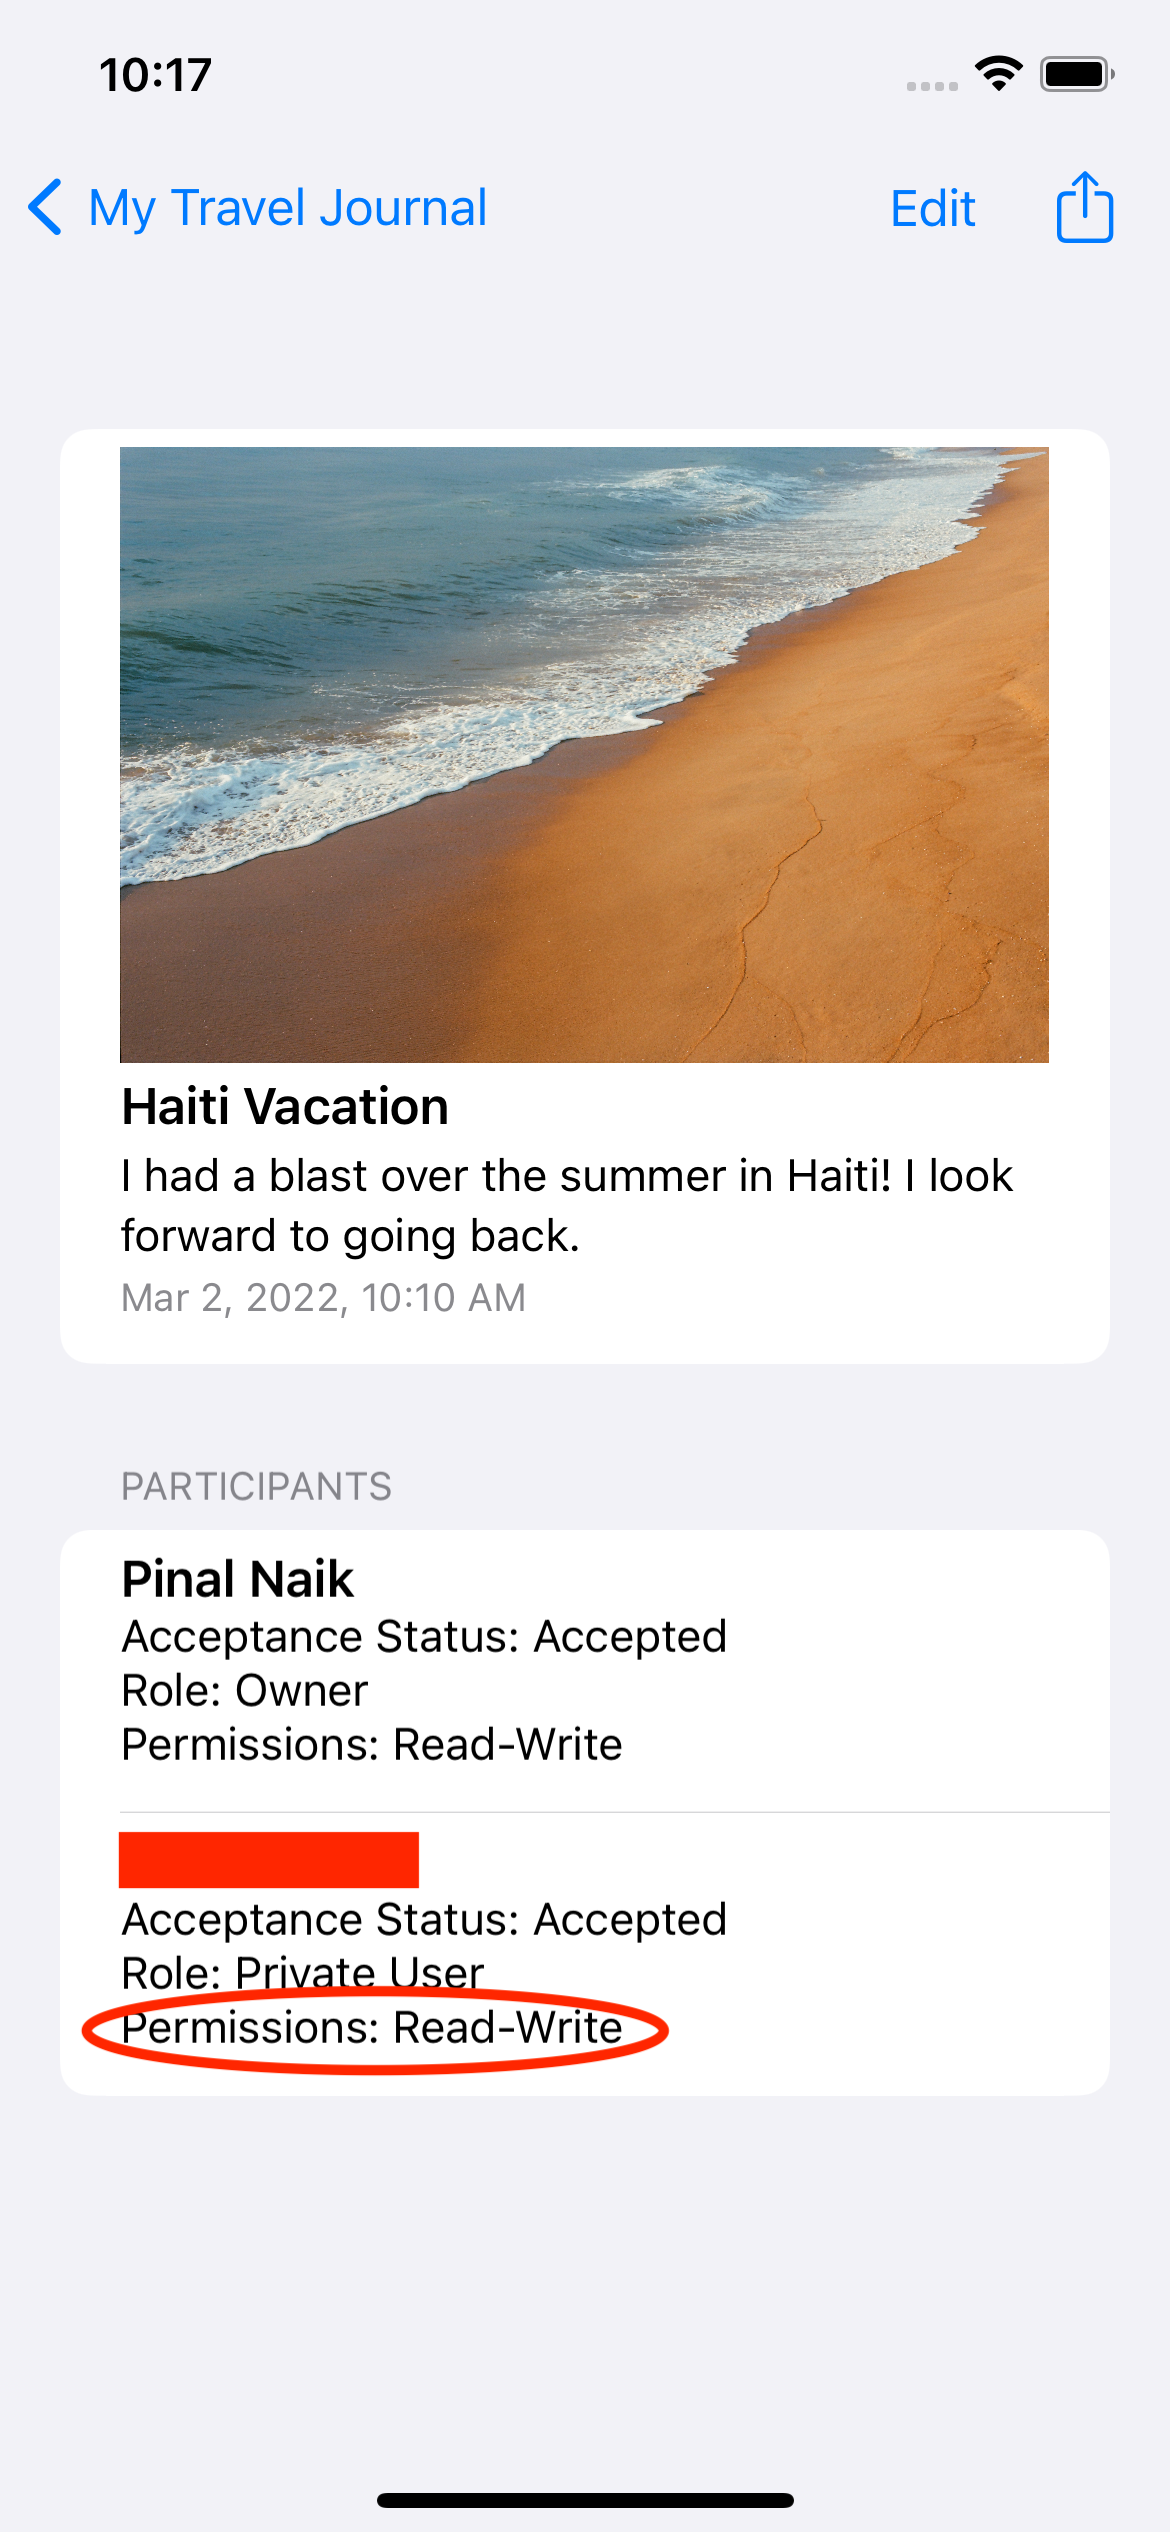
This code uses getShare(_:) and retrieves CKShare. You need to extract information about the participants of this share. With this code in place, build and run on your second device. Tap the shared object to go to the detail screen. See that data now exists at the bottom in the Participants section.

Notice the role and permission for each user. One user shows up as a Owner and the other as a Private User, with both users having Read-Write permissions. This means not only the owner but also the second user can modify the data shared with them.
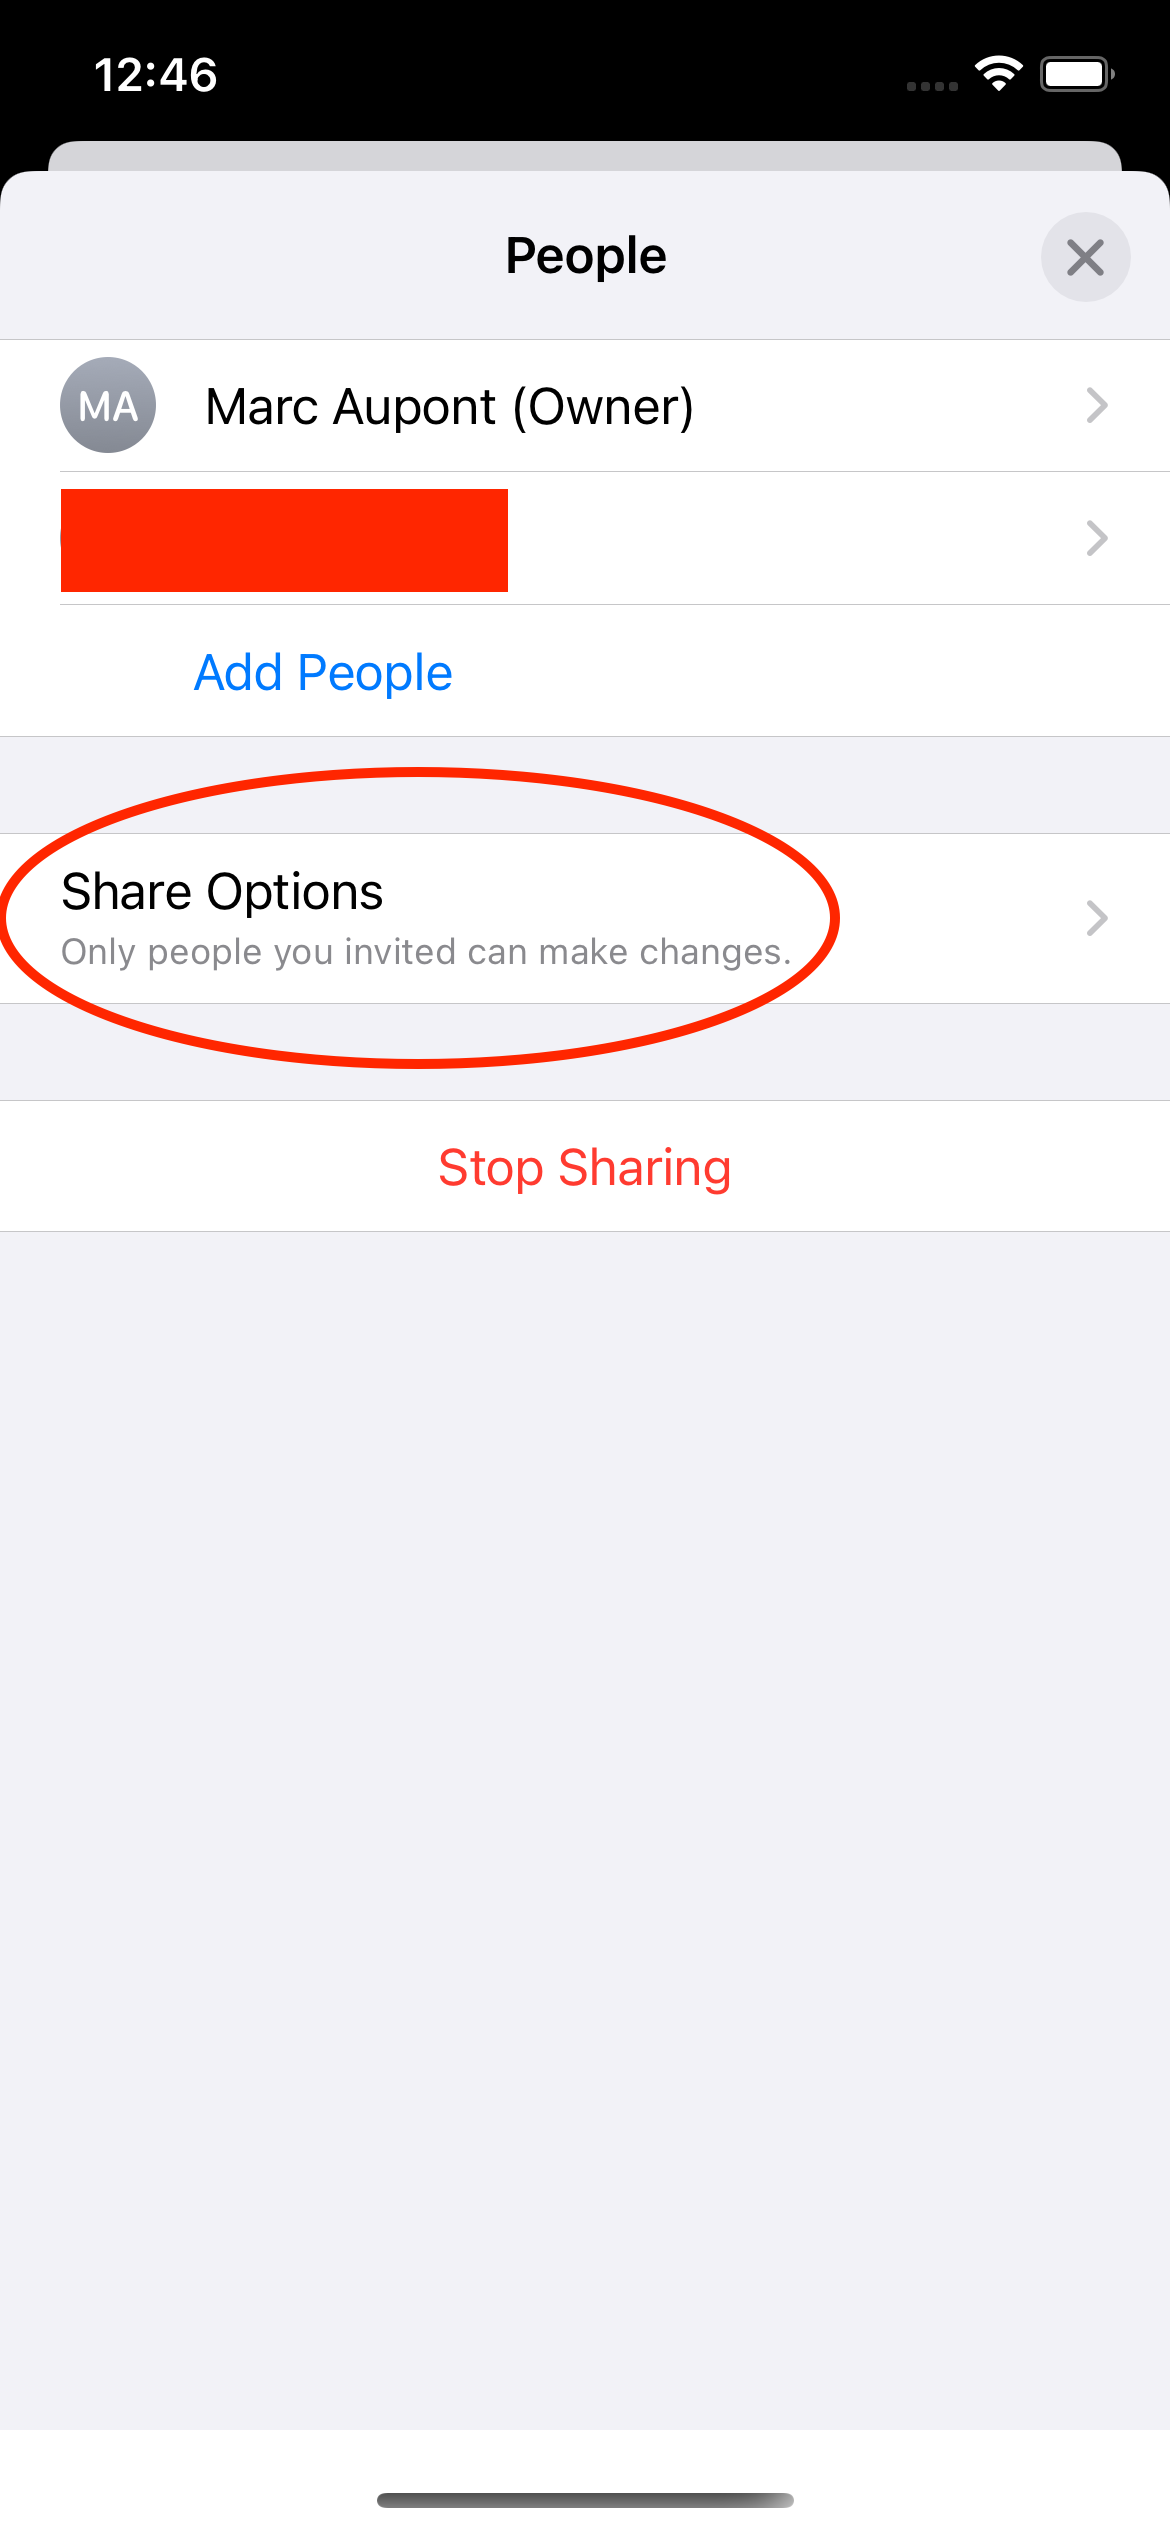
To change the permissions and access to this data, Apple has done all the heavy lifting for you. Go to the first device you created the share from, because you need to be the Owner to access the Share Options. Build and run, then perform the following steps:
- Tap the entry you want to update the permissions for.
- From the details screen, tap the Share action.
- Notice
CloudSharingViewlaunches in a new context based on the information it has aboutCKShare. From this screen, you can update permissions globally or for a specific participant. Select Share Options and update the permission to View only. Everyone with access to this share will have only Read access.
Notice the user can currently read and write for the entry the permissions are being modified for.
Observe CloudSharingView in the context of updating permissions.
Look at the share options. Change the permission to View only.

Build and run again. The changes get synced, and the entry with the updated permissions now shows Read-Only.

Displaying Private Data Versus Shared Data
At the moment, when you launch the app, entries in your journal all look the same. The only way to distinguish the private records versus shared records is to tap the detail and view the role in the participant’s list. To improve this, go back to HomeView.swift. Then, replace the following code:
VStack(alignment: .leading) {
  Image(uiImage: UIImage(data: destination.image ?? Data()) ?? UIImage())
    .resizable()
    .scaledToFill()

  Text(destination.caption)
    .font(.title3)
    .foregroundColor(.primary)

  Text(destination.details)
    .font(.callout)
    .foregroundColor(.secondary)
    .multilineTextAlignment(.leading)
}
With the following code:
VStack(alignment: .leading) {
  Image(uiImage: UIImage(data: destination.image ?? Data()) ?? UIImage())
    .resizable()
    .scaledToFill()

  Text(destination.caption)
    .font(.title3)
    .foregroundColor(.primary)

  Text(destination.details)
    .font(.callout)
    .foregroundColor(.secondary)
    .multilineTextAlignment(.leading)

  if stack.isShared(object: destination) {
    Image(systemName: "person.3.fill")
      .resizable()
      .scaledToFit()
      .frame(width: 30)
  }
}
This code uses isShared to determine whether a record is part of a share. Build and run. Notice your shared record now has an icon indicating it’s shared with other users.

Challenge Time
To improve the app further, consider the user’s role and permission before allowing specific actions such as editing or deleting a record.
Challenge One
Using canUpdateRecord(forManagedObjectWith:) and canDeleteRecord(forManagedObjectWith:) on persistentContainer, adjust the view logic so it considers permissions.
Were you able to figure it out? See the solution below:
[spoiler title="Solution 1″]
Open CoreDataStack.swift. Under isShared(object:), add the following methods:
func canEdit(object: NSManagedObject) -> Bool {
  return persistentContainer.canUpdateRecord(
    forManagedObjectWith: object.objectID
  )
}
func canDelete(object: NSManagedObject) -> Bool {
  return persistentContainer.canDeleteRecord(
    forManagedObjectWith: object.objectID
  )
}
These methods return a Boolean based on the object’s permissions.
Next, open DestinationDetailView.swift. Look for the ToolBarItem that contains the Text("Edit") button. Add the following modifier to the Button:
.disabled(!stack.canEdit(object: destination))
The edit button is now disabled, unless you have read/write permissions for this data.
Last, open HomeView.swift and look for the swipeActions modifier. Now, you should see a Button with Label("Delete", systemImage: "trash"). Add the following modifier to the Button:
.disabled(!stack.canDelete(object: destination))
With this code in place, only users with the proper permissions can perform actions like editing or deleting.
[/spoiler]