Using TimelineView and Canvas in SwiftUI
Learn how to use TimelineView and Canvas in SwiftUI and combine them to produce animated graphics. By Bill Morefield.
Sign up/Sign in
With a free Kodeco account you can download source code, track your progress, bookmark, personalise your learner profile and more!
Create accountAlready a member of Kodeco? Sign in
Sign up/Sign in
With a free Kodeco account you can download source code, track your progress, bookmark, personalise your learner profile and more!
Create accountAlready a member of Kodeco? Sign in
Sign up/Sign in
With a free Kodeco account you can download source code, track your progress, bookmark, personalise your learner profile and more!
Create accountAlready a member of Kodeco? Sign in
Contents
Using TimelineView and Canvas in SwiftUI
30 mins
Every version of SwiftUI brings new features and new views. Some expand SwiftUI with additional features in UIKit or AppKit, while others add new and unique functionality. The third version of SwiftUI, which arrived with iOS 15 and corresponding operating systems, brought higher-performance drawing with the canvas view. It also introduced a new, time-based method to update views, which is called TimelineView
.
In this tutorial, you’ll learn how to:
- Use
Canvas
andTimelineView
. - Combine these two to produce animated graphics in the form of a clock.
It’s time to start!
Getting Started
Download the starter project by clicking Download Materials at the top or bottom of this tutorial. Open the project in the starter directory in Xcode. Build and run.
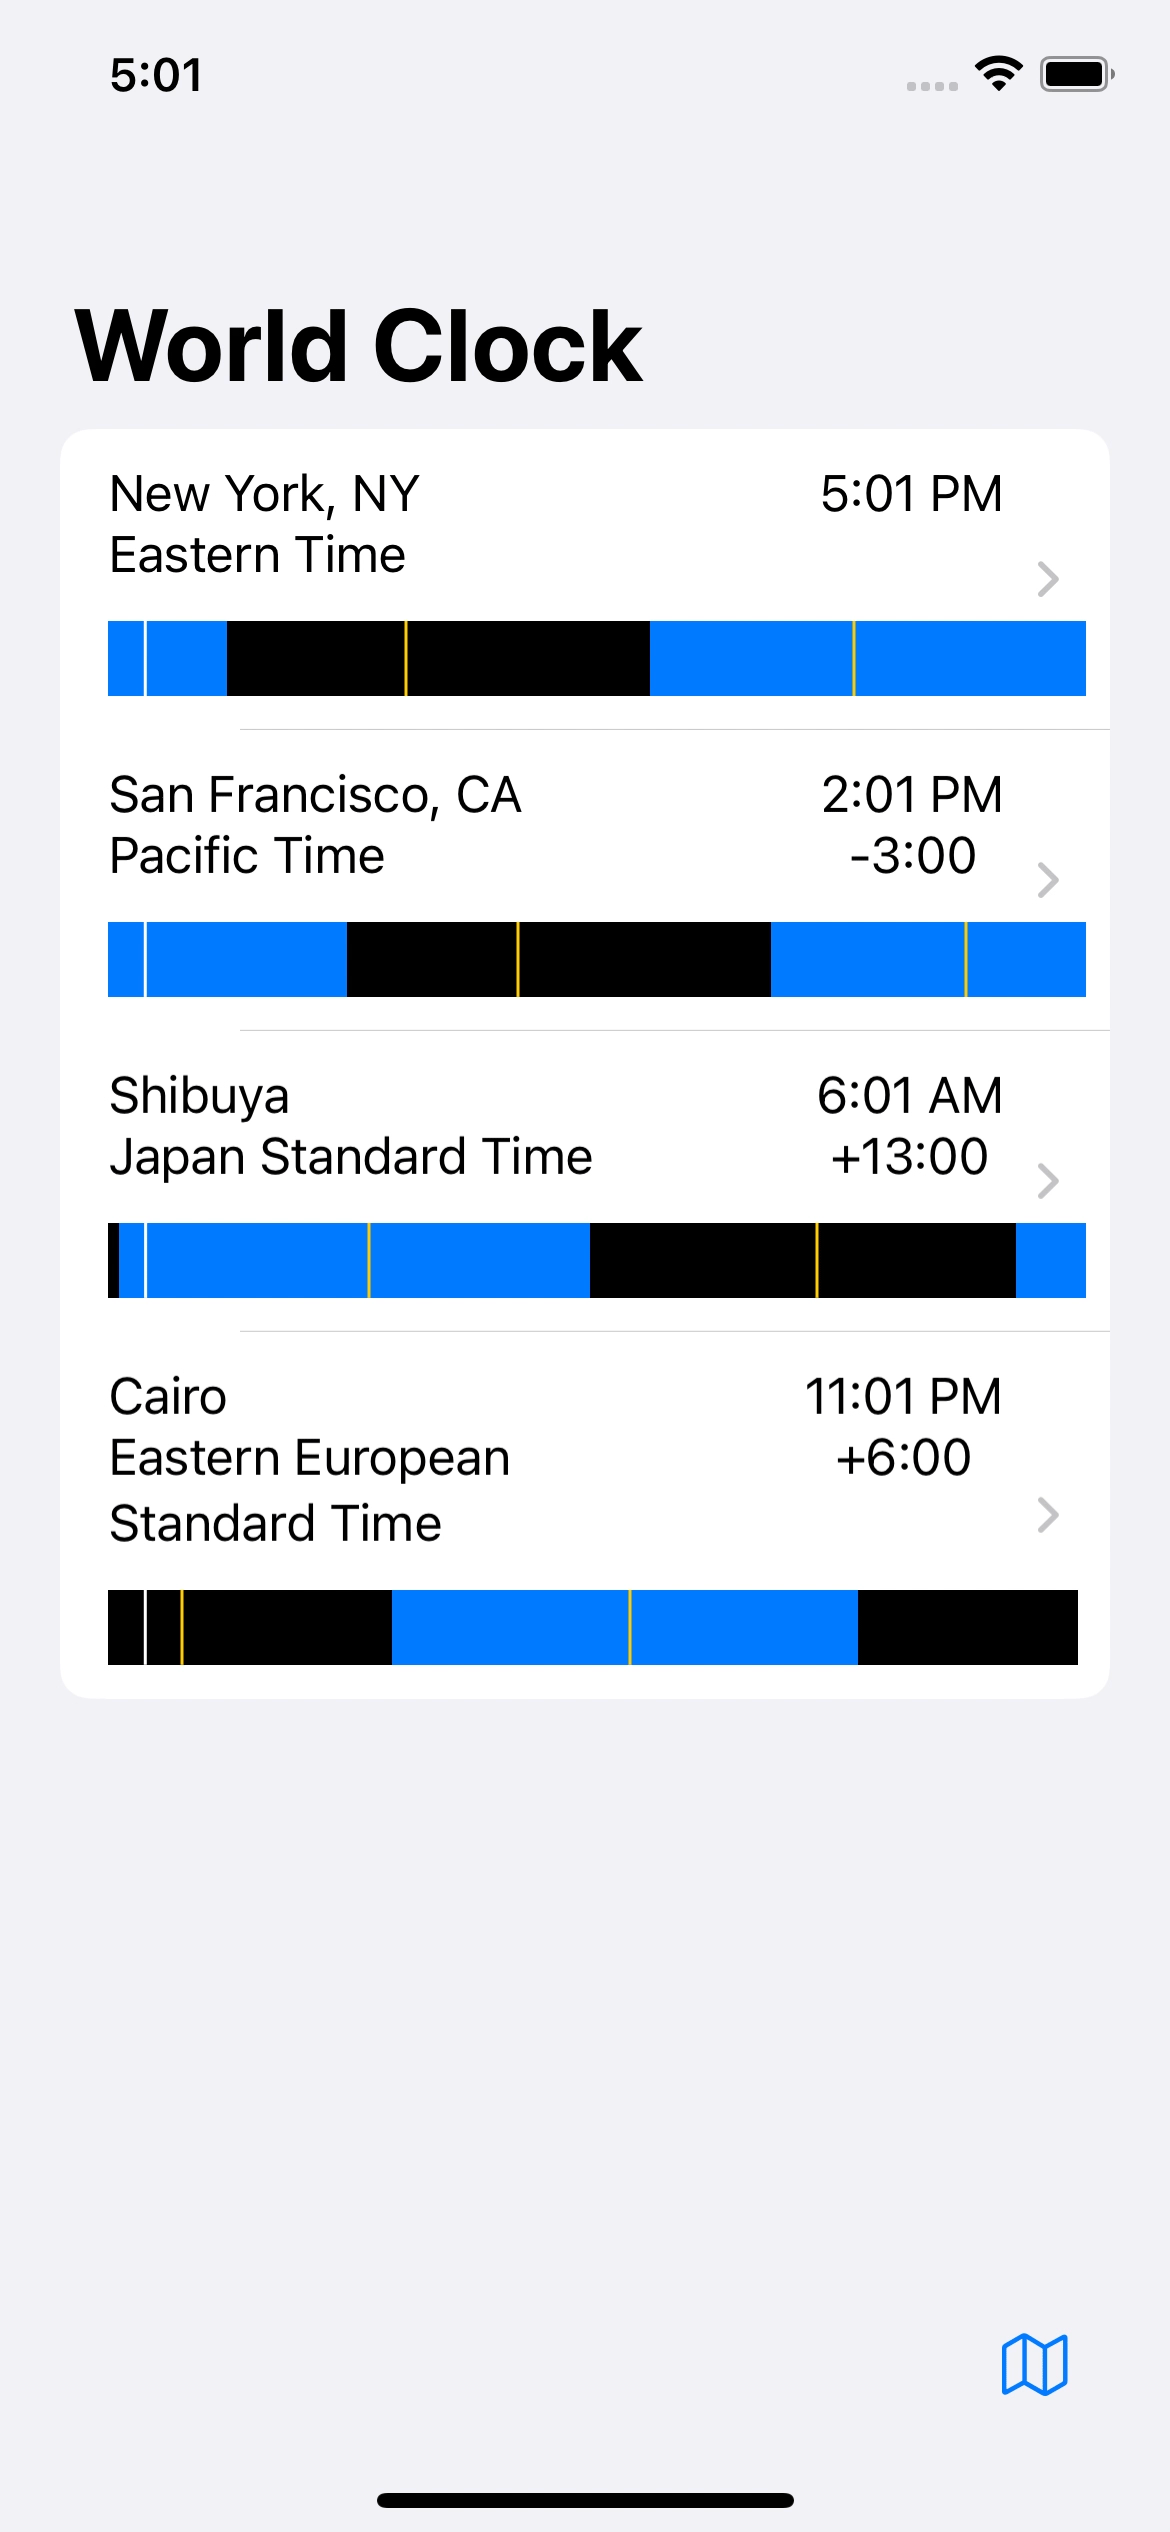
You’ll find a World Clock app that allows you to add multiple locations and view the current time in each place. Tap the map icon to move to the view where you can add, delete and move cities in the list. To add a location, slide down the view until you see a search field where you can enter the location’s name. When you go back to the main view, you’ll see each city’s time zone and the difference between the time in the first city and each of the others.
Below each city, a line shows the local time as it relates to day and night. Tapping a city takes you to a summary of the information for that city.
While exploring the app, you may notice a bug, which you’ll now address. Run the app, and wait until the time changes to a new minute. The times displayed in the app still show the time when the view first appeared. Tap a city to navigate to another view and return. The app now updates the time. As long as the user remains on the view, the app falls behind the passage of time:
In the next section, you’ll use a TimelineView
to fix this problem.
Using TimelineView
Open ContentView.swift and find the NavigationView
. Embed the entire contents of NavigationView
inside TimelineView
:
TimelineView(.everyMinute) { context in
// The entire content of NavigationView closure goes here.
}
After the above update, the NavigationView
looks like this:
NavigationView {
TimelineView(.everyMinute) { context in
List(locations.locations) { ... }
.onAppear { ... }
.onChange(of: locations.locations) { ... }
.navigationTitle("World Clock")
.toolbar { ... }
}
}
TimelineView
updates on a time schedule specified using a value implementing the TimelineSchedule
protocol. This protocol includes several built-in static types, one of which is the everyMinute
parameter. This specifies the view should update at the start of every minute.
Change the currentDate
parameter of LocationView
to:
currentDate: context.date,
The context
passed into the closure of a TimelineView
contains two properties. First, a date
property that you use here and contains the date of the update. It also contains a cadence
property that defines the rate at which the timeline updates the view.
Run the app and wait on the initial view until the minute changes. This time, you’ll see the view update in sync with the phone’s clock:
In the next section, you’ll explore the new drawing view available in SwiftUI 3.0 — the canvas.
Introducing the Canvas View
The new canvas view supports high-performance, immediate mode drawing in SwiftUI. The view provides both a graphics context of type GraphicsContext
and a CGSize
property with the dimensions of the canvas to its closure, allowing you to adapt to the size of the canvas.
Open DaytimeGraphicsView.swift. This view creates the day/night image for a provided day and location using standard SwiftUI drawing views. In this section, you’ll modify this view to use a canvas instead. The view uses GeometryReader
to adapt the shapes to the size of the containing view. A canvas already provides this information as one of the parameters to the closure. Replace GeometryReader
with the following:
Canvas { context, size in
A canvas isn’t a drop-in replacement for GeometryReader
, but in this case, it provides the same information. The size
parameter from Canvas
contains the same dimensions that you get from GeometryReader
.
Change the four references to proxy.size.width
inside the closure to size.width
and the one reference to proxy.size.height
to size.height
.
You’re not done yet.
The view draws three rectangles, one each for:
- Pre-dawn hours, in black.
- Daytime hours, in blue.
- After-sunset hours, in black again.
The context
represents the drawing area of the canvas. If you’re familiar with Core Graphics, you’ll feel right at home here. The canvas drawing model builds on Core Graphics and uses many of the same methods and structures.
Replace the first Rectangle
view with the following code:
// 1
let preDawnRect = CGRect(
x: 0,
y: 0,
width: sunrisePosition,
height: size.height)
// 2
context.fill(
// 3
Path(preDawnRect),
// 4
with: .color(.black))
This code draws the pre-dawn portion of the drawing in the following steps:
- To draw a rectangle in a canvas, you create a
CGRect
struct that defines the position and size of the rectangle. Unlike a SwiftUI view, you must specify all dimensions and can’t assume the rectangle will fill the view. The dimension and axes insideCanvas
follow the same rules as Core Graphics. The origin, where the x and y both equal zero, lies at the top-left corner. Values of x increase moving right, and values of y increase going down. The coordinates here put the top-left corner of the rectangle at the top-left corner of the drawing space. You use the width of the frame previously applied to theRectangle
view as the width of the rectangle andsize.height
as a height parameter. This makes the rectangle fill the full height of the canvas. - You call
fill(_:with:)
on the context to draw a filled shape. - To specify the object to draw, you create a path using the rectangle as the first parameter. This defines the area to fill.
- You pass black as the color to draw the filled shape. Notice that you use a SwiftUI color definition.
Run the app, ignoring the warnings for now, and you’ll see that only the pre-dawn portions of the drawings appear:
Next, you’ll take care of the warnings.
Drawing Inside a Canvas
The Rectangle
views inside the canvas don’t render because the closure to a canvas isn’t a view builder. This is different from almost every other SwiftUI closure. In exchange for losing the ability to use SwiftUI views inside a Canvas
directly, you gain access to some powerful Core Graphics APIs that you can now mix and match with SwiftUI.
Replace the remaining two rectangle views with the following code:
let dayRect = CGRect(
x: sunrisePosition,
y: 0,
width: sunsetPosition - sunrisePosition,
height: size.height)
context.fill(
Path(dayRect),
with: .color(.blue))
let eveningRect = CGRect(
x: sunsetPosition,
y: 0,
width: size.width - sunsetPosition,
height: size.height)
context.fill(
Path(eveningRect),
with: .color(.black))
As before, the rectangle fills the full vertical space of the canvas. You move the offset
previously applied to the Rectangle
view to the rectangle’s x
coordinate. As before, the width of the frame
applied to Rectangle
becomes the width of each rectangle.
The last code in this view draws a yellow line at midnight and noon on the graph. Replace the current ForEach
view with:
// 1
for hour in [0, 12] {
// 2
var hourPath = Path()
// 3
let position = Double(hour) / 24.0 * size.width
// 4
hourPath.move(to: CGPoint(x: position, y: 0))
// 5
hourPath.addLine(to: CGPoint(x: position, y: size.height))
// 6
context.stroke(
hourPath,
with: .color(.yellow),
lineWidth: 3.0)
}
Here’s how the code works, step by step:
- Since you’re not inside a view builder, you use a
for-in
loop to iterate over a collection of integers, with 0 representing midnight and 12 representing noon. - You create an empty path that you’ll add inside the canvas.
- To determine the horizontal coordinate of the line, convert the hour to
Double
and then divide it by 24.0 to get the fraction of a full day that the hour represents. Then, multiply this fraction by the width of the canvas to get the horizontal position that represents the hour. -
move(to:)
on the path moves the current position without adding to the path. It moves the current position to the horizontal position from step three and to the top of the view. -
addLine(to:)
adds a line from the current position to the position specified to the path. This position is at the same horizontal coordinate at the bottom of the view. - You now use
stroke(_:with:lineWidth:)
on the context to draw, not fill, the path. You specify a yellow color and a width of three points to help the line stand out.
Build and run. You’ll see the views look the same as before, but use Canvas
instead of SwiftUI shape views:
The main reason to use a canvas is performance. For complex drawings with many gradients or parts, you’ll see much better performance than with SwiftUI views. A canvas view also provides compatibility with Core Graphics, including access to a Core-Graphics-enabled wrapper. If you have existing code created using Core Graphics, like custom controls written for UIView
and rendered in draw(_:)
, you can drop it inside a canvas without modification.
What do you lose in a canvas view? As you saw in this example, a canvas often needs more verbose code. The canvas exists as a single element, and you can’t address and modify the components individually like with SwiftUI views. You can add onTapGesture(count:perform:)
to a canvas, but not to a path in the canvas.
A canvas also provides one more function. You can combine it with TimelineView
to perform animations. You’ll explore that in the rest of this tutorial as you create an analog clock for the app.
Drawing a Clock Face
TimelineView
provides a way to update a view regularly, while a canvas view offers a way to create high-performance graphics. In this section, you’ll do just that by creating an animated analog clock showing the selected city’s time on the details page.
Open AnalogClock.swift. Replace the body of the view with the following code:
Canvas { gContext, size in
// 1
let clockSize = min(size.width, size.height) * 0.9
// 2
let centerOffset = min(size.width, size.height) * 0.05
// 3
let clockCenter = min(size.width, size.height) / 2.0
// 4
let frameRect = CGRect(
x: centerOffset,
y: centerOffset,
width: clockSize,
height: clockSize)
}
This code defines a Canvas
view and calculates the size of the clock face based on the size of the view:
- You first determine the smaller dimension between the width and height of the canvas. You multiply this value by 0.9 to set the size of the face to fill 90% of the smaller dimension.
- To center the clock in the canvas, determine the smaller dimension and multiply it by 0.05 to get half of the 10% remaining from step one. This value will be the top-left corner for the rectangle containing the clock face.
- You determine the clock’s center coordinate by dividing the smaller dimension by two. This gives you both the horizontal and vertical center position since the clock is symmetrical. You’ll use this value later in this tutorial.
- You define a rectangle using the offset from step two and the size from step one. This rectangle encloses the clock face.
Now, you’ll draw the clock face. Continue the closure of the canvas with the following code:
// 1
gContext.withCGContext { cgContext in
// 2
cgContext.setStrokeColor(
location.isDaytime(at: time) ?
UIColor.black.cgColor : UIColor.white.cgColor)
// 3
cgContext.setFillColor(location.isDaytime(at: time) ? dayColor : nightColor)
cgContext.setLineWidth(2.0)
// 4
cgContext.addEllipse(in: frameRect)
// 5
cgContext.drawPath(using: .fillStroke)
}
Here’s how the code works, step by step:
- As mentioned earlier, the
Canvas
view supports Core Graphics drawing. However, thegContext
parameter you get inside the canvas closure is still a wrapper around Core Graphics. To get all the way down to Core Graphics, you callGraphicsContext.withCGContext(content:)
. This creates and passes a true Core Graphics context to the corresponding closure, where you can use all the Core Graphics code. Changes to the graphics state made in either the canvas or Core Graphics contexts persist until the end of the closure. - You use the Core Graphics’
setStrokeColor(_:)
to set the line color based on if it’s day at the specified time. For daytime, you set it to black, and for night, you set it to white. You useCGColor
since this is a Core Graphics call. - Then, you set the fill color using the
dayColor
andnightColor
properties. You also set the line width to two points. - To draw the clock face, call
addEllipse(in:)
on the Core Graphics context using the rectangle from earlier that defines the edges of the ellipse. - Finally, you draw the path, consisting of the ellipse from step four, onto the view.
To view the clock, open LocationDetailsView.swift. Wrap VStack
inside TimelineView
like this:
TimelineView(.animation) { context in
// Existing VStack
}
This creates TimelineView
using the animation
static identifier that updates the view as fast as possible. Change the reference to Date()
in the second Text
view to context.date
:
Text(timeInLocalTimeZone(context.date, showSeconds: showSeconds))
Now, add the following code after the existing text fields, before the spacer:
AnalogClock(time: context.date, location: location)
This will show the new analog clock on the view. Build and run, and tap one of the cities to view its details page. You’ll see your new clock face:
You’ll see a simple black or blue circle. Next, you’ll add static tick marks to help the user tell the displayed time.
Drawing Tick Marks
Tick marks show twelve equal intervals around the clock face to indicate hours and five-minute increments. These help the user better tell the time displayed on the clock.
You’ll need a lot of trigonometry here, but thou shalt not be afraid! You’ll walk through all the steps required.
Go back to AnalogClock.swift and add the following new method above the body of the view:
func drawTickMarks(context: CGContext, size: Double, offset: Double) {
// 1
let clockCenter = size / 2.0 + offset
let clockRadius = size / 2.0
// 2
for hourMark in 0..<12 {
// 3
let angle = Double(hourMark) / 12.0 * 2.0 * Double.pi
// 4
let startX = cos(angle) * clockRadius + clockCenter
let startY = sin(angle) * clockRadius + clockCenter
// 5
let endX = cos(angle) * clockRadius * 0.9 + clockCenter
let endY = sin(angle) * clockRadius * 0.9 + clockCenter
// 6
context.move(to: CGPoint(x: startX, y: startY))
// 7
context.addLine(to: CGPoint(x: endX, y: endY))
// 8
context.strokePath()
}
}
Separating the components of the clock into different methods helps reduce clutter. You'll pass in the Core Graphics context to the method along with the size and offset you calculated in the view's body. Here are the steps for the rest of the method:
- You calculate the clock face's center position by dividing the size of the clock face by two and then adding the offset you passed in.
- Next, set up a loop through the integers from zero to 11, one for each tick mark. Notice, again, you use a standard
for-in
loop instead ofForEach
since you're not in a view builder. - You divide the clock face into twelve equal segments. For each segment, you calculate the fraction of the full circle's diameter the current
hourMark
represents. Trigonometric calculations in Swift use radians. The conventional 360 degrees of a circle equals 2π radians. To determine the number of radians equivalent to the current fraction of the circle, multiply the fraction by two and by theDouble.pi
constant.Note: Technically, you must now subtract π/2 to shift the angle a quarter-circle counterclockwise. Without this adjustment, the zero angle will be to the right and not upward. For these marks, it doesn't make a difference, but if you change it to display numbers, then they would appear in the wrong positions. - You use trigonometry here, but don't panic. All you need to know is that the cosine of an angle gives you the position of the horizontal part of the full radius for a point at a given angle. Sine provides the same information for the vertical position. Since you want the points positioned at an equal distance around the center of the clock face, you add the offset calculated in step one. This gives you the x and y points for the angle calculated in step three.
- This is the same as step four, except you multiply the radius by 0.9 to bring the point inside the clock face. The resulting tick mark runs in from the edge of the face inside to this point.
- With the points calculated, you move the context to the start point from step four.
- Next, add a line to the endpoint from step five.
- Draw a line along the path on the canvas.
Now, add the call to the method at the bottom of the closure, where you got the Core Graphics context:
drawTickMarks(
context: cgContext,
size: clockSize,
offset: centerOffset)
Run the app, and tap any city to see the clock face with tick marks:
With the tick marks in place, you can now add the hands for the clock.
Drawing Clock Hands
You'll first create a reusable method that draws all three clock hands. Add the following code after drawTickMarks(context:size:offset:)
:
func drawClockHand(
context: CGContext,
angle: Double,
width: Double,
length: Double
) {
// 1
context.saveGState()
// 2
context.rotate(by: angle)
// 3
context.move(to: CGPoint(x: 0, y: 0))
context.addLine(to: CGPoint(x: -width, y: -length * 0.67))
context.addLine(to: CGPoint(x: 0, y: -length))
context.addLine(to: CGPoint(x: width, y: -length * 0.67))
context.closePath()
// 4
context.fillPath()
// 5
context.restoreGState()
}
This method draws a clock hand at the angle, width and length specified. Make the hour, minute and second hands different by changing the width and length. Here's how the method works:
-
saveGState()
pushes a copy of the current graphics state onto a stack. You can restore the current state at a later time from the stack. Saving the state lets you easily undo the changes made during this method. - When creating the tick marks, you calculated the positions of lines using trigonometry. For situations where you want to show multiple lines or shapes, this can get tedious.
rotate(by:)
rotates every path that follows by a specified angle in radians. Using this method, you can now draw the clock hand vertically and let this rotation handle the math to make it appear at the desired angle. Let computers do the hard work! - These lines move to the center of the canvas — hold that question for a moment. It then draws a line of the specified width to the left and upward two-thirds of the full length. It continues back to the center the full length upward before mirroring the first line to the right of the center.
closePath()
adds a line back to the initial point at the center. - You fill the shape you just defined with the current fill color.
- This restores the graphics state you stored in step one. It undoes the change to the angle from the rotation in step two.
Now that you have a method to draw a hand, you can draw the hour hand. Add the following code to the end of the Core Graphics closure just after the call to drawTickMarks(context:size:offset:)
:
// 1
cgContext.setFillColor(location.isDaytime(at: time) ?
UIColor.black.cgColor : UIColor.white.cgColor)
// 2
cgContext.translateBy(x: clockCenter, y: clockCenter)
// 3
let angle = clockDecimalHourInLocalTz / 12.0 * 2 * Double.pi
let hourRadius = clockSize * 0.65 / 2.0
// 4
drawClockHand(
context: cgContext,
angle: angle,
width: 7.5,
length: hourRadius)
You change the fill color and calculate the information needed for the hand. Here are the details:
- Change the fill color to match the current line color — black for daytime and white for night.
- When drawing before, you added an offset for the tick marks and clock face to center them on the canvas. As with
rotate(by:)
above, you can also change the graphics state.translateBy(x:y:)
shifts the origin of the drawing surface to the point you want to be the center of the clock. This change affects all drawing operations that follow. This shift lets you use the origin indrawClockHand(context:angle:width:length:)
. - Calculate the angle for the given hour. Note that
clockDecimalHourInLocalTz
includes a fraction, so 1:30 would be 1.5. Including fractions supports the smooth motion of the clock's hands. Usingrotate(by:)
while drawing the hand vertically before the rotation means you don't need the shift by π/2 like you did when manually calculating angles. - Call the method that draws the clock hand.
Run the app, and you see your clock hand on the clock face:
Now, use the same process to draw the other hands. After the code to draw the hour hand, add:
let minuteRadius = clockSize * 0.75 / 2.0
let minuteAngle = clockMinuteInLocalTz / 60.0 * 2 * Double.pi
drawClockHand(
context: cgContext,
angle: minuteAngle,
width: 5.0,
length: minuteRadius)
cgContext.saveGState()
cgContext.setFillColor(UIColor.red.cgColor)
let secondRadius = clockSize * 0.85 / 2.0
let secondAngle = clockSecondInLocalTz / 60.0 * 2 * Double.pi
drawClockHand(
context: cgContext,
angle: secondAngle,
width: 2.0,
length: secondRadius)
cgContext.restoreGState()
You use a larger radius multiplier and narrower width to draw the minute hand. Then, you change the fill color to red and draw a longer, narrower second hand. Save and restore the graphics state around drawing the second hand to restore the original fill color.
Run the app, and you'll see the minute and second hands along with the hour hand:
Adding a Center Button
Next, you'll next add a small circle at the center of the clock face where the hands meet. After the code to draw the second hand, add:
let buttonDiameter = clockSize * 0.05
let buttonOffset = buttonDiameter / 2.0
let buttonRect = CGRect(
x: -buttonOffset,
y: -buttonOffset,
width: buttonDiameter,
height: buttonDiameter)
cgContext.addEllipse(in: buttonRect)
cgContext.fillPath()
You calculate the diameter of five percent of the clock face. Then, you shift the corner of the rectangle half of that diameter toward the upper left. Next, you add an ellipse defined by that rectangle and fill it.
Run the app to see the updated clock face:
One more thing, as Steve Jobs would say! You'll add a display showing the day of the month in the selected city to see how to integrate SwiftUI views with a canvas.
Mixing SwiftUI Views Into a Canvas
The canvas isn't a ViewBuilder, meaning you can't include SwiftUI views directly. You saw this when the rectangle views from DaytimeGraphicsView.swift didn't show until you converted them to canvas method calls. Instead, you can pass SwiftUI views to the canvas and reference them when drawing.
Open AnalogClock.swift, and starting on the line with the closing brace for Canvas
, add the following code:
symbols: {
ClockDayView(time: time, location: location)
.tag(0)
}
You pass in SwiftUI views using the symbols
parameter of the canvas view initializer. You must tag each view with a unique identifier using tag(_:)
.
Next, you need to use that tag to reference the view. At the top of the canvas closure, add the following code:
let dayView = gContext.resolveSymbol(id: 0)
This code looks for a SwiftUI view tagged with the passed identifier. If one exists, it's stored in dayView
. If not, then the method returns nil
.
At the end of the view, after the end of withCGContext(content:)
, add the following code to show the SwiftUI view on the clock face:
if let dayView = dayView {
gContext.draw(
dayView,
at: CGPoint(x: clockCenter * 1.6, y: clockCenter))
}
You attempt to unwrap dayView
. If successful, you use the GraphicsContext's draw(_:at:)
method to draw the view on the canvas using the symbol. Note that even though you've left the closure where you changed the origin, it remains at its new position at the clock center. Hence, you use the clockCenter
you calculated earlier and shift the horizontal position to the right. Run the app to see the final clock face:
Where to Go From Here?
You can download the finished project by clicking Download Materials at the top or bottom of this tutorial.
You just created an app that not only syncs times but also shows the time on an analog clock you built from scratch — great job!
For more background on rotations and the trigonometry used to draw the clock face, see Trigonometry for Game Programming — SpriteKit and Swift Tutorial: Part 1/2 and Trigonometry for Game Programming — SpriteKit and Swift Tutorial: Part 2/2.
The Beginning Core Graphics video course is another great resource. Plus, raywenderlich.com has many more Core Graphics tutorials. Here are a few of them:
- Core Graphics Tutorial: Getting Started
- Core Graphics Tutorial: Gradients and Contexts
- Core Graphics Tutorial: Patterns
- Core Graphics Tutorial: Lines, Rectangles and Gradients
We hope you enjoyed this tutorial. If you have any questions or comments, please join the forum discussion below.
All videos. All books.
One low price.
A Kodeco subscription is the best way to learn and master mobile development — plans start at just $19.99/month! Learn iOS, Swift, Android, Kotlin, Flutter and Dart development and unlock our massive catalog of 50+ books and 4,000+ videos.
Learn more