SwiftUI Localization Tutorial for iOS: Getting Started
Learn time-saving techniques to transform your team’s localization workflow! By Andy Pereira.
Utilizing New Localization Techniques
In the next sections, you’ll learn about new time-saving enhancements to the localization process introduced in Xcode 13 and iOS 15.
Initializing Strings
In the previous example, iOS could translate your app’s title because a string passed to Text is actually treated as an instance of LocalizedStringKey. Behind the scenes, it handles all the work for you, making it much easier to work with translations. But what happens when you aren’t supplying a string directly to an instance of Text?
In the past, developers would get around this by using the global function, or macro, NSLocalizedString(_:tableName:bundle:value:comment:). For the most part, this was fairly easy to use. It does get complicated, though, when your strings require parameters supplied to your code. Open ContentView.swift, and find the property scoreMessage.
private var scoreMessage: String {
  // 1
  let localizedString
  = NSLocalizedString("points-count %lld", comment: "The pluralized score")
  // 2
  return String(format: localizedString, quiz.score)
}
Here’s what’s happening in the code above:
- This creates a reference to the pluralized string points-count.
- This replaces the
%lldformat specifier with the actual score. The previous step is always required so that you can supply the localized string to the string formatter.
While this certainly isn’t the most complicated process you might encounter, there’s definitely room for improvement.
New to iOS 15 and Xcode 13 is String(localized:table:bundle:locale:comment:). This allows you to consolidate the two-step process in the previous code into one. Replace scoreMessage with the following:
private var scoreMessage: String {
  String(
    localized: "points-count \(quiz.score)",
    comment: "The pluralized score."
  )
}
Here, you pass the pluralized string’s key and the value it needs in one easy step. You also have the benefit of the compiler automatically exporting strings found in this initializer, so you don’t need to worry about hunting them down in bigger projects.
There are several other places in the app that need to use this new initializer. Open QuestionView.swift, and replace this line from optionButton(_:):
message = isCorrect ? "correctly" : "incorrectly"
with:
    message = isCorrect ?
    String(localized: "correctly", comment: "Correct message") :
    String(localized: "incorrectly", comment: "Incorrect message")
This localizes the strings that show when a user answers a question.
Finally, open QuestionModel.swift. You’ll find twelve places using NSLocalizedString(_:tableName:bundle:value:comment:). Taking what you learned in the last two steps, convert each one of these to use String(localized:table:bundle:locale:comment:).
Including Localized Markdown
One great addition in iOS 15 is the ability to include Markdown directly in views that accept strings, like Text. Open ContentView.swift, and find the line of code where the title is set:
Text("Welcome to Country Quiz Time")
Replace it with the following:
Text("Welcome to _Country Quiz Time_", comment: "App welcome title")
Here’s what you just added:
- The string now has an underscore before and after the title of the app. This will cause the app’s title to appear italicized when the app runs.
- You’ve added the parameter
comment, making things clearer for the translators. It’s important to remember to give your translators all the help you can.
You’ll also want to go back to Localizable.strings (Spanish) and update the app title line to include the Markdown. Do this by replacing the line beginning “Welcome…” with the following:
"Welcome to _Country Quiz Time_" = "Bienvenido a _Country Quiz Time_";
Refresh the preview as needed. You’ll see the title of the app with only the name italicized.

You may not always be able to directly set the string value within Text. However, if you want to provide a localized string with Markdown, you’ll need to use AttributedString. In ContentView.swift, add the following new property after the scoreMessage property:
private var appTitle: AttributedString {
  AttributedString(
    localized: "Welcome to _Country Quiz Time_",
    comment: "App welcome title"
  )
}
Here, you’ve added a localized string, with Markdown, almost exactly as you did a few steps ago in the tutorial.
Still in ContentView.swift, replace:
Text("Welcome to _Country Quiz Time_", comment: "App welcome title")
With the following:
Text(appTitle)
Resume automatic preview updating as needed. You’ll still see the title formatted the same as before.
Localizing Asset Catalogs
Colors and symbols can have a variety of meanings across different cultures and languages. You can localize colors and images to your project’s asset catalogs to help bring an even richer cultural experience for all users.
Open Assets, and select the color asset Region. With the color highlighted, under the Attributes inspector, find and select Spanish under Localization.

Now select the color square for Spanish. Again in the Attributes inspector, change Input Method to 8-bit Hexadecimal, and set the Hex value to #006847.
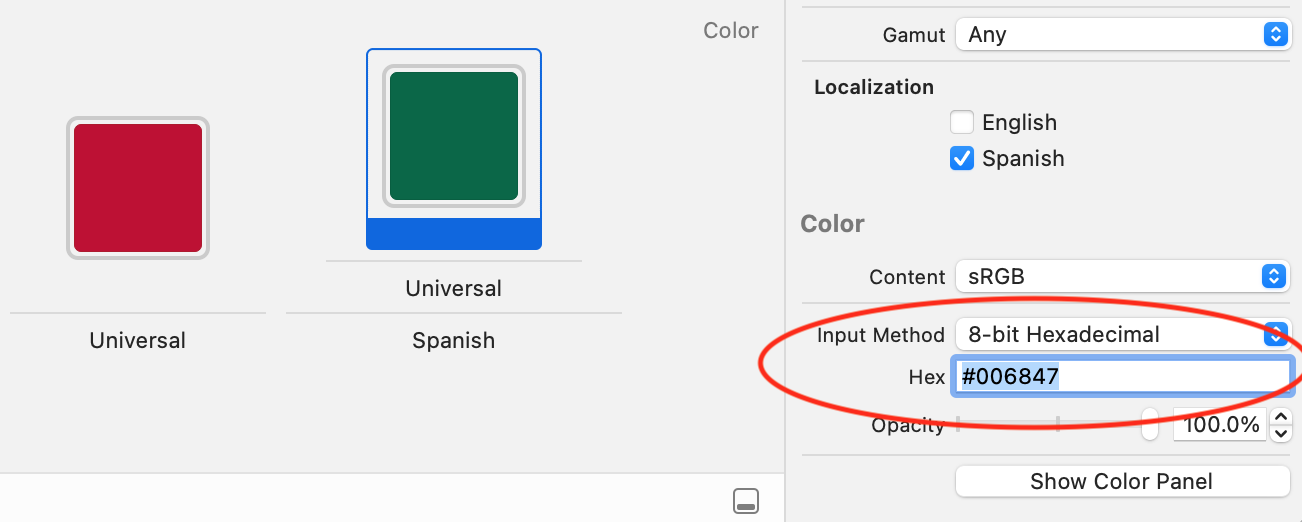
Set your scheme’s language to Spanish, then build and run. Your title will now be green.

If you switch your scheme’s language back to English, the title will be red.
Using Automatic Grammar Agreement
One of the more unique and powerful things Apple introduced with iOS 15 is automatic grammar agreement. In English, the rules behind pluralizing a noun are relatively simple. If you have one of something, you typically use the singular form of the noun. When you have zero or more than one, you use the plural form. There are some exceptions, but for the most part, that’s it.
One thing most English speakers don’t have to think about is gendered nouns. Many languages apply a grammatical gender to nouns, which can affect the articles, verbs and adjectives used with the nouns.
As an example, in Spanish, the words paper and house have different genders:
- Paper, masculine: el papel
- House, feminine: la casa
In languages that assign gender to nouns, pluralizing words requires the correct agreement between the number and gender. The rules can get quite complex for those not familiar with this concept, especially when learning how to pluralize combinations of things that may contain different genders. In the past, developers relied on a stringsdict file to account for the basic pluralization of things.
The following block of code might be your first instinct to handle pluralizing strings:
if points == 0 {
  print("0 points")
} else if points == 1 {
  print("1 point")
} else {
  print("\(points) points")
}
However, this provides no flexibility for translations. With stringsdict files, you can declare variables and provide the different values for varying amounts. This works really well and allows for all sorts of scalability and localization. It has its own set of challenges, though.
Enter automatic grammar agreement. To kick things off, open ContentView.swift and find the property scoreView. Note the string it uses to show the score in a Text view.
Text("Score: \(quiz.score)")
You’ll change the localization of this string to include an appropriately pluralized form of ‘point’ after it. Open Localizable.strings (English) and add the following line:
"Score: %lld" = "**Score:** ^[%lld Points](inflect: true)";
The localization entry you just added does the following:
- Sets the value of your translation to include the markup to bold Score:.
- Wraps the phrase to inflect within
^[]. This tells the system that there will be values that need inflection, or interpretation at runtime. - Includes an instruction to inflect the block of text preceding it.
Essentially, your localized string automatically changes the word “points” to the correct form of itself, depending on the integer value passed to the string. If you have one point, it will say “1 Point.” If you have zero or more than one, it will use “Points.”
Be sure your scheme is set to English, then build and run. Step through the quiz and pay attention to the score in the lower-left corner of the UI to see how the word “points” changes based on your score.

- What day is Mexican Independence Day? September 16
- Which language is spoken in Andorra? Catalan
- What is the capital of the United States? Washington, D.C.
- What day is Mexican Independence Day? September 16
- Which language is spoken in Andorra? Catalan
- What is the capital of the United States? Washington, D.C.
In the example above, the automatic grammar agreement correctly figured out that “Points” is a noun. But if it doesn’t, you can tell it which part of speech a word in your string belongs to. In Localizable (English).strings, you can change the entry for Score: %lld to the following:
"Score: %lld"
= "**Score:** ^[%lld ^[Points](grammar: { partOfSpeech: \"noun\" })]
  (inflect: true)";
The app will look very similar to its previous state, but you’ve made these changes:
- Wrapped “Points” in brackets, telling the system you are going to provide more instructions about this word.
- Within parentheses, provided a key-value pair with the key
grammar. - Inside, you’ll see another key-value pair, with the key
partOfSpeechand the value"noun". This requires escape characters, as this instruction lives within a string itself.
This will have the same result as before, as “Points” is already identified by the system as a noun. However, if you find words not behaving as you’d expect, you can customize your localizations as shown.