


Trigonometry for Game Programming: Part 1/2
Learn Trigonometry for Game Programming in this 2-part tutorial series, where you’ll learn the theory and then practice by making a space shooter game! By Matthijs Hollemans.
Know 2 Sides, Need Angle
The above formulas are useful when you already know an angle, but that is not always the case – sometimes it is the angle you are looking for. Then you need to know the lengths of at least two of the sides and plug these into the inverse functions:
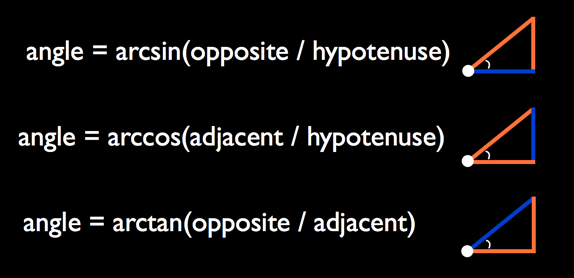
- angle = arcsin(opposite/hypotenuse)
- angle = arccos(adjacent/hypotenuse)
- angle = arctan(opposite/adjacent)
In other words, if sin(a) = b, then it is also true that arcsin(b) = a. Of these inverse functions, you will use the arc tangent (arctan) the most in practice. Sometimes these functions are also notated as sin-1, cos-1, and tan-1, so don’t let that fool you.
Is any of this sinking in or sounding familiar? Good, but you’re not done yet with the theory lesson – there is still more that you can calculate with triangles.
Know 2 Sides, Need Remaining Side
Sometimes you may know the length of two of the sides and need to know the length of the third, like in the example at the beginning of this tutorial where you wanted to find the distance between the two space ships.
This is where Trigonometry’s Pythagorean Theorem comes to the rescue. Even if you forgot everything else about math, this is probably the one formula you do remember:
a2 + b2 = c2
Or, put in terms of the triangle that you saw earlier:
opposite2 + adjacent2 = hypotenuse2
If you know any two of these sides, then calculating the third is simply a matter of filling in the formula and taking the square root. This is a very common thing to do in games and you’ll be seeing it several times in this tutorial.
Note: Want to drill this formula into your head while having a great laugh at the same time? Search YouTube for “Pythagoras song” – it’s an inspiration for many!
Note: Want to drill this formula into your head while having a great laugh at the same time? Search YouTube for “Pythagoras song” – it’s an inspiration for many!
Have Angle, Need Other Angle
Lastly, the angles. If you know one of the non-right angles from the triangle, then figuring out the other ones is a piece of cake. In a triangle, all angles always add up to a total of 180 degrees. Because this is a right triangle, you already know that one of the angles is 90 degrees. That leaves:
alpha + beta + 90 = 180
Or simply:
alpha + beta = 90
The remaining two angles must add up to 90 degrees. So if you know alpha, you also know beta, and vice-versa.
And those are all the formulas you need to know! Which one to use in practice depends on the pieces that you already have. Usually you either have the angle and the length of at least one of the sides, or you don’t have the angle but you do have two of the sides.
Enough theory. Let’s put this stuff into practice.

To Skip, or Not to Skip?
In the next few sections, you will be setting up a basic Cocos2D project with a space ship that can move around the screen using the accelerometer. This won’t involve any trigonometry (yet), so if you already know Cocos2D and feel like this guy:

Then feel free to skip ahead to the Begin the Trigonometry! section below – I have a starter project waiting for you there.
But if you’re the type who likes to code everything from scratch, keep reading! :]
Getting Started
To get started, download the latest version of the Cocos2D v2.1 branch. At the time of writing, this is the “unstable” version cocos2d-iphone-2.1-rc1.
After Cocos2D is done downloading and unzipping, you want to install the project templates. Open a Terminal window to the directory where you downloaded Cocos2D and enter the following command:
./install-templates.sh -f
You should see “Installing cocos2d templates” and a bunch of messages. Now you’re ready to work with Cocos2D.
Fire up Xcode and create a new application from the “cocos2d iOS” template you just installed.

Name the project TrigBlaster and set the device family to iPhone. Build and run the template as-is. If all works OK, you should see the following:

You are going to use ARC in this project, but Cocos2D projects have it disabled by default. Luckily, enabling ARC is really easy. Just go to Edit\Refactor\Convert to Objective-C ARC. Expand the drop-down and select only the last four files (main.m, AppDelegate.m, HelloWorldLayer.m, and IntroLayer.m), then click Check and finish the steps in the wizard.

Note: When you convert a project to ARC or make other large changes, Xcode will prompt you to enable snapshots for the current project. A snapshot saves the state of the entire project as if you copied and pasted the project into another directory. You can learn more about snapshots over here. For the purposes of this tutorial, select disable.
Note: When you convert a project to ARC or make other large changes, Xcode will prompt you to enable snapshots for the current project. A snapshot saves the state of the entire project as if you copied and pasted the project into another directory. You can learn more about snapshots over here. For the purposes of this tutorial, select disable.
Next download the resources for this tutorial. This file contains the images for the sprites and the sound effects. Unzip it and drag the Images and Sounds folders into Xcode to add them to the project. In the import dialog, make sure Copy items into destination group’s folder is checked.

Great, the preliminaries are over and done with – now let’s get coding for real.
Steering with Accelerometers
Because this is a simple game, you will be doing all your work inside a single class: the HelloWorldLayer. Right now, this layer contains a bunch of stuff that you don’t need.
Replace the contents of HelloWorldLayer.h with:
#import "cocos2d.h"

@interface HelloWorldLayer : CCLayerColor

+ (CCScene *)scene;

@end
This game doesn’t use GameKit, so you got rid of that. You also changed HelloWorldLayer from a plain CCLayer to a CCLayerColor so that you can have a background color other than just black.
There is also a bunch of code in the .m file that you don’t need for this game. Replace HelloWorldLayer.m with:
#import "HelloWorldLayer.h"
#import "SimpleAudioEngine.h"

@implementation HelloWorldLayer

+ (CCScene *)scene
{
    CCScene *scene = [CCScene node];
    HelloWorldLayer *layer = [HelloWorldLayer node];
    [scene addChild:layer];
    return scene;
}

- (id)init
{
    if ((self = [super initWithColor:ccc4(94, 63, 107, 255)]))
    {
    }
    return self;
}

@end
The scene method is unchanged from the template, but init now calls [super initWithColor] to set a purple background color on the layer.
Build and run, and you should see nothing but purple:
Let’s make things a bit more exciting by adding a spaceship to the scene. You will need some instance variables for this, so modify the @implementation line in HelloWorldLayer.m as follows:
@implementation HelloWorldLayer
{
    CGSize _winSize;
    CCSprite *_playerSprite;
}
The _winSize variable stores the dimensions of the screen, which is useful because you will be referring to that quite often. The _playerSprite variable holds the spaceship sprite.
Now change init to the following:
- (id)init
{
    if ((self = [super initWithColor:ccc4(94, 63, 107, 255)]))
    {
        _winSize = [CCDirector sharedDirector].winSize;

        _playerSprite = [CCSprite spriteWithFile:@"Player.png"];
        _playerSprite.position = ccp(_winSize.width - 50.0f, 50.0f);
        [self addChild:_playerSprite];
    }
    return self;
}
This is all pretty basic if you have worked with Cocos2D before. The player sprite is positioned in the bottom-right corner of the screen. Remember that with Cocos2D, it is the bottom of the screen that has y-coordinate 0, unlike in UIKit, where y = 0 points to the top of the screen.
Build and run to try it out, and you should see the following:

To move the spaceship, this game uses the iPhone’s built-in accelerometers. Unfortunately, the iOS Simulator cannot simulate the accelerometers. That means that from now on, you will need to run the app on your device to test it.
Note: If you are unsure how to put the app on your device, check out this extensive tutorial that explains how to obtain and install the certificates and provisioning profiles that allow Xcode to run apps on your device. It’s not as intimidating as it looks, but you do need to sign up for the paid Apple developer program.
Note: If you are unsure how to put the app on your device, check out this extensive tutorial that explains how to obtain and install the certificates and provisioning profiles that allow Xcode to run apps on your device. It’s not as intimidating as it looks, but you do need to sign up for the paid Apple developer program.
To move the spaceship with the accelerometers, you’ll obviously be rocking your device from side to side. During testing I found that this sometimes caused the screen to autorotate from landscape right to landscape left, which is really annoying when you’re in the middle of a heated battle.
To prevent that from happening, go into the Target Settings screen and in the Summary tab under Supported Interface Orientations, de-select all options except for Landscape Right.

Using the accelerometers from code is pretty straightforward. You first ask Cocos2D to activate the accelerometers. Once enabled, it sends you periodic updates with the values of the three accelerometers that are built into the iPhone. You then use these values to change the speed of the spaceship.
First, add new instance variables to keep track of the accelerometer values. You only store the values for two of the accelerometers; the “Z” one isn’t used by this game.
@implementation HelloWorldLayer
{
    . . .
    UIAccelerationValue _accelerometerX;
    UIAccelerationValue _accelerometerY;
}
A good place to activate the accelerometers is inside init. Add the following line to it:
self.accelerometerEnabled = YES;
Finally, add the method that receives the accelerometer values:
- (void)accelerometer:(UIAccelerometer *)accelerometer didAccelerate:(UIAcceleration *)acceleration
{
    const double FilteringFactor = 0.75;

    _accelerometerX = acceleration.x * FilteringFactor + _accelerometerX * (1.0 - FilteringFactor);
    _accelerometerY = acceleration.y * FilteringFactor + _accelerometerY * (1.0 - FilteringFactor);
}
This bit of logic is necessary to filter – or “smoothen” – the data that you get back from the accelerometers so that it appears less jittery.
Note: An accelerometer records how much gravity currently pulls on it. Because the user is holding the iPhone in her hands, and hands are never completely steady, there are a lot of tiny fluctuations in this gravity value. We are not so much interested in these unsteady motions as in the larger changes in orientation that the user makes to the device. By applying this simple low-pass filter, you retain this orientation information but filter out the less important fluctuations.
Note: An accelerometer records how much gravity currently pulls on it. Because the user is holding the iPhone in her hands, and hands are never completely steady, there are a lot of tiny fluctuations in this gravity value. We are not so much interested in these unsteady motions as in the larger changes in orientation that the user makes to the device. By applying this simple low-pass filter, you retain this orientation information but filter out the less important fluctuations.
Now that you have a stable measurement of the device’s orientation, how can you use this to make the player’s spaceship move?
Movement in games often works like this:
- Set the acceleration based on some form of user input, in this case from the accelerometer values.
- Add the new acceleration to the spaceship’s current speed. This makes the object speed up or slow down, depending on the direction of the acceleration.
- Add the new speed to the spaceship’s position to make it move.
Of course, you have a great mathematician to thank for these equations: Sir Isaac Newton!

You need some more instance variables to pull this off. There is no need to keep track of the player’s position because the CCSprite already does that for you, but acceleration and speed are your own responsibility.
Add these instance variables:
@implementation HelloWorldLayer
{
    . . .
    float _playerAccelX;
    float _playerAccelY;
    float _playerSpeedX;
    float _playerSpeedY;
}
It’s good to set some bounds on how fast the spaceship can travel or it would be pretty hard to maneuver. Infinite acceleration sounds like a good idea in theory but in practice it doesn’t work out so well (besides, even Einstein thinks there are limits to how fast you can go).
Add the following lines directly below the #import statement:
const float MaxPlayerAccel = 400.0f;
const float MaxPlayerSpeed = 200.0f;
This defines two constants, the maximum acceleration (400 points per second squared) and the maximum speed (200 points per second).
Now add the following bit of logic to the bottom of accelerometer:didAccelerate::
if (_accelerometerY > 0.05)
{
    _playerAccelX = -MaxPlayerAccel;
}
else if (_accelerometerY < -0.05)
{
    _playerAccelX = MaxPlayerAccel;
}
if (_accelerometerX < -0.05)
{
    _playerAccelY = -MaxPlayerAccel;
}
else if (_accelerometerX > 0.05)
{
    _playerAccelY = MaxPlayerAccel;
}
This is a basic technique for controlling a sprite using the accelerometers. When the device is tilted to the left, you give the player maximum acceleration to the left. Conversely, when the device is tilted to the right, you give the player maximum acceleration to the right. Likewise for the up and down directions.
Note: You’re using the _accelerometerY value for the x-direction. That’s as it should be. Remember that this game is in landscape, so the Y-accelerometer runs from left to right in this orientation, and the X-accelerometer from top to bottom.
Note: You’re using the _accelerometerY value for the x-direction. That’s as it should be. Remember that this game is in landscape, so the Y-accelerometer runs from left to right in this orientation, and the X-accelerometer from top to bottom.
You’re almost there. The last step is applying the _playerAccelX and Y values to the speed and position of the spaceship. You will do this in the game’s update method. This method is called 60 times per second, so it’s the natural place to perform all of the game logic.
Add updatePlayer to the class:
- (void)updatePlayer:(ccTime)dt
{
    // 1
    _playerSpeedX += _playerAccelX * dt;
    _playerSpeedY += _playerAccelY * dt;

    // 2
    _playerSpeedX = fmaxf(fminf(_playerSpeedX, MaxPlayerSpeed), -MaxPlayerSpeed);
    _playerSpeedY = fmaxf(fminf(_playerSpeedY, MaxPlayerSpeed), -MaxPlayerSpeed);

    // 3
    float newX = _playerSprite.position.x + _playerSpeedX*dt;
    float newY = _playerSprite.position.y + _playerSpeedY*dt;

    // 4
    newX = MIN(_winSize.width, MAX(newX, 0));
    newY = MIN(_winSize.height, MAX(newY, 0));

    _playerSprite.position = ccp(newX, newY);
}
If you’ve programmed games before (or studied physics), then this should look very familiar. Here’s how it works:
Add the current acceleration to the speed.
The acceleration is expressed in points per second (actually, per second squared, but don’t worry about that) but update: is performed a lot more often than once per second. To compensate for this difference, you multiply the acceleration by the elapsed or “delta” time, dt. Without this, the spaceship would move about sixty times faster than it should!
Clamp the speed so that it doesn’t go faster than MaxPlayerSpeed if it is positive or -MaxPlayerSpeed if it is negative. You could write this using an if statement instead:
However, I like the succinctness of the one-line version. fminf() makes sure the speed doesn’t become larger than MaxPlayerSpeed because it always picks the smallest of the two, while fmaxf() makes sure the speed doesn’t drop below -MaxPlayerSpeed because it always picks the largest value. It’s a neat little trick.
-
Add the current acceleration to the speed.
The acceleration is expressed in points per second (actually, per second squared, but don’t worry about that) but
update:is performed a lot more often than once per second. To compensate for this difference, you multiply the acceleration by the elapsed or “delta” time,dt. Without this, the spaceship would move about sixty times faster than it should! -
Clamp the speed so that it doesn’t go faster than
MaxPlayerSpeedif it is positive or-MaxPlayerSpeedif it is negative. You could write this using anifstatement instead:if (_playerSpeedX < -MaxPlayerSpeed) { _playerSpeedX = -MaxPlayerSpeed; } else if (_playerSpeedX > MaxPlayerSpeed) { _playerSpeedX = MaxPlayerSpeed; }However, I like the succinctness of the one-line version.
fminf()makes sure the speed doesn’t become larger thanMaxPlayerSpeedbecause it always picks the smallest of the two, whilefmaxf()makes sure the speed doesn’t drop below-MaxPlayerSpeedbecause it always picks the largest value. It’s a neat little trick. - Add the current speed to the sprite’s position. Again, speed is measured in points per second, so you need to multiply it by the delta time to make it work correctly.
- Clamp the new position to the sides of the screen. You don’t want the player’s spaceship to go offscreen, never to be found again!
if (_playerSpeedX < -MaxPlayerSpeed)
{
    _playerSpeedX = -MaxPlayerSpeed;
}
else if (_playerSpeedX > MaxPlayerSpeed)
{
    _playerSpeedX = MaxPlayerSpeed;
}
Finally, add the following line to init to make update active:
[self scheduleUpdate];
Then add update itself:
- (void)update:(ccTime)dt
{
    [self updatePlayer:dt];
}
That should do it. Build and run the game. You can now control the spaceship by tilting the device.
