Tweening Animations in Unity with LeanTween
Learn how to use LeanTween to animate the User Interface and various GameObjects in Unity 3D by creating a Breakout game clone. By Ricardo Santos.
When making games, you frequently need to animate on-screen elements to create a narrative or add that special polish to capture the player’s interest. In the latter case, these effects’ only purpose is to make the experience enjoyable.
Unity has a powerful and user-friendly animation engine that lets you animate anything your heart desires. However, some types of animation, especially the most simple ones, don’t need the full power of the animation engine. You can perform them more efficiently with a more straightforward approach: Tweening techniques.
In this tutorial, you’ll learn about tweening and how to:
- Use tweening in GameObjects, such as assets and UI.
- Integrate the LeanTween package in your project.
- Apply rotation, displacement and scale effects to GameObjects in your projects.
- Add tweening UI elements to your projects.
By the time you’re done, you’ll think about animations not only in terms of Unity’s Animator but using other types of packages as well. As a bonus, the final sample project will look great!
Do you feel the tween?
Do you feel the tween?
Getting Started
Click the Download Materials button at the top or bottom of the tutorial to download the starter project. This project requires Unity 2020.3.20f1 or later.
In Assets/RW, you’ll find the assets used in this project. Look at the folder structure:
- Input: Files used by Unity’s new input system.
- Physics Materials: The physics materials used for the ball in the project.
- Plugins: This folder has LeanTween installed. You’ll learn how to install LeanTween in your projects later in the tutorial.
- Prefabs: The project’s prefabs.
- Scenes: You’ll find the sample scene here.
- Scripts: The C# scripts for this project.
- Sprites: The game art, courtesy of the kenney.nl industrial platformer pack.
- Text Mesh Pro: Files used by Text Mesh Pro where you create the UI. To learn more, make sure to check out the TextMesh Pro tutorial.
Whew, that was a lot of folders!
Open the TweenBreaker scene in Assets/RW/Scenes, then click Play to try this Breakout clone. Use the right and left arrows or the A and D buttons on the keyboard to move the paddle. Make the ball bounce around and break as many crates as you wish.
Now, it’s time to take a closer look at tweening.
Why Not Use Unity’s Animator for Everything?
That’s a great question!
Unity already has a module capable of implementing most kinds of animation, so why would you want to bring in another package? Isn’t it redundant?
The keyword here is overkill. The animation engine is too powerful for simpler tasks, and it may drain precious resources from the player’s computer.
Unity’s Animator Component has a callback function that continuously calls for every Animator on the scene. Animating GameObjects without using the Animator Component is an excellent way to keep requirements low.
What is Tweening?
Simplistically, tweening, or inbetweening, is another name for interpolation. In this operation, a property can assume any value between two limits.
For example, imagine a GameObject that translates between two points in a four second time interval, as shown in the following figure:
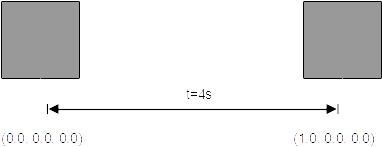
You know the position at zero seconds and four seconds: As the figure shows, those are the points (0, 0, 0) and (1, 0, 0). However, to animate it properly, the computer needs to draw each frame.
By getting values between those points, the animation engine can determine that at two seconds, the GameObject should be at (0.5, 0, 0), at one second, at (0.25, 0, 0), at three seconds, (0.75, 0, 0) and so on. This simple interpolation creates animation using only simple algebraic operations.
It’s possible to make this animation a little fancier by using animation curves, also known as tweening curves. In the previous example, to get the position of an element at any given time, you had to divide the total displacement by the elapsed time and add this value to the initial position.
That isn’t the only way to reach the final value: The progression doesn’t need to be uniform. It’s time to discuss tweening curves, also called easing functions.
In this case, the interpolation is no longer linear but instead uses an arbitrary function to dictate how the element moves. For example, if you said the GameObject in the previous example should move similarly to a sine function, the velocity would be lower on the extremes of the function.
For more information on easing functions and their effects, check this reference.
Animator Component vs Tweening Techniques
When you’re choosing between the two techniques, you should consider tweening’s strengths and limitations.
Tweening is great for simple components and animations. A good rule of thumb is to use tweening whenever you want to animate something straightforward without sacrificing framerate.
But trying to create complex animations solely with tweening can quickly get out of hand. The Animator Component’s extra bulk and power is better suited for tackling these more elaborate animations, such as sprite or skeletal animation.
How much overhead is there in the Animator Component? Let’s take a moment to compare their performance.
Performance Comparison
You can use Unity’s profiler to get a better view of what’s going on behind the scenes in this Animator and tweening comparison. To allow for a better comparison, take an example scene, with sprites moving as shown in the following figure:

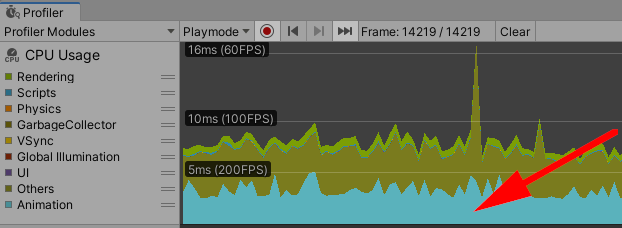
Now, consider a scene with many of those sprites making the same movement. As their number increases, the computer requirements increase accordingly. For 300 sprites moving sideways with the animator, the Unity profiler shows:
The animator is that thick blue line.
The animator is that thick blue line.
That thick blue line is how much processing power Unity’s Animator component is consuming. Selecting the line at a given point shows what’s happening in Unity’s main loop:

Notice that the main villain here is the Animator.Update() method. It’s taking a lot of the main thread processing time. If only there were a way to eliminate it…
That’s where LeanTween enters. LeanTween is a package that provides a lean, lightweight tweening implementation. Without the need to invoke the Animator, the whole process changes dramatically. See what the Unity profiler has to say about it:

The main thread is different too. Take a look:

And the final animation effect is the same. This demonstration proves that eliminating the Animator Component from simpler animations makes it possible to boost performance and enhance your complex animations.