How To Build a Monkey Jump Game Using Cocos2d 2.X, PhysicsEditor & TexturePacker – Part 1
Learn how to make a fun 2D physics game called Monkey Jump in this 3-part tutorial series covering Physics Editor, Texture Packer, and Cocos2D. By .
Last But Not Least: the Monkey
There’s one shape you have left to create, and that’s because it’s the most complex. Your monkey consists of quite a few animation phases (fourteen total):

The first idea that comes to mind is to add a collision polygon for each animation frame to make a perfect match for each phase of the animation. But this would be a bad idea.
First of all, the frequent exchange of fixtures would consume a good deal of CPU power. But the bigger problem is that with each new shape, the mass of the monkey would change!
This is because Box2d calculates mass based on a polygon’s area and density. If you change the polygon, the monkey will gain or lose weight! And this will lead to the physics simulation behaving erratically.
The solution is to make only one shape for the monkey, which you will try to make as good a fit as possible. To begin, drag one of the monkey shapes onto PhysicsEditor (for example, walk\right_1.png will do fine). Then double click the shape in Physics Editor, and rename it to monkey.

Now click the “+” button shown in the screenshot above and add the other images for the monkey (you can just select all the pngs in the monkey folder). The files will show up in the combo box and you can switch between them to look at them at a glance.
Start the tracer by clicking on the magic wand icon. What you see now is that the shape does not fit the monkey anymore. This is exactly what you want.

The tracer is now in animation tracing mode. You can switch between two frame modes: intersection and union. Intersection creates the polygon only from the parts that are covered by all sprites, whereas union uses the parts that are covered by any sprite. Choose intersection.
The slider allows you to browse through the animation phases and see how the shape fits the different phases.
If you want, you can add one of these shapes to the monkey as a temporary estimate. This will help you make your own shapes that fit the monkey’s animation frames. Or you can just click Cancel to dismiss the dialog and build it yourself – it’s up to you.
Here is what you have to build:

Sometimes polygon shapes don’t slide smoothly over other polygons and stick to each other. This is why you’re building the monkey from circle shapes.
The other reason is that using circles results in faster collision detection. The math to check if a point is inside a circle is much simpler than that for testing for a point inside a polygon. So you’ll save CPU power. You’ll delete the tracer shape after the other parts are set up.
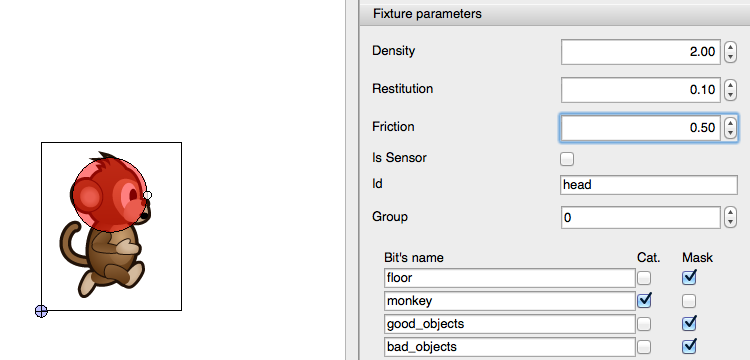
First build the head of the monkey. Use a circle shape and make it as big as the traced version. The head must be treated differently from the other body parts, since you want the monkey to get hurt when objects land on his head from above.
To distinguish the head from the other parts, set the Id to head. Set the head’s category to monkey, and make sure it collides with good_objects, bad_objects, and floor. Set the density to 2.0, the restitution to 0.1, and the friction to 0.5.
Next build the body of the monkey from two circles, one covering the torso and one the legs. For both, set the Id to body. Set the body’s category to monkey, and make sure it collides with good_objects, bad_objects and floor. Set the body’s density to 2.0, its restitution to 0.1, and its friction to 0.5.
Cycle through the different animation phases by selecting the different images from the Filename combo box. Check if the circles fit all phases. It doesn’t have to be a perfect fit, and you can come back to PhysicsEditor any time you want to tweak the collision set.
If you added the polygon from the tracer earlier, delete the polygon created with the tracer now.
During the game you need to check if there are objects to the left or right to trigger the push animation. To do this, place two sensors on the left and right sides of the monkey.
Sensors are fixtures that don’t interact with other bodies and simply report collisions. So to make a fixture a sensor, select each sensor shape and check IsSensor.
Set the Id to push_left for the left sensor and push_right for the right one. For each shape, set the category to monkey, and make sure it collides with bad_objects only – you don’t want the monkey push the floor and the bananas away!
Make the monkey shape fit all animation phases
Make the monkey shape fit all animation phases
One last thing to do: save and click Publish! When asked for a location, store the file in the Resources folder of the project as shapes.plist.
That’s it for now in PhysicsEditor. Next you move to Xcode and start coding your game!
The Xcode Project: Overview
Next, open up the Xcode project that you downloaded earlier from the tutorial source code (0-BaseProject\MonkeyJump\MonkeyJump.xcodeproj).
I created this starter project using the standard Cocos2d+Box2d template that comes with Cocos2d and removing all the demo stuff. I also added the sound resources and some classes which will make your life easier when working with Box2d inside Cocos2d.
One important thing to know about this project is that all files must have the .mm extension instead of .m. This is because Box2d is C++ based, so you must use Objective-C++ for development.
Note: If you get strange errors during compilation – like MonkeyJump/libs/Box2D/Common/b2Settings.h:22:10: fatal error: 'cassert' file not found – this is because a file including the b2Settings.h still has the .m extension. It can’t find the C++ header files required by Box2d because the compiler assumes that it’s a C file. Changing the extension to .mm fixes the issue.
Note: If you get strange errors during compilation – like MonkeyJump/libs/Box2D/Common/b2Settings.h:22:10: fatal error: 'cassert' file not found – this is because a file including the b2Settings.h still has the .m extension. It can’t find the C++ header files required by Box2d because the compiler assumes that it’s a C file. Changing the extension to .mm fixes the issue.
Now let’s discuss the starter project in more detail:
GBox2D
First let me give you some information about GBox2D. GBox2D is an Objective-C wrapper for Box2d that I developed for my own games.
These are the main classes in Gbox2D:
- GB2Engine: This class wraps the Box2d world simulation. It runs the simulation, updates all sprite positions and rotations and can iterate through all objects in the world. It is implemented as a singleton class to make access as easy as possible.
- GB2Node: This class combines a CCNode and a B2Body. It’s the glue between the physics simulation and the graphics representation inside Cocos2d. It also contains selectors for simple management of the physics object and implements a proxy to access the inner node’s data.
- GB2Sprite: This class is derived from GB2Node and specializes in using CCSprite as the inner object.
- GB2DebugDrawLayer: This is a Cocos2d layer that wraps the debug drawing. It can be added to your project like a normal layer. When added, it will draw the physics shape outlines. The nice thing about it is that it detects when running on a retina display target and scales the content accordingly.
- GB2Contact: This structure will be passed as parameter to an object when a collision is detected. Both objects involved in the collision will be called for each single point of contact.
- GB2WorldContactListener: This is a C++ class that reacts to collisions in the physics simulation.
If you’re curious, go ahead and scan through these classes to get an idea of what they do. Don’t worry if you don’t understand what they’re doing – you’ll learn how to use them it in the next few sections.
Collision Detection with Gbox2D
GBox2D makes collision detection a piece of cake! This is because you do not need to create one huge switch-case statement or a series of if-else cascades to detect the various possible collision combinations.
Instead, GBox2D simply uses the names of the colliding classes and calls selectors with names derived from the class names! If this sounds too abstract, take a look at the following example:
Let’s assume you have a monkey that is an object of class Monkey, and a banana that is an object of class Banana. If both objects begin to collide, the following selectors will be called by GBox2D:
    [banana beginContactWithMonkey:collisionA];
    [monkey beginContactWithBanana:collisionB];
If the collision is released, because the objects do not touch anymore:
    [banana endContactWithMonkey:collisionA];
    [monkey endContactWithBanana:collisionB];
The collisionA and collisionB parameters contain collision information, e.g., which objects and which fixtures took part in the collision. You will use this information to see if the monkey was hit on his head or body.
AppDelegate
Things I changed from the AppDelegate contained in the original Box2d project are as follows:
First I set the default pixel format of the frame buffer to RGBA8. That means that the game gets the full 24-bit color depth. I disabled the depth buffer, since you don’t need it.
	CCGLView *glView = [CCGLView viewWithFrame:[window_ bounds]
							pixelFormat:kEAGLColorFormatRGBA8
							depthFormat:0	//GL_DEPTH_COMPONENT24_OES
							preserveBackbuffer:NO
							sharegroup:nil
							multiSampling:NO
							numberOfSamples:0];
The next important thing to set is pre-multiplied alpha. This is because you use pre-multiplied PVR images created with TexturePacker. If you don’t set pre-multiplied alpha, your images will have dark borders.
[CCTexture2D PVRImagesHavePremultipliedAlpha:YES];
Since you’re going to use the random generator to select objects to drop, you have to seed it. The best way to do this is using time(). If you forget to seed the random generator, you will still get random numbers – but they will be the same with every start of the game.
srand (time (NULL));
When the initialization is done, the GameLayer scene is started:
[director_ pushScene: [GameLayer scene]];
GameLayer
The GameLayer is a simple class derived from CCLayer. In this state it consists of an empty init function…
    -(id) init
    {
    	if( (self=[super init]))
        {
    	}
    	return self;
    }
…and a static selector that wraps the CCLayer into a CCScene to hand over to the Director:
    +(CCScene *) scene
    {
    	// 'scene' is an autorelease object.
    	CCScene *scene = [CCScene node];

    	// 'layer' is an autorelease object.
    	GameLayer *layer = [GameLayer node];

    	// add layer as a child to scene
    	[scene addChild: layer];

    	// return the scene
    	return scene;
    }
Audio Resources
I got the theme music, tafi-maradi-loop.caf, from http://incompetech.com/
Since I knew I wanted to loop the music, I made things easier on myself and chose a theme without a vocal track.
The sound effects for the objects were obtained from http://soundbible.com (thanks to Mike Koenig). Some of them were created using cfxr.
All sounds and the music files were converted to .caf format. See Ray’s Audio 101 tutorial for more information.
If you compile and run the project, you will simply see a black screen. So let’s add some content to that screen now!