How To Build a Monkey Jump Game Using Cocos2d 2.X, PhysicsEditor & TexturePacker – Part 1
Learn how to make a fun 2D physics game called Monkey Jump in this 3-part tutorial series covering Physics Editor, Texture Packer, and Cocos2D. By .
Creating Sprite Sheets
Time to start the real work, beginning with sprite sheets.
Open the 0-BaseProject folder and have a look at the Assets folder. I’ve already arranged the images for you. You’re going to add the sprites from the background folder into one sprite sheet, and the sprites from the jungle folder into as second.
The background sheet will use RGB565, a 16-bit image format that reduces the amount of memory used by 50%. Using RGB565 will also speed up rendering. The foreground sheet, with most of the content, will use RGBA8888 for full quality. For more information on pixel formats with TexturePacker, check out this tutorial.
Creating the Background Sprite Sheet
Let’s start by creating the background sheet. Start TexturePacker, navigate to the O-BaseProject\Assets\background folder in Finder, and drag it into the right-hand side of the TexturePacker window. It will be blank at first, but don’t worry – that’s just because this is a big image.
To get it to show up, set the Max Size W and H values to 4096. Now that the sprite sheet is big enough, you’ll see the image appear.
Below is a screenshot of what you’ll see and the settings you’ll be changing. You can either change the settings by following the screenshot, or keep reading and I’ll walk you step-by-step through the process, along with an explanation of what each setting does.

To set up the parameters for the texture, first set the Data Format to Cocos2d. Next set the Texture format to .pvr.ccz. The main advantage of pvr.ccz is that it can be loaded quite fast, and it usually consumes less memory than PNG.
You may see a warning sign at this point next to Premultiply alpha. Move your mouse over that, and select Enable premultiply alpha to suppress the warning.
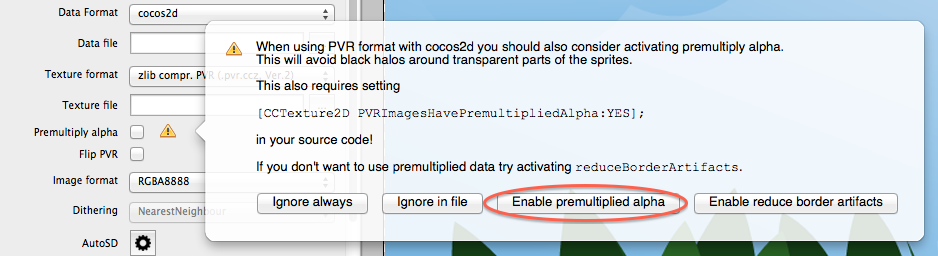
Pre-multiply means that all color values get multiplied by their transparency value when saving the file. This speeds up graphics rendering in the game, since the multiplication step does not need to be performed at runtime.
Next, change the Image format to RGB565. This means that you are using only 16 bits to store color information, down from the default RGBA888 (32 bits). This results in some incredible memory savings – if you look in the lower right of Texture Packer, you’ll see it’s gone down from 32768KB to 16384KB!
You might have noticed by doing this, the quality of the image has suffered a bit. You can see that the gradients are now not as smooth and have some artifacts called banding. You can compensate for this by setting Dithering to FloydSteinberg.
The following two images show a part of the jungle. The left one has no dithering, while on the right one, dithering has been enabled:
RGB565 image with banding artifacts

RGB565 image with banding artifacts
RGB565 image with dithering

RGB565 image with dithering
Set Size constraints to Any Size. First generation iPhones required textures to be a power of 2, but newer devices all can handle non-power-of-2 sizes. Also check Force word aligned.
Word aligned means that the number of bytes per row can be divided by 4. If you have an odd width like 1011px (that is 1011 pixels/row * 2 bytes/pixel = 2022 bytes/row, which isn’t divisible by 4), TexturePacker will extend the sheet to make it 1102px wide – that makes 551 words.
This is important to set because 16-bit textures like the background require it. If you forget to set this, Cocos2d will warn you and instruct you to play with the width of the sprite sheet until it’s an even number.
Next, set the Data file to background-568h@2x.plist in the Resources directory of the Xcode project. This will automatically set the Texture file to background-568h@2x.pvr.ccz.
Don’t worry that the paths are displayed as absolute paths. TexturePacker creates a relative path to the document file as soon as it is saved. This means you can move your project around as long as you don’t change the relative position of the assets and resources to the saved .tps file.
The -568h@2x extension is important, because TexturePacker can save retina display and reduced-resolution images for older devices. To enable this, simply click on the cog wheel in the AutoSD option.
An overlay pops up:

In most cases using one of the presets from the top of the dialog is sufficient. But in this case you need some detailed control.
Set the Main extension to -586h@2x.. This part of the data and image file name will be replaced with a different extension for the scaled variants.
Press the “+” button to add a scaling variant for retina display on iPhone 4.
Set Scale to 0.84507 – that’s simply 960 divided by 1136 – scaling the iPhone 5 background down to iPhone 4’s width. Set the Extension for this variant to -hd. (don’t forget the “.”).
Use an H value of 4096.
Press the “+” button again to add another scaling variant for non-retina displays.
Set Scale to 0.422535 – that’s simply 480 divided by 1136 – scaling the iPhone 5 background down to iPhone 3GS’s width. Set the Extension for this variant to . (yes – a single “.”).
Finally, click Save and save your Texture Packer file inside your project’s Assets folder, named background.tps. Then Publish. This creates six files in the Resources folder: background-hd-568h@2x.plist, background-568h@2x.pvr.ccz, background-hd.plist, background-hd.pvr.ccz, background.plist and background.pvr.ccz.
Open the Resources folder to make sure the files are there. You should see something like the following:

Creating the Jungle Sprite Sheet
Now create a new sheet for the foreground by pressing the New button on the toolbar. Drag the complete jungle folder from the Assets folder into the empty right pane.
See how TexturePacker builds the complete directory structure on the right pane? You can expand the tree view by pressing the arrow button to the left of the word “jungle”.

You are using a feature called Smart Folders, where TexturePacker rescans the directory every time you add sprites to the folder. If you want to add a new asset, or rename or change an existing asset, just drop it into the folder on your file system, and when you re-enter TexturePacker it will automatically update the sheet.
Yellow folders are the main folders you added, blue ones are folders found in the directory structure.
Note: If you need to update many sprite sheets at once, you can switch to Terminal and update all .tps files from the command line by calling TexturePacker *.tps.
You can even integrate TexturePacker with your Xcode build process. This has several advantages:
For more information on integrating TexturePacker with Xcode 4, check out this tutorial.
- You no longer need to worry about sprite sheets – just add the sprites to your Assets folder, and you’re done.
- If you use version control, sprite sheets will hang around as binary blobs. This will grow your working copy size pretty fast, especially when using Git or Mercurial for version control. The easy way around this is to simply not add the sprite sheets to version control, and instead create them on the fly.
Note: If you need to update many sprite sheets at once, you can switch to Terminal and update all .tps files from the command line by calling TexturePacker *.tps.
You can even integrate TexturePacker with your Xcode build process. This has several advantages:
- You no longer need to worry about sprite sheets – just add the sprites to your Assets folder, and you’re done.
- If you use version control, sprite sheets will hang around as binary blobs. This will grow your working copy size pretty fast, especially when using Git or Mercurial for version control. The easy way around this is to simply not add the sprite sheets to version control, and instead create them on the fly.
For more information on integrating TexturePacker with Xcode 4, check out this tutorial.
For the options, you’ll use a nearly identical setup as for the background sheet (see screenshot above). Just make sure to leave the image format at RGBA8888 for full quality.
In AutoSD simply select cocos2d hd/sd and press Apply. This sets the 0.5 scaling for retina and non-retina display images.

Also be sure to leave the padding at the default of 2. This will reduce artifacts on the sprite borders. Sometimes OpenGL drags in pixels from neighboring sprites. Padding avoids this problem by adding transparent borders around the sprites.
Note: If you want to use sprites as tiles with seamless connections, you must use either select extrude or reduce border artifacts, which replaces the transparent borders with colored ones. If you do not do this, you might get transparent lines between the tiles.
Note: If you want to use sprites as tiles with seamless connections, you must use either select extrude or reduce border artifacts, which replaces the transparent borders with colored ones. If you do not do this, you might get transparent lines between the tiles.
Set the Data File to jungle-hd.plist in the Resources folder of your Xcode project. This will automatically set the Texture File to jungle-hd.pvr.ccz.
Finally, save the sheet as jungle.tps in the Assets folder and click Publish. This creates 4 files in the Resources folder: jungle-hd.plist, jungle-hd.pvr.ccz, jungle.plist, and jungle.pvr.ccz. Check and see if they are there.
![]()