Cocos2D-X Tile Map Tutorial: Part 1
Learn how to make a simple tile-based cross platform game in this Cocos2D-X tile map tutorial! By Jorge Jordán.
Adding the Tiled Map to the Cocos2D-X Scene
Open up HelloWorldScene.h, and add right after the #include "cocos2d.h" line:
using namespace cocos2d;
This directs the compiler to use the cocos2d namespace so you don’t have to prefix everything with cocos2d:: here on out.
Then add these lines to the class definition, right after the opening curly brace:
private:
    CCTMXTiledMap *_tileMap;
    CCTMXLayer *_background;
This creates a private instance variable to keep track of the tile map itself, and another instance variable to keep track of the background layer in the map. You’ll learn more about tile map layers later.
Next, replace the contents of HelloWorldScene.cpp with the following:
#include "HelloWorldScene.h"

using namespace cocos2d;

CCScene* HelloWorld::scene()
{
    // 'scene' is an autorelease object
    CCScene *scene = CCScene::create();

    // 'layer' is an autorelease object
    HelloWorld *layer = HelloWorld::create();

    // add layer as a child to scene
    scene->addChild(layer);

    // return the scene
    return scene;
}

// on "init" you need to initialize your instance
bool HelloWorld::init()
{
    if ( !CCLayer::init() )
    {
        return false;
    }

    _tileMap = new CCTMXTiledMap();
    _tileMap->initWithTMXFile("TileMap.tmx");
    _background = _tileMap->layerNamed("Background");

    this->addChild(_tileMap);

    return true;
}
Here you make a call to the CCTMXTiledMap class, instructing it to create a map from the tile map file you created before with Tiled.
Some quick background: As CCTMXTiledMap is a CCNode, you can set its position, scale, etc. The children of the node are the layers of the tile map and there’s a helper function, layerNamed, where you can look them up by name – as you did to get the background. Each layer is a subclass of CCSpriteSheet for performance reasons – but this also means that you can only have one tileset per layer.
So the above source code saves a reference to the tile map and the background layer and then add the tile map to the HelloWorld layer.
And that’s it! Build and run your code on your iPad simulator, and you should see the bottom left corner of your map:
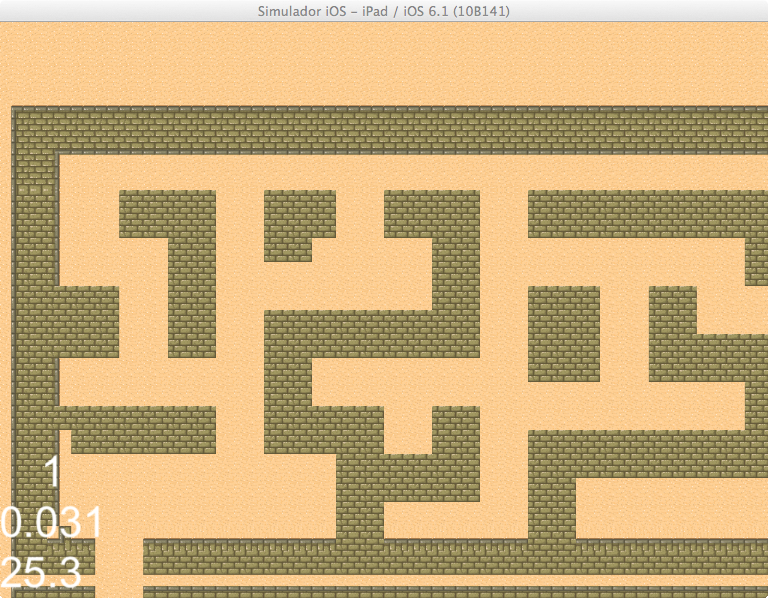
Not bad! But, for this to be a game, you need three things:
- a player
- a starting point to put the player
- to move your view so that you are looking at the player
And this is where it gets tricky. So let’s tackle this next!
Tiled Object Layers and Setting Tile Map Position
Tiled supports two kinds of layers:
- Tile layers: These are which you’ve been working with so far.
- Object layers: These allows you to draw boxes around portions of the maps to specify areas where things might happen. For example, you might make an area where monsters spawn, or an area that is deadly to enter. In this tutorial, you’re going to create an area for the spawn point of the player.
So go to the menu bar in Tiled and pick Layer\Add Object Layer, name the layer Objects. To insert an Object, select the Insert Rectangle(R) item from the toolbar. To know what layer is currently shown, you just look to the bottom left corner.

If you draw on the map, you’ll notice it doesn’t draw a tile. Instead, it draws a rectangle, which you can expand to cover multiple tiles or move around. In the latest version of tiled you can also draw other types of object shapes as ellipses, polygons and polylines.
You just need to select one tile for the player to start in. So choose somewhere on your map and click the tile. The size of the box doesn’t really matter, since you will just use the x, y coordinates. Note that this will be done for you already if you were lazy and used the sample map (although you will have to rename the provided object to “SpawnPoint” or you’ll get a crash – keep reading to learn how).

Then right click the gray object you just added, and select Object Properties…. Give it a name of SpawnPoint and click OK:

In previous versions of Cocos2D-X you could set the Type of the object to a Cocos2D-X class name but was removed due to issues with it, so leave the Type blank, which will create a CCDictionary where you can access the various aspects of the object, including the x, y coordinates.
Save the map, go back to Xcode, and open HelloWorldScene.h. Add the following inside the private variables declaration, with the other private variables:
CCSprite *_player;
Next open HelloWorldScene.cpp and add the following inside the init method, after setting this->addChild(_tileMap):
CCTMXObjectGroup *objectGroup = _tileMap->objectGroupNamed("Objects");

if(objectGroup == NULL){
    CCLog("tile map has no objects object layer");
    return false;
}

CCDictionary *spawnPoint = objectGroup->objectNamed("SpawnPoint");

int x = ((CCString)*spawnPoint->valueForKey("x")).intValue();
int y = ((CCString)*spawnPoint->valueForKey("y")).intValue();

_player = new CCSprite();
_player->initWithFile("Player.png");
_player->setPosition(ccp(x,y));

this->addChild(_player);
this->setViewPointCenter(_player->getPosition());
There will be a warning on that last line – don’t worry, you’ll get to it in a second.
Let’s stop for a second and explain the bit about the object layer and object groups. First note that you retrieve object layers via the objectGroupNamed method on the CCTMXTiledMap object (rather than layerNamed). It returns a special CCTMXObjectGroup object.
Then objectGroup calls the objectNamed method to get a CCDictionary containing a bunch of useful info about the object, including x and y coordinates, width, and height. In this point of the tutorial all you need to care about is the x, y coordinates to set them as the position of your player sprite.
At the end of the code block you are setting the view to focus on where the player is. So now add the following line to HelloWorldScene.h:
// In the public section
void setViewPointCenter(CCPoint position);
and the new method to HelloWorldScene.cpp (at the bottom of the file is fine):
void HelloWorld::setViewPointCenter(CCPoint position) {

    CCSize winSize = CCDirector::sharedDirector()->getWinSize();

    int x = MAX(position.x, winSize.width/2);
    int y = MAX(position.y, winSize.height/2);
    x = MIN(x, (_tileMap->getMapSize().width * this->_tileMap->getTileSize().width) - winSize.width / 2);
    y = MIN(y, (_tileMap->getMapSize().height * _tileMap->getTileSize().height) - winSize.height/2);
    CCPoint actualPosition = ccp(x, y);

    CCPoint centerOfView = ccp(winSize.width/2, winSize.height/2);
    CCPoint viewPoint = ccpSub(centerOfView, actualPosition);
    this->setPosition(viewPoint);
}
Ok, here is the explanation of this block. Imagine this function is setting the center of a camera. It allows the user to pass in any x,y coordinate in the map here – but if you think about it there are some points that you don’t want to be able to show – for example you don’t want the screen to extend beyond the edges of the map (where it would just be blank space!).
For example, take a look at this diagram:

See how if the center of the camera is less than winSize.width/2 or winSize.height/2, part of the view would be off the screen? Similarly, is important to check the upper bounds as well, and that’s exactly what does setViewPointCenter.
Now so far this function has been treated as if it was setting the center of where a camera was looking. However… that isn’t exactly what it’s doing. There is a way in Cocos2D-X to manipulate the camera of a CCNode, but using that can make things more difficult than the solution you’re going to use: moving the entire layer instead.
Take a look at this diagram:

Imagine a big world, and you’re looking at the coordinates from 0 to winSize.height/width. The center of your view is centerOfView, and you know where you want the center to be (actualPosition). So to get the actual position to match up to the center of view, all you do is slide the map down to match!
This is accomplished by subtracting the actual position from the center of view, and then setting the HelloWorld layer to that position.
Phew! Enough theory – is time to see it in action! Build and run the project, and if all goes well you should see your ninja in the scene, with the view moved to show him strutting his stuff!
