Cocos2D-X Tile Map Tutorial: Part 1
Learn how to make a simple tile-based cross platform game in this Cocos2D-X tile map tutorial! By Jorge Jordán.
Sign up/Sign in
With a free Kodeco account you can download source code, track your progress, bookmark, personalise your learner profile and more!
Create accountAlready a member of Kodeco? Sign in
Sign up/Sign in
With a free Kodeco account you can download source code, track your progress, bookmark, personalise your learner profile and more!
Create accountAlready a member of Kodeco? Sign in
Contents
Cocos2D-X Tile Map Tutorial: Part 1
25 mins
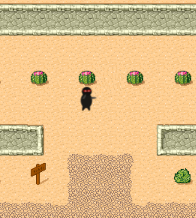
Mmm, tasty melons!
This is a 2-part Cocos2D-X tile map tutorial series, where you’ll create a simple game about a ninja in the desert, in the search for a tasty watermelon.
Note that this tutorial is about Cocos2D-X, the cross-platform C++ port of Cocos2D-iPhone. So the code you’ll write here will work on iPhone, Android, and more!
Note: This tutorial is a port of a similar tutorial for Cocos2D-iPhone. If you are looking for the Cocos2D-iPhone version, you can check it out here.
Note: This tutorial is a port of a similar tutorial for Cocos2D-iPhone. If you are looking for the Cocos2D-iPhone version, you can check it out here.
In this first part of the series, you’ll learn how to add a tile map to the game, scroll the map to follow the player, and use object layers. You’ll also learn how to use a map editor to create the tile maps themselves.
The second part of this series covers how to make collidable areas in the map, how to use tile properties, how to make collectable items and modify the map dynamically and how to make sure your ninja doesn’t overeat.
If you haven’t already, you may wish to start with the Cocos2D-X Tutorial for iOS and Android: Space Game, since that covers most of the basics that you’ll build upon here.
Ok, so let’s have some fun with tile maps!
Getting Started
For this tutorial you will need the latest version of Cocos2D-X installed (2.1.4 at the time of writing this tutorial). If you don’t have it already, download it now and install the templates by running the following commands in Terminal:
cd ~/Downloads/cocos2d-x-2.1.4
./install-templates-xcode.sh -f -u
Then create a new project in Xcode with the iOS\cocos2d-x\cocos2dx template. Click Next, name the project TileGame, select the options to make the project Universal, click Next and then click Create.
You are going to use ARC in this project so if this is the first time you have heard about ARC, I encorage you to take a look at the Beginning ARC series. By default the template isn’t set up to use ARC but, luckily, fixing it is really easy. Just go to Edit\Refactor\Convert to Objective-C ARC. Expand the dropdown and select only the files main.m, AppDelegate.cpp, HelloWorldScene.cpp, then click Check and finish the steps of the wizard.
And that’s it! Build and Run and make sure everything still works OK – you should see the normal Hello World screen.
Next, download this zip file of resources for the game. The zip file contains the following:
- A sprite you’ll use for your player object. This may look familiar from the How to Make A Simple iPhone Game with Cocos2D Tutorial!
- Some sound effects made with the excellent cfxr utility that you’ll use in the tutorial.
- Some background music made with Garage Band (see this post for more info).
- The tile set you’ll be using – it actually comes with the map editor you’ll be using, but I thought it would be easier to include it with everything else.
- Some additional “special” tiles explained a bit later.
Once you have the resources downloaded, unzip it and drag the TileGameResources folder to the Resources group in your project. In the project menu, right click the Resources group, and select Add Files to “TileGame”…. Select the Resources/TileGameResources folder, verify that Copy items into destination group’s folder (if needed) is checked and that Create groups for any added folders is selected, then click Finish.
If all works well, all of the files should be listed in your project.
Your project should look like this:
That’s it for now – time to have some fun and make your map!
Making a Map with Tiled
Cocos2D-X supports maps created with the open source Tiled Map Editor and saved in TMX format.
Visit the above link and download Tiled if you don’t have it already. At the time of writing this tutorial, the latest version is 0.9.0.
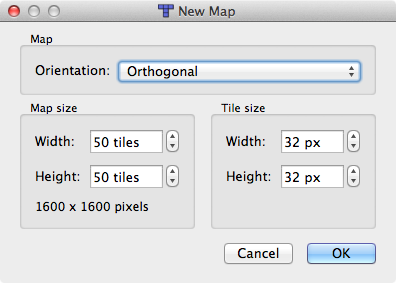
Then run Tiled, go to File\New, and fill in the dialog as follows:
In the orientation section, you can choose between Orthogonal (think: the Legend of Zelda) or Isometric (think: Disgaea). You’re going to pick Orthogonal here.
Next you get to set up the map size. Keep in mind that this is in tiles, not pixels. You are going to make a smallish sized map, so choose 50×50 here. Tiled will show you the total map size in pixels, at the bottom of the New Map dialog. This is calculated by multiplying the map size (50 tiles) by the tile size (32 px) in both height and width.
Finally you specify the tile width and height. What you choose here depends on the tile set that your artist will be making. For this tutorial, you are going to use some sample tiles that come with the Tiled editor which are 32×32, so choose that and click OK.
Next, you have to add the tile set that you’ll be using to draw your map. Click on Map in the menu bar, then chose New Tileset…, and fill in the dialog as follows:
To get the image, just click Browse and navigate to your TileGame/Resources/TileGameResources folder, and pick the tmw_desert_spacing.png file that you downloaded from the resource zip and added to your project. It will automatically fill out the name based on the filename.
You can leave the width and height as 32×32 since that is the size of the tiles. As for margin and spacing, this is what they mean:
- Margin is how many pixels Tiled should skip (for both width and height) for the current tile before it starts looking for actual tile pixels.
- Spacing is how many pixels Tiled should advance (for both width and height) after it reads the actual tile pixels to get to the next tile data.
If you take a look at tmw_desert_spacing.png, you’ll see that each tile has a 1px black border around it, which would explain the settings of margin and spacing as 1.
Once you click OK, you will see the tiles show up in the Tilesets window. Now you can start drawing away! Simply click the Stamp Brush icon in the toolbar, then click a tile, then click anywhere on the map you’d like to place a tile.
So go ahead and draw yourself a map – be as creative as you’d like! Make sure to add at least a couple buildings on the map, because you’ll need something to collide into later!
To make the drawing easier, you can take a look to the keyboard shortcuts. These are some of the most used:
- You can drag a box around a series of tiles in the Tileset picker, to put down multiple adjacent tiles at the same time.
- You can use the Bucket Fill Tool button in the toolbar to paint areas.
- You can zoom in and out with View\Zoom In and View\Zoom Out.
- The z key will rotate the tile when editing a map with the Stamp Brush tool.
There is a new feature you might have noticed Mini-map. This is an awesome feature, it let you see a (you guessed it) Mini-map! Take a look at my poor attempt at a maze in the bottom of the Mini-map below. The red box indicates the area you see in the main editing window.
Keep this Mini-map view in mind when you read about about scrolling in the next section.
Note that the resources for this tutorial comes the above map pre-made – feel free to use it if you’re feeling lazy. If you do so, you should open the map in Tiled and take a peek how it’s set up.
Once you’re done drawing the map, double click on the Tile Layer 1 in the Layers view, and change the name to Background. Then click File\Save and save the file to TileGame\Resources\TileGameResources in the TileGame project, and name the file TileMap.tmx, overriding the existing file.
You’re going to do some more stuff with Tiled later, but for now let’s get this map into the game!


