How to Update Your App for iOS 7
Learn how to update your app for iOS 7, from a richly textured to a minimalistic design. By Matthijs Hollemans.
Back to the drawing board
One of the main themes of iOS 7 is deference; that the interface should get out of the way of the user. Apple has made it very clear that apps should focus on their content. For Treasure Hunt, the content is the treasure maps. If you have a photo manipulation app, the content is the photos. If your app is for note taking, the content is the notes. Content is king on iOS 7; UI elements should never compete with the content for the user’s attention.
As you consider the transition of your app to iOS 7, it might be useful to rethink your app and consider what is really important to your app and what isn’t. Does the user experience still make sense in an iOS 7 world? Maybe now is a good time to change the navigational structure of your app, to combine two separate screens into one, or to use gestures to directly manipulate your content rather than through buttons and sliders.
Many of the standard apps — Calendar and Photos, for example — now use a zooming paradigm for navigating through the content. You zoom in from the year to the month to the week to the day, often literally, using attractive but contextually relevant animations. When you launch an app, the app icon appears to zoom into the launch image. Conversely, closing an app invokes a zoom-out animation. Zooming is a big idea on iOS 7 and if your app can take advantage of it, you should plan to adopt the new paradigm.
The changes to the Treasure Hunt app of this chapter won’t be that extensive. There will be many small tweaks in the UI, but the organization of most of the screens will remain largely the same. As you’re looking to transition your own apps, you might take this as an opportunity to not just patch up the graphics, but also to dramatically increase the user experience.
First steps in Xcode 5
Note: Before you open your own projects in Xcode 5, it’s essential to make a backup copy first. Xcode 5 will make some format changes to your storyboard files, making it impossible to edit them in the previous version of Xcode, should you want to go back at some point. Of course, if you’re using version control, this is less of an issue. Just make sure you commit your latest changes first.
Note: Before you open your own projects in Xcode 5, it’s essential to make a backup copy first. Xcode 5 will make some format changes to your storyboard files, making it impossible to edit them in the previous version of Xcode, should you want to go back at some point. Of course, if you’re using version control, this is less of an issue. Just make sure you commit your latest changes first.
Open the Treasure Hunt starter project in Xcode 5. The project should open without any issues. Press ⌘+B to build the app (that’s the cmd key on your keyboard together with the B key). You should see no warnings or error messages.
Time to take a look at the app in iOS 7. Run the app using the iPhone Retina (4-inch) simulator. Choose the simulator using the scheme picker box at the top of the Xcode window:

The app looks a bit worse for wear now:
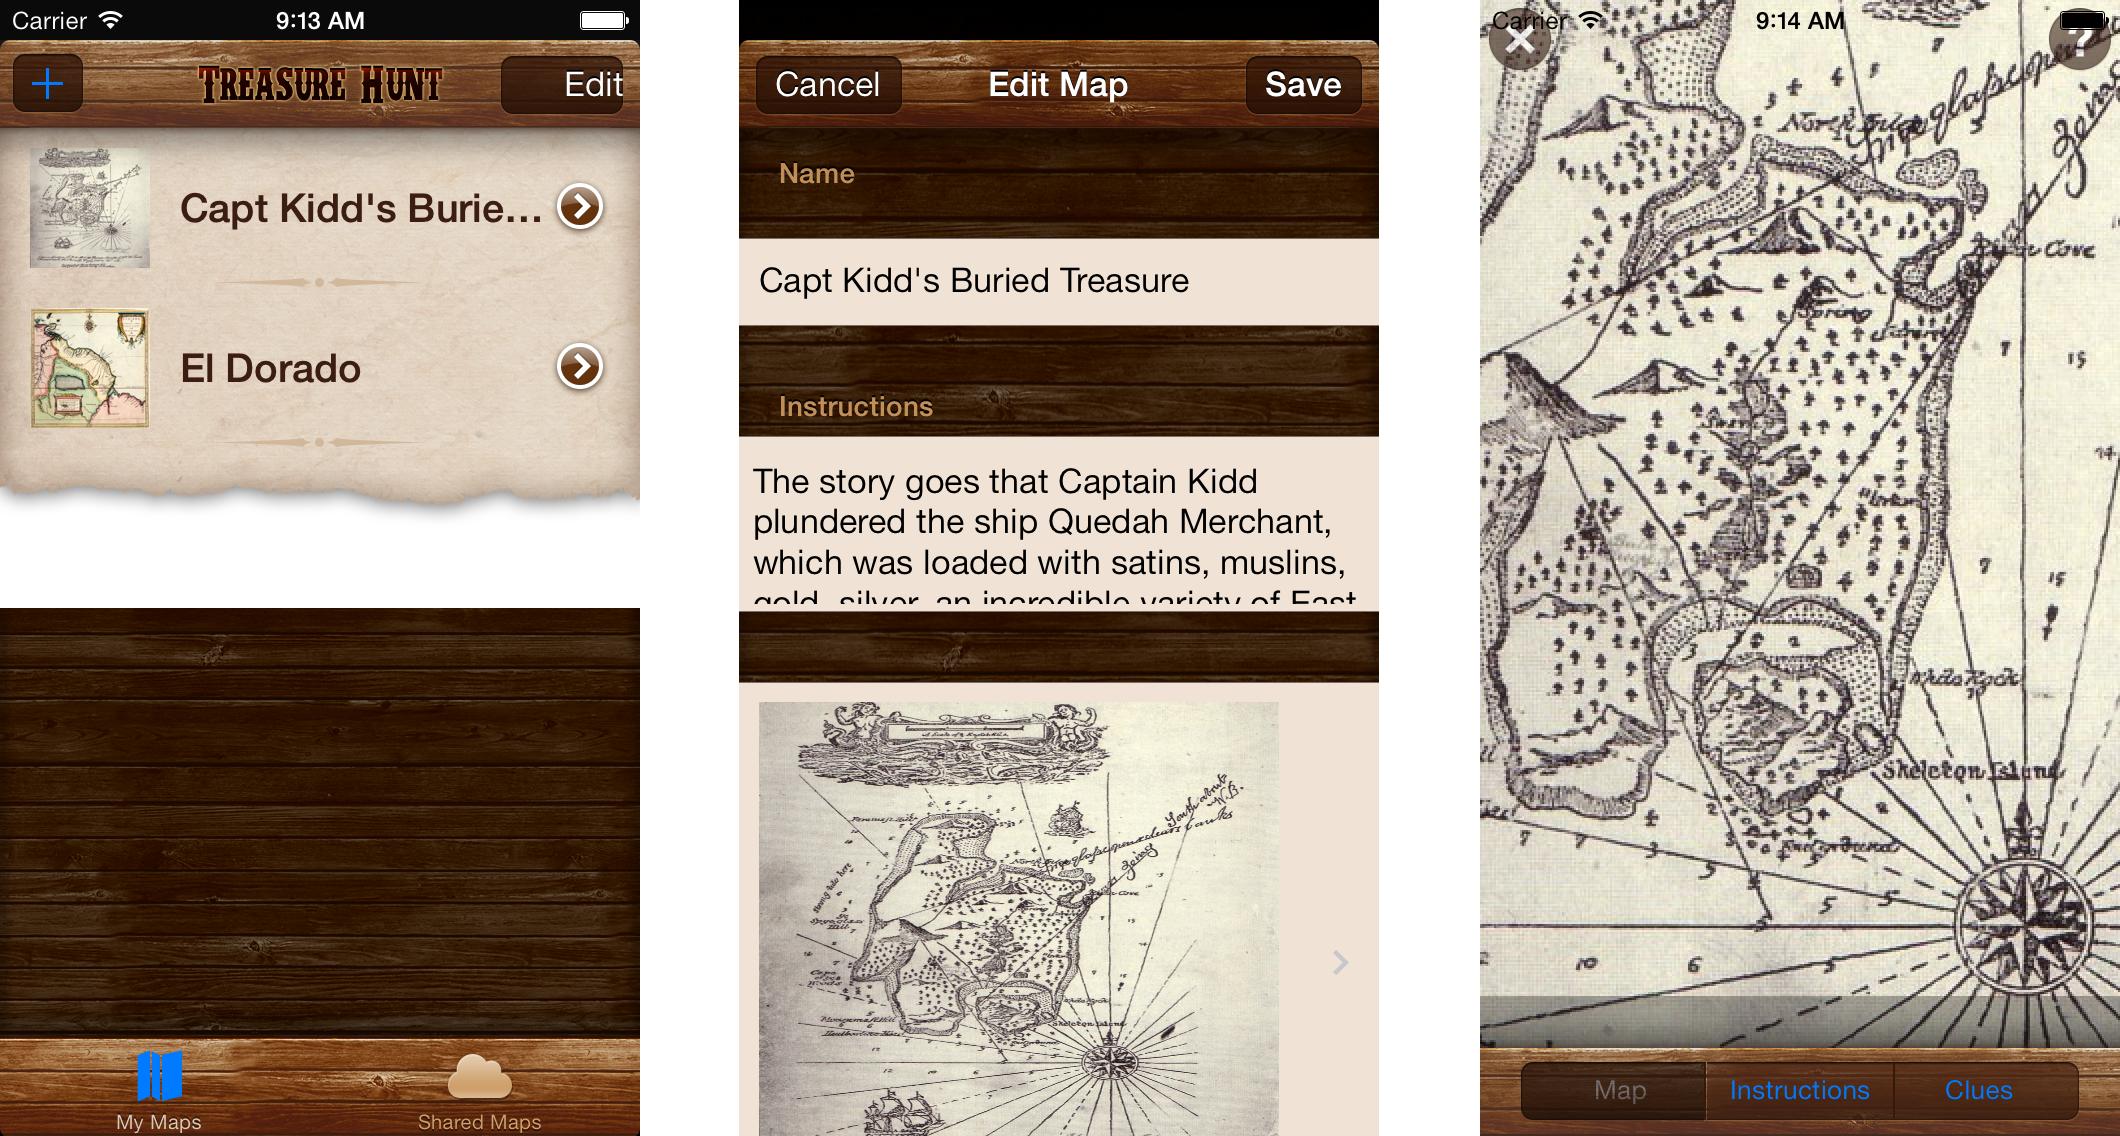
There are some obvious problems here:
- In the main screen of the app, the + bar icon is blue and the Edit label doesn’t fit the bar button shape. The background of the table view cell with the torn paper is not transparent but opaque white. The selected tab bar icon is also blue, which doesn’t sit well with the wooden motif.
- The Edit Map screen has a solid black bar where the status bar used to be, and the rest of its layout looks untidy.
- The third screen, known as the Map Detail screen, does have a status bar but it overlaps the actual map image making it hard to see. The toolbar doesn’t look very good either; its shadow image is now a dark strip on top of the map, and the colors of the labels render them illegible.
The app has several more screens, and they all suffer from similar problems. What’s worse, the richly textured design of the app no longer fits in well with the overall aesthetic of iOS 7. All other iOS 7 apps use a subtle, minimal design. This clashes with the heavy wood texture used in Treasure Hunt.
The following image of the Clue Sheet popup that lets users add clues and comments to a treasure map illustrates this mismatch between visual styles:

The new look of the on-screen keyboard conflicts directly with the tattered paper texture of the Clue Sheet. This just isn’t very nice to look at.
Going iOS 7 only
To simplify the transition to iOS 7, let’s assume the app is now iOS 7-only. The look-and-feel of iOS 7 is so different from its predecessors that it will be tricky to make your apps look good and be backward compatible. (In the full chapter in the book you will see how you can make the app also run on iOS 6.)
To force the app to be iOS 7-only, you have to set the iOS Deployment Target to 7.0. You may be familiar with doing this in Xcode 4, but there’s a new way to set this in Xcode 5 because it combines several settings screens into the one area.
Click the TreasureHunt icon at the top to switch from the Target settings to the Project settings. A project can contain multiple targets. The settings you change at the project level filter down to all targets unless you override them on a per-target basis:

Change iOS Deployment Target from 6.1 to 7.0.
Press ⌘+B to build the app again. Xcode will now give several warning messages:

Apparently the app is using an API that’s been deprecated in iOS 7. You’ll take care of that later on. Other than that, there are no compilation problems, so you’re still in pretty good shape.

Not so fast! This doesn’t mean the app update is now ready for submission to the App Store. There are plenty of small UI problems to fix, as you saw earlier.
You’ll now go through the app and fix these issues one by one. When you do this, it’s easiest to remove all the custom graphics and strip the app down to its bare essentials. This allows you to focus on the more important problems first. Once everything works properly, then you can then add the graphics back in.
For Treasure Hunt, removing the custom graphics is simple. All the appearance customizations for the iOS 6 version of the app are performed in code and a single flag enables or disables them.
Open TreasureHunt-Prefix.pch and change the following line:
#define CUSTOM_APPEARANCE 1
to this:
#define CUSTOM_APPEARANCE 0
Build and run your app to see the difference:
This already looks more like an iOS 7 app, but it still has plenty of UI issues. Also, turning off the custom appearance means the app has lost most of its charm. Those wooden textures may be considered overkill in this new design style, but they did give the app tons of personality. This chapter will show you how to retain some of that charm even in a minimal, texture-barren world.
Notice that all the compiler warnings have now disappeared — bar one. Most of them were related to the UIAppearance API. The app no longer uses this API; you removed that dependency with the #define statement earlier. If you use UIAppearance in your own apps then be forewarned; many of the things that you were able to do with it are now deprecated or work slightly differently.
Note: When you switched the Deployment Target to iOS 7, the non-Retina iPhone simulators were removed from the scheme picker. This means you cannot test your iOS 7 apps on a non-Retina iPhone simulator. This sounds draconian, but it makes sense since there aren’t any low-resolution iPhone or iPod touch models (iPhone 3GS or earlier) that can run iOS 7. All iPhones that can run iOS 7 have Retina screens.
Does this mean you no longer need to supply non-Retina images for you app? It depends. If your app is for the iPad (or universal) then you still need to provide 1x versions of the graphics to support the iPad 2 and iPad mini.
Remember that the iPad can run any non-universal iPhone app in a special emulation mode. As of iOS 7 this emulation mode always uses the Retina graphics. So if your app is iPhone-only then yes, you no longer need 1x graphics. (Designers rejoice!)
If you do decide to leave out the 1x artwork for the iPhone version of your app, make sure your Retina images still adhere to the Retina @2x.png naming rules or UIKit won’t apply the proper scaling to them.