Getting Started with Cucumber
Learn to use Cucumber, Gherkin, Hamcrest and Rest Assured to integrate Behavior-Driven Development (BDD) in an application made using Spring Boot and Kotlin. By Prashant Barahi.
Creating an HTTP Client
To simulate the REST controller, perform HTTP calls to /articles endpoint. Use Rest Assured for this.
Create HttpUtils.kt at src/test/kotlin/com/raywenderlich/artikles and paste the snippet below:
import io.restassured.response.Response

fun <T : Any> withPayload(payload: T, block: () -> Response?) {
  StateHolder.setPayload(payload)
  block()
}

object HttpUtils {

  private fun executeAndSetResponse(block: () -> Response): Response {
    val response = block()
    StateHolder.setResponse(response)
    return StateHolder.getResponse()
  }

  fun executePost(url: String): Response {
    return executeAndSetResponse {
      StateHolder.getRequest().post(url)
    }
  }

  fun executePut(url: String): Response {
    return executeAndSetResponse {
      StateHolder.getRequest().put(url)
    }
  }

  fun executeGet(url: String): Response {
    return executeAndSetResponse {
      StateHolder.getRequest().get(url)
    }
  }

  fun executeDelete(url: String): Response {
    return executeAndSetResponse {
      StateHolder.getRequest().delete(url)
    }
  }
}
The methods in HttpUtils read payload (if required) and use Rest Assured’s Request from State instance of the current thread to make an HTTP call. After receiving the response back, it stores the result in State‘s response.
Paste the snippet below to complete the previously created createAnArticleWithFollowingFields() in ArticleStepDefs.
// 1
withPayload(payload) {
  HttpUtils.executePost("/${Resources.ARTICLES}")
}
// If successful, store the "id" field in differentiator for use in later steps
if (StateHolder.getResponse().statusCode == 200) {
  // 2
  StateHolder.setDifferentiator(
      StateHolder.extractPathValueFromResponse<String>("id")!!
  )
}
Here:
- You made a POST request to
/articlesendpoint, supplyingpayloadas a body. - Recall that the
responseofStatestores the response retrieved as a result of HTTP requests. If the request is successful, you extract the value of the “id” field from the response and store it atdifferentiator. Later, you’ll use it to fetch the article using its ID.
You haven’t asserted anything yet. In the upcoming sections, you’ll see how to validate the actual state against the expected.
Expected vs. Actual
Alright! Back to the create-article.feature file. In the previously created scenario, add the following steps:
Then Should succeed
And "id" should not be null
And "title" should not be null
And "body" should not be null
And "lastUpdatedOn" should not be null
And "createdOn" should not be null
And "title" should be equal to "Cucumber"
And "articleType" should be equal to "FREE"
And "title" should be same as that in payload

When Fetch article by id
Then Should succeed
And "title" should be equal to "Cucumber"
And "id" should be equal to differentiator
The parameter values like ID, title and body are the field names in the response. Next, create corresponding step definitions in ArticleStepDefs:
@Then("{string} should not be null")
fun shouldNotBeNull(path: String) {
  // 1
  StateHolder.getValidatableResponse().body(path, notNullValue())
}

@Then("{string} should be equal to {string}")
fun shouldBeEqual(path: String, right: String) {
  StateHolder.getValidatableResponse().body(path, equalTo(right))
}

@Then("{string} should be equal to differentiator")
fun shouldBeEqualToDifferentiator(path: String) {
  StateHolder.getValidatableResponse().body(
      path,
      equalTo(StateHolder.getDifferentiator())
  )
}

@Then("{string} should be same as that in payload")
fun pathValueShouldBeSameAsPayload(path: String) {
  val valueFromResponse = StateHolder.getValidatableResponse()
      .extract().body().path<Comparable<Any>>(path)
  val valueFromPayload = StateHolder.getPayloadAsMap()[path]
  assert(valueFromResponse.equals(valueFromPayload))
}

@When("Fetch article by id")
fun fetchArticleById() {
  // 2
  val id = StateHolder.getDifferentiator()
  requireNotNull(id)
  HttpUtils.executeGet("/${Resources.ARTICLES}/${id}")
}

@Then("Should succeed")
fun requestShouldSucceed() {
  assertThat(
      StateHolder.getResponse().statusCode,
      allOf(
          greaterThanOrEqualTo(200),
          lessThan(300)
      )
  )
}

@Then("Should have status of {int}")
fun requestShouldHaveStatusCodeOf(statusCode: Int) {
  assertThat(
      StateHolder.getResponse().statusCode,
      equalTo(statusCode)
  )
}
Here:
-
getValidatableResponse()provides a convenient way to validate a response. Most of the assertion methods are similar because they read the value in theresponsepointed by the field name and use Hamcrest’sMatchersto assert it. - Recall that
createAnArticleWithFollowingFields()also stores the value of the “id” field indifferentiator. You use it to fetch the corresponding article, which gets stored inresponse.
Take a moment to understand the above methods and how they’re related to the Gherkin steps.
The additional imports should look like this:
import org.hamcrest.MatcherAssert.assertThat
import org.hamcrest.Matchers.*
// ...
Finally, run the Cucumber Java configuration Feature: create-article to execute the scenario. You should see something like this:

Great job! You completed your first scenario.
Feature: Get Article
So far, you’ve learned how to write Gherkin steps and implement their step definition methods. Now, add a get directory to /src/test/resources/com/raywenderlich/artikles/. Create a feature file there named get-article.feature and paste the following:
Feature: Get Article.

  Scenario: As a user, I should be able to get all articles.
    Given Bulk create articles with following fields
      | title    | body                    |
      | Hamcrest | A testing library       |
      | AssertJ  | Fluent testing library  |
      | TDD      | Test Driven Development |
    When Fetch all articles
    Then Should succeed
    And Should have size of 3
This scenario validates if fetching all articles actually returns every article in the database. First, it bulk-creates three articles and then asserts the result has a length of three.
To implement the step definitions, open ArticleStepDefs.kt and add the methods:
@Given("Bulk create articles with following fields")
fun bulkCreateArticles(payloads: List<Map<String, Any>>) {
  // 1
  payloads.forEach {
    createAnArticleWithFollowingFields(it)
  }
}

@When("Fetch all articles")
fun fetchAllArticles() {
  // 2
  HttpUtils.executeGet(Resources.ARTICLES)
}

@Then("Should have size of {int}")
fun shouldHaveSizeOf(size: Int) {
  assertThat(
      StateHolder.getValidatableResponse().extract().body().path<List<Any>>(""), // 3
      hasSize(size)
  )
}
Here:
- Because no endpoint exists for bulk creation, iterate over the values in the data table, calling
createAnArticleWithFollowingFields()on each row. - Send a GET request to
/articlesendpoint. The response will be a JSON array. - Read the root, i.e. the entire JSON array, as a
List. Then, validate its size.
Now, create a copy of the Cucumber Java configuration Feature: create-article. Name this one Feature: get-article. Change the feature path to the file location for get-article.feature. Then, run to execute the tests.

Open the final project for scenarios to update, delete and fetch a single article and the new step definitions. The test directory’s final structure will look like this:

Copy the final project’s ArticleStepDefs.kt, get-article.feature, delete-articles.feature and update-article.feature files to your Starter project. In get-articles.feature, comment out the line containing @requiresDBClear with #. You’ll learn about tags later.
One interesting scenario in get-article.feature uses Scenario Outline to describe a template and Examples to define a combination of inputs.
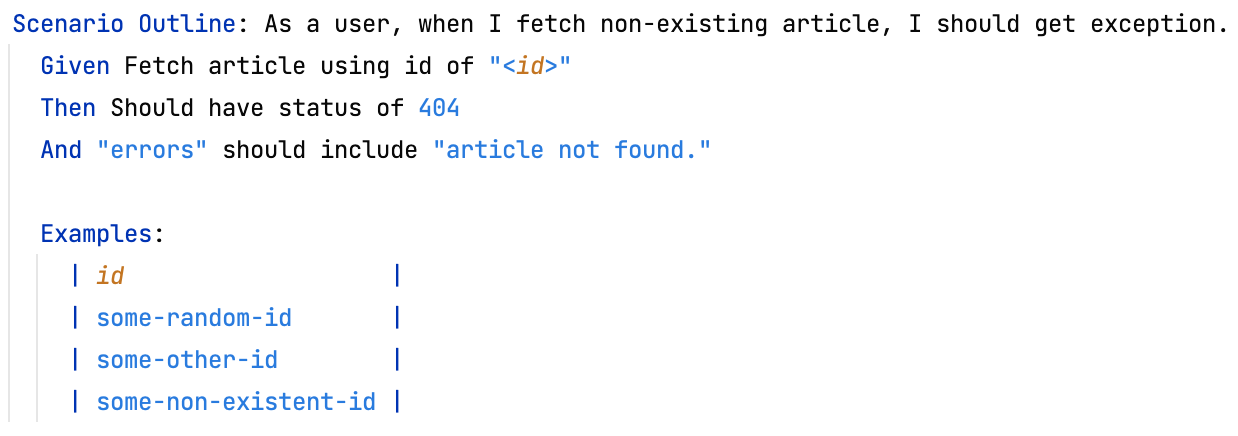
This scenario gets executed three times — once for each value of ID, replacing "<id>" in each step.
Your tests could pass or fail depending on the order of execution of the feature file. The cause:

Because you’re running these tests against a single Spring Boot application with a single database, the test will pass only if the above scenario processes before other scenarios that create articles. The scenario creates three articles, fetches all articles and asserts the length of the list is exactly three. That’s correct if this scenario was executed alone and against an empty database. This isn’t always achievable.
To make that assertion less strict, either change the step to something like Should have size of at least 3 instead of Should have size of 3 or clear the database before executing this scenario. Next, you’ll learn how to organize using tags.