Sprite Kit Tutorial: Space Shooter
A Sprite Kit tutorial that teaches you how to make a space shooter game. In the process, you’ll learn about accelerometers, textures, and scrolling too! By Tony Dahbura.
Sign up/Sign in
With a free Kodeco account you can download source code, track your progress, bookmark, personalise your learner profile and more!
Create accountAlready a member of Kodeco? Sign in
Sign up/Sign in
With a free Kodeco account you can download source code, track your progress, bookmark, personalise your learner profile and more!
Create accountAlready a member of Kodeco? Sign in
Contents
Sprite Kit Tutorial: Space Shooter
40 mins
- Create the Project
- Adding Resources
- Setting up your Project
- Switching to Landscape Orientation
- Adding a Space Ship
- Adding Parallax Scrolling
- Adding Stars
- Moving the Ship with the Accelerometer
- Pulling accelerometer data from your code
- Positioning the ship via Physics
- Adding Asteroids
- Shooting Lasers
- Basic Collision Detection
- Win/Lose Detection
- Gratuitous Music and Sound Effects
- Where To Go From Here?
This is a post by Tutorial Team Member Tony Dahbura, an independent iOS developer with FullMoon Manor LLC. You can also find him on Google+.
Note from Ray: Tony has ported this popular tutorial from Cocos2D to Sprite Kit. We hope you enjoy!
In this Sprite Kit tutorial, you’ll learn how to make a space shooter game for the iPhone.
You’ll pilot a space ship with the accelerometer, and blast your way through a field of dangerous asteroids with your trusty laser gun!
If you’re a complete beginner to making iPhone games using Sprite Kit, this tutorial is for you. You’ll learn how to make a complete game from scratch, with no prior experience necessary.
If you’re completely new to programming in general you might want to check out this slightly easier introduction first.
This Sprite Kit tutorial is also good for intermediate developers, because it covers some neat effects such as parallax scrolling, using texture atlas’, accelerometer movement, particle emitters and physics engines.
Without further ado, let’s get blasting!
Create the Project
Let’s start by creating a Xcode skeleton for your project – start up Xcode, select File\New\Project…, choose iOS\Application\SpriteKit Game template, and click Next:
Enter SpaceShooter for the Product Name, iPhone for Devices, and click Next:
Choose somewhere on your drive to save the project, and click Create. Then click the play button in the upper left to run the project as-is. You should see the following after clicking on the Hello, World! screen:
In this tutorial, you’ll mainly be working with the MyScene.m file. Before you start coding, let’s get some space game stuff added to your project.
Adding Resources
To make this iPhone game, you are going to need some art and sound effects with a space theme.
But don’t whip out a paint program quite yet – luckily Vicki Wenderlich has made some cool space game art, and we have pulled some cool sounds and other things together as resources you can use in this project!
So go ahead and download the space game resources and unzip them to your system.
Once you’ve unzipped the resources drag the whole folder to the SpaceShooter folder in your Xcode project. Make sure that Copy items into destination group’s folder (if needed) is checked, and click Finish. When you’re done your Groups and Files tree should look something like this:
If you’re curious, feel free to take a peek through the contents of the folders you just added to your project.
Here’s what’s inside:
- Icons: Some images that you’ll use to create the icons for the game when it is on your phone. Little details, but important for that professional look and feel.
- Backgrounds: Some images that you’ll use to create a side-scrolling background for the game. Includes an image of some space dust (that will go in front and move a little bit faster). There are some other images you can use to spruce up your game if you want to.
- Classes: Some additional classes for you to use to implement parallax scrolling (will discuss in a bit). Sprite Kit, unlike Cocos 2D does not contain built-in parallax scrolling, and what would a space shooter game be without a cool background rolling by?
- Particles: Some special effects we’ll be using to create the effect of some stars flying by, created with Xcode’s built in particle emitter tool.
- Sounds: Some space-themed background music and sound effects, created with Garage Band and cxfr.
- SpaceShooter.atlas: Contains a Xcode generated Texture Atlas we’ll be using in the game, including the asteroid, space ship, etc. Texture Atlas’ offer the advantage of fast rendering and conserve memory usage for games.
In case you’re wondering why we’re combining all those images into a large image like this, it’s because it helps conserve memory and improve performance while making the game run faster. There is a full tutorial on Texture Atlas’ available here.
It’s a good practice to get into, so we’re starting you out with it early! :]
Setting up your Project
Let’s begin by getting the icons in place so the app stands out on your iPhone.
Start by expanding the Icons folder under Resources. Select the Images.xcassets in the Groups and Files tree. Click AppIcon and then drag each png file from the Icons folder into the AppIcon window. They will be auto-placed for you in the proper slots. When done your window should look like this:
Before you begin writing the game, you’ll need to make a few changes to support the game in landscape mode versus portrait.
Switching to Landscape Orientation
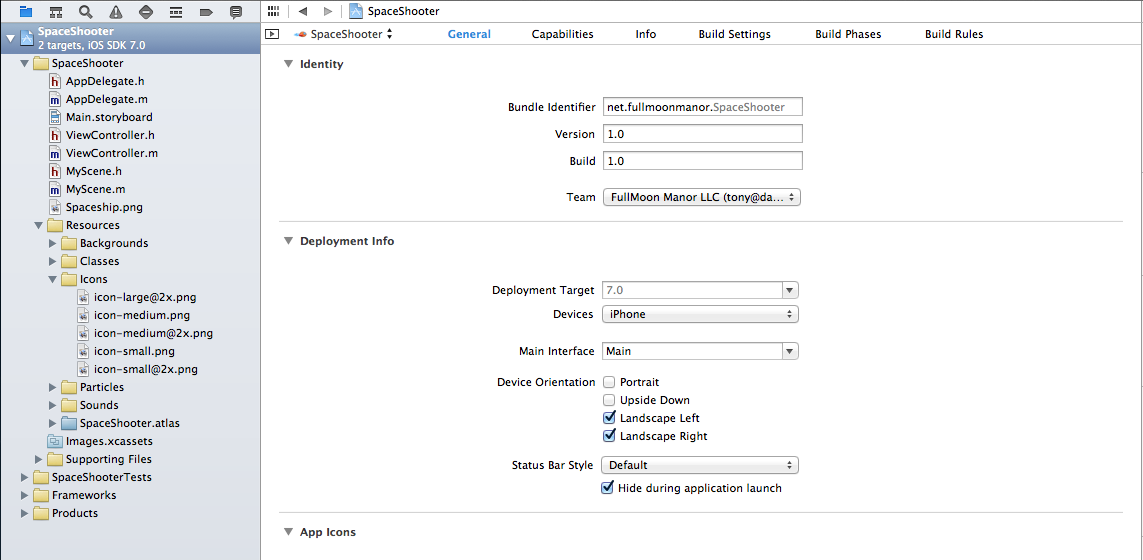
First, open your target setting by clicking your SpaceShooter project in the Project Navigator, selecting the SpaceShooter target. Then, in the Deployment Info section make sure General is checked at the top, uncheck Portrait so only Landscape Left and Landscape Right are checked in the Device Orientation area, as shown below:
Build and run your project, and all seems to work:
Or does it? More on this later.
Adding a Space Ship
Open MyScene.m
and replace all the contents below the #import "MyScene.h"
line with the following:
@implementation MyScene
{
SKSpriteNode *_ship; //1
}
-(id)initWithSize:(CGSize)size {
if (self = [super initWithSize:size]) {
/* Setup your scene here */
//2
NSLog(@"SKScene:initWithSize %f x %f",size.width,size.height);
//3
self.backgroundColor = [SKColor blackColor];
#pragma mark - TBD - Game Backgrounds
#pragma mark - Setup Sprite for the ship
//Create space sprite, setup position on left edge centered on the screen, and add to Scene
//4
_ship = [SKSpriteNode spriteNodeWithImageNamed:@"SpaceFlier_sm_1.png"];
_ship.position = CGPointMake(self.frame.size.width * 0.1, CGRectGetMidY(self.frame));
[self addChild:_ship];
#pragma mark - TBD - Setup the asteroids
#pragma mark - TBD - Setup the lasers
#pragma mark - TBD - Setup the Accelerometer to move the ship
#pragma mark - TBD - Setup the stars to appear as particles
#pragma mark - TBD - Start the actual game
}
return self;
}
-(void)update:(NSTimeInterval)currentTime {
/* Called before each frame is rendered */
}
@end
Let’s go over this step-by-step.
- At the top you define a variable to keep track of your trusty ship which you are about to add to the scene.
- You log out the size of the scene, which will yield interesting results shortly.
- Here you make the background color of the scene to black by setting the
backgroundColor
property. - Adding a sprite to a Sprite Kit scene is really easy, you just use the
spriteNodeWithImageNamed
method, and pass in the name of the image. You then set the position of the sprite, and calladdChild
to add it to the scene. Here you set the space ship to be at the left edge of the screen and centered on the Y axis. - The pragma marks will be used throughout, to guide you in building out the rest of the game. They are a glimpse into the future… Pragma marks also allow you to quickly jump to those locations in your source file by selecting the menu drop down on the far right over your edit window.
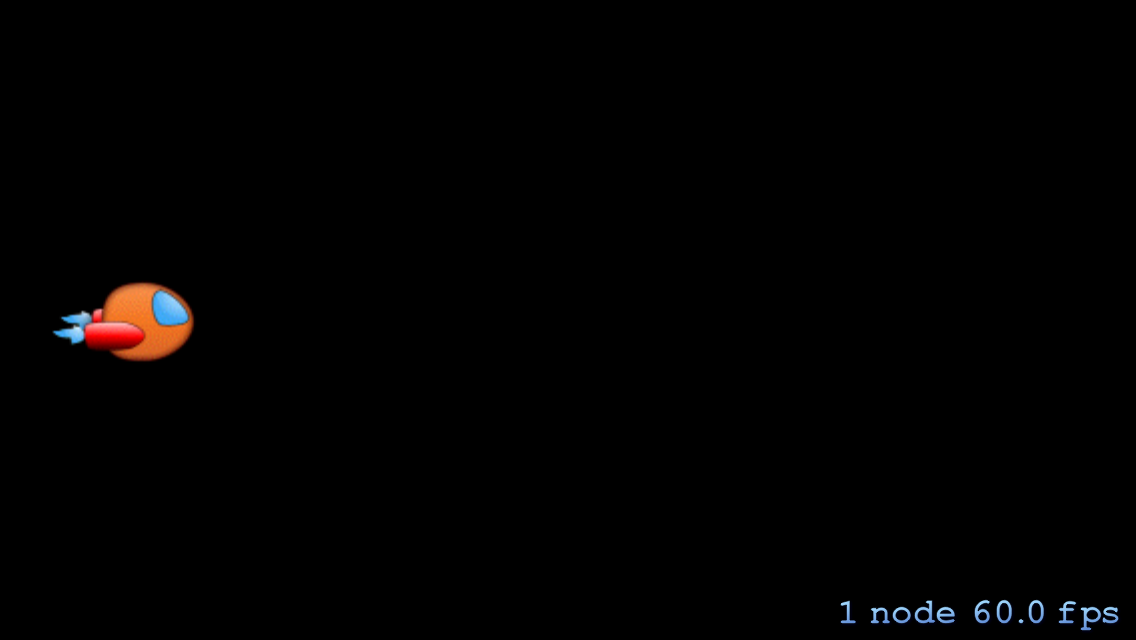
Build and run (use iPhone Retina (4 inch)), and… wait a minute, the ship looks a bit too large! Also, if you look at the console output you’ll see the following:
SpaceShooter[22664:a0b] SKScene:initWithSize 320.000000 x 568.000000
Your scene thinks its width is 320 and its height is 568 – which it is not! To see what’s happening, take a look at the ViewController.m's viewDidLoad
method:
- (void)viewDidLoad
{
[super viewDidLoad];
// Configure the view.
SKView * skView = (SKView *)self.view;
skView.showsFPS = YES;
skView.showsNodeCount = YES;
// Create and configure the scene.
SKScene * scene = [MyScene sceneWithSize:skView.bounds.size];
scene.scaleMode = SKSceneScaleModeAspectFill;
// Present the scene.
[skView presentScene:scene];
}
This creates the scene with a size as the bounds of the view. However, when viewDidLoad
is called, the view has not yet been added to the view hierarchy and hence it hasn’t responded to layout changes yet. So, the view bounds might not be correct yet, and this probably isn’t the best time to start up the scene.
The solution is to move the start up code to a later point in the process. In the ViewController.m
file, replace the viewDidLoad
method with the following:
- (void)viewDidLoad
{
[super viewDidLoad];
}
- (void)viewWillLayoutSubviews
{
[super viewWillLayoutSubviews];
// Configure the view.
// Configure the view after it has been sized for the correct orientation.
SKView *skView = (SKView *)self.view;
if (!skView.scene) {
skView.showsFPS = YES;
skView.showsNodeCount = YES;
// Create and configure the scene.
MyScene *theScene = [MyScene sceneWithSize:skView.bounds.size];
theScene.scaleMode = SKSceneScaleModeAspectFill;
// Present the scene.
[skView presentScene:theScene];
}
}
Build and run, voila, the coordinates output to the screen are correct and your ship is sized a bit better! The viewWillLayoutSubviews
has already gone through proper orientation, which is why you use the size from here instead.
Console output confirms your success:
SpaceShooter[22768:a0b] SKScene:initWithSize 568.000000 x 320.000000
At this point you have a project setup to launch correctly in landscape mode and all the coordinates are working as they should.
Adding Parallax Scrolling
You have a space ship on the screen, but it looks like it’s just sitting there all by itself! Let’s fix this by adding some cool parallax scrolling to the scene.
But wait a minute – what in the galaxy is parallax scrolling?
Parallax scrolling is just a fancy way of saying “move some parts of the background more slowly than the other parts.” If you’ve ever played SNES games like Act Raiser, you’ll often see this in the background of the action levels.
Sprite Kit does not have built in parallax scrolling, but this is easily handled by a simple class that will scroll the background you specify at a certain speed. This class is included in the resources you downloaded (under Resources\Classes). To use it, just create an instance and specify the speed you want the backgrounds to roll by. The class also supports random placement of specified elements (like the planets).
Select MyScene.m
and add an underneath your #import "MyScene.h"
add:
#import "FMMParallaxNode.h"
In the @implementation block underneath the SKSpriteNode *_ship;
declaration add:
FMMParallaxNode *_parallaxNodeBackgrounds;
FMMParallaxNode *_parallaxSpaceDust;
In the -(id)initWithSize:(CGSize)size method below the #pragma mark – TBD Game Backgrounds add the parallax code:
#pragma mark - Game Backgrounds
//1
NSArray *parallaxBackgroundNames = @[@"bg_galaxy.png", @"bg_planetsunrise.png",
@"bg_spacialanomaly.png", @"bg_spacialanomaly2.png"];
CGSize planetSizes = CGSizeMake(200.0, 200.0);
//2
_parallaxNodeBackgrounds = [[FMMParallaxNode alloc] initWithBackgrounds:parallaxBackgroundNames
size:planetSizes
pointsPerSecondSpeed:10.0];
//3
_parallaxNodeBackgrounds.position = CGPointMake(size.width/2.0, size.height/2.0);
//4
[_parallaxNodeBackgrounds randomizeNodesPositions];
//5
[self addChild:_parallaxNodeBackgrounds];
//6
NSArray *parallaxBackground2Names = @[@"bg_front_spacedust.png",@"bg_front_spacedust.png"];
_parallaxSpaceDust = [[FMMParallaxNode alloc] initWithBackgrounds:parallaxBackground2Names
size:size
pointsPerSecondSpeed:25.0];
_parallaxSpaceDust.position = CGPointMake(0, 0);
[self addChild:_parallaxSpaceDust];
#pragma mark - Setup Sprite for the ship
Let’s review these lines step-by-step:
- Create an array of the planets you want to scroll.
- Call the initializer passing the names of the files to use, the size to make it and the speed.
- Position it in the center of the screen.
- Call the method to randomly place the planets as offsets from the center.
- Add it to the layer.
- Create your space dust in a similar way.
Build and run your project, and some planets and dust will appear.
However this isn’t very interesting yet, since nothing is moving!
To move the space dust and planets, all you need to do is to call the update method in the parallax class. You call this with the currentTime and the class will move your background at the speed you want.
Modify the Sprite Kit update method:
-(void)update:(NSTimeInterval)currentTime {
/* Called before each frame is rendered */
//Update background (parallax) position
[_parallaxSpaceDust update:currentTime];
[_parallaxNodeBackgrounds update:currentTime];
}
Sprite Kit calls the update
method before each frame is rendered and is where you put actions you want done as your game runs.
Build and run your project, and now the background should scroll continuously through a cool space scene with some planets!
Adding Stars
No space game would be complete without some flying stars!
You could create more sprites with stars and add that to the parallax node, like you have with the other decorations, but stars are a perfect example of when you’d want to use a particle system.
Particle systems allow you to efficiently create a large number of small objects using the same sprite. Sprite Kit gives you a lot of control over configuring particle systems, and you can even design them visually within Xcode 5.
But for this tutorial, I’ve already set up some particle effects of stars racing from right to left across the screen you can use. Simply add the following code underneath the pragma mark - Setup the stars to appear as particles
line:
[self addChild:[self loadEmitterNode:@"stars1"]];
[self addChild:[self loadEmitterNode:@"stars2"]];
[self addChild:[self loadEmitterNode:@"stars3"]];
Under the initWithSize
method add:
- (SKEmitterNode *)loadEmitterNode:(NSString *)emitterFileName
{
NSString *emitterPath = [[NSBundle mainBundle] pathForResource:emitterFileName ofType:@"sks"];
SKEmitterNode *emitterNode = [NSKeyedUnarchiver unarchiveObjectWithFile:emitterPath];
//do some view specific tweaks
emitterNode.particlePosition = CGPointMake(self.size.width/2.0, self.size.height/2.0);
emitterNode.particlePositionRange = CGVectorMake(self.size.width+100, self.size.height);
return emitterNode;
}
This utility method loads the specified particle emitter from the Resources folder and prepares it for use by Sprite Kit. Finally, you adjust a couple of settings for last minute screen specific values and return the SKEmitterNode
. The node is added to the layer and the stars start running.
Note: If you click the stars1.sks file in the Resources\Particles folder Xcode will show it running in a window and the inspector will show settings that can be tweaked.
Build and run to see for yourself, and now you should see some stars randomly flying across the scene!
You have a ship, stars flying around, planets moving and even have some space dust to look at, but your ship looks a little lonely without movement.
Moving the Ship with the Accelerometer
You’re going to take the approach of moving the space ship via the accelerometer. As you tilt the device along the X-axis, the ship will move up and down.
This is actually pretty easy to implement, so let’s jump right into it.
Note: You will only be able to move your ship by loading the app on a device, since you cannot tilt your computer monitor with the simulator! If you’ve been testing your code on the simulator up till now, this would be the time to switch to your device. You won’t be able to test the tilt code unless you are running the game on an actual device.
Pulling accelerometer data from your code
In this scenario, you’ll call CMMotionManager and ask it for data when you need it. Placing these calls inside your update:
method aligns nicely with the ticks of your system. You’ll be sampling accelerometer data 60 times per second, so there’s no need to worry about lag.
You are going to take advantage of a Xcode 5 feature called modules. In the old days you added a library and did an #import in your code. This can now be done in one line using the @import command which automatically includes the framework for you.
In the MyScene.m
file, above your #import "MyScene.h"
line add:
@import CoreMotion;
Your app should only use a single instance of CMMotionManager to ensure you get the most reliable data. In the @implementation block underneath the FMMParallaxNode *_parallaxSpaceDust;
declaration, add:
CMMotionManager *_motionManager;
Below the #pragma mark - Setup the Accelerometer to move the ship
line, add:
_motionManager = [[CMMotionManager alloc] init];
Below the #pragma mark - Start the actual game
line, add:
[self startTheGame];
This initializes the Core Motion Manager for you at startup and places a call to a new method to start up your game. Finally, below the loadEmitterNode
method, add:
- (void)startTheGame
{
_ship.hidden = NO;
//reset ship position for new game
_ship.position = CGPointMake(self.frame.size.width * 0.1, CGRectGetMidY(self.frame));
//setup to handle accelerometer readings using CoreMotion Framework
[self startMonitoringAcceleration];
}
- (void)startMonitoringAcceleration
{
if (_motionManager.accelerometerAvailable) {
[_motionManager startAccelerometerUpdates];
NSLog(@"accelerometer updates on...");
}
}
- (void)stopMonitoringAcceleration
{
if (_motionManager.accelerometerAvailable && _motionManager.accelerometerActive) {
[_motionManager stopAccelerometerUpdates];
NSLog(@"accelerometer updates off...");
}
}
- (void)updateShipPositionFromMotionManager
{
CMAccelerometerData* data = _motionManager.accelerometerData;
if (fabs(data.acceleration.x) > 0.2) {
NSLog(@"acceleration value = %f",data.acceleration.x);
}
}
These methods will be used to start and stop motion monitoring and make sure the device has the capability for this feature. The last thing to add is a call to the updateShipPositionFromMotionManager
method in your update
method. Below the [_parallaxNodeBackgrounds update:currentTime];
line, add:
[self updateShipPositionFromMotionManager];
Build and run on your device. By tilting the device, you should see output on the console.
Positioning the ship via Physics
Next is making the ship move…Sprite Kit includes a a great capability called a physics engine.
Hold on a minute…No one said anything about getting involved with physics! Well, whenever you discuss outer space, someone always brings up physics. Anyways, the physics you are going to use is way easier than your physics book :]
Sprite Kit’s built-in physics system is based on Box 2D and can simulate a wide range of physics like forces, translation, rotation, collisions, and contact detection. Each SKNode (which includes SKScenes and SKSpriteNodes) has a SKPhysicsBody attached to it. This SKPhysicsBody represents that node in the physics simulation.
Right after the _ship.position = CGPointMake(self.frame.size.width * 0.1, CGRectGetMidY(self.frame));
line in your initWithSize
method, add:
//move the ship using Sprite Kit's Physics Engine
//1
_ship.physicsBody = [SKPhysicsBody bodyWithRectangleOfSize:_ship.frame.size];
//2
_ship.physicsBody.dynamic = YES;
//3
_ship.physicsBody.affectedByGravity = NO;
//4
_ship.physicsBody.mass = 0.02;
These lines do the following:
- Create a rectangular physics body the same size as the ship.
- Make the shape dynamic; this makes it subject to things such as collisions and other outside forces.
- You don’t want the ship to drop off the bottom of the screen, so you indicate that it’s not affected by gravity.
- Give the ship an arbitrary mass so that its movement feels natural.
You are basically defining a rectangular physics body around the ship.
Because you do not want your ship to slide off the top and bottom of the galaxy (the screen) while you move it, you must also define a edge loop around the boundary of your screen. This is like a wall around the screen.
At the top of the initWithSize
method below the line self.backgroundColor = [SKColor blackColor];
add:
//Define your physics body around the screen - used by your ship to not bounce off the screen
self.physicsBody = [SKPhysicsBody bodyWithEdgeLoopFromRect:self.frame];
Now you need to get the console output to actually move the ship for you. In the updateShipPositionFromMotionManager
method, replace the NSLog
statement with:
[_ship.physicsBody applyForce:CGVectorMake(0.0, 40.0 * data.acceleration.x)];
The applies a force 40.0*data.acceleration.x
to the ship’s physics body in the y direction. The number 40.0 is an arbitrary value to make the ship’s motion feel more natural.
Build and run the app on your device and move your device up and down to see your ship move. You can play around with the 40.0 number to get it where you like the settings.
Adding Asteroids
The game is looking good so far, but where’s the danger and excitement? Let’s spice things up by adding some wild asteroids to the scene!
The approach you’re going to take is every so often, you’ll create an asteroid offscreen to the right. Then you’ll run a Sprite Kit action to move it to the left of the screen.
You could simply create a new asteroid every time you needed to spawn, but allocating memory is a slow operation and it’s best when you can avoid it. So you’ll pre-allocate memory for a bunch of asteroids, and simply grab the next available asteroid when needed.
OK, let’s see what this looks like. At the top of the MyScene.m
file, below your imports add:
#define kNumAsteroids 15
Now, inside the @implementation
section underneath your _motionManager
variable, add:
NSMutableArray *_asteroids;
int _nextAsteroid;
double _nextAsteroidSpawn;
Inside your initWithSize
method underneath the line #pragma mark - TBD - Setup the asteroids
add:
_asteroids = [[NSMutableArray alloc] initWithCapacity:kNumAsteroids];
for (int i = 0; i < kNumAsteroids; ++i) {
SKSpriteNode *asteroid = [SKSpriteNode spriteNodeWithImageNamed:@"asteroid"];
asteroid.hidden = YES;
[asteroid setXScale:0.5];
[asteroid setYScale:0.5];
[_asteroids addObject:asteroid];
[self addChild:asteroid];
}
The above code adds all kNumAsteroids
asteroids to the array as soon as the game starts, but sets them all to invisible. If they're invisible you'll treat them as inactive.
Above your update
method, add the following:
- (float)randomValueBetween:(float)low andValue:(float)high {
return (((float) arc4random() / 0xFFFFFFFFu) * (high - low)) + low;
}
At the end of your update
method, under the [self updateShipPositionFromMotionManager];
line, add:
double curTime = CACurrentMediaTime();
if (curTime > _nextAsteroidSpawn) {
//NSLog(@"spawning new asteroid");
float randSecs = [self randomValueBetween:0.20 andValue:1.0];
_nextAsteroidSpawn = randSecs + curTime;
float randY = [self randomValueBetween:0.0 andValue:self.frame.size.height];
float randDuration = [self randomValueBetween:2.0 andValue:10.0];
SKSpriteNode *asteroid = [_asteroids objectAtIndex:_nextAsteroid];
_nextAsteroid++;
if (_nextAsteroid >= _asteroids.count) {
_nextAsteroid = 0;
}
[asteroid removeAllActions];
asteroid.position = CGPointMake(self.frame.size.width+asteroid.size.width/2, randY);
asteroid.hidden = NO;
CGPoint location = CGPointMake(-self.frame.size.width-asteroid.size.width, randY);
SKAction *moveAction = [SKAction moveTo:location duration:randDuration];
SKAction *doneAction = [SKAction runBlock:(dispatch_block_t)^() {
//NSLog(@"Animation Completed");
asteroid.hidden = YES;
}];
SKAction *moveAsteroidActionWithDone = [SKAction sequence:@[moveAction, doneAction ]];
[asteroid runAction:moveAsteroidActionWithDone withKey:@"asteroidMoving"];
}
Some things worth mentioning in the above code:
- The instance variable
_nextAsteroidSpawn
tells when to spawn an asteroid next. You always check this in the update loop. - If you're new to Sprite Kit actions, they are easy ways to get sprites to do things over time, such as move, scale, rotate, etc. Here you perform a sequence of two actions: move to the left a good bit, then call a method that will set the asteroid to invisible again. This is an example of a sequential action, one must complete before the next begins.
- The asteroids move from some x position off to the right and random Y position towards the left of the screen (towards where your ship is!) at a random speed.
At the top of the startTheGame
method, add:
_nextAsteroidSpawn = 0;
for (SKSpriteNode *asteroid in _asteroids) {
asteroid.hidden = YES;
}
Build and run your app, and now you have some asteroids flying across the screen!
Shooting Lasers
Not sure about you about you, but the first thing I think of when I see asteroids flying at me is SHOOT THEM!
So let's take care of this urge by adding the ability to fire lasers! This code will be similar to how you added asteroids, because you'll create an array of reusable laser beams and move them across the screen with actions based on when you tap to fire.
The main difference is we'll be using touch handling to detect when to shoot.
Underneath your #define kNumAsteroids
line, add:
#define kNumLasers 5
Inside the @implementation
section underneath your other variables, add:
NSMutableArray *_shipLasers;
int _nextShipLaser;
Inside your initWithSize
method underneath the line #pragma mark - TBD - Setup the lasers
add:
_shipLasers = [[NSMutableArray alloc] initWithCapacity:kNumLasers];
for (int i = 0; i < kNumLasers; ++i) {
SKSpriteNode *shipLaser = [SKSpriteNode spriteNodeWithImageNamed:@"laserbeam_blue"];
shipLaser.hidden = YES;
[_shipLasers addObject:shipLaser];
[self addChild:shipLaser];
}
In the startTheGame
method before the line [self startMonitoringAcceleration];
, add:
for (SKSpriteNode *laser in _shipLasers) {
laser.hidden = YES;
}
Finally, you need to detect touches to fire your laser. Add this new touchesBegan
method:
- (void)touchesBegan:(NSSet *)touches withEvent:(UIEvent *)event {
/* Called when a touch begins */
//1
SKSpriteNode *shipLaser = [_shipLasers objectAtIndex:_nextShipLaser];
_nextShipLaser++;
if (_nextShipLaser >= _shipLasers.count) {
_nextShipLaser = 0;
}
//2
shipLaser.position = CGPointMake(_ship.position.x+shipLaser.size.width/2,_ship.position.y+0);
shipLaser.hidden = NO;
[shipLaser removeAllActions];
//3
CGPoint location = CGPointMake(self.frame.size.width, _ship.position.y);
SKAction *laserMoveAction = [SKAction moveTo:location duration:0.5];
//4
SKAction *laserDoneAction = [SKAction runBlock:(dispatch_block_t)^() {
//NSLog(@"Animation Completed");
shipLaser.hidden = YES;
}];
//5
SKAction *moveLaserActionWithDone = [SKAction sequence:@[laserMoveAction,laserDoneAction]];
//6
[shipLaser runAction:moveLaserActionWithDone withKey:@"laserFired"];
}
This shows you how easy it is to receive touch events in Sprite Kit. It's identical to receiving them in a standard iOS application!
- Pick up a laser from one of your pre-made lasers.
- Set the initial position of the laser to where your ship is positioned.
- Set the end position off screen (X) and at the same Y position as it started. Define a move action to move to the edge of the screen from the initial position with a duration of a 1/2 second
- Define a done action using a block that hides the laser when it hits the right edge.
- Define a sequence action of the move and done actions
- Run the sequence on the laser sprite
Build and run your code, and now you can go fire your shipboard laser!
Basic Collision Detection
So far things look like a game, but don't act like a game, because nothing blows up! It's time to add some violence into this game!
Starting in the @implementation variables block underneath the _nextShipLaser declarataion, add:
int _lives;
At the bottom of the update
method, add:
//check for laser collision with asteroid
for (SKSpriteNode *asteroid in _asteroids) {
if (asteroid.hidden) {
continue;
}
for (SKSpriteNode *shipLaser in _shipLasers) {
if (shipLaser.hidden) {
continue;
}
if ([shipLaser intersectsNode:asteroid]) {
shipLaser.hidden = YES;
asteroid.hidden = YES;
NSLog(@"you just destroyed an asteroid");
continue;
}
}
if ([_ship intersectsNode:asteroid]) {
asteroid.hidden = YES;
SKAction *blink = [SKAction sequence:@[[SKAction fadeOutWithDuration:0.1],
[SKAction fadeInWithDuration:0.1]]];
SKAction *blinkForTime = [SKAction repeatAction:blink count:4];
[_ship runAction:blinkForTime];
_lives--;
NSLog(@"your ship has been hit!");
}
}
This is a very basic method of collision detection that just checks the bounding box of the sprites to see if they collide. Note that this counts transparency, so it isn't a perfect way of checking for collisions, but it's good enough for a simple game like this.
The first thing that happens is the for loop goes through each of the asteroids. If they are hidden it skips to the next asteroid. Once it gets an asteroid that is not hidden it checks to see if a laser has intersected with it (again making sure the laser is not hidden).
If there is an intersect (the laser has hit the asteroid) both are hidden and the check continues to the next asteroid. If the check with the laser fails then a similar check is done against your ship.
The ship indicates it has been hit by the blink action that is repeated 4 times. If a hit happens the lives are reduced.
You are checking if the laser has hit the asteroid first, and clearing it before the check underneath can see if the ship has been hit. In this regard you are giving the player a little better chance!
Build and run your code, and now things should blow up!
Win/Lose Detection
You're almost done - just need to add a way for the player to win or lose!
In this game, the player wins if he survives for 30 seconds, and loses if he gets hit 3 times.
Start by making the following changes to MyScene.m
:
Before your @implementation
line, underneath the #defines
add the following:
typedef enum {
kEndReasonWin,
kEndReasonLose
} EndReason;
Underneath your _lives
variable declaration, add:
double _gameOverTime;
bool _gameOver;
At the top of the startTheGame
method, add:
_lives = 3;
double curTime = CACurrentMediaTime();
_gameOverTime = curTime + 30.0;
_gameOver = NO;
At the end of the update
method, add:
// Add at end of update loop
if (_lives <= 0) {
NSLog(@"you lose...");
[self endTheScene:kEndReasonLose];
} else if (curTime >= _gameOverTime) {
NSLog(@"you won...");
[self endTheScene:kEndReasonWin];
}
Underneath the update
method, add this new method:
- (void)endTheScene:(EndReason)endReason {
if (_gameOver) {
return;
}
[self removeAllActions];
[self stopMonitoringAcceleration];
_ship.hidden = YES;
_gameOver = YES;
NSString *message;
if (endReason == kEndReasonWin) {
message = @"You win!";
} else if (endReason == kEndReasonLose) {
message = @"You lost!";
}
SKLabelNode *label;
label = [[SKLabelNode alloc] initWithFontNamed:@"Futura-CondensedMedium"];
label.name = @"winLoseLabel";
label.text = message;
label.scale = 0.1;
label.position = CGPointMake(self.frame.size.width/2, self.frame.size.height * 0.6);
label.fontColor = [SKColor yellowColor];
[self addChild:label];
SKLabelNode *restartLabel;
restartLabel = [[SKLabelNode alloc] initWithFontNamed:@"Futura-CondensedMedium"];
restartLabel.name = @"restartLabel";
restartLabel.text = @"Play Again?";
restartLabel.scale = 0.5;
restartLabel.position = CGPointMake(self.frame.size.width/2, self.frame.size.height * 0.4);
restartLabel.fontColor = [SKColor yellowColor];
[self addChild:restartLabel];
SKAction *labelScaleAction = [SKAction scaleTo:1.0 duration:0.5];
[restartLabel runAction:labelScaleAction];
[label runAction:labelScaleAction];
}
Don't worry if you don't understand how the endTheScene method works - it's some code used for a bunch of games for a quick win/lose menu text on the screen that uses the Sprite Kit SKLabelNode. SKLabelNodes are just like the sprites you've been using, but allow displaying text.
Finally, at the top of your touchesBegan
method, add:
//check if they touched your Restart Label
for (UITouch *touch in touches) {
SKNode *n = [self nodeAtPoint:[touch locationInNode:self]];
if (n != self && [n.name isEqual: @"restartLabel"]) {
[[self childNodeWithName:@"restartLabel"] removeFromParent];
[[self childNodeWithName:@"winLoseLabel"] removeFromParent];
[self startTheGame];
return;
}
}
//do not process anymore touches since it's game over
if (_gameOver) {
return;
}
The additional code added to the touchesBegan method checks if the player has tapped the node for wanting to play again. This uses a very handy Sprite Kit method called nodeAtPoint
. When you detect a tap on this label you clear out the labels and call the startTheGame
method to replay.
Build and run the code, and see if you can lose!
Gratuitous Music and Sound Effects
As you know, this game needs some awesome sound effects to make it complete. There were some sounds as part of the resources you downloaded as well as some cool outer space type background music.
You just need a bit of code to play these sounds in the right places. In MyScene.m
file, make the following changes:
//Add to top of file underneath @import CoreMotion;
@import AVFoundation;
//Add the following variable underneath the bool _gameOver; declaration
AVAudioPlayer *_backgroundAudioPlayer;
//Add above [self startTheGame] in initWithSize
[self startBackgroundMusic];
Add the following method underneath the updateShipPositionFromMotionManager
:
- (void)startBackgroundMusic
{
NSError *err;
NSURL *file = [NSURL fileURLWithPath:[[NSBundle mainBundle] pathForResource:@"SpaceGame.caf" ofType:nil]];
_backgroundAudioPlayer = [[AVAudioPlayer alloc] initWithContentsOfURL:file error:&err];
if (err) {
NSLog(@"error in audio play %@",[err userInfo]);
return;
}
[_backgroundAudioPlayer prepareToPlay];
// this will play the music infinitely
_backgroundAudioPlayer.numberOfLoops = -1;
[_backgroundAudioPlayer setVolume:1.0];
[_backgroundAudioPlayer play];
}
The above method uses the AVAudioPlayer to play the background music continuously during the game.
Now you need to get the explosions and firing working. There are three areas for sounds: when the laser fires, when an asteroid is hit, and when your ship gets destroyed.
In the touchesBegan
method, above the SKAction *laserMoveAction = [SKAction moveTo:location duration:0.5];
line add:
SKAction *laserFireSoundAction = [SKAction playSoundFileNamed:@"laser_ship.caf" waitForCompletion:NO];
Replace the SKAction *moveLaserActionWithDone
line with:
SKAction *moveLaserActionWithDone = [SKAction sequence:@[laserFireSoundAction, laserMoveAction,laserDoneAction]];
The above line adds one more sequence to your existing laserFire action.
The next area to fix is the asteroids being destroyed by lasers.
Inside the update
method add the following inside the if ([shipLaser intersectsNode:asteroid]) {
block above the shipLaser.hidden = YES;
line, add:
SKAction *asteroidExplosionSound = [SKAction playSoundFileNamed:@"explosion_small.caf" waitForCompletion:NO];
[asteroid runAction:asteroidExplosionSound];
The last area to fix is when your ship gets destroyed.
In the update
method replace the [_ship runAction:blinkForTime];
line with:
SKAction *shipExplosionSound = [SKAction playSoundFileNamed:@"explosion_large.caf" waitForCompletion:NO];
[_ship runAction:[SKAction sequence:@[shipExplosionSound,blinkForTime]]];
The above lines create a new sound action and insert a Sprite Kit sequence of actions, replacing the single blinkAction, with a sound effect and then the blink.
Does the sound being a sequence mean the ship will delay blinking till the sound finishes?
[spoiler title="Tell Me!"]The answer is no, the SKAction that plays the sound set the waitForCompletion
flag to NO[/spoiler]
Although Sprite Kit can play music as an action, it is better to utilize the AVAudioPlayer for longer playing stuff like background music.
And that's it - congratulations, you've made a complete space game for the iPhone from scratch!
Where To Go From Here?
This Sprite Kit tutorial covered a lot of different topics including particles, texture atlas', and sound effects. I hope this tutorial inspired you to make the next great game using Sprite Kit.
Some other things to try...
- Why are the asteroids still hitting us while in the game over screen? [spoiler title="Why?"]The asteroids are still being checked against the ship position because the update method is still getting called in the game over screen. To fix this you put a check in the
update
method to see if the _gameOver variable is not set. The downloadable version has this code in place so look at theif (!_gameOver) {
block in theupdate
method.[/spoiler] - Suppose you wanted to make the game harder by adding more asteroids?
- Suppose you made the asteroids faster?
- Add a score line that keeps track of the asteroids killed.
Here is the SpaceShooter project with all of the code from the above tutorial.
And that concludes the How To Make A Space Shooter iPhone Game tutorial! If you want to learn more about Sprite Kit, take a look at iOS Games by Tutorials on this site.
Please join in the forum discussion below if you have any questions or comments!