Unity 4.3 2D Tutorial: Animations
Learn how to use Unity’s powerful built-in animation system in this Unity 4.3 2D Tutorial! By Chris LaPollo.
Introducing the Animation View
Before creating any animations, it will help if you understand the following three terms:
- Animation Clip: A Unity asset that defines a specific piece of animation. Animation Clips can define simple animations, like a blinking light, or complex ones, such as an attack animation for a seven-headed hydra. Later you’ll learn how you can combine Animation Clips to produce even more complex animations.
- Curve: Changing the values of one or more properties over time is what produces an animation, and Unity refers to each of these animated properties as a curve. Unity uses this term because you can graph the property’s values over time, and lines on a graph are referred to as curves, even if they’re straight. Mathematicians, am I right?
- Keyframe: Rather than define values for every frame of an animation, you will set values at certain points in time and let Unity fill in the gaps by interpolating the values between those points. The points along a curve that you define explicitly are called keyframes, because they are the “frames” in the animation that are “key” to calculating the final result.
With those terms defined, it will now be easier to discuss the Animation view. You use this window to create Animation Clips associated with a specific GameObject. Each clip will consist of one or more curves, and each curve will consist of one or more keyframes.
The following image highlights the different parts of the Animation view, and the list after it provides the names used in this tutorial to refer to these areas, along with a brief description of each:
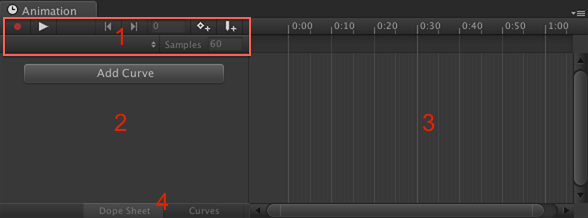
- Control bar: This area contains various controls you’ll use when working on Animation Clips. These will be described as needed.
- Curves List: The list of curves affected by the current Animation Clip, as well as a button for adding a new property curve.
- Timeline: A view of the animation curves, showing their values over time. The contents of this area will be different depending on the current view mode (see item #4). In Dope Sheet mode, it will contain each curve’s keyframes, laid out horizontally over time. This functions similarly to what traditional animators use in that it is mainly useful for judging the timing of important moments in your animation. However, in Curves mode, the timeline graphs the actual value of the property over the duration of the animation, providing a visual indication of the curve’s values at any point in time.
- View mode buttons: These two buttons allow you to switch the timeline’s view mode between Dope Sheet and Curves modes. This tutorial utilizes Dope Sheet mode exclusively, but each mode can be useful. Generally, you will set up your keyframes in Dope Sheet mode and then use Curves mode if you need to fine tune how the values are interpolated between your keyframes.
Don’t worry if any of the above descriptions don’t seem clear – the Animation view’s various components will be described in detail throughout this tutorial.
Inside the Project browser, click zombie_0 and then shift+click zombie_3, resulting in a selection containing all four zombie Sprites, as shown below:
![]()
Now drag the selected Sprites over the Animation view. A green icon with a plus sign in it will appear, as shown below:
![]()
When you see the + icon, release the mouse button, which will display a dialog titled Create New Animation. This dialog simply allows you to name and choose a location in which to save your new Animation Clip.
Enter ZombieWalk in the field labeled Save As, choose the Animations directory, and click Save. The following image shows the completed dialog:

When the dialog closes, Unity has done several things for you behind the scenes:
The Animator Controller is what decides which Animation Clip the Animator should play at any given time and will be covered in the next part of the tutorial.
![]()
The other red components are covered in more detail later, but for now, just know that whenever you see a red field or UI component in Unity, you’re currently recording an Animation Clip.
- Added a new Animator component to zombie. Unity plays Animation Clips on a GameObject through this Animator component. You’ll learn more about it in the next part of this tutorial.

- Created a new Animation Clip called ZombieWalk and set up the Animation view to edit it. As you can see below, the Animation view’s clip drop-down menu, in the view’s control bar, now indicates that ZombieWalk is the current Animation Clip:

- Created a new Animator Controller, saved it in the same Animations folder into which you saved ZombieWalk, and assigned it to zombie‘s Animator. You can see it in the Controller field in the zombie’s Animator component here:

The Animator Controller is what decides which Animation Clip the Animator should play at any given time and will be covered in the next part of the tutorial.
- Colored some interface elements red. For example, the scene controls shown below:

The other red components are covered in more detail later, but for now, just know that whenever you see a red field or UI component in Unity, you’re currently recording an Animation Clip.
You can only work on one clip at a time in the Animation view. Clicking the clip drop-down allows you to select which Animation Clip to edit from all of the clips associated with a specific GameObject. As you can see in the following image, the zombie currently only has one clip – ZombieWalk.
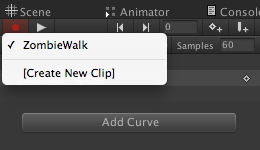
In the above image, the check mark next to ZombieWalk indicates that this is the current clip selection, which becomes more useful when you have multiple clips in the list. The above image also shows that the menu includes an option labeled [Create New Clip], which allows you to create a new clip associated with the same GameObject. You’ll use this later when animating the cat.
The screenshot below shows how dragging the Sprites into the Animation view automatically added a curve labeled zombie : Sprite:
![]()
This means that this animation affects the sprite field of the zombie’s SpriteRenderer component. Sometimes, if the property name is not obvious based on the components attached to the object, the property name will include the name of the component as well. For example, if you wanted to animate the enabled state of the SpriteRenderer, it would be labeled zombie : SpriteRenderer.enabled.
Select zombie in the Hierarchy (or select zombie : Sprite in the Animation view’s curves list, which automatically selects zombie in the Hierarchy), and then look at the Sprite Renderer component in the Inspector. As the following image shows, the Sprite field is tinted red. This not only indicates that you are recording an Animation Clip, but that the clip you are recording specifically affects this field.

In the Animation view’s timeline, you can see that Unity added four keyframes to the Sprite curve. If you can’t see the frames as clearly as you can in the following image, try zooming in on the timeline by scrolling with your mouse wheel or by performing whatever scroll operation your input device supports.
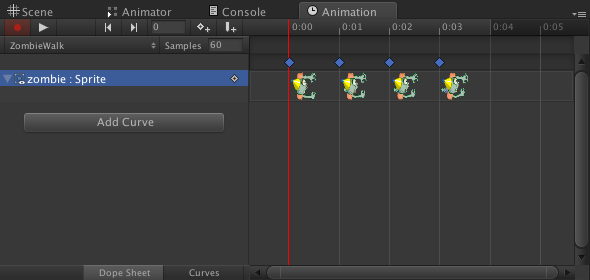
Along the top of the timeline you’ll see labels that consist of a number of seconds followed by a colon and then a frame number.
![]()
Values start counting at zero, so 0:02 indicates the third frame of the first second of animation. I wanted to use 1:02 as the example, but I was afraid the phrase “third frame of the second second” might be confusing. ;]
As you can see, Unity placed the four sprites at 0:00, 0:01, 0:02 and 0:03.
Before doing anything else, try running the clip by clicking the Play button in the Animation view’s control bar.
![]()
Be sure that the Animation view is visible along with either the Scene view or the Game view so you can see the zombie strutting his stuff. Or, to put it more accurately, watch as he apparently gets electrocuted.

If that were Unity’s idea of good animation, you’d have to resurrect that script you removed earlier. Fortunately, this isn’t a problem with Unity; it’s just a problem with ZombieWalk‘s configuration.
Click the Animation view’s Play button again to stop the preview.
You may recall from the first installment of this series that the zombie’s walk cycle ran at ten frames per second. However, if you look at the field labeled Samples in the Animation view’s control bar, you’ll see it is set to 60:
![]()
The Samples field defines an Animation Clip’s frame rate and it defaults to 60 frames per second. Change this value to ten, and notice how the timeline’s labels now go from 0:00 to 0:09 before moving to 1:00:

Preview your animation again by clicking the Animation view’s Play button. You should see the zombie moving at a much more reasonable pace:

The zombie is looking better already, but he’s not quite his old self yet. That’s because the animation you defined only includes the first four frames of the walk cycle, so when it loops it jumps from zombie_3 back to zombie_0. You need to add some more frames to smooth this transition.
Select only zombie_2 in the Project browser and drag it over the Animation view. Position your cursor inside the zombie : Sprite row in the timeline, just to the right of the last keyframe, and release your mouse button, as shown below:
You should now have keyframes at 0:00 through 0:04. However, depending on your zoom level, it’s pretty easy to accidentally place the new keyframe too far to the right. For example:

If this occurs, simply drag the keyframe to the left using the small diamond above the curve, as shown below:

Now repeat the previous process to add zombie_1 to the end of the animation, which is frame 0:05. Your Animation view now looks like this:

Test your animation again by pressing the Play button in the Animation view. Your zombie is finally strutting his stuff.

With your Animation Clip complete, run your scene and make sure the zombie still moves around properly while animating.

You’ve successfully replaced the zombie’s script-based animation with an Animation Clip. That may have seemed like a lot of effort, but it was really just a lot of words describing the UI. If you break down what you actually did, you basically dragged some sprites into the Animation view and set a frame rate. Darn, now I’m kicking myself for not just writing that in the first place.
If you simply select a group of Sprites in the Project browser and drag them directly into the Scene or Hierarchy views, Unity does everything you saw earlier, like creating an Animation Clip, an Animator and an Animator Controller. However, it also creates a GameObject in the Scene and connects everything to it! I’m guessing that by Unity 5.0, you’ll just have to drag your Sprites into the Scene and Unity will automatically create the correct gameplay based on the art style. You heard it here first!
If you simply select a group of Sprites in the Project browser and drag them directly into the Scene or Hierarchy views, Unity does everything you saw earlier, like creating an Animation Clip, an Animator and an Animator Controller. However, it also creates a GameObject in the Scene and connects everything to it! I’m guessing that by Unity 5.0, you’ll just have to drag your Sprites into the Scene and Unity will automatically create the correct gameplay based on the art style. You heard it here first!
Ok, you’ve gotten your feet wet with animations in Unity, but there is still plenty left to learn. Fortunately, you’ve got a perfectly good cat to experiment on just sitting there.