Unity 4.3 2D Tutorial: Animations
Learn how to use Unity’s powerful built-in animation system in this Unity 4.3 2D Tutorial! By Chris LaPollo.
Welcome back to our Unity 4.3 2D Tutorial series!
In the first part of the series, you started making a fun game called Zombie Conga. You learned how to add sprites, work with sprite sheets, configure the game view, and animate and move sprites using scripts.
In this second part of the series, you will re-animate the zombie (he is undead, after all), this time using Unity’s built-in animation system. You’ll also add several animations to the cat sprite.
By the time you’re done, you’ll have a great understanding of Unity’s powerful animation system, and Zombie Conga will get its groove on!
Getting Started
First download this starter project, which contains everything from the first installment in this tutorial series, Unity 4.3 2D Tutorial: Getting Started. If you really want to, you can continue with your old project, but it’s better to use this starter project so you’re sure to be in the right place.
Unzip the file and open your scene by double-clicking ZombieConga/Assets/Scenes/CongaScene.unity:

While these assets are the same as the ones you made in Unity 4.3 2D Tutorial: Getting Started, this version of the project has been organized into several folders: Animations, Scenes, Scripts and Sprites. This will help keep things tidy as you add assets to the project.
You’ll store the animations you create in this tutorial in the Animations folder; the other folders have names that clearly describe their contents.

Note: If your folders show up as icons rather than small folders, you can drag the slider in the bottom right of the window to change to the view you see here. I will switch back and forth between the icon view and compressed view in this tutorial, as is convenient.
Note: If your folders show up as icons rather than small folders, you can drag the slider in the bottom right of the window to change to the view you see here. I will switch back and forth between the icon view and compressed view in this tutorial, as is convenient.
[spoiler title="Want to learn how to create folders yourself?"]The folders in your Unity project are nothing more than directories on your computer’s disk.
You can create folders from within Unity in one of three ways:
This will make a new folder in whatever folder you have selected in the Project browser, or in the top-level Assets folder if nothing is selected.
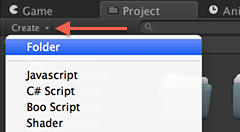
- Choose Assets\Create\Folder from Unity’s menu. This will make a new folder in whatever folder you have selected in the Project browser, or in the top-level Assets folder if nothing is selected.
- Click Create in the Project browser and choose Folder from the popup menu, shown in the following image:
This will make a new folder in whatever folder you have selected in the Project browser, or in the top-level Assets folder if nothing is selected.
- Right-click in the Project browser and choose Create\Folder from the popup menu to create a new folder in whatever folder you right-clicked.
Keep in mind that when you have multiple folders, Unity adds any new assets you create to whatever folder you have selected in the Project browser, or to the top-level Assets folder if nothing is selected. However, you can always drag assets between folders if you want to rearrange them.
[/spoiler]
If it has been a while since you completed the first part of this tutorial series, then you may not remember the state of the project. Run the scene now to refresh your memory.
- Does the zombie walk toward where you click? Yep.
- Does the zombie wander off the screen? Annoying, but yep. You’ll fix that later in this series.
- Does the cat sit on the beach, more lifeless than even a zombie? Completely unacceptable! Time for some animation.
Sprite Animations
In the first part of this series, you animated the zombie’s walk cycle using a script named ZombieAnimator.cs. That was meant to demonstrate how to access the SpriteRenderer from within your scripts, which you’ll find can be useful at times. However, here you’ll replace that script to use Unity’s great built-in support for animations.
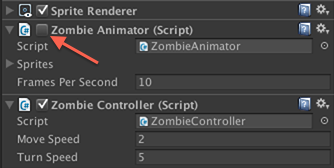
Select zombie in the Hierarchy and remove the ZombieAnimator (Script) component in the Inspector. To do so, click the gear icon in the upper right of the component and then choose Remove Component from the menu that appears, as shown below:

Of course, disabling components is not just for testing purposes. There will be times when you want to enable or disable components at runtime, which you can do from within your scripts by setting the component’s enabled flag.
You won’t be using ZombieAnimator.cs anymore in this tutorial, so removing it from zombie is the cleaner option.
Run your scene just to make sure rigor mortis has set in. That is, make sure your zombie isn’t moving those limbs!

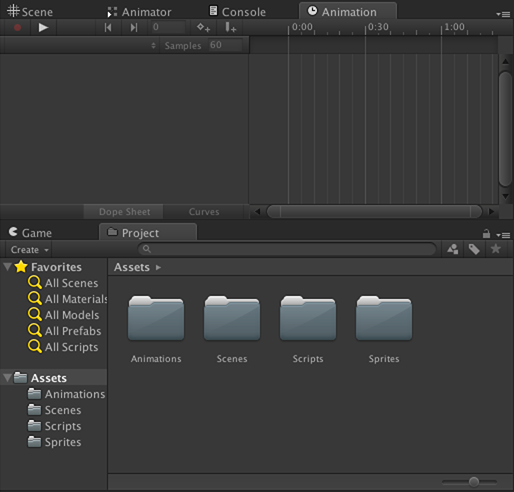
To start creating animations, open the Animation view by choosing Window\Animation. As you can see in the following image, you can also add this view to your layout by choosing Animation from the Add Tab menu connected to any other tab:

Arrange your interface so that you can see the contents of the Animation view and the Project browser at the same time. For example, it might look something like this:
Inside the Project browser, expand zombie to reveal its Sprites, then select zombie in the Hierarchy.
Your interface should look something like this:

Because you selected zombie in the Hierarchy, the Animation view allows you to edit the zombie’s animations. Currently, it has none.
That means that later, when you select a Sprite asset in the Project browser and Unity clears the Hierarchy’s selection, the Animation view will still operate on the zombie’s animations. This will continue to be the case until you select something else in the Hierarchy.
The term “usually” was used earlier because if you select certain types of assets in the Project browser, such as Prefabs, the controls in the Animation view all disable themselves rather than allow you to continue working on your animations.