Picture in Picture Across All Platforms
Learn how to implement Picture in Picture for default and custom video players across all app platforms. By Jordan Osterberg.
These days, users expect the ability to play videos using Picture in Picture (PiP). PiP mode minimizes video content into a small window, allowing users to multitask. In this tutorial, you’ll learn how to add PiP support to an existing video app that was built using UIKit.
Specifically, you’ll learn about:
- Background modes
- Setting up AVAudioSession
- Controlling Picture in Picture display
- Using PiP with custom player controllers
This tutorial uses an iPhone, but the sample app is cross-platform and will also work on tvOS and macOS. PiP is part of AVKit, which is available on all platforms.
You’ll need a physical device to follow this tutorial. If you don’t have an iPhone, iPad or Apple TV available, you can use your Mac to test the PiP functionality using the My Mac target in Xcode.
Getting Started
Download the project materials using the Download Materials button at the top or bottom of this tutorial.

Build and run the starter project: the RickTV app.

RickTV has a variety of content but for some reason, only plays Rick Astley’s “Never Gonna Give You Up” regardless of the video you pick. Darn those internet trolls. :]
OK. Time to learn how to view RickTV in PiP!
Adding Background Modes
To enable PiP functionality in your app, you’ll need to add Background Modes capability.
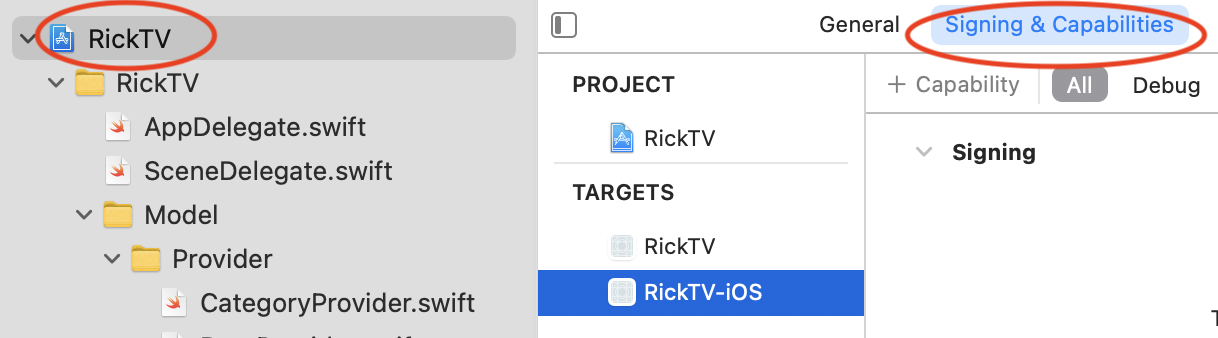
Click the RickTV project in the Project navigator, then click Signing & Capabilities.
You’ll need to repeat the following steps for both the RickTV and RickTV-iOS targets:


- Select the RickTV or RickTV-iOS target.
- Click + Capability.
- Search for Background Modes, then double-click to add it as a capability.
- In the newly added Background Modes section, select the Audio, AirPlay, and Picture in Picture checkbox.
Great! Now that you’ve set everything up, you can implement PiP in your app.
Implementing PiP
Open AppDelegate.swift.
Inside application(_:didFinishLaunchingWithOptions:), which is within AppDelegate, add the following code:
let audioSession = AVAudioSession.sharedInstance()
In the code above, you referenced the shared instance of AVAudioSession.
Next, add the following to the code you added in the previous step:
do {
  try audioSession.setCategory(.playback, mode: .moviePlayback)
} catch {
  print("Failed to set audioSession category to playback")
}
By doing this, you set the category of the audio session to .playback and the playback mode to .moviePlayback. This operation can fail, so you wrapped it in a do catch block.
Build and run. Play a video and you’ll see the PiP icon within the player controller.
![]()
Success! Tap the PiP icon to see that it works.

You’ve seen that PiP is almost automatic if you’re using the standard AVPlayerViewController. If your app has a custom playback controller, there is additional work you’ll need to do to support PiP. You’ll learn about that next.
Enabling PiP in a Custom Player Controller
You’re in luck — the sample project has a built-in custom player controller. To use it instead of the default, AVPlayerViewController, you need to change the line of code that tapping a video calls.
Open CategoryListViewController.swift and scroll to the UICollectionViewDataSource Implementation section that’s marked with a comment.
The last line of collectionView(_:didSelectItemAt:) is the method that presents the player controller:
presentPlayerController(with: player, customPlayer: false)
Change customPlayer to true to use the custom player controller.
Build and run. Tap a video to present the custom player controller.

Awesome! The video plays within the custom controller. But… if you tap the PiP button, nothing happens. Don’t worry, you’ll fix that now.
Open CustomPlayerViewController.swift. Inside viewDidLoad(), below view.layer.addSublayer(playerLayer), add the following code:
pictureInPictureController = AVPictureInPictureController(
  playerLayer: playerLayer)
pictureInPictureController?.delegate = self
This code initializes pictureInPictureController and sets up its delegate.
Next, you’ll add functionality so your user can start and stop PiP in the custom player controller.
Starting and Stopping PiP
To allow your user to stop and start PiP mode, go to the extension of CustomPlayerViewController, which implements CustomPlayerControlsViewDelegate.
You’ll see two related methods: controlsViewDidRequestStartPictureInPicture(_:) and controlsViewDidRequestStopPictureInPicture(_:).
Inside controlsViewDidRequestStartPictureInPicture(_:), replace // Start PiP with:
pictureInPictureController?.startPictureInPicture()
Then, inside controlsViewDidRequestStopPictureInPicture(_:), replace // Stop PiP with:
pictureInPictureController?.stopPictureInPicture()
These methods tell the PiP controller to start or stop PiP when the user taps the appropriate button.
Make sure to only call the associated AVPictureInPictureController methods when you receive user input. App Review will not approve your app if you break this rule!
Build and run. Open a video and tap the button to start PiP.

Bravo! PiP starts playing within the custom controller, but you’re not done yet. If the user has chosen to play the video PiP, it’s reasonable to assume that they don’t want your app’s screen to display a huge message about how the video is now playing picture-in-picture. They probably want to get on with using the rest of your app. Also, if you tap the button to return to standard play from PiP, nothing happens. You’ll address the first of these issues next.
Dismissing the Custom Player Controller When PiP Starts
When the user starts PiP, you can assume it’s because they want to do something else in your app while continuing to enjoy the video. Currently, the sample app shows a message when the video plays in the PiP window. You can control what happens at the start and end of PiP playback using methods from the picture in picture controller’s delegate.
In CustomPlayerViewController.swift, scroll to the extension marked with AVPictureInPictureDelegate. The delegate methods are all present with empty implementations, to save you some typing!
First, inside pictureInPictureControllerDidStartPictureInPicture(_:), add the following code:
dismiss(animated: true, completion: nil)
Here you dismiss the custom player controller when PiP starts. But if you build and run and try this out, you’ll see the PiP window immediately close. This is because your custom player object is deallocated, and that was the only thing holding on to the PiP controller, which is therefore also deallocated. To prevent this, add the following code to pictureInPictureControllerWillStartPictureInPicture(_:):
activeCustomPlayerViewControllers.insert(self)
activeCustomPlayerViewControllers is a global Set which will keep your player object in memory, meaning you can safely dismiss it.
You’ll need to clean this up if the PiP controller fails or is closed by the user.