OpenGL ES Pixel Shaders Tutorial
In this OpenGL ES pixel shaders tutorial, take a deep dive into GLSL and fragment shader math – including how to make gradients and random noise! By Ricardo Rendon Cepeda.
Procedural Textures: Interpolated Noise
The next step for your noise shader is rid the tiles of hard edges by using bilinear interpolation, which is simply linear interpolation on a 2D grid.
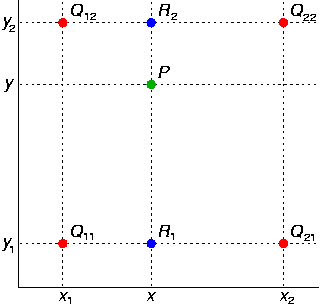
For ease of comprehension, the image below shows the desired sampling points for bilinear interpolation within your noise function roughly translated to your previous 2x2 grid:

Tiles can blend into one another by sampling weighted values from their corners at point P. Since each tile is 1x1 unit, the Q points should be sampling noise like so:
Q11 = smoothNoise(0.0, 0.0);
Q12 = smoothNoise(0.0, 1.0);
Q21 = smoothNoise(1.0, 0.0);
Q22 = smoothNoise(1.0, 1.0);
In code, you achieve this with a simple combination of floor() and ceil() functions for p. Add the following function to RWTNoise.fsh, just above main(void):
float interpolatedNoise(vec2 p) {
  float q11 = smoothNoise(vec2(floor(p.x), floor(p.y)));
  float q12 = smoothNoise(vec2(floor(p.x), ceil(p.y)));
  float q21 = smoothNoise(vec2(ceil(p.x), floor(p.y)));
  float q22 = smoothNoise(vec2(ceil(p.x), ceil(p.y)));

  // compute R value
  // return P value
}
GLSL already includes a linear interpolation function called mix().
You'll use it to compute R1 and R2, using fract(p.x) as the weight between two Q points at the same height on the y-axis. Include this in your code by adding the following lines at the bottom of interpolatedNoise(vec2 p):
float r1 = mix(q11, q21, fract(p.x));
float r2 = mix(q12, q22, fract(p.x));
Finally, interpolate between the two R values by using mix() with fract(p.y) as the floating-point weight. Your function should look like the following:
float interpolatedNoise(vec2 p) {
  float q11 = smoothNoise(vec2(floor(p.x), floor(p.y)));
  float q12 = smoothNoise(vec2(floor(p.x), ceil(p.y)));
  float q21 = smoothNoise(vec2(ceil(p.x), floor(p.y)));
  float q22 = smoothNoise(vec2(ceil(p.x), ceil(p.y)));

  float r1 = mix(q11, q21, fract(p.x));
  float r2 = mix(q12, q22, fract(p.x));

  return mix (r1, r2, fract(p.y));
}
Since your new function requires smooth, floating-point weights and implements floor() and ceil() for sampling, you must remove floor() from main(void).
Replace the lines:
float tiles = 8.;
position = floor(position*tiles);
float n = smoothNoise(position);
With the following:
float tiles = 8.;
position *= tiles;
float n = interpolatedNoise(position);
Build and run. Those hard tiles are gone…

… but there is still a discernible pattern of "stars", which is totally expected, by the way.
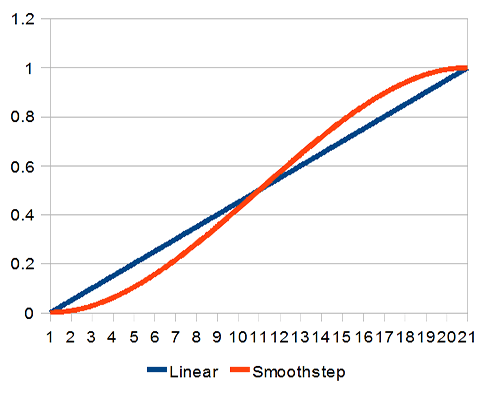
You’ll get rid of the undesirable pattern with a smoothstep function. smoothstep() is a nicely curved function that uses cubic interpolation, and it's much nicer than simple linear interpolation.
"Smoothstep is the magic salt you can sprinkle over everything to make it better." --Jari Komppa
"Smoothstep is the magic salt you can sprinkle over everything to make it better." --Jari Komppa
Add the following line inside interpolatedNoise(vec2 p), at the very beginning:
vec2 s = smoothstep(0., 1., fract(p));
Now you can use s as the smooth-stepped weight for your mix() functions, like so:
float r1 = mix(q11, q21, s.x);
float r2 = mix(q12, q22, s.x);

return mix (r1, r2, s.y);
Build and run to make those stars disappear!

The stars are definitely gone, but there’s still a bit of a pattern; almost like a labyrinth. This is simply due to the 8x8 dimensions of your square grid. Reduce tiles to 4., then build and run again!
Much better.
Your noise function is still a bit rough around the edges, but it could serve as a texture primitive for billowy smoke or blurred shadows.
Procedural Textures: Moving Noise
Final stretch! Hope you didn’t forget about little ol' uTime, because it’s time to animate your noise. Simply add the following line inside main(void), just before assigning n:
position += uTime;
Build and run.
Your noisy texture will appear to be moving towards the bottom-left corner, but what’s really happening is that you’re moving your square grid towards the top-right corner (in the +x, +y direction). Remember that 2D noise extends infinitely in all directions, meaning your animation will be seamless at all times.
Pixel Shader Moon
Hypothesis: Sphere + Noise = Moon? You're about to find out!
To wrap up this tutorial, you’ll combine your sphere shader and noise shader into a single moon shader in RWTMoon.fsh. You have all the information you need to do this, so this is a great time for a challenge!
Hint: Your noise tiles will now be defined by the sphere’s radius, so replace the following lines:
float tiles = 4.;
position *= tiles;
With a simple:
position /= radius;
Also, I double-dare you to refactor a little bit by completing this function:
float diffuseSphere(vec2 p, float r) {
}
[spoiler title="Werewolves, Beware"]
//  RWTMoon.fsh
//
// Precision
precision highp float;

// Uniforms
uniform vec2 uResolution;
uniform float uTime;

// Constants
const vec3 cLight = normalize(vec3(.5, .5, 1.));

float randomNoise(vec2 p) {
  return fract(6791.*sin(47.*p.x+p.y*9973.));
}

float smoothNoise(vec2 p) {
  vec2 nn = vec2(p.x, p.y+1.);
  vec2 ee = vec2(p.x+1., p.y);
  vec2 ss = vec2(p.x, p.y-1.);
  vec2 ww = vec2(p.x-1., p.y);
  vec2 cc = vec2(p.x, p.y);

  float sum = 0.;
  sum += randomNoise(nn)/8.;
  sum += randomNoise(ee)/8.;
  sum += randomNoise(ss)/8.;
  sum += randomNoise(ww)/8.;
  sum += randomNoise(cc)/2.;

  return sum;
}

float interpolatedNoise(vec2 p) {
  vec2 s = smoothstep(0., 1., fract(p));

  float q11 = smoothNoise(vec2(floor(p.x), floor(p.y)));
  float q12 = smoothNoise(vec2(floor(p.x), ceil(p.y)));
  float q21 = smoothNoise(vec2(ceil(p.x), floor(p.y)));
  float q22 = smoothNoise(vec2(ceil(p.x), ceil(p.y)));

  float r1 = mix(q11, q21, s.x);
  float r2 = mix(q12, q22, s.x);

  return mix (r1, r2, s.y);
}

float diffuseSphere(vec2 p, float r) {
  float z = sqrt(r*r - p.x*p.x - p.y*p.y);
  vec3 normal = normalize(vec3(p.x, p.y, z));
  float diffuse = max(0., dot(normal, cLight));
  return diffuse;
}

void main(void) {
  vec2 center = vec2(uResolution.x/2., uResolution.y/2.);
  float radius = uResolution.x/2.;
  vec2 position = gl_FragCoord.xy - center;

  if (length(position) > radius) {
    discard;
  }

  // Diffuse
  float diffuse = diffuseSphere(position, radius);

  // Noise
  position /= radius;
  position += uTime;
  float noise = interpolatedNoise(position);

  gl_FragColor = vec4(vec3(diffuse*noise), 1.);
}
[/spoiler]
Remember to change your program’s fragment shader source to RWTMoon in RWTViewController.m:
self.shader = [[RWTBaseShader alloc] initWithVertexShader:@"RWTBase" fragmentShader:@"RWTMoon"];
While you’re there, feel free to change your glClearColor() to complement the scene a bit more (I chose xkcd’s midnight purple):
glClearColor(.16f, 0.f, .22f, 1.f);
Build and run! Oh yeah, I’m sure Ozzy Osbourne would approve.
