Resolver for iOS Dependency Injection: Getting Started

Learn how to use Resolver to implement dependency injection in your SwiftUI iOS apps to achieve easily readable and maintainable codebases. By Mina Ashna.

Leave a rating/review
Download materials
Save for later
Share

Dependency Injection, or DI, is essential for creating maintainable and testable apps. While DI has been around for many years, some find it intimidating. It sounds complicated, but it’s simple to implement, especially with tools like Resolver, a Dependency Injection framework for Swift.

In this tutorial, you’ll refactor a cryptocurrency app named Cryptic. Along the way, you’ll learn about:

  • why you should care about DI.
  • how to enable DI using Resolver.
  • what Inversion of Control and Dependency Inversion Principle means.
  • how to unit test with DI.
Note: This tutorial assumes you’re comfortable with using Xcode to develop iOS apps and familiar with SwiftUI basics like those in SwiftUI Tutorial: Getting Started.

Getting Started

Click Download Materials at the top or bottom of this tutorial to download the project. Open the starter project in Xcode and run the app.

You’ll see a list of the top ten crypto-assets sorted by the highest market cap. Don’t worry if the numbers or assets you see are different than those you see in the image. After all, it’s the cryptocurrency market: No changes would be surprising. :]

Cryptic home screen with live cryptocurrency market data

Note: The starter project includes the Resolver package to the project using Swift Package Manager. When you open the project, Xcode updates all the package dependencies. If for some reason it doesn’t, go to File ▸ Swift Packages and select Resolve Package Versions.

Look at the code, and you’ll see tightly coupled classes. Even though you can run the app, this code is neither maintainable nor testable. Your goal is to refactor the code, so the classes become loosely coupled. If these terms are foreign to you, don’t worry — you’ll be covering them throughout the tutorial.

Before you start, take a moment to explore the classes in the project.

Refactoring Tightly Coupled Classes

In tightly coupled classes, changes in one class result in unanticipated changes in the other. Thus, tightly coupled classes are less flexible and harder to extend. Initially, this might not be a problem, but as your project grows in size and complexity it becomes harder and harder to maintain.

As you see in the diagram below, you can use a few techniques to create loosely coupled classes. Before diving into the code, it’s important to understand these techniques.

Roadmap for refactoring tightly coupled classes. Using the principle of of Inversion of Control you use Dependency Injection to achieve loosely coupled classes.

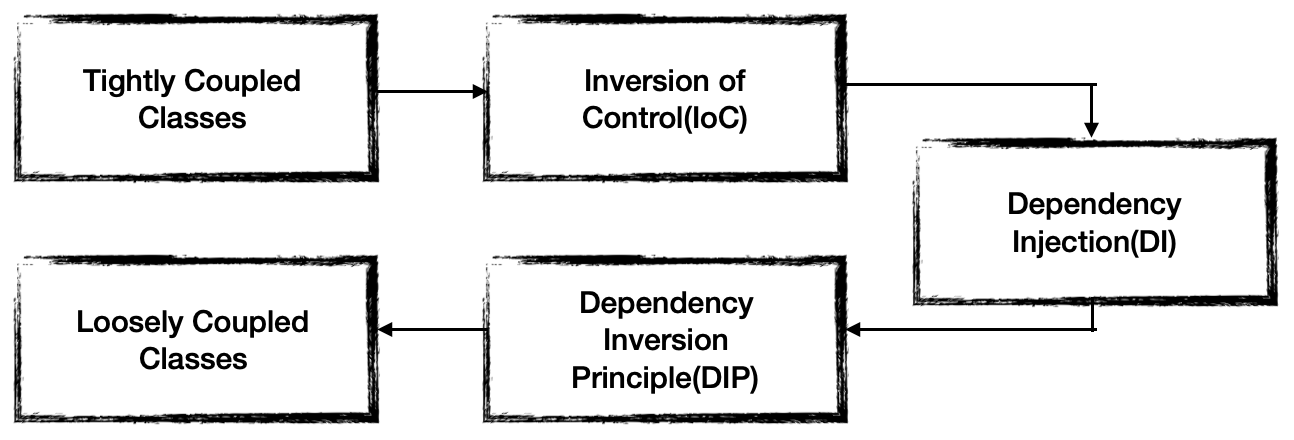
Roadmap to move from Tightly Coupled to Loosely Coupled classes.

Inversion of Control, or IoC, and Dependency Inversion Principle or DIP, are design principles. While design principles recommend certain best practices, they don’t provide any implementation details.

On the other hand, Dependency Injection is one of the many patterns you can use to implement design principles.

Design principles and design patterns

Next, you’ll take a closer look at Inversion of Control.

Inversion of Control

IoC recommends moving all of a class’s responsibilities, other than its main one, to another class.

For a better understanding, imagine yourself as a startup founder. In the beginning, you deal with development, taxes, recruitment, salaries and many other things yourself. As your business grows, you need to start delegating tasks and introduce dependencies.

You do that by adding different departments like legal and HR. As a result, you aren’t involved in the complexity of their work. Instead, you can focus on your main job, which is running the startup.

It’s the same in an app life cycle. When the app is small, it’s easy to handle the dependencies. But, as it grows, managing dependencies becomes more and more complicated.

In this tutorial, you’ll use DI to implement IoC.

Next, you’ll explore dependency flow.

Understanding Dependency Flow

DI is a design pattern you can use to implement IoC. It lets you create dependent objects outside of the class that depends on them.

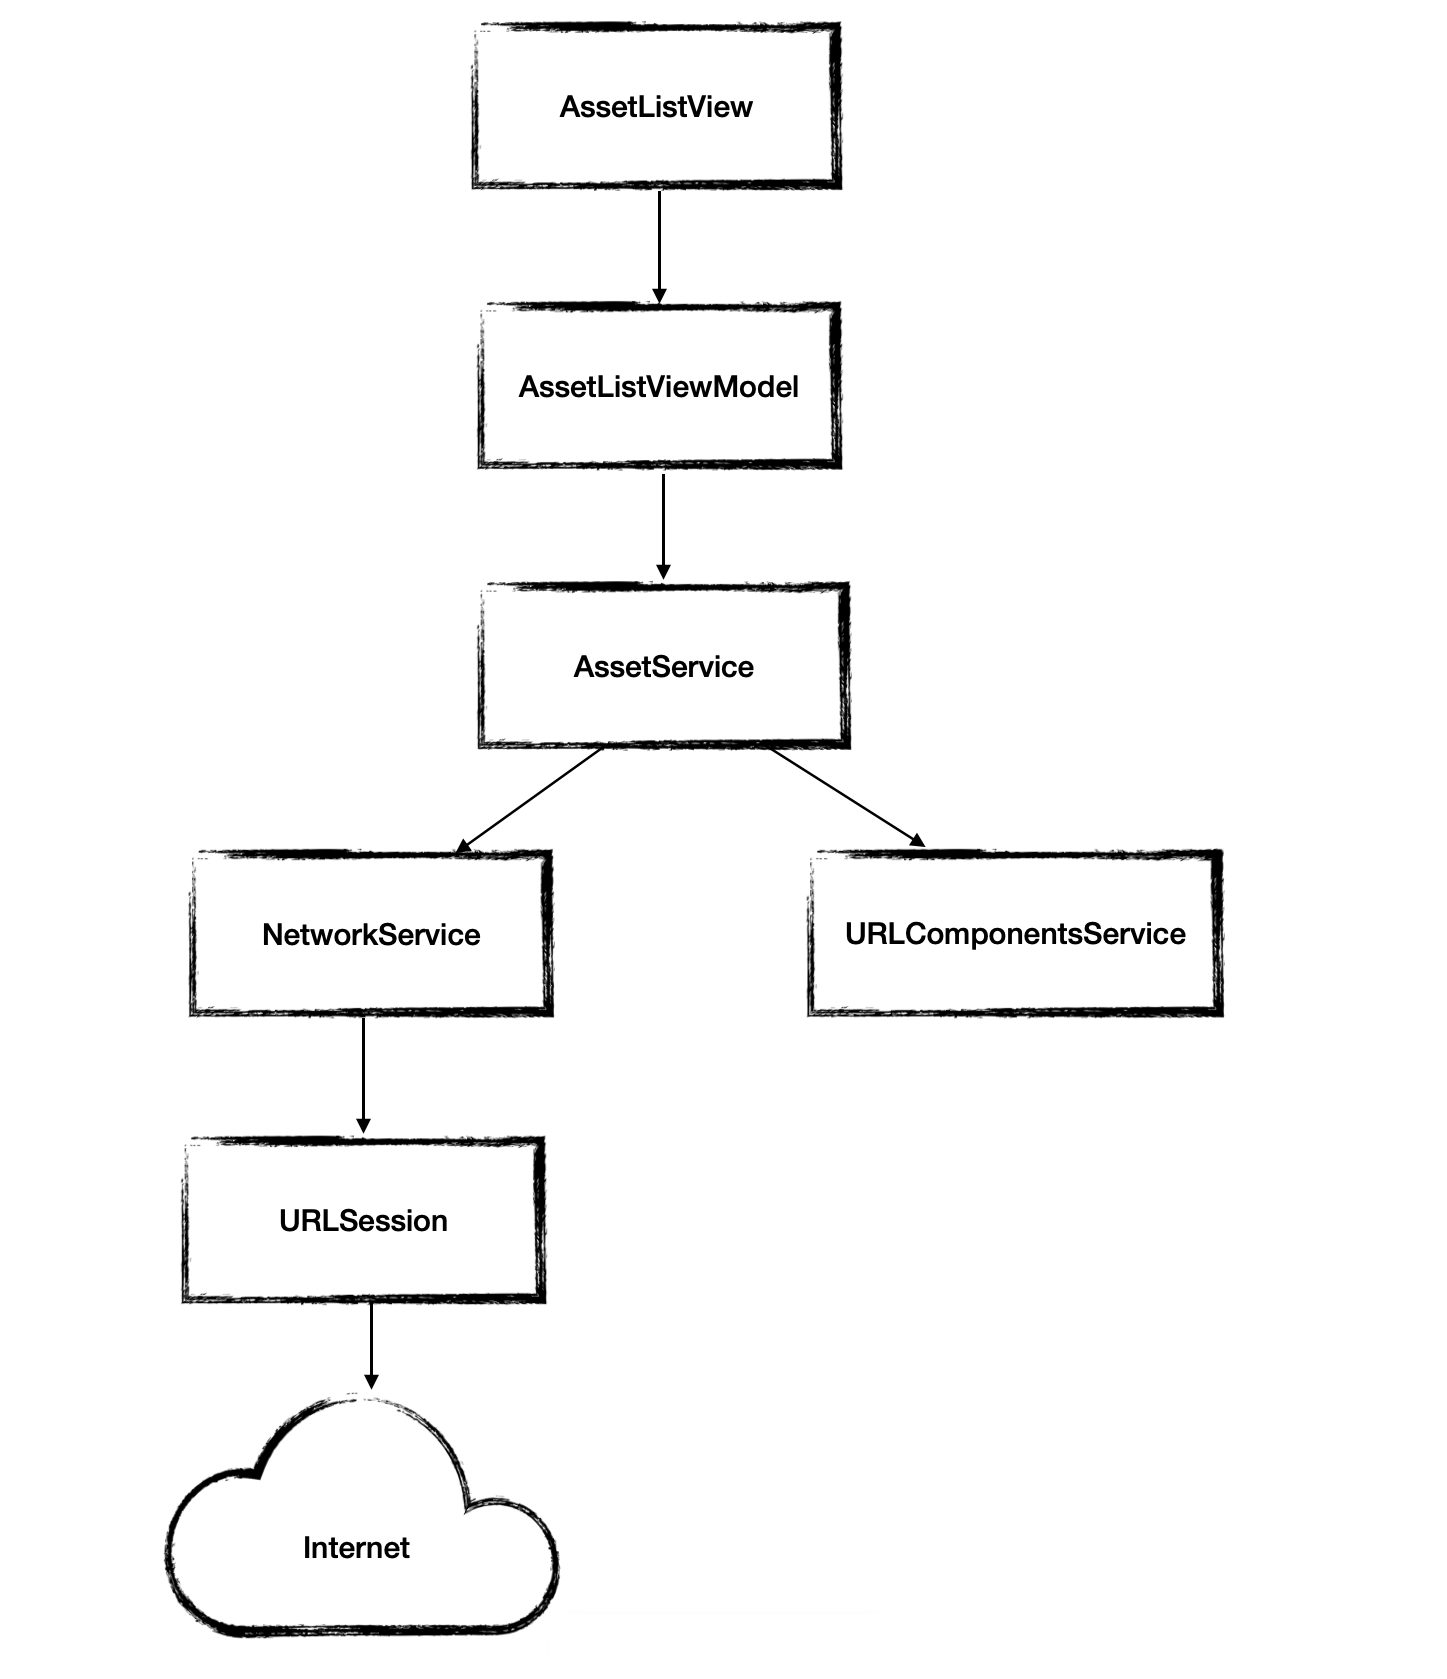
Before you can add DI to any project, you need to understand that project’s dependency flow. Here’s the main dependency flow for this project:

Dependency flow for the Cryptic app

  • AssetListView is the project’s main view. It’s dependent on AssetViewModel.
  • AssetViewModel needs AssetService.
  • AssetService is dependent on URLComponentsService and NetworkService to fetch the assets.
  • And finally, NetworkService is dependent on URLSession.

Your goal with DI is to resolve this chain of dependencies. Now that you know the dependency flow of the app and the task at hand, it’s time to get started.

Dependency Injection Without Resolver

Open Xcode and find NetworkService.swift. As you can see by its only property, NetworkService is dependent on URLSession. You need to hide the details of creating URLSession from NetworkService.

This is important because any changes in URLSession will result in changes to NetworkService and all classes dependent on NetworkService. For example, using a custom configuration instead of the default one in URLSession would change NetworkService.

You can achieve a looser coupling by adding an initializer to NetworkService that receives the session. Replace:

private let session = URLSession(configuration: .default)

With:

// 1
private var session: URLSession
// 2
init(session: URLSession) {
  // 3
  self.session = session
}

Here you:

  1. Remove the URLSession constructor and make the session mutable.
  2. Create an initializer for NetworkService and receive the session as a dependency.
  3. Update the local session variable with the newly received value from the initializer.

Now, NetworkService isn’t responsible for creating the session. Instead, it receives it through the initializer. Now, build the app.

Yes, it fails. You defined an initializer for NetworkService as a way to inject the session, but you haven’t injected that dependency yet.

You need to provide the session for NetworkService. Open AssetService.swift and replace:

private let networkService = NetworkService()

With:

private let networkService = NetworkService(
  session: URLSession(configuration: .default))

Here, AssetService resolves the session by creating a URLSession instance and passing it to NetworkService.

As a result, NetworkService is loosely coupled to URLSession. Now, AssetService injects the session to NetworkService.

Build and run. Everything is back to normal. :]

Note: In this tutorial, none of the changes you make to the project will affect the UI of the app, so screenshots won’t be added after every build and run.

Take a closer look at AssetService. Before it was only dependent on NetworkService and URLComponentsService. Now, it’s also dependent on URLSession.

Yes, you’re about to open a rabbit hole. But don’t worry: Resolver is here to save the day. :]

Resolver to the rescue

Dependency Injection Using Resolver

Resolver is a Dependency Injection framework for Swift that supports IoC. The framework is already in your Xcode project via the Swift Package Manager, or SwiftPM. Along with SwiftPM, Resolver also supports CocoaPods and Carthage.

In general, there are three ways to perform dependency injection: Constructor Injection, Method Injection and Property Injection. Resolver also introduced a new type named Annotation.

  • Constructor Injection: Injecting dependencies through constructors or initializers.
  • Method Injection: Injecting dependencies through methods.
  • Property Injection: Injecting dependencies through properties.
  • Annotation Injection: Resolver uses @Injected as a property wrapper to inject dependencies.

In this tutorial, you’ll use Annotation. You’ll also use Service Locator, a design pattern distinct from Dependency Injection.

Constructor, method and property injection -- oh my!

Injecting Dependencies by Annotation

It’s your time to shine! Refactor the code so it uses the Annotation technique to inject dependencies.

First, find NetworkService.swift and replace:

private var session: URLSession

init(session: URLSession) {
  self.session = session
}

With:

@Injected private var session: URLSession

Here, you replace Constructor Injection with Annotation Injection. Using @Injected, you declare that Resolver resolves and injects this dependency. Now, NetworkService can focus on its main job, fetching assets.

Next, open AssetService.swift. As you can see, AssetService is dependent on NetworkService and URLComponentsService. To loosen these dependencies, you need to wrap them in @Injected.

Replace:

private let networkService = NetworkService(
  session: URLSession(configuration: .default))
private let urlComponentsService = URLComponentsService()

With:

@Injected private var networkService: NetworkService
@Injected private var urlComponentsService: URLComponentsService

As you see, AssetService doesn’t have to create the URLSession and inject it to NetworkService anymore. From now on, Resolver will take care of all dependencies.

Finally, you need to inject a dependency in AssetListViewModel.swift. AssetListViewModel is dependent on AssetService. To make sure Resolver handles that as well, wrap assetService in @Injected.

Try modifying the code yourself before seeing the solution.

[spoiler title=”Solution”]

@Injected private var assetService: AssetService

[/spoiler]

Good job! Now all your dependencies use Resolver of type Annotation.

Even though you can build the app, it crashes at runtime. Don’t worry: You’ll soon find out why that’s happening and how to fix it.

Patience, you must have, my young Padawan.

Yoda

Registering Services

You learned how to inject dependencies using Resolver by annotating them with @Injected. But, what’s the magic? How does Resolver know to resolve URLSession like URLSession(configuration: .default) but NetworkService like NetworkService()?

The magic is that there is no magic!

In the Resolver world, you need to provide all dependencies for Resolver. You do that by registering them in a factory called registerAllServices(). In short, no matter which DI technique you use, Resolver will check the factory to find the registered services and resolve them.

To register dependencies, find App+Injection.swift and add:

// 1
extension Resolver: ResolverRegistering {
  public static func registerAllServices() {
    // 2
    register { URLSession(configuration: .default) }
    // 3
    register { NetworkService() }
    register { URLComponentsService() }
    register { AssetService() }
  }
}

Here you:

  1. Extend Resolver and conform to ResolverRegistering, which forces you to implement registerAllServices().
  2. Register URLSession with a default configuration.
  3. Register NetworkService, URLComponentsService and AssetService.

As a result, each time you use Resolver to inject a dependency, you need to register it in the factory. Resolver calls registerAllServices() the first time it needs to resolve an instance.

Build and run. Even though there are no visual changes, now your classes are loosely coupled behind the scenes.

Next, you’ll learn how to register arguments for your dependencies.

Registering Arguments

Not all services are as easy to register as the ones you just did. Some services take arguments you need to provide when registering them.

For these cases, Resolver offers the possibility of registering dependencies with arguments. For example, open AssetListView.swift. Then, find the following line in .loaded:

AssetView(assetViewModel: AssetViewModel(asset: asset))

As you can see, AssetView is dependent on AssetViewModel. Look closer and you’ll see it’s not like other dependencies. It takes asset as an argument.

Now, you’ll register AssetViewModel with an argument. Go to App+Injection.swift. In registerAllServices(), add:

register { _, args in
  AssetViewModel(asset: args())
}

Resolver uses the new callAsFunction feature from Swift 5.2 to immediately get the single passed argument from args.

To resolve this dependency, go back to AssetListView.swift.

Replace:

AssetView(assetViewModel: AssetViewModel(asset: asset))

With:

AssetView(assetViewModel: Resolver.resolve(args: asset))

Here, you ask Resolver to resolve a dependency of type AssetViewModel by passing asset as an argument.

Build and run. See your reward. That app should look and feel exactly the same as before, but you now have more loosely coupled classes :]

Reward for successfully running the app

Service Locator

Service Locator is another design pattern you can use to implement IoC. Fortunately, Resolver supports Service Locator well. You may ask yourself, why am I using Service Locator when Annotation is so convenient?

Find AssetListView.swift and check assetListViewModel. As you can see, it already has @ObservedObject as property wrapper. So, you can’t use Annotation and add @Injected here.

Instead, you either have to use Service Locator or other types of DI, such as Constructor Injection. In this tutorial, you’ll use Service Locator.

Next, still in AssetListView.swift, resolve AssetListViewModel using Service Locator. Replace:

@ObservedObject var assetListViewModel: AssetListViewModel

With:

@ObservedObject var assetListViewModel: AssetListViewModel = Resolver.resolve()

Resolver.resolve() reaches out to registerAllServices(), where all services are registered. Then, it looks for AssetListViewModel. As soon as it finds the instance, it resolves it.

Next, you need to register AssetListViewModel as a service. Open App+Injection.swift. Then, add the following to registerAllServices():

register { AssetListViewModel() }

Now go to AppMain.swift.

Resolver will handle the dependency for you, so you can remove AssetListViewModel. Replace:

AssetListView(assetListViewModel: AssetListViewModel())

With:

AssetListView()

Build and run. Now, you can easily access modules without worrying about dependencies.

Using Scopes

Resolver uses Scopes to control the lifecycles of instances. There are five different scopes in Resolver: Graph, Application, Cached, Shared and Unique.

To better understand the scopes, check the app’s main dependency flow again.

Cryptic app main dependency flow

  • The resolution cycle starts when AssetListView asks Resolver to resolve assetListViewModel.
  • To resolve assetListViewModel, Resolver has to resolve AssetService, URLComponentsService and NetworkService.
  • The cycle finishes when it resolves them all.

In this tutorial, you’ll use Graph and Application scopes.

  • Graph: Graph is Resolver’s default scope. Once Resolver resolves the requested object, it discards all objects created in that flow. Consequently, the next call to Resolver creates new instances.
  • Application: Application scope is the same as a singleton. The first time Resolver resolves an object, it retains the instance and uses it for all subsequent resolutions as long as the app is alive. You can define that by adding .scope(.application) to your registrations.

You can define scopes in two ways. First, you could add scope to each registration separately like this:

register { NetworkService() }.scope(.graph)

Alternatively, could add scope to all registrations by changing the default scope. It’s important to set the default scope before registering services.

You’ll use the Graph scope in your app target. Go to App+Injection.swift. Add the following as the first line in registerAllServices():

defaultScope = .graph

Great job! You’re about to become a DI master by adding some unit tests to the project.

But first, build and run. Enjoy your work. :]

Hero enjoying your work

Unit Testing and the Dependency Inversion Principle

Unit testing is an important step in building a clean and maintainable codebase. To ease the process of unit testing, you’ll follow the Dependency Inversion Principle, or DIP.

DIP is one of the SOLID principles popularized by Robert Martin, also known as Uncle Bob. It declares that high-level modules shouldn’t depend on low-level modules. Instead, both should depend on abstractions.

For example, AssetService, a high-level module, should be dependent on an abstraction of NetworkService, a low-level module. You implement abstractions in Swift with Protocols.

The following steps show how to implement DIP:

  1. First, create a protocol for the low-level module.
  2. Second, update the low-level module to conform to the protocol.
  3. Third, update the high-level module to be dependent on the low-level module protocol.

To apply DIP to your project, you need to go through the steps one by one.

First, create a protocol for the low-level module. In this case, NetworkService is the low-level module. So, open NetworkService.swift and add NetworkServiceProtocol right below // MARK: - NetworkServiceProtocol:

protocol NetworkServiceProtocol {
  func fetch(
    with urlRequest: URLRequest,
    completion: @escaping (Result<Data, AppError>) -> Void
  )
}

Second, update the low-level module to conform to the protocol. Since NetworkService is the low-level module, it has to conform to the protocol. Find the line of code that reads:

extension NetworkService {

And replace it with:

extension NetworkService: NetworkServiceProtocol {

Third, update the high-level module dependency to the protocol. AssetService is the high-level module. So, in AssetService.swift, change networkService to be of type NetworkServiceProtocol. Replace:

@Injected private var networkService: NetworkService

with:

@Injected private var networkService: NetworkServiceProtocol

Good job! Soon, you’ll find out in practice why this is important.

You can’t build the app now because your NetworkService registration doesn’t reflect the protocol. You’ll fix that next.

Registering Protocols

When resolving instances, Resolver infers the registration type based on the type of object the factory returns. Thus, if your instances are of type protocol like this:

@Injected private var networkService: NetworkServiceProtocol

You need to make sure your registration in the factory returns the protocol type as well.

Open App+Injection.swift. Then, update register { NetworkService() } to address the protocol:

register { NetworkService() }.implements(NetworkServiceProtocol.self)

Here you create an object of type NetworkService. But, it’s returned as a type of NetworkServiceProtocol, thus confirming to the requirement of NetworkService.

Now build and run. Enjoy the beauty you created even though you can’t see it. :]

With the Dependency Inversion Principle in place, you’ve now made it easier to test your code. You’ll do this next.

Generating mock data

Generating Mock Data

Mocking is an essential technique when writing unit tests. By mocking dependencies, you create fake versions of them, so your tests can focus solely on the class at hand rather than its collaborators.

For a better understanding, open AssetServiceTests.swift. Here, you test if AssetService handles the success and failure responses of NetworkService as expected.

In cases like this, mocking is an excellent approach because you’re in control of how you challenge your Subject Under Test, or SUT, based on different response types.

Now go to MockNetworkService.swift and add:

// 1
class MockNetworkService: NetworkServiceProtocol {
  // 2
  var result: Result<Data, AppError>?

  // 3
  func fetch(
    with urlRequest: URLRequest,
    completion: @escaping (Result<Data, AppError>) -> Void
  ) {
    guard let result = result else {
      fatalError("Result is nil")
    }
    return completion(result)
  }
}

Here you:

  1. Create a mock class that conforms to NetworkServiceProtocol. You’ll use this class in your Test target instead of NetworkService. That’s the beauty of abstractions.
  2. Then create the result property. The default value is nil. You’ll assign success and failure to it based on your test case.
  3. As a result of conforming to NetworkServiceProtocol, you need to implement fetch(with:completion:). You can modify the result as you want because it’s a mock class.

Next, you’ll register these mock classes in Resolver, so you can resolve them when testing.

Using Resolver’s Containers

In a DI system, a container contains all the service registrations. By using Resolver, you can create different containers based on what your project needs. In this tutorial, you’ll create a Mock container for your Test target.

By default, Resolver creates a main container for all static registrations. It also defines a root container. If you inspected Resolver’s code you’d see:

public final class Resolver {
  public static let main: Resolver = Resolver()
  public static var root: Resolver = main
}

You can create different containers and decide when to use them to resolve instances by pointing at them using the root container.

In this project, you use the default main container in the App target and a mock container in the Test target, as shown in the diagram below.

App Target

Root in App Target

Test Target

Root in Test Target

Registering Services in a Mock Container

Now, you’ll register your MockNetworkService in a mock container. Go to Resolver+XCTest.swift. Right below // MARK: - Mock Container create a mock container by adding:

static var mock = Resolver(parent: .main)

Now, still in Resolver+XCTest.swift, change the default root value in registerMockServices(). It must point to your new mock container:

root = Resolver.mock

You’ll use the Application scope instead of Graph in your test target. In registerMockServices(), add:

defaultScope = .application

Then, register your mock service in the mock container. In registerMockServices(), right after defaultscope, add:

Resolver.mock.register { MockNetworkService() }
  .implements(NetworkServiceProtocol.self)

Now that your registration is complete, it’s time to use it.

Dependency Injection in Unit Tests

Open AssetServiceTests.swift. Then, call registerMockServices at the bottom of setUp():

Resolver.registerMockServices()

This call ensures all dependencies are registered before use.

Finally, add NetworkService to AssetServiceTests. Right below // MARK: - Properties, add:

@LazyInjected var networkService: MockNetworkService

You might be thinking, “What the heck is @LazyInjected?” Calm down! It’s not a big deal.

Well, actually, it is. :]

By using Lazy Injection you ask Resolver to lazy load dependencies. Thus, Resolver won’t resolve this dependency before the first time it’s used.

You need to use @LazyInjected here because the dependencies aren’t available when the class is initiated as you registered them in setup().

Now everything is ready for you to write your first unit test.

Unit Testing in Action

Open AssetServiceTests.swift. Then, in testFetchAssetsSuccessfully() add:

// 1
let asset = mockAsset()
// 2
networkService.result = .success(assetList())

// 3
sut?.fetchAssets { assetList, error in
  XCTAssertEqual(assetList?.data.count, 1)
  XCTAssertEqual(assetList?.data.first, asset)
  XCTAssertNil(error)
}

Here you:

  1. Create a mock asset. The helper method mockAsset() is already included in the codebase for you. You’re welcome. :]
  2. Assert a success result to MockNetworkService as you test a success case.
  3. Fetch the assets from MockNetworkService. Test if you receive the same asset back as you provided to MockNetworkService.

By letting Resolver handle the dependencies, you can focus on testing AssetService without any problems. As a result, you can add as many tests as needed.

Add the following code in testFetchAssetsFailure() to test a failure case:

// 1
let networkError = AppError.network(description: "Something went wrong!")
// 2
networkService.result = .failure(networkError)

// 3
sut?.fetchAssets { assetList, error in
  XCTAssertEqual(networkError, error)
  XCTAssertNil(assetList)
}

Here you:

  1. Create a mock error of type AppError, as it’s the error type in this project.
  2. Then create a failure result with networkError and pass it to the MockNetworkService. That’s the benefit of mocking dependencies: you have complete control over the response.
  3. Fetch the assets from MockNetworkService. Test if you receive the same error back as you provided to MockNetworkService.

Good job! Run your unit test by pressing Command-U. Green is the warmest color. :]

unitTest

Where to Go From Here?

You can download the completed project by clicking Download Materials at the top or bottom of the tutorial.

In this tutorial, you learned about Dependency Injection using Resolver. You can learn more about Resolver in the official GitHub repository.

You may also want to read more about using Resolver scopes.

To learn more about Dependency Injection in Swift, check out our awesome Dependency Injection Tutorial for iOS: Getting Started.

You can also read more about calling types as functions in our What’s New in Swift 5.2 article.

If you have any questions or comments, join the forum discussion below.