Advanced Charles Proxy Tutorial for iOS

Get more out of Charles Proxy by learning advanced features like mapping responses to local files, automating requests and writing logs. By Emad Ghorbaninia.

Leave a rating/review
Download materials
Save for later
Share

Charles Proxy offers developers and testers an immediate look at network traffic. But there’s a lot to learn beyond the basics.

If you’ve ever wanted to change response data without asking the back-end server to test the client, report a server-side bug or reproduce a state on the client that needs a specific back-end response, advanced Charles Proxy features offer solutions.

In this tutorial, you’ll manipulate the response from the Star Wars API (SWAPI) to your own custom API in the StarCharles app. Along the way, you’ll:

  • Set up Charles.
  • Use the mapping tool and breakpoints.
  • Perform repetitive actions with the rewrite and repeat tools.
  • Save network activity to disk.
  • Share reports with others.
Note: This tutorial assumes you’re familiar with Charles Proxy. Still a Padawan learner? Check out Charles Proxy Tutorial for iOS first.

Getting Started

Download the project materials by clicking the Download Materials button at the top or bottom of this tutorial.

Open StarCharles.xcodeproj in the starter folder.

StarCharles lists the films and characters of Star Wars, as provided by SWAPI. Build and run to see how it works.

Master detail list of the StarCharles sample app

Behind the scenes, each time you tap a film or a character, the app makes a sequence of requests to get the information it displays next.

Look at the following groups in Xcode:

  • Network: Contains NetworkService.swift, which defines all the networking interactions.
  • Models: Includes all the data models.
  • ViewModel: Contains ViewModel.swift, which is the core of the project. It calls all the APIs, maps to the local models and updates the views.
  • Views: Includes all the view-related code.

Now, you’ll install and configure Charles Proxy to observe the communications between StarCharles and SWAPI.

Setting up Charles

Your first step is to get a web debugging setup working. To do this, you’ll:

  • Download and install Charles.
  • Let Charles automatically configure your network settings.
  • Download and install SSL certificates onto each simulator or device where you want to observe encrypted network communication.

First, download the latest version of Charles Proxy for macOS, which is v4.6.1 at the time of this writing. Double-click the DMG file, accept the license agreement and drag the Charles icon to your Applications folder to install it.

Charles Proxy isn’t free, but it does offer a free 30-day trial. Because Charles only runs for 30 minutes in trial mode, you may need to restart it throughout this tutorial.

Configuring Network Settings

Launch Charles. It should ask for permission to configure your network settings automatically. If it doesn’t, press Shift-Command-P to see this prompt:

Charles Proxy prompt for automatic network settings configuration

Click Grant Privileges and enter your password, if prompted. Charles starts recording network events as soon as it launches. You should already see events popping into the left pane.

Network traffic appearing in Charles Proxy's left pane

Installing SSL Certificates

Charles sits between a web browser and an API. It uses its own root certificate, also known as a certificate authority (CA), to dynamically create and sign certificates it sends to your local browser, letting you view network traffic as plain text.

For this to work, you must install and trust the Charles root certificate on the device or in the simulator where you want to view network requests and responses.

Go to the simulator that’s running StarCharles. Open Safari, then enter chls.pro/ssl.

Prompt to allow the simulator or mobile device to download the Charles root certificate configuration profile

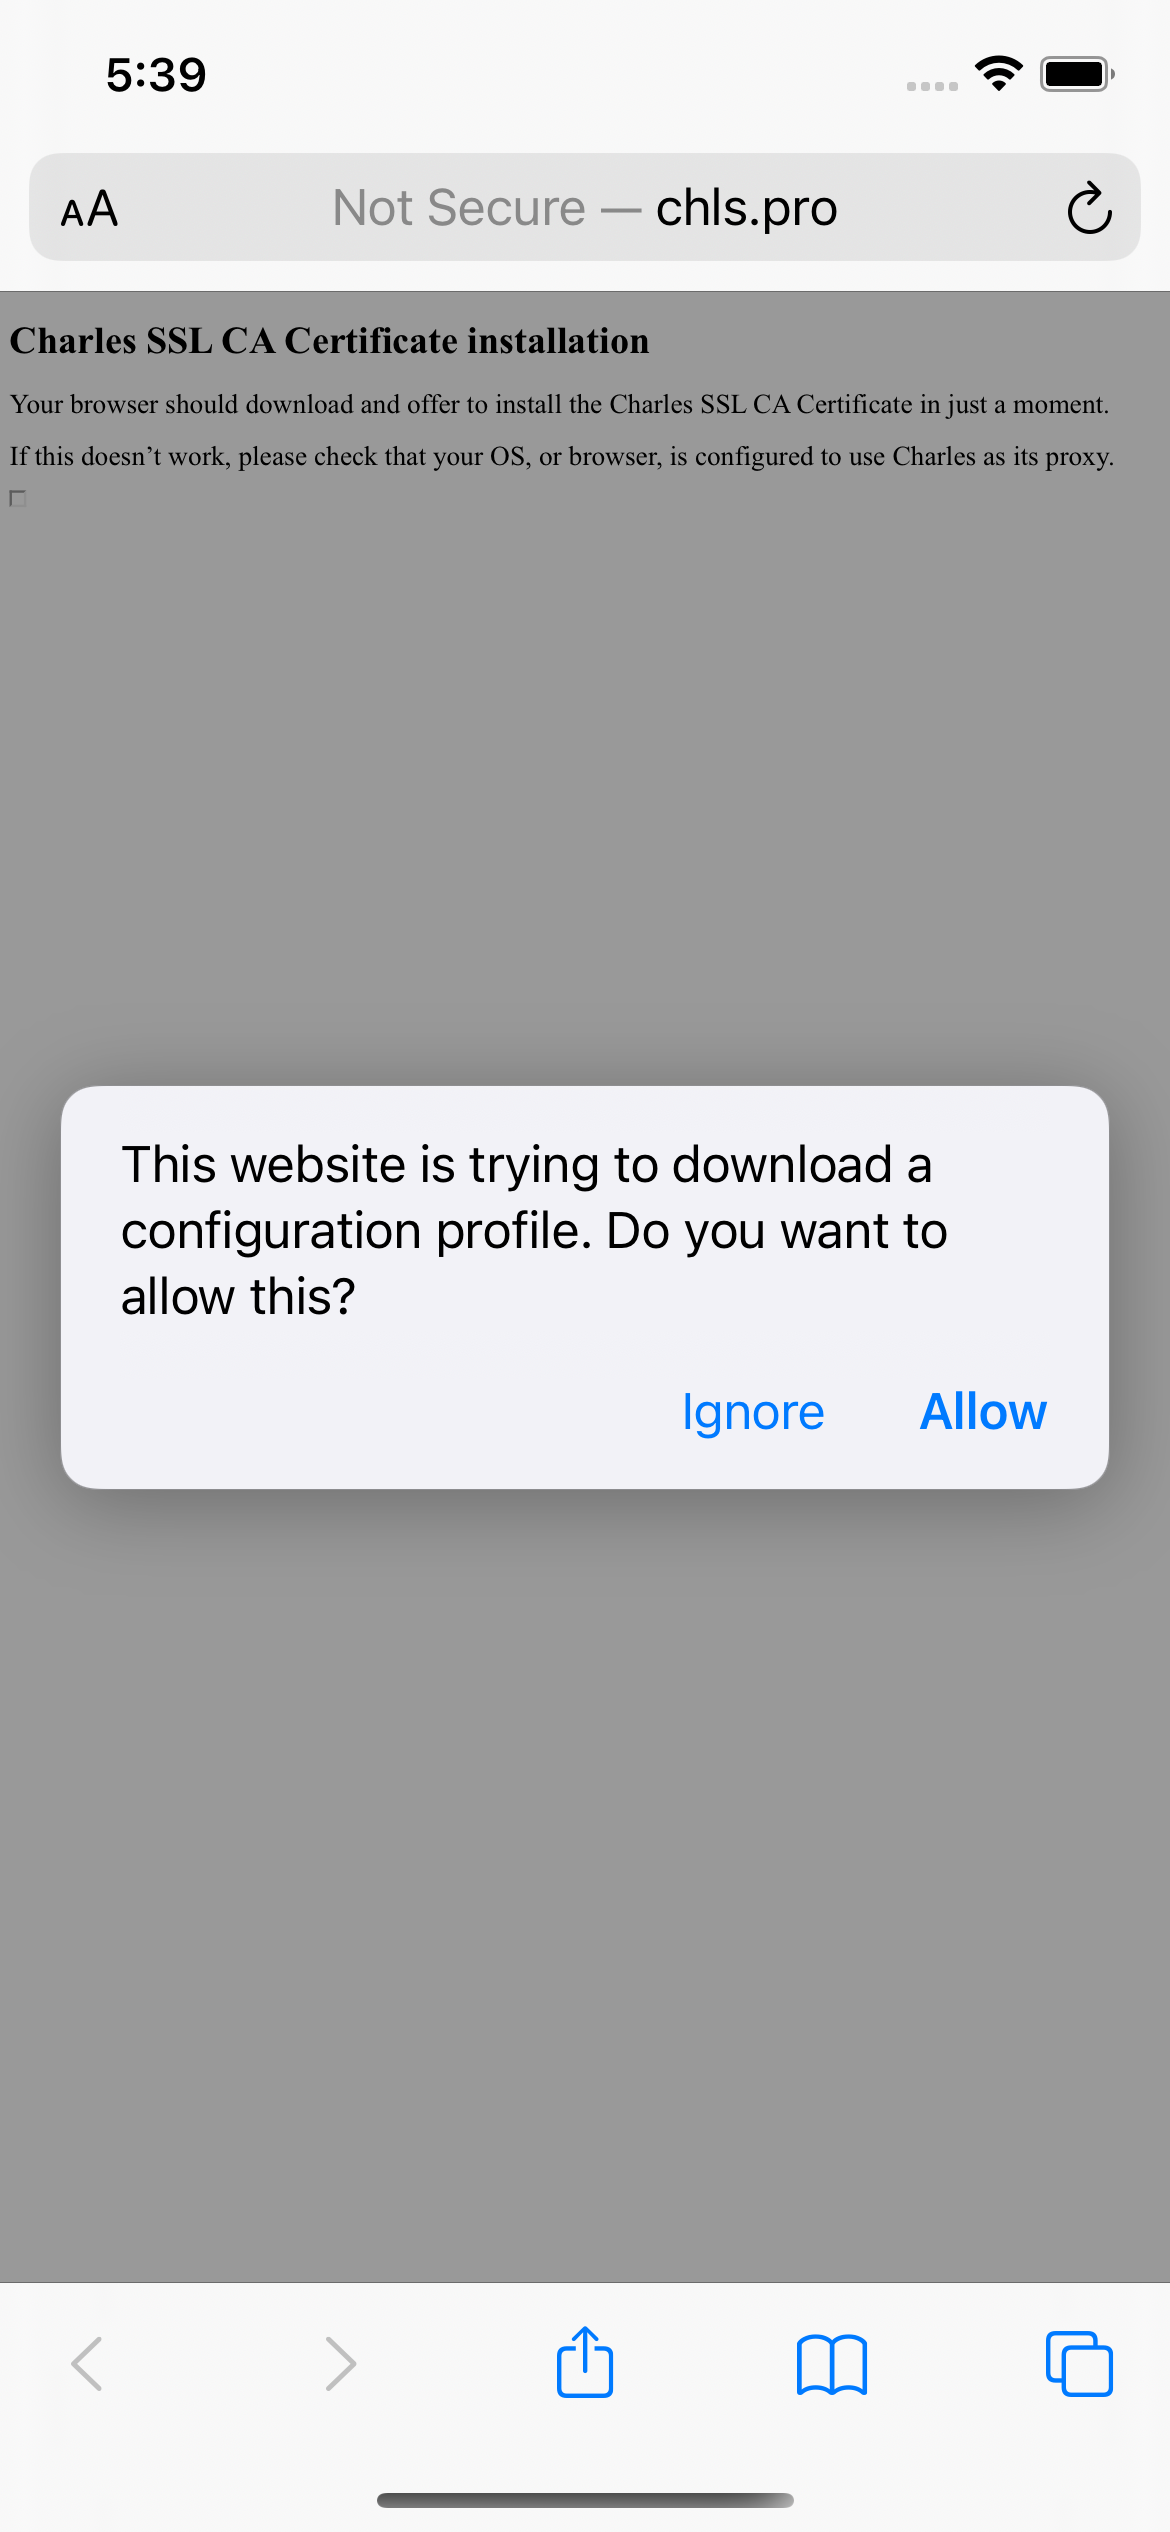
If you don’t see this alert, you might need to restart Charles. Try it, then reload the web page in Safari on the simulator. Tap Allow to download the configuration profile containing the root certificate.

Profile Downloaded confirmation screen after downloading configuration profile

Next, open Settings. Navigate to GeneralProfile and tap Charles Proxy CA.

Install Profile screen shown in Settings under General then Profile

Tap the blue Install button in the upper right-hand corner, then tap Install again on the following Warning screen. Once you’ve fully installed the profile containing the Charles Proxy CA, your simulator screen will look like this:

Profile Installed screen

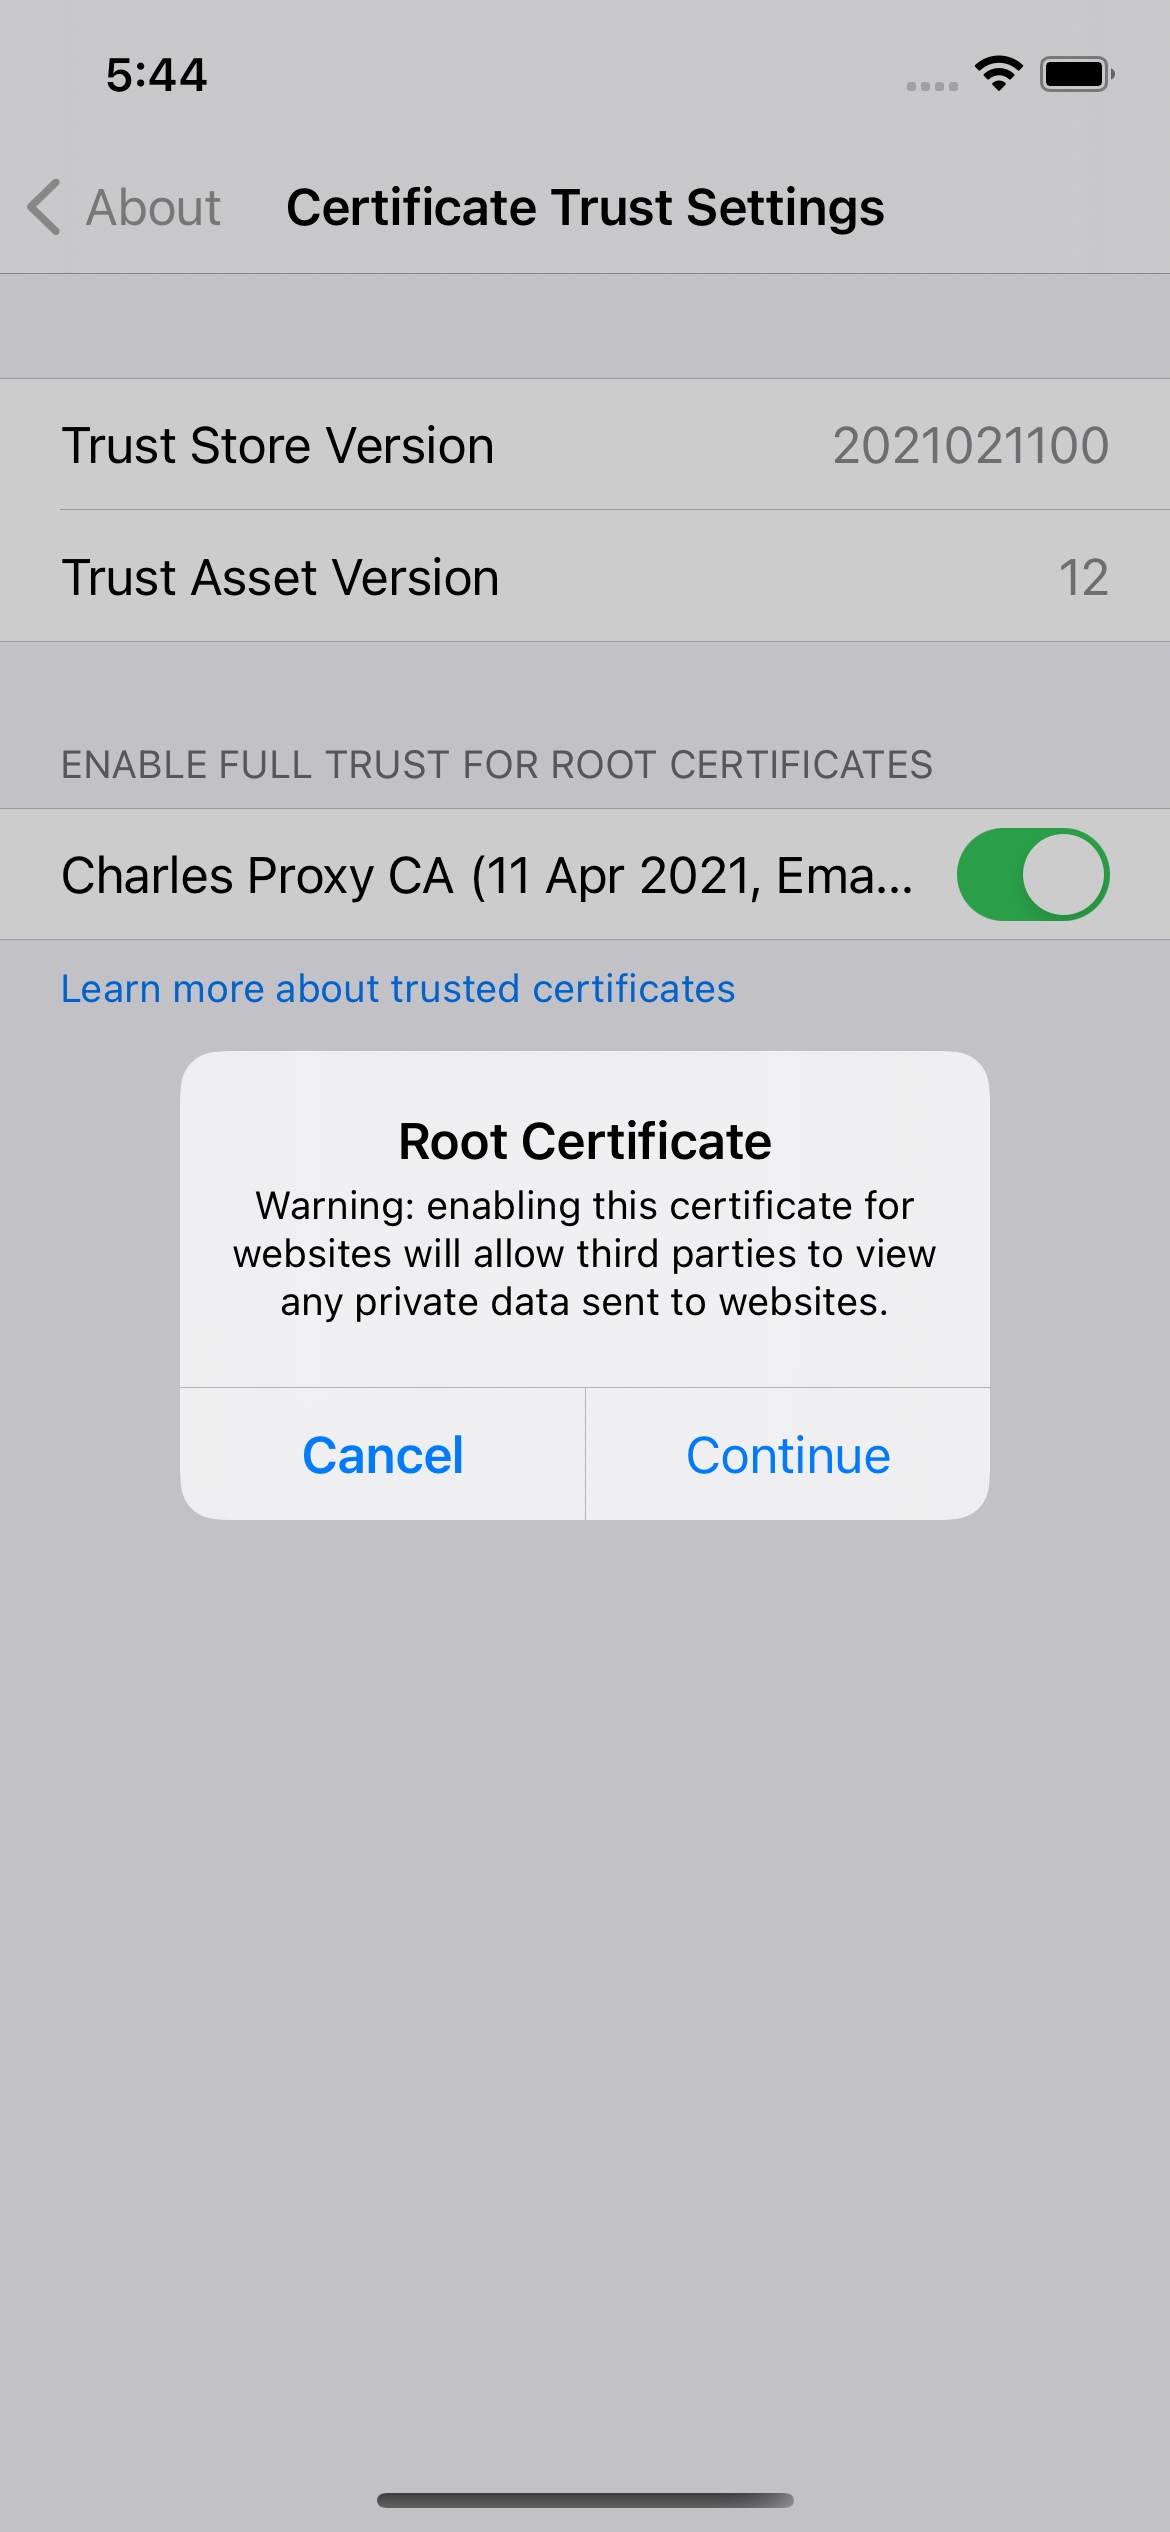
Finally, you need to fully trust this certificate. In Settings on the simulator, go to GeneralAboutCertificate Trust Settings.

Certificate Trust Settings screen

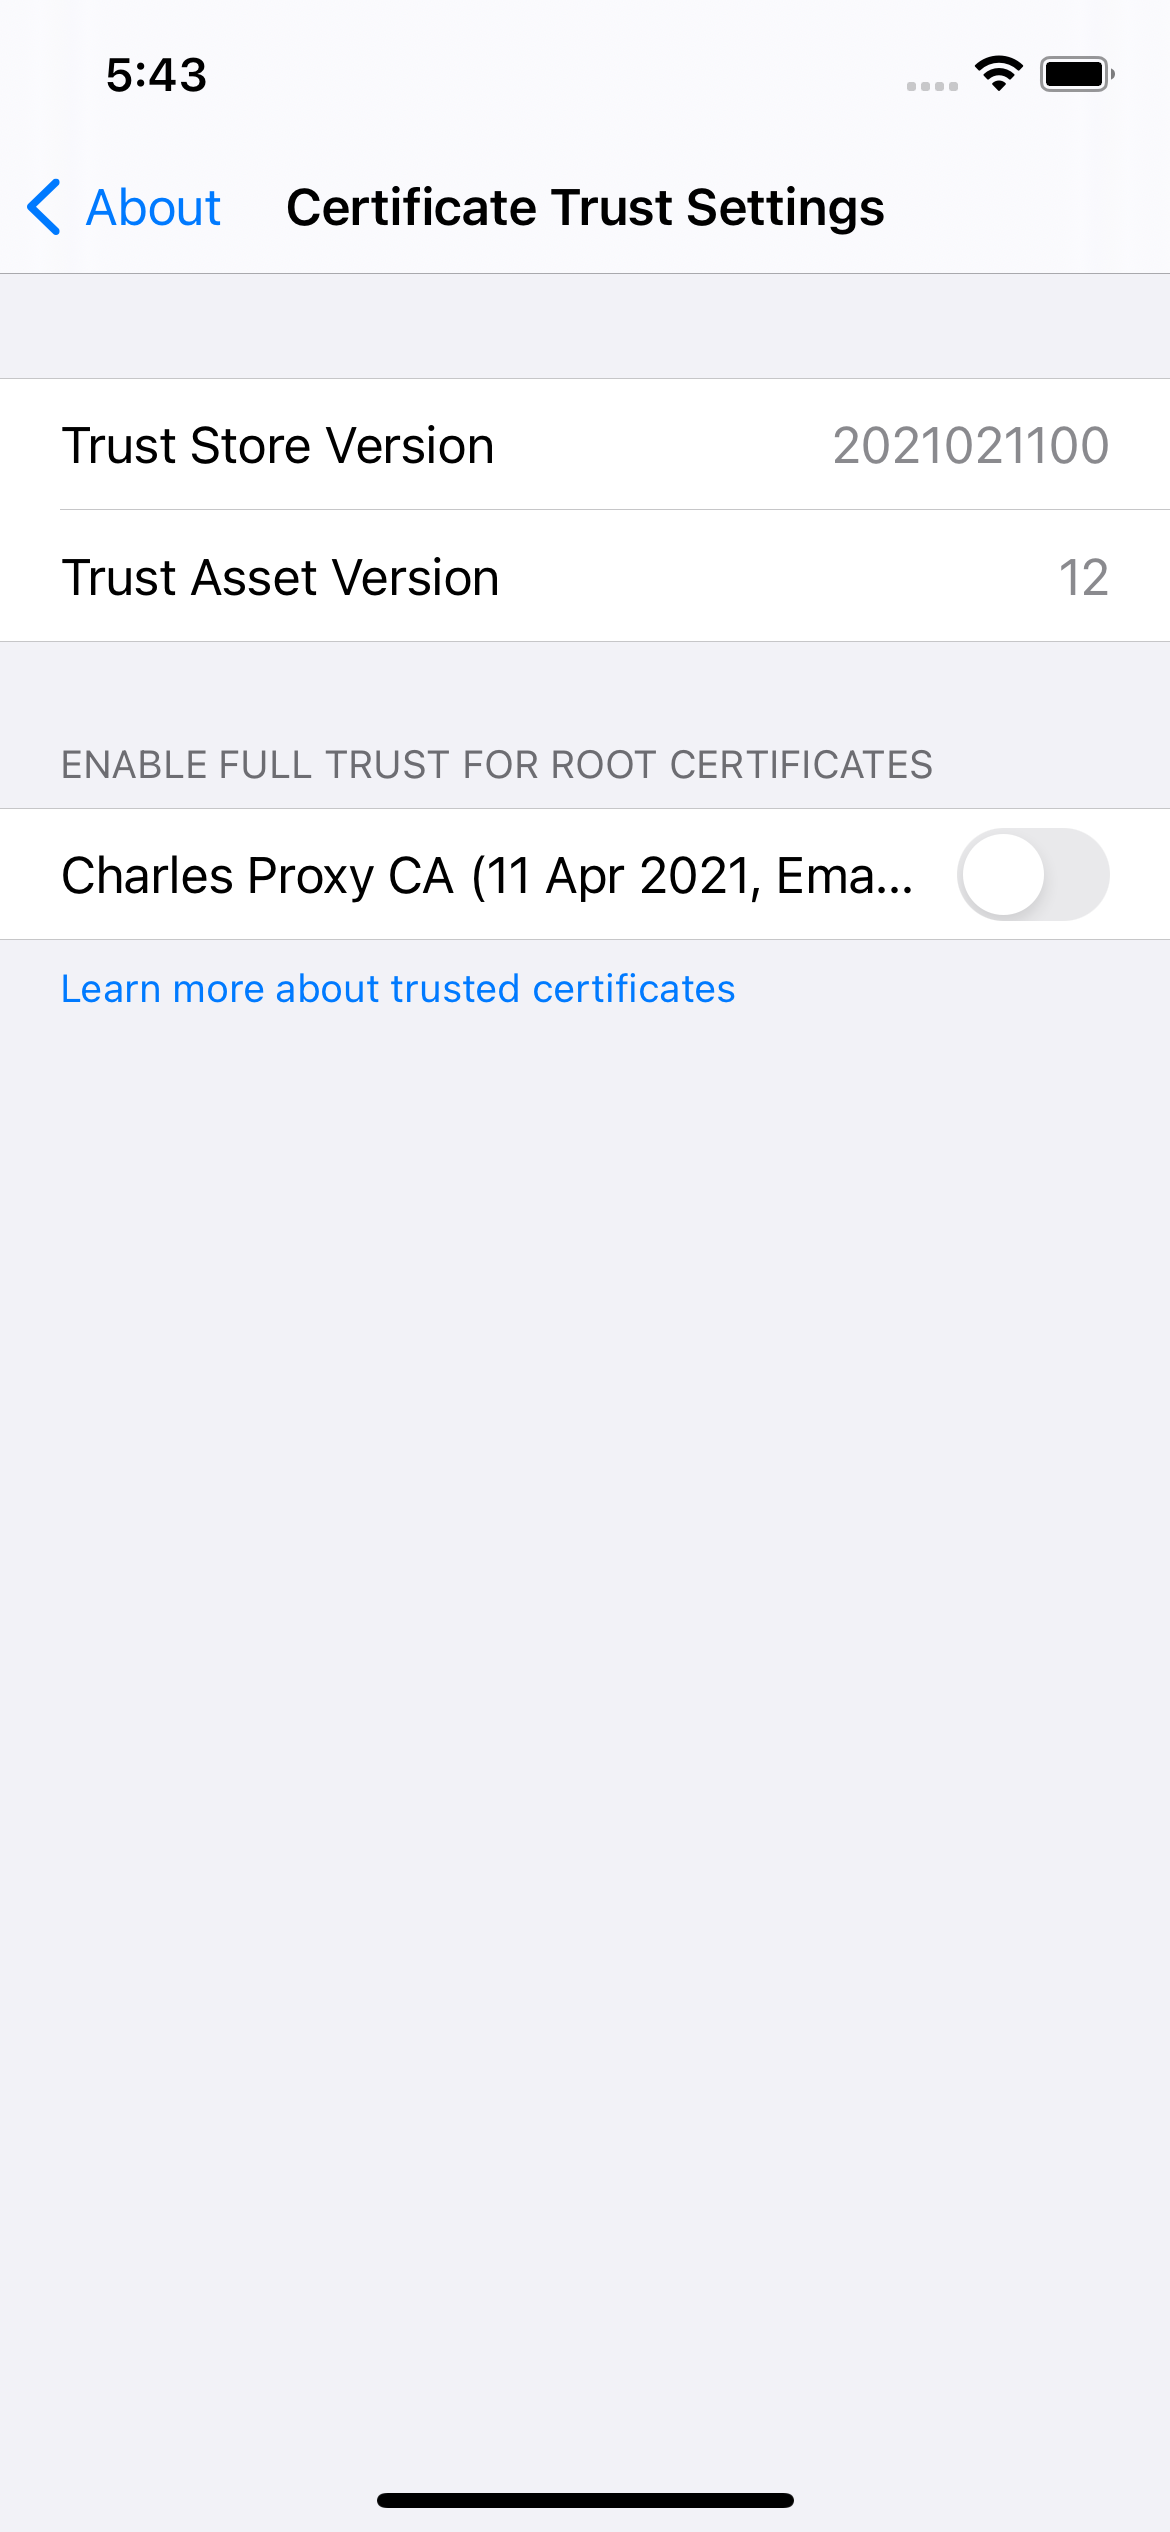
Under Enable Full Trust for Root Certificates, toggle Charles Proxy CA on and tap Continue after reading the root certificate alert.

Root certificate warning

Build and run. Tap Films, then tap a specific film. Next, tap a character. Navigate around the app to make some network calls. Check out how each row you tap in StarCharles shows a CONNECT request to swapi.dev in Charles.

Charles Proxy sequence tab showing network requests

Congratulations, making it this far means you managed to set up Charles completely. Onward and upward!

Superhero tabby cat with Charles Proxy written on his tummy soaring to greatness

Note: If you had any trouble setting up Charles, check out the Charles Proxy Tutorial for iOS or the Charles FAQ page for more help.

Focusing on a Host

By default, Charles tracks all network calls on your Mac. Right now, you’re interested in just one specific host: https://swapi.dev/. You can avoid the distraction of seeing every network request in Charles by focusing only on this domain.

Follow these steps to focus on a single domain:

  • Click the Sequence tab to display network calls chronologically.
  • How to choose sequential output in Charles Proxy

  • Right-click on any swapi.dev request, then click Focus on the drop-down menu.
  • Check Focused to the right of the Filter field to constrain the displayed traffic to just the calls to swapi.dev.
  • Animated GIF showing how to focus output on a single host domain

With that, you added one domain to the focus list. At any time, you can disable the Focus filter and choose any other domain to focus on instead.

Note: By pressing Shift-Command-O, you can see the list of Focused Hosts, add or remove domains and import and export this list.

Enabling SSL Proxying

Take a look at what’s inside one of the swapi.dev requests. Select any request, then click the Contents tab in the lower part of the screen. Whoa, what is that?

Unreadable response in the Contents screen of a request

Note: If you see Request and Response instead of Contents, click either of those. This simply means you have unchecked Combine request and response in the Viewers tab of the Charles Preferences dialog.

If a request’s contents appear garbled, you need to enable SSL proxying. This tells Charles to use its root certificate, which you installed earlier, to communicate with a domain where you’ve enabled SSL proxying. To do this:

  1. Right-click any swapi.dev request, then choose Enable SSL Proxying from the drop-down menu.
    Drop-down menu with Enable SSL Proxying option
  2. Quit and relaunch Charles.
  3. Open ProxySSL Proxying Settings. Confirm that swapi.dev appears as an included location in the SSL Proxying tab.
  4. Tap the little broom in the main Charles window to sweep out the existing traffic. Then, navigate around StarCharles to make network calls.
  5. Now, select any swapi.dev request and select the Contents tab.

Ah, much better!

Meaningful response displays after SSL proxying is enabled

Explore all the content pane tabs to get a deeper look inside Star Wars.

Manipulating Data

Charles offers a variety of tools for working with request and response data, including:

  • Map Local
  • Map Remote
  • Rewrite
  • Mirror
  • Auto Save
  • Repeat
  • Advanced Repeat
Note: You can see all the tools in the Charles documentation.

Mapping Requests to Local and Remote Responses

In Charles, mapping lets you change a request so its response is transparently served from the new location as if it were the original response. In fact, the data actually arrives from other places, like another host or even a local file.

This means you can mock your responses and manipulate the data however you like, then see how your app handles the changes. For example, how would your app behave if a variable’s type changed from Int to String? What if a value is unexpectedly nil? You can test those issues easily.

The Map Local tool maps a single request to get the response from your local machine instead of the usual endpoint. Next, you’ll try it out in StarCharles.

Inside the downloaded project materials, you’ll find a resources folder that contains films.json. Use the following steps to map https://swapi.dev/api/films/ to films.json:

  • In the StarCharles app on the simulator, tap Films.
  • StarCharles Star Wars data sample app Films page

  • In Charles, right-click https://swapi.dev/api/films/ and select Map Local.
  • Click Choose. Select the destination of films.json from the downloaded materials. Click OK.
  • configuring local mapping to get response data from a file

  • Open the simulator. Navigate back from the current screen. Tap Films.
  • iPhone simulator screen shows local data

You just mapped a single request to get your customized local response. In the result, you have the same data model but with different values.

From this point, you can manipulate films.json to contain whatever values you want. Be careful with the data model, however, to avoid introducing errors into the app.

Map Remote Tool

As avid fans of SWAPI already know, no one maintains the original swapi.co. Fortunately, however, copies of SWAPI live on elsewhere in the galaxy. In this section, you will use the Map Remote tool to map between the copy StarCharles uses, swapi.dev, and a different copy, swapi.tech.

Use the following steps to map the https://swapi.dev/api/people/ request to get its response from https://www.swapi.tech/api/people/ instead:

  • Tap Characters in StarCharles to generate https://swapi.dev/api/people/.
  • StarCharles Star Wars data sample app Characters page

  • Right-click the request in Charles and select Map Remote. Leave the Map From section as is, then fill in the lower Map To section like this:
    • Choose https as the Protocol.
    • Fill in www.swapi.tech as the Host.
    • Enter 443 in the Port.
    • Enter /api/people/ as the Path.
    • Click OK to save the mapping.

    configure remote mapping to get response from a different host

  • Head back to the simulator, tap StarCharles to go back to the top level of the app, then tap Characters. Oh no! How will we ever know what Luke looks like?
  • sample app Characters Page showing response data from remote mapped host, with no images

As you can see in Charles, the request now goes to a new host. Because the new host uses a slightly different data model, the response now only contains character names.

Remote mapped response data in different format

View All Mappings

To see a list of mapped requests, follow these steps:

  • Open the Tools menu.
  • set up mapping from Charles tools menu

  • Click Map Local to see the requests mapped to locations on your computer.
  • view and change mapping to files on your disk with Map Local Settings

  • Or, click Map Remote to see requests mapped to different hosts.
  • view and change mapping to other servers with Map Remote Settings

You can double-click any mapping to edit it or use the buttons shown to add new mappings, reorder the list of mappings, import mappings from elsewhere or export your current mappings.

Note: Mapping settings affect the data that StarCharles displays. If you don’t see the results you expect in a later section, check whether you need to enable or disable local or remote mapping.

Using Breakpoints

Trying to fix a back-end issue? By using breakpoints and manipulating the data on the air, you can simulate any states that might come from your back-end server.

In this section, you’ll try this out by adding a breakpoint on https://swapi.dev/api/people/1 and its corresponding responses. Before you start, turn off the remote mapping you set up in the previous section by going to ToolsMap Remote and unchecking Enable Map Remote. Leave the local mapping in place; you’ll use it here.

Follow these steps to add a breakpoint on the https://swapi.dev/api/people/1 request and its corresponding responses.

  • Open Films in StarCharles.
  • Tap LOCAL A New Hope.
  • Right-click the request https://swapi.dev/api/people/1 in Charles and select Breakpoints.
  • Return to the simulator and open LOCAL A New Hope again.
  • Now, you can change the request’s field with any input before it arrives in the back end.
  • Click Execute. The first time is for sending the request.
  • Click Execute. The second time for the request response.

animation of setting a breakpoint by right-clicking request and choosing Breakpoint

When you do this, you put a breakpoint on a specific API call. Then, you can catch that call before making that request to the actual server and you can manipulate the sent request. You can also change the exact response that came from the back end before it arrives at the client — in this case, StarCharles.

Note: If you miss the response, your request most likely failed because of the timeout. Try making the changes faster.

To stop catching the requests with breakpoints, go to ProxyDisable Breakpoints.

Disable breakpoints from the Proxy menu

To see the list of all the requests with a breakpoint, open ProxyBreakpoint Settings.

Breakpoint Settings in the Proxy menu

Filtering Requests with Allow and Block Lists

Earlier in this tutorial, you learned how to focus on a specific host. Now, you’ll learn how to make a list to allow or block requests. This comes in handy if you want to simulate a server error or a connection lost situation.

Follow these steps to add https://swapi.dev/api/people/2 to the block list:

  • Open Films in StarCharles.
  • Tap LOCAL A New Hope.
  • Right-click https://swapi.dev/api/people/2 in Charles and select Block List.
  • Return to the simulator and open LOCAL A New Hope again.

right-click request to add to Block List

By doing this, you put that request on the block list. Charles will fail it all the time and you’ll see the following error in the Xcode console:

Fetch character completed: failure(StarCharles.NetworkError.jsonDecodingError(error: Foundation.URLError(_nsError: Error Domain=NSURLErrorDomain Code=-1 "(null)")))

You can disable the block by right-clicking on this request again in Charles, then unchecking Block List in the drop-down menu.

Note: By adding any request to the allow list, you create a white list. Charles will now block all requests except those on the allow list.

You can see the list of all the requests you added to either an allow or block list by selecting ToolsAllow List or ToolsBlock List. You can also modify that list here.

View or change Block or Allow List Settings from Tools menu

Automating Actions

Now that you know how to manipulate requests and responses with breakpoints, you may wonder if there’s a way to do this without having to open the breakpoint editing pane and race to manually change the response every time.

There is! In this section, you’ll learn how to write rules for repetitive actions.

Not only does this save time, but it also helps testers who don’t have the same access to your app. For example, say a tester wants to try your app with a specific token. In this case, they wouldn’t need to add breakpoints to all the requests. Instead, they could use the Rewrite tool to modify the token on all requests using a rule.

Using the Rewrite tool, you can create a rule to modify requests and responses as they pass through Charles.

Illustration of data transforming as it passes through a rewrite rule, with cool animal names like leopard gecko becoming long numbers instead

In the Charles menu bar, click ToolsRewrite. Check Enable Rewrite, then click Add to see all three sections of the tool: sets, locations and rules.

The Charles Proxy Rewrite tool contains areas to configure sets, locations and rules

  1. Sets: Shown on the left, each set can have different locations and different rules.
  2. Locations: Shown on the top right, each location includes a specification for a destination host.
  3. Rules: Shown on the bottom right, each rule includes the actual rewrite operation, where you can manipulate the following attributes of requests and responses:
    • Header
    • Host
    • Path
    • URL
    • Query Parameters
    • Response Status
    • Body

Next, you’ll try this out.

Rewriting Responses in Action

Remember when you mapped https://swapi.dev/api/people/ to get the response from https://www.swapi.tech/api/people/?

Imagine you’re a hacker who wants to use a man-in-the-middle server to receive all the requests and gather the data, responding to it using the same structure as the client expected but with different values. You already mapped the original server to the new one; now, it’s time to rewrite all the requests with a replacement.

In this section, you’ll rewrite that request so that instead of getting people from the swapi.tech, it gets planets.

  • Remove placeholder set if any.
  • In Charles, open ToolsRewrite.
  • Check Enable Rewrite.
  • Click Add to add a new set and name it People.
  • New set called People

  • Under Location, click Add and paste https://swapi.dev/api/people/ in the host text field for autofill of the other files. Ensure to include the final slash after people. Click OK

    screencap showing swapi.tech added as a new location

  • In the rules section, add a new rule with a Path type. Enter people into the Value field under Match and planets in the Value field under Replace.
  • screencap showing a new rule mapping people to planets in the Path

  • Click OK to save the new rule, then click OK again to save and close the Rewrite Settings.
  • In the simulator, tap Characters.
  • StarCharles Star Wars data sample app now shows planets as the characters after setting rewrite rule

As you can see, the results aren’t the same as before. One could argue, of course, that the planets themselves are characters too.

Repeating Requests

When you test back-end code, you might want to examine the server’s response without involving your client. The Repeat tool makes this easy. Enable it by right-clicking on any request, then choosing Repeat.

In this scenario, Charles resends the exact same request to the server and shows you the response as a new request without taking any action on your client. This happens only once by default.

Keep the Repeat tool in mind when it’s difficult to navigate to the location where a request gets sent in the client interface. Once you have one example request, use Repeat to send it again.

Note: You can use Repeat Advanced to have more options, like the number of iterations and concurrency, to hook the errors that might come from your back end.

Recording Network Activity

By logging and saving network activity to disk, you can compare results over time. This lets you see if your back-end team made any changes on your server.

Happy cartoon iPhone with blue-green gradient screen of stylized network activity

This also lets you make some reports if you want to pass along any results as a tester or even as a hacker who finds security issues in a particular request.

Mirroring Network Data Locally

Using Mirror, you can save a session’s responses to disk. This comes in handy to:

  • Migrate data from one server to another.
  • Make a copy of all responses.
  • Clone a server to use locally.

Charles places the responses in the same directory structure that the API itself uses. This means you’ll have the same path for each response with the same filename as the URL. Note that the filename includes the query strings.

Colorful, happy cartoon folders and files representing Charles data mirrored to disk

Note: If you receive two responses for the same URL, Charles will overwrite the new one, so you’ll always have the latest response saved in the mirror unless you turn off the tool.

To enable mirroring, do the following:

  • In Charles, open ToolsMirror.
  • Check Enable Mirror.
  • Check Only for selected locations.
  • Choose a save destination.
  • Add a new location by entering https://swapi.dev/api/* in the host field and click on another field for autofill. Click OK
  • .

view or change mirror settings from the Tools menu

Now that you set Charles to mirror all the responses from swapi.dev to your disk, return to StarCharles in the simulator and navigate around to generate some traffic.

In Finder, open the save destination.

Mirrored data appears in Finder where you chose to save it

Now, you can see the saved session responses.

Automatically Saving Sessions

These days, most developers use Charles or other proxies to monitor their interactions with their servers. However, sometimes it’s really hard to find the specific request and session that caused an issue. This could be because you cleaned the Charles session view or because so many different requests pop in.

Imagine you have a tester who runs a front-end test in parallel across multiple devices with Charles setups. In this case, the tester should be able to see the result and easily make a report in case of an error. By using the Auto Save tool, the pipeline for test automation becomes more straightforward.

Using this tool, Charles automatically saves and clears the recording sessions for any period.

To enable this, follow the steps below:

  • In Charles, open ToolsAuto Save.
  • Check Enable Auto Save.
  • Enter a 2 for save interval. This tell Charles to save every two minutes.
  • Choose a destination to save the data.
  • For this tutorial, leave the Save type as Charles Session File. Check out all the other choices, though, to see what makes sense for your use case.

view or change Auto save settings from the Tools menu

Charles saves session files that have a timestamp in their name in the format yyyyMMddHHmm, so they appear chronologically where you chose the sessions.

Navigate around in StarCharles. Wait for a couple of minutes, you’ll see a saved session in your save destination.

List of auto-saved Charles sessions in Finder

You can make a report using these files and share it with anyone. They can open the file in Charles and see precisely the same session as you produced here.

Note: Auto Save and Mirror save different information from a session. Auto Save keeps everything, all the requests and responses. Mirror keeps just the output data that you received as a response from the server.

Using Charles in a Team

Charles offers several features that help testers and developers work together. You already learned about sharing sessions with Auto Save, but there are other ways to send Charles data to others. You can also send your Charles settings or import someone else’s, so all the members of a testing team can use the same setup.

Sharing Sessions

In Charles, when you right-click one of the requests, you see these options:

  • Copy URL: Copies the actual URL.
  • Copy cURL Request: Copies the cURL request that contains all the data for the request, including headers.
  • Copy Response: Copies the response content.
  • Save Response: Saves the response content.
  • Export Session: Exports the whole session in your choice of formats.

Right-click to copy a cURL request

Note: To best help back-end developers exactly understand what happened, send either the whole session or the cURL request and the corresponding response.

Sharing Settings

As you might have noticed, Charles offers options to import and export almost everything, especially the configurations for the tools. Try either of the following to share a tool configuration from Charles:

  1. When you open any tool from the menu bar, you end up in a window with two options, Import and Export. That lets you perform the action in a specific tool.

    You can import or export map remote settings

  2. You can also open ToolsImport/Export Settings. Choose whether you want to Import or Export settings.

    Import/export settings on the Tools menu

Note: In the downloaded project materials, you can find Charles Settings.xml inside the resources folder, which you can import into your Charles. It includes all the configurations you used in this tutorial.

Congratulations! Now that you’ve finished this tutorial, you have a deeper understanding of some of Charles Proxy’s more advanced features.

Where to Go From Here?

You can download the project materials and additional resources using the Download Materials button at the top or bottom of this tutorial.

In this tutorial, you learned how to:

  • Use Charles as a proxy to observe the network and rewrite the data along the way.
  • Use mapping and breakpoints to manipulate data.
  • Add different rule sets to rewrite requests and responses.
  • Save all the network activities to disk.
  • Share reports with others.

From here, take a look at the Charles documentation if you want to explore in greater depth. For more on iOS networking, check out the Networking with URLSession video course.

We hope you enjoyed this tutorial. If you have any questions or comments, please join the forum discussion below!