Intro to Object-Oriented Design in Swift: Part 2/2
Learn the basics of object-oriented design in Swift. In this second part, you’ll learn about polymorphism, initialization, and some common design patterns for dealing with objects. By Ray Fix.
Proper Initialization
One of the big safety features of Swift is its ability to do proper initialization. Through a process called two-phase initialization, the Swift complier guarantees that you never access uninitialized memory.
Swift uses two phase initialization that works roughly like the following. First, initialization of your Derived class begins.
Phase 1
- The stored properties of the most derived class are set either at the point where the stored property is declared or at the beginning of the
init()method. In Phase 1, properties declared withletmust be set exactly once. -
super.init()is called. The same rule above applies. That is, the super class also sets all of it’s stored properties that it introduces and calls up the chain. - The process continues until the top of the inheritance hierarchy is finally reached.
Phase 2
- The highest level
init()method returns starting the chain back down towards the most derived class - As each derived class returns, it can overwrite stored properties defined in the super classes above it.
- This process continues back down to the most derived class.
- Finally, any convenience initializers in the chain have the option to customize the instance and to work with self. More on convenience initializers in the next section.
You can find a longer explanation of initialization in the Swift Programming Language Book. While the rules are a bit subtle, they are simple to follow and avoid corner cases where properties would not be initialized or confusingly over-written.
Designated vs Convenience Initializers
Every class must have at least one designated initializer that is responsible for initializing everything in that class. If you set all of the stored properties (or they have their own default initializers) the compiler will provide you with a default designated initializer automatically.
It is typical for a class to have only one designated initializer. Sometimes you can declare additional convenience initializers that are marked with the keyword convenience. While this tutorial doesn’t show any convenience initializers in action, they can be convenient (as the name suggests) in shortening common initialization calls.
Convenience initializers may only call the designated initializer or other convenience initializers of the same class. Ultimately they must eventually lead to the designated initializers of the same class. This simple rule ensures instances are in a usable state by the end of the initialization process.
Unlike convenience initializers, designated initializers of a derived class must only call the designated of the superclass.
Back to the Code
When you created Vehicle, Car, Motorcycle and Truck in Part 1 you used a bunch of placeholder values to set the properties. After creating Vehicle instances, you immediately set the values to something more reasonable. This, however, is an error prone process. It is easy to forget setting one of the values resulting in a bug. It would be better if you could set the values explicitly right at initialization so the compiler can check your work.
In this section you’ll set the values right in the initializer. This will make your classes easy to use correctly and conversely, difficult to use incorrectly.
Because you specified all of the initial values and didn’t write a default initializer, the compiler created one for you behind the scenes. When you write your own, the compiler-created one goes away. So, along with creating a new member-wise initializer, add a default initializer to prevent breakage while you are refactoring. Open Vehicle.swift and add these below your computed properties:
// Mark: - Initialization Methods

init() {}

init(brandName:String, modelName:String, modelYear:Int, powerSource:String, numberOfWheels:Int) {
  self.brandName = brandName
  self.modelName = modelName
  self.modelYear = modelYear
  self.powerSource = powerSource
  self.numberOfWheels = numberOfWheels
}
The blank initializer is just temporary to keep the compiler from complaining. You will remove this later.
The new initializer with arguments simply sets each property with the value coming in.
Now open Car.swift. Change the declaration of the four stored properties to remove their default values. They should look like the following:
let isConvertible: Bool
let isHatchback: Bool
let hasSunroof: Bool
let numberOfDoors: Int
Next, replace the current overridden init() with the following:
init(brandName: String, modelName: String, modelYear: Int, powerSource: String,
  isConvertible: Bool, isHatchback: Bool, hasSunroof: Bool, numberOfDoors: Int) {

    self.isConvertible = isConvertible
    self.isHatchback = isHatchback
    self.hasSunroof = hasSunroof
    self.numberOfDoors = numberOfDoors

    super.init(brandName: brandName, modelName: modelName, modelYear: modelYear,
      powerSource: powerSource, numberOfWheels: 4)
}
This initializes a Car object in one call. In the initializer you first initialize the properties that the Car class introduces. Then you call the superclass’s designated initializer. By declaring your stored properties with the let keyword, they are now immutable so they can never change after they are initialized. Using let is a good idea because it more appropriately models these properties. The number of doors on a car, for example, does not change from minute to minute.
Now repeat the process for Motorcycle. Open Motorcycle.swift and replace the stored property and overridden init() with the following:
let engineNoise: String

init(brandName: String, modelName: String, modelYear: Int, engineNoise: String) {
  self.engineNoise = engineNoise
  super.init(brandName: brandName, modelName: modelName, modelYear: modelYear,
    powerSource: "gas engine", numberOfWheels: 2)
}
And the some thing for Truck. Open Truck.swift and replace the stored property and init with the following:
let cargoCapacityCubicFeet: Int

init(brandName: String, modelName: String, modelYear: Int, powerSource: String, numberOfWheels: Int, cargoCapacityInCubicFeet:Int) {
  self.cargoCapacityCubicFeet = cargoCapacityInCubicFeet
  super.init(brandName: brandName, modelName: modelName, modelYear: modelYear,
    powerSource: powerSource, numberOfWheels: numberOfWheels)
}
Finally you are ready to remove the temporary init() with no parameters in the Vehicle class and change all of the properties to immutable values with no dummy placeholders. Go to Vehicle.swift and change the stored properties to the following:
let brandName: String
let modelName: String
let modelYear: Int
let powerSource: String
let numberOfWheels: Int
Also, remove the temporary init() {} you had.
The test code that you put in AppDelegate in Part 1 will no longer compile because it used the default initializer Vehicle() that no longer exists. Open AppDelegate.swift and remove it. application(_:didFinishLaunchingWithOptions:) should simply return true:
func application(application: UIApplication, didFinishLaunchingWithOptions launchOptions: [NSObject: AnyObject]?) -> Bool {
  return true
}
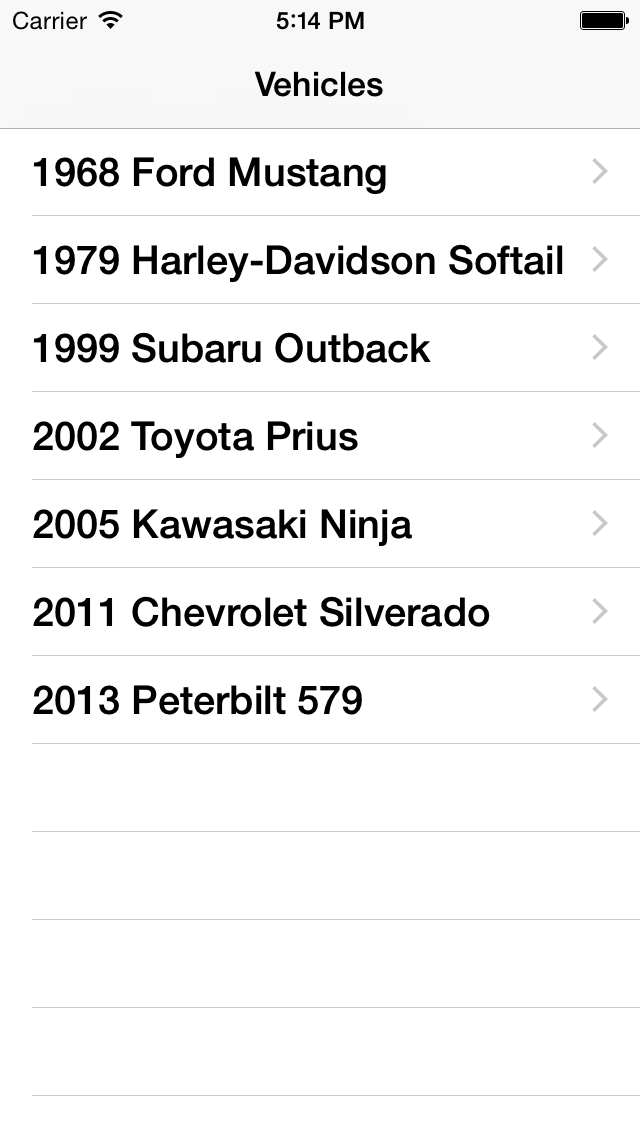
Now you can use your new initializers to create all the different Vehicle objects. Open VehicleListViewController.swift and replace the current method body of setupVehicle() with the following:
// Clear the array. (Start from scratch.)
vehicles.removeAll(keepCapacity: true)

// Create a car.
var mustang = Car(brandName: "Ford", modelName: "Mustang", modelYear: 1968, powerSource: "gas engine",
  isConvertible: true, isHatchback: false, hasSunroof: false, numberOfDoors: 2)

// Add it to the array
vehicles.append(mustang)

// Create another car.
var outback = Car(brandName: "Subaru", modelName: "Outback", modelYear: 1999, powerSource: "gas engine",
  isConvertible: false, isHatchback: true, hasSunroof: false, numberOfDoors: 5)

// Add it to the array.
vehicles.append(outback)

// Create another car
var prius = Car(brandName: "Toyota", modelName: "Prius", modelYear: 2002, powerSource: "hybrid engine",
  isConvertible: false, isHatchback: true, hasSunroof: true, numberOfDoors: 4)

// Add it to the array.
vehicles.append(prius)

// Create a motorcycle
var harley = Motorcycle(brandName: "Harley-Davidson", modelName: "Softail", modelYear: 1979,
  engineNoise: "Vrrrrrrrroooooooooom!")

// Add it to the array.
vehicles.append(harley)

// Create another motorcycle
var kawasaki = Motorcycle(brandName: "Kawasaki", modelName: "Ninja", modelYear: 2005,
  engineNoise: "Neeeeeeeeeeeeeeeeow!")

// Add it to the array
self.vehicles.append(kawasaki)

// Create a truck
var silverado = Truck(brandName: "Chevrolet", modelName: "Silverado", modelYear: 2011,
  powerSource: "gas engine", numberOfWheels: 4, cargoCapacityInCubicFeet: 53)

// Add it to the array
vehicles.append(silverado)

// Create another truck
var eighteenWheeler = Truck(brandName: "Peterbilt", modelName: "579", modelYear: 2013,
  powerSource: "diesel engine", numberOfWheels: 18, cargoCapacityInCubicFeet: 408)

// Add it to the array
vehicles.append(eighteenWheeler)

// Sort the array by the model year
vehicles.sort { $0.modelYear < $1.modelYear }
Build and run the application. Everything should look as it did before, and there should be no difference in behavior.
Although things behave the same way, your code is now much more robust and much less susceptible errors when creating new objects. With proper initialization in the Vehicle class hierarchy, you can be sure your objects and properties start off in a known good state.