Creating a Cross-Platform Multiplayer Game in Unity — Part 1
Learn how to create a cross-platform multiplayer game in Unity in the first of a fourth part tutorial. By Todd Kerpelman.
In spite of the challenge of creating multiplayer games, they are totally worth it. No AI, no matter how clever, will have the same ingenuity as a human opponent, nor will trash talking an AI be as fun as trash talking your friends. And I haven’t heard of any player starting a relationship with an AI that they met online…movies starring Joaquin Phoenix notwithstanding. :]
In this tutorial, you’ll create a networked multiplayer game that works across different brands of devices. When you show off an iOS and Android game playing together, your co-workers are going to think you’re some kind of crazy wizard!
But try not to let it go to your head.

But try not to let it go to your head.
In the first part of this tutorial series, you will learn the following:
- How to configure and install Google Play Games Services
- How to setup an iOS project to work with Google Play Games Services.
- How to sign in a user.
- How to sign out a user.
You should have the following prerequisites before you move ahead with this tutorial:
- A basic understanding of Unity and C#. All of your coding is going to be in C# — no Objective-C, Swift, or Java here!
- Some experience running a Unity game on an actual device.
- At least two devices to develop on: either iOS, Android, or one of each. Testing a multiplayer game with just one device tends to be rather difficult. :]
- A Google Play Developer account, which you can sign up for at https://play.google.com/apps/publish/. Even if you’re going to test this on iOS only, you’ll still need one of these accounts. Obtaining a Play Developer account will set you back $25 — but you’ll consider it worthwhile once you experience your game in action!
If you are just starting out with Unity, it would be well worth your time to work through Christopher LaPollo’s excellent Unity 2D tutorial series on this site before you tackle an advanced-level Unity tutorial like this one.
Getting Started
It’s time to get familiar with the game you’re going to turn into a multiplayer showcase of awesomeness. Download the starter project for Circuit Racer, The Unity Version here, then unzip the file to extract the project.
In Unity, select File\Open Project. Select Open Other… from the dialog box that appears, and then select the Circuit Racer folder you just unzipped:

Start by loading up the Main Menu scene. From the Assets panel, select MenuStuff and then double-click MainMenu to open up the main menu.
Hit the Play button to try out the game within Unity; select the single player experience, and watch as your car performs death-defying feats as it circles around the track before time runs out!

Oh, by the way — watch out for those crates. :]
Running on a Real Device
It’s time to try this on an actual device. Since you’re reading this on RayWenderlich.com, I’ll assume you’ll want to run this on your favorite iOS device. Readers on RoyWenderlich.com, the Android tutorial site run by Ray’s evil twin, probably have a different experience in mind:
A rare photo of Ray and Roy together, before what has only been referred to as “the incident”.

A rare photo of Ray and Roy together, before what has only been referred to as “the incident”.
You’ll first need to change the Bundle Identifier of your project to something a little less generic. Go to File\Build Settings, then select iOS. The iOS platform should already be selected as your target platform, but if it isn’t, click the Switch Platform button with iOS selected.
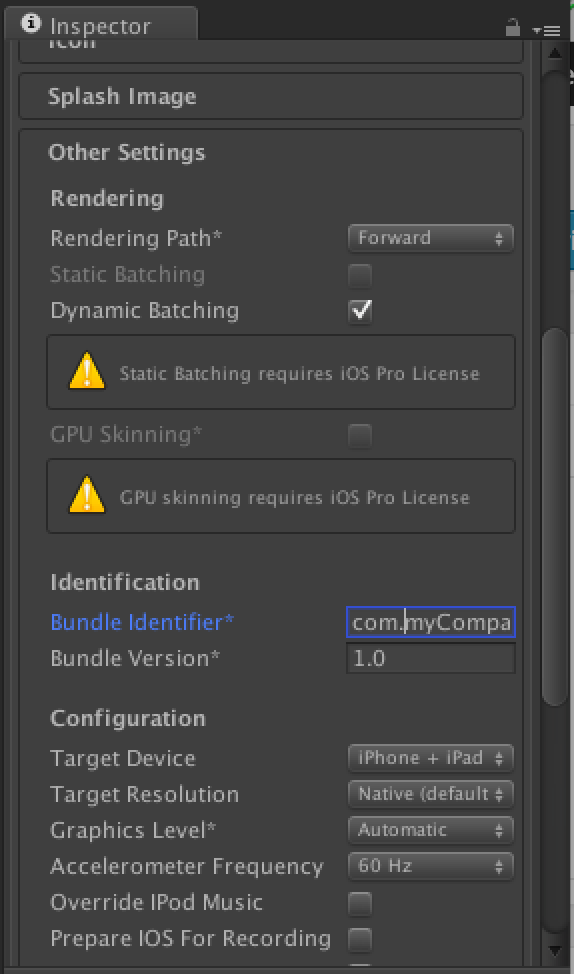
Click Player Settings and the PlayerSettings should appear in your Inspector panel. In the Other Settings area, look for the Bundle Identifier and change it from com.example.CircuitRacerUnity to something that’s unique to you and appropriate for your provisioning profile, like com.<your company name>.<your user name>.CircuitRacerUnity:
Now connect your physical device to your Mac. If you haven’t run an Xcode project on a device before, then read up on what’s required in this tutorial first.
Head back to the Build Settings dialog box, which should still be open, and select Build and Run. Unity will ask you to save the generated Xcode project; give it a fun and original name such as CircuitRaceriOS.
Once Unity has finished exporting the project, it will open up the newly created project in Xcode. Xcode will take a few moments to process the file, and it will then run the game on your actual device! However, sometimes Xcode forgets to run the project for you. If this happens, just click the Run button to remind Xcode why it opened in the first place. :]
In addition to the on-screen gamepad support, the game also supports tilt controls — something you probably wouldn’t have noticed when you were playing the game within Unity.
Understanding Circuit Racer
The Circuit Racer game in this tutorial is a mashup of two different tutorials:
- The Circuit Racer SpriteKit game, as presented in the book Games for iOS by Tutorials.
- The Unity 2D intro tutorials on this site by Christopher LaPollo.
This tutorial won’t go into too much detail about how the controls work, how the game knows you’ve completed a circuit, or how the car turns, since that’s been covered by the two aforementioned tutorials and it’s not directly relevant to your goal of turning this into a multiplayer game. Still, feel free to browse through the code, in particular the GameController, CarController, and AnalogControl classes, which will give you a general idea of how things work.
As long as you’re trying out the game on your device, you might as well see what the multiplayer option has to offer. Head back to the main menu and click on the Multiplayer button:

Well, that was underwhelming, to say the least. But the good news is that you’re going to fix it all up!