Custom Thumbnails and Previews with Quick Look on iOS

Learn how to build your own Quick Look preview and thumbnail extensions to display custom file types in iOS. By Chuck Krutsinger .

5 (3) · 1 Review

Download materials
Save for later
Share

You may find yourself wanting to display a thumbnail representation of a file in your app, or you might even find yourself wanting to show a richer preview of the file itself. Fortunately, the QuickLook framework lets you generate thumbnails and display previews for many standard file types with little effort.

Thumbnails artwork

While this is great for standard file types, what if your app focuses on a specific type of file that isn’t covered by QuickLook? Well fear not; with Quick Look previews and thumbnail extension points introduced in iOS 13, you can provide custom previews and thumbnails for custom file types both in your own app and any other app on the same device that also uses QuickLook.

Note: You’ll see both forms of spacing used for the back-end QuickLook framework without a space and for the user-facing Quick Look with a space. The rules for spacing in the name appear to be mixed so we’ve endeavored to strike a balance.

In this tutorial, you’ll learn how to:

  • Generate thumbnail images using QLThumbnailGenerator
  • Define and export your own document type for your custom file format
  • Build your own Quick Look preview extension
  • Build your own Thumbnail extension
  • Debug your code that runs within an extension

To do this, you’ll work on RazeThumb, an app that shows a list of files and presents the Quick Look preview of each file when tapped. You’ll enhance the app to use QuickLook to display a thumbnail representing each file in the list. Finally, you’ll add a Quick Look preview extension and a Thumbnail extension for your custom .thumb file type and see it in action both in your app and in the Files app.

Getting Started

Begin by downloading the project materials using the Download Materials button at the top or bottom of this tutorial. Then open RazeThumb.xcodeproj in the starter folder.

RazeThumb is a simple document browsing app. It comes preloaded with a variety of file types containing thumb images. Five of the six formats are standard file types. The sixth is a custom file type called a .thumb file.

Build and run:

The RazeThumb app home screen containing a list of documents using a default placeholder icon for each one

The app presents a list of six different file types, each represented with a placeholder document icon. Tapping each file will present the QLPreviewController, which displays a preview of the file. That’s all it does for now, but you’ll be enhancing the app as you go.

Adding Quick Look Thumbnails

The first thing you’ll do is enhance RazeThumb to use a thumbnail of each file type. Currently, RazeThumb displays a generic document icon for each file. The QuickLook framework provides thumbnail images for a variety of file types, including images, PDFs, audio and video. Review Apple’s documentation for more details on what other file types Apple supports. If QuickLook doesn’t recognize a file type, it’ll still create some kind of placeholder thumbnail. You’ll learn more about that after you’ve added thumbnailing to the app.

For now, it’s time to start prettying up RazeThumb.

Pretty pink thumbnail artwork

Open Document.swift and change import Foundation to:

import QuickLook

At the bottom of the file, paste in the following extension:

// MARK: - QLThumbnailGenerator
extension Document {
  func generateThumbnail(
    size: CGSize,
    scale: CGFloat,
    completion: @escaping (UIImage) -> Void
  ) {
    if let thumbnail = UIImage(systemName: "doc") {
      completion(thumbnail)
    }
  }
}

The code above is a placeholder for your asynchronous thumbnail generating method. For now, it returns a UIImage of the document system icon. In a moment, you’ll replace this with a request to the QuickLook framework to generate a thumbnail.

Next, open DocumentThumbnailView.swift and paste the following code immediately below .groupBoxStyle(PlainGroupBoxStyle()):

.onAppear {
  document.generateThumbnail(
    size: thumbnailSize,
    scale: displayScale
  ) { uiImage in
    DispatchQueue.main.async {
      self.thumbnail = Image(uiImage: uiImage)
    }
  }
}

The code above waits for the view to appear. Then, it asks for a thumbnail UIImage for each file. Once the UIImage arrives, the view updates the SwiftUI Image using the main thread. This is necessary for all user interface updates.

Build and run:

The RazeThumb app home screen containing a list of documents using the new placeholder icon generated by the previous steps

You’ll see that the document icon for each file is now much smaller. This is because you didn’t size the images. But soon the QuickLook framework will handle the sizing for you.

Generating a Quick Look thumbnail

To get a thumbnail from the QuickLook framework, you’ll need to use QLThumbnailGenerator to create a QLThumbnailGenerator.Request and perform the request. Open Document.swift again and replace the contents of generateThumbnail(size:scale:completion:) with the following code:

// 1
let request = QLThumbnailGenerator.Request(
  fileAt: url,
  size: size,
  scale: scale,
  representationTypes: .all)

// 2
let generator = QLThumbnailGenerator.shared
generator.generateRepresentations(for: request) { thumbnail, _, error in
  // 3
  if let thumbnail = thumbnail {
    print("\(name) thumbnail generated")
    completion(thumbnail.uiImage)
  } else if let error = error {
    print("\(name) - \(error)")
  }
}

In the code above, you do the following:

  1. Create a new QLThumbnailGenerator.Request using the size and scale provided by the view, along with the defined representation type. The available representation types are .icon, .lowQualityThumbnail and .thumbnail. In this case, you request all of them and use the best one. In cases where using all formats is too slow, you can specify one format.
  2. Using the .shared generator, you start the request and wait for the thumbnails to be provided.
  3. If the generator passes an image in the completion closure, you then pass it back to the view. If you receive an error, you print the error message. Keep in mind that the generator can return up to three different images because the request is for all representations.

Build and run:

The RazeThumb app home screen containing a list of documents using the default thumbnails from Quick Look

You’ll now see the thumbnails for each file type. Unfortunately, QuickLook doesn’t know anything about .thumb files, so its thumbnail image is blank.

Searching messages printed in the Console

Now, take a look at the messages in the Debug area. There are three possible representations of each thumbnail, so there are three messages in the Console for each document displayed.

In the Filter field at the bottom-right corner of the Debug area, type .html. You’ll see there were three messages — one showing a thumbnail was generated and two showing failures. This is normal, and it’s something you can ignore when requesting all representations. The advantage of asking for all representations is that you’ll get at least one you can use.

Filtering thumbnail debugger messages

Now erase .html and type .pdf. For the PDF file, QuickLook generated two thumbnails. The DocumentThumbnailView displayed the placeholder document icon, and then it updated twice using the generated thumbnails. The trade-off for using all representations is the extra work of updating the view multiple times.

Replace .pdf and type .thumb. Even though QuickLook knows nothing about thumb files, it still gave you at least one thumbnail, albeit a blank one.

Now, take a moment to examine the different thumbnails the framework generated. The files zombiethumb.jpg, humanthumb.pdf and thumbsup.txt generated nice thumbnails of the file contents. The thumbnail of the Markdown file thumbsdown.md rendered as text since the framework doesn’t support Markdown rendering.

The RazeThumb app home screen containing a list of documents using the default thumbnails from Quick Look with annotations explaining that Markdown doesn't render, HTML uses a simple icon, and the custom .thumb thumbnail is not implemented

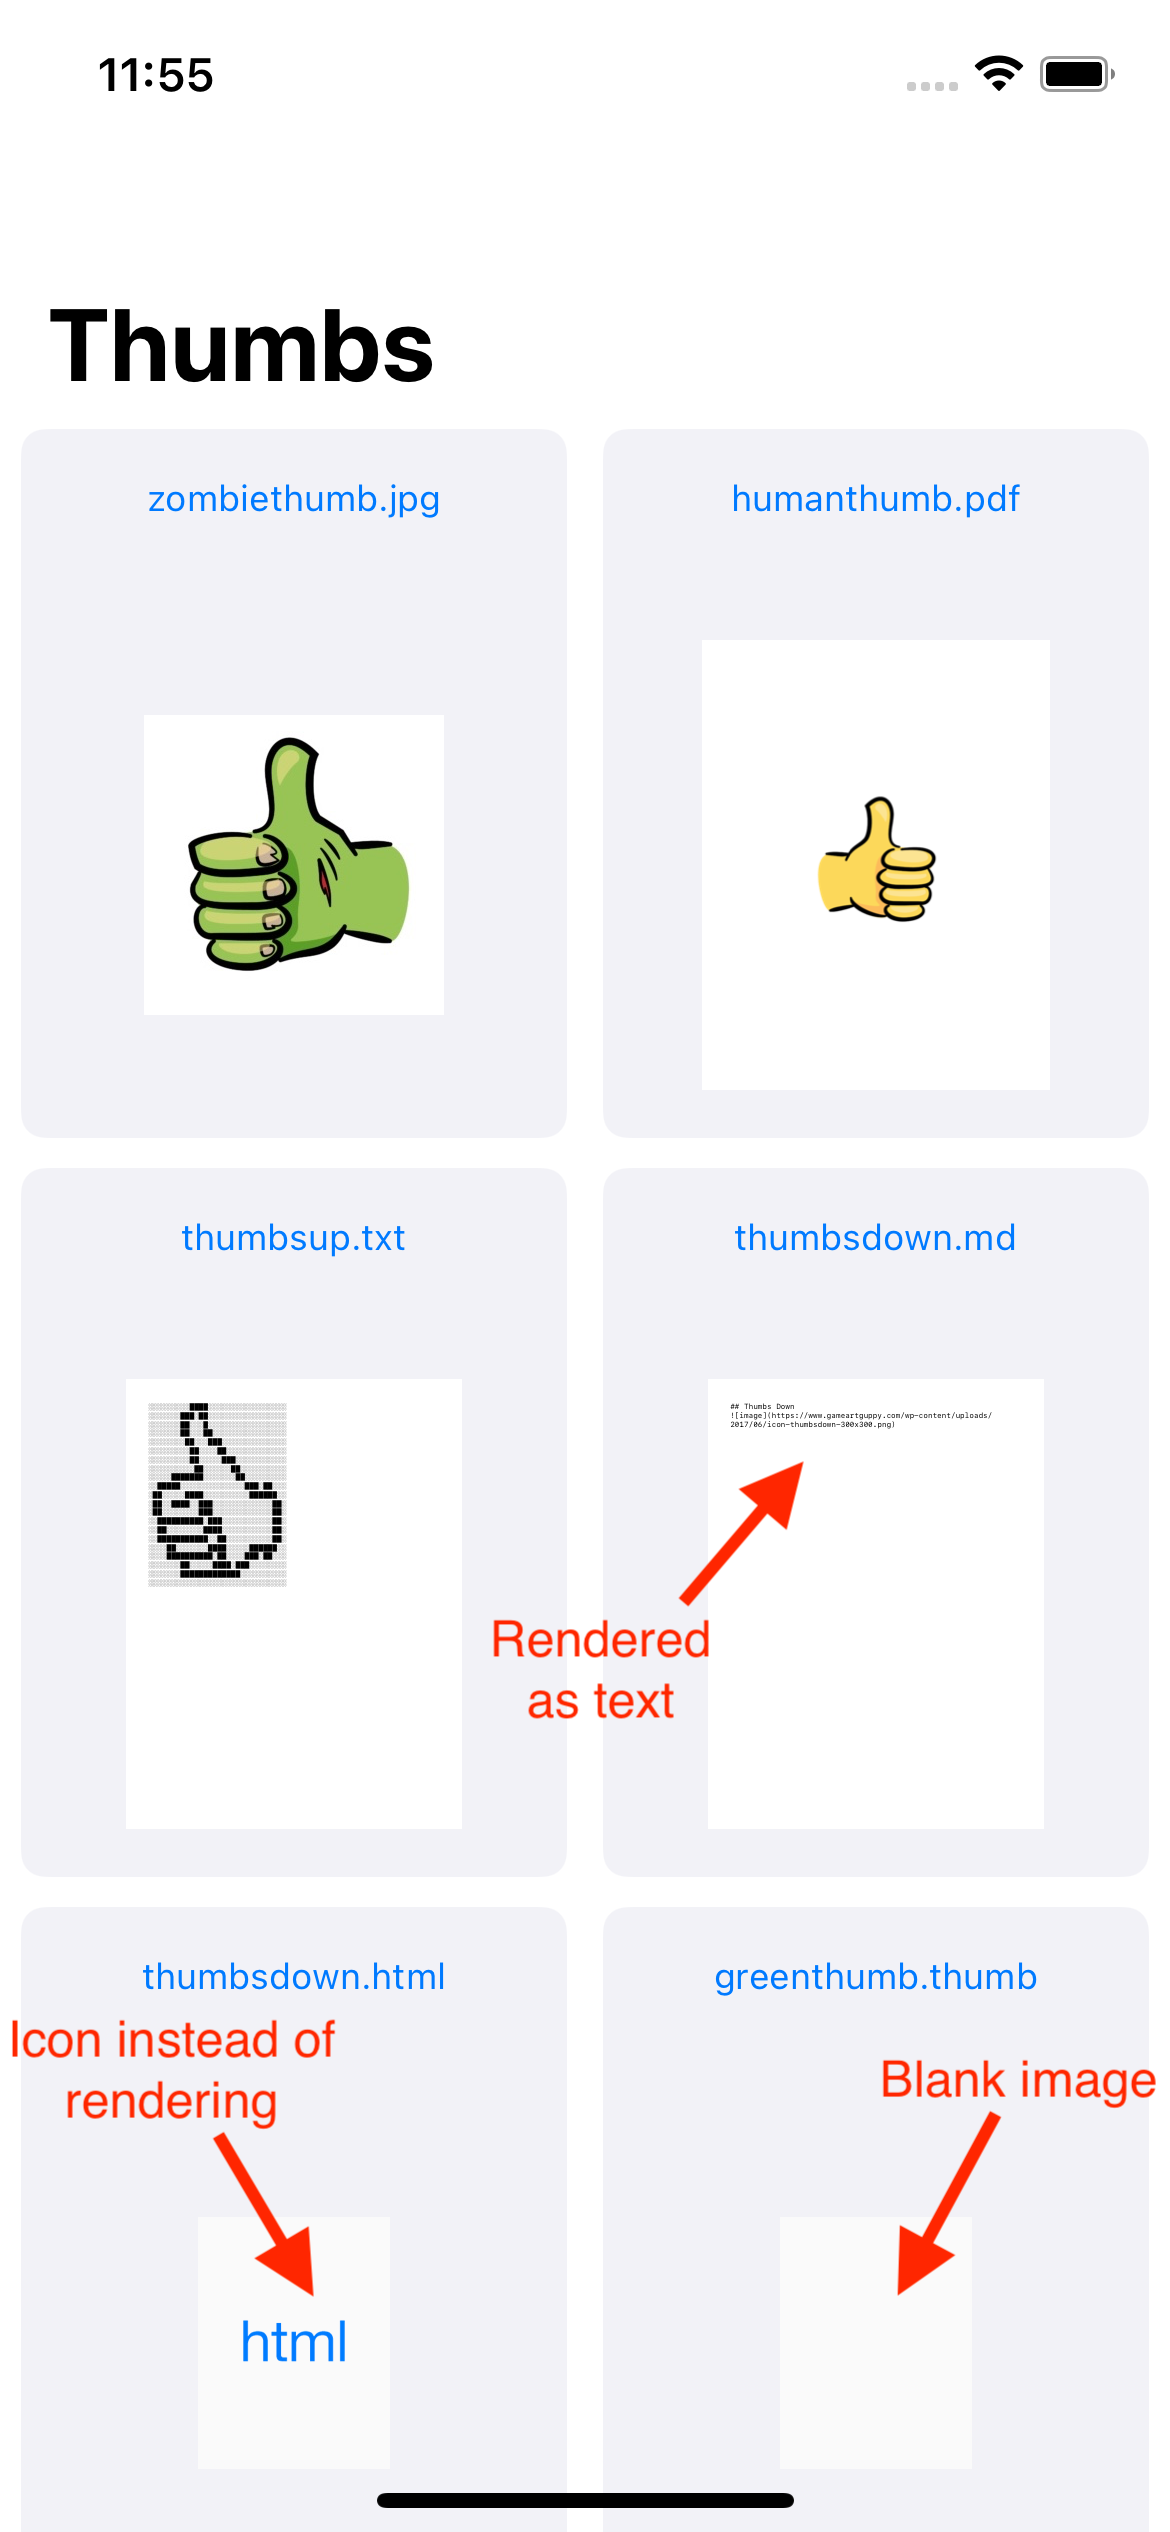
The thumbsdown.html file put up a generic HTML icon as its thumbnail, because the framework designers decided that rendering the HTML to produce an actual thumbnail wouldn’t perform well.

Finally, as you already discovered, the greenthumb.thumb thumbnail is a blank image. But don’t worry; you’ll soon fix that.

Give yourself a big “thumbs up” for generating thumbnails. On to the next thing.

Defining and Exporting a Document Type

So why didn’t the .thumb file have a thumbnail? Well, the first problem is that the system doesn’t know how to map this file extension to a document type. The system uses Uniform Type Identifiers to define known data formats while also allowing you to define your own proprietary formats such as .thumb. You can follow these same steps to implement a new file type in your future projects.

Defining a Document Type

Follow the steps below to define a new document type:

  • In the Project navigator, select the RazeThumb project icon at the top.
  • Select the RazeThumb target under Targets.
  • Select the Info tab above the target.
  • Click the disclosure triangle next to Document Types to expand the section.
  • Click the + when revealed.

Adding document type settings

Fill in the new Document Type with the following details:

  • Set Name to Thumb File.
  • Set Types to com.raywenderlich.rwthumbfile.
  • Set Handler Rank to Owner since this app is the owner of that file type.
  • Click where it says Click here to add additional document type properties.
  • Set Key to CFBundleTypeRole.
  • Leave the Type as String.
  • Enter a Value of Editor.

Review your settings. They should match what’s shown below:

Thumb file document type settings

Exporting a Document Type

Now that you’ve told the system that your app owns the .thumb document type, you’ll need to export it so that other apps are aware of .thumb files. Here are the steps to do that:

  • Click the disclosure triangle next to Exported Type Identifiers.
  • Click the + that’s revealed.
  • For Description, type Thumb File.
  • For Identifier, type com.raywenderlich.rwthumbfile
  • For Conforms To, type public.data, public.content.
  • For Extensions, type thumb, which is the file extension for this new file type.

Double-check that your settings match what’s shown below:

Thumb file exported document type identifier settings

Build and run:

The RazeThumb app home screen now showing the RazeThumb app icon as a thumbnail for .thumb documents

Look at the thumbnail for greenthumb.thumb. By adding and exporting document type information, you made iOS aware of the .thumb file type. By default, the QuickLook framework will use the app icon (like you see on the Home screen) as the thumbnail since this app owns that file type. So the RazeThumb app icon is now showing up as the thumbnail for all .thumb files on the system. Give yourself another thumbs up!

Quick Look Extensions

So now RazeThumb is using the QuickLook framework to provide a thumbnail for each file, and if you tap each of the files one by one, you’ll also see a rich preview for each file up until you get to greenthumb.thumb:

A screenshot of RazeThumb displaying the default preview of the custom .thumb file which consists of just the name of the Document Type and it's size

It’s now time to see how you can take advantages of the new extension points introduced in iOS 13 to improve the experience for your .thumb files.

Adding a Quick Look preview extension

A Quick Look preview extension allows your app to replace the boring preview above with a completely custom view controller. Not only will RazeThumb be able to take advantage of your extension, but all other apps installed will benefit from previewing .thumb files using your extension.

To add the extension to the project, follow these steps:

  • Select the RazeThumb project in the Project navigator.
  • At the bottom of the window listing Targets, click the + icon.
  • Type Preview in the Filter.
  • Double-click Quick Look Preview Extension and give it the name ThumbFilePreview.
  • Click Finish.
  • If prompted, do not activate the new ThumbFilePreview scheme just yet.

Add preview extension to RazeThumb

There are two files in the RazeThumb app’s Sources folder that your new extension will use when generating a preview. You’ll use ThumbFile.swift to load thumb files and ThumbFileViewController.swift to present the instance of ThumbFile as a preview.

To ensure these files are also included in your newly created ThumbFilePreview target, follow these steps:

  • Select ThumbFile.swift in the Project navigator.
  • Open the Inspectors on the right-hand side of Xcode and click the document icon to reveal the File inspector.
  • Under the Target Membership section, check the box to include the file in both the ThumbFilePreview and RazeThumb targets.
  • Select ThumbFileViewController.swift in the Project navigator and repeat the steps above to update the Target Membership again.

Add ThumbFile and ThumbFileViewController to ThumbFilePreview target

Expand the new ThumbFilePreview group in the Project navigator. Xcode has added files called PreviewViewController.swift, MainInterface.storyboard and Info.plist. These are the files that make up the extension.

Invoking a Quick Look Preview Extension

Now, to invoke your extension correctly, you’ll need to associate it with the .thumb file type. Here are the steps for that:

  • Open ThumbFilePreview/Info.plist.
  • Expand the NSExtension entry and all its sub-entries by Option-clicking the disclosure triangle next to it.
  • Hover the mouse over QLSupportedContentTypes and click the + that appears to add an item below it.
  • Make Item 0 a String and give it a value of com.raywenderlich.rwthumbfile, which matches the document type identifier you added earlier.

Specifying supported content types for preview extension

Now that the system knows when to invoke your extension, you need to customize the preview your extension provides. Open PreviewViewController.swift and replace its contents with the following:

import UIKit
import QuickLook

// 1
class PreviewViewController: ThumbFileViewController, QLPreviewingController {
  // 2
  enum ThumbFilePreviewError: Error {
    case unableToOpenFile(atURL: URL)
  }

  func preparePreviewOfFile(
    at url: URL,
    completionHandler handler: @escaping (Error?) -> Void
  ) {
    // 3
    guard let thumbFile = ThumbFile(from: url) else {
      handler(ThumbFilePreviewError.unableToOpenFile(atURL: url))
      return
    }

    // 4
    self.thumbFile = thumbFile

    // 5
    handler(nil)
  }
}

Here’s what you’re doing in the code above:

  1. Instead of inheriting from UIViewController, inherit from ThumbFileViewController, which is the view controller that already knows how to display a ThumbFile by assigning the thumbFile property.
  2. Declare a simple error type that can inform QuickLook that the load failed.
  3. Inside preparePreviewOfFile(at:completionHandler:), attempt to load the ThumbFile from the specified location and return the error in the event of a failure.
  4. Update the view controller to display the thumbnail that was just loaded.
  5. Notify the provided handler that the preview has finished loading successfully by passing a nil error.

Finally, before you run the app again, open ThumbFilePreview/MainInterface.storyboard and delete the “Hello World” label that it added by default.

Build and run and click greenthumb.thumb to invoke your extension:

Rendered thumb file preview

Congratulations! Thanks to the work above, the QuickLook framework can load your extension and generate a much better preview of the .thumb file. Give yourself yet another thumbs up!

Adding a Thumbnail Extension

Now that RazeThumb can render a thumb file, it’s time to produce a thumbnail image from that rendering. You’ll do this by adding a thumbnail extension to your project in a way similar to how you added the last extension.

A thumbnail extension is used by the QuickLook framework to create thumbnails for custom file types and to then return them to RazeThumb, as well as any other app on the device, via QLThumbnailGenerator. To get started, follow the steps below to add the next extension:

  • Select the RazeThumb project in the Project navigator.
  • At the bottom of the window listing Targets, click the + icon and type Thumbnail in the Filter.
  • Double-click Thumbnail Extension and give it the name ThumbFileThumbnail.
  • Click Finish.
  • If prompted, do not activate the new ThumbFileThumbnail scheme just yet.

Add thumbnail extension to RazeThumb

Expand the new ThumbFileThumbnail group in the Project navigator. Xcode has added ThumbnailProvider.swift and Info.plist. These are the files that make up the extension.

Invoking a Thumbnail extension

In order to invoke the Thumbnail extension, you’ll need to associate this thumbnail extension with the .thumb file type like you did with the preview extension.

  • Open the Info.plist file in the ThumbFileThumbnail extension folder.
  • Expand the NSExtension entry and all its sub-entries by Option-clicking the disclosure triangle next to it.
  • Hover the mouse over QLSupportedContentTypes and click the + that appears to add an item below it.
  • Make Item 0 a String and give it a value of com.raywenderlich.rwthumbfile, which matches the document type identifier you added earlier.
  • Optionally, you can also specify a minimum size in points for the thumbnail using QLThumbnailMinimumDimension. If the thumbnail is displayed very small like a favicon in an internet browser tab, you might want to use the cached thumbnail (like the default app icon) instead of the generated thumbnail (like the markdown text) that might be too complex to discern at a small size. In this app, you won’t use the minimum dimension feature.

Add supported content type to thumbnail extension

As with the ThumbFilePreview target, the ThumbFileThumbnail target will also make use of ThumbFile.swift and ThumbFileViewController.swift. Following the same steps from earlier, select the two swift files in the Project navigator and update their target memberships to include ThumbFileThumbnail by checking the appropriate checkbox in the File inspector.

Next, open ThumbnailProvider.swift and replace the contents of the file with the following:

import UIKit
import QuickLookThumbnailing

class ThumbnailProvider: QLThumbnailProvider {
  // 1
  enum ThumbFileThumbnailError: Error {
    case unableToOpenFile(atURL: URL)
  }

  // 2
  override func provideThumbnail(
    for request: QLFileThumbnailRequest,
    _ handler: @escaping (QLThumbnailReply?, Error?) -> Void
  ) {
    // 3
    guard let thumbFile = ThumbFile(from: request.fileURL) else {
      handler(
        nil, 
        ThumbFileThumbnailError.unableToOpenFile(atURL: request.fileURL))
      return
    }

    // 4
    DispatchQueue.main.async {
      // 5
      let image = ThumbFileViewController.generateThumbnail(
        for: thumbFile,
        size: request.maximumSize)

      // 6
      let reply = QLThumbnailReply(contextSize: request.maximumSize) {
        image.draw(in: CGRect(origin: .zero, size: request.maximumSize))
        return true
      }

      // 7
      handler(reply, nil)
    }
  }
}

There are a few steps involved here:

  1. Define a simple error type that can describe any failures back to QLThumbnailProvider, should it be required.
  2. Override provideThumbnail(for:_) so you can load the ThumbFile and render its thumbnail for the QuickLookThumbnailing framework.
  3. Attempt to load the ThumbFile and invoke the handler with an error in the event of a failure.
  4. The QuickLookThumbnailing framework invokes this method on a background thread. But in order to draw user interface on the screen, you have to be in the main thread.
  5. Using some existing code from ThumbFileViewController, construct a UIImage representation of the preview with the correct dimensions.
  6. Using the generated thumbnail, create a QLThumbnailReply object that draws the image thumbnail into the context provided.
  7. Invoke the handler with the reply object and a nil error to indicate success.
Note: In this example, you dispatch to the main queue because ThumbFileViewController.generateThumbnail(for:size:) uses UIGraphicsImageRenderer — which requires use of the main thread — internally. In other scenarios where you might use other drawing APIs such as CoreGraphics directly, you might not need to do this.

Build and run. You should now see a thumbnail for greenthumb.thumb that looks like a miniature version of the preview.

The RazeThumb app home screen now showing the the contents of a custom .thumb file as the rendered thumbnail icon

Congratulate yourself with two big thumbs up! The RazeThumb app is finished.

Trying Out Your Extensions Using the Files App

Now that you’ve created a preview extension and a thumbnail extension for .thumb files, other apps will be able to use that file type. In this section, you can show that the extension supports other apps by adding a .thumb file to the simulator and browsing to that file using the Files app.

Here are the steps to add a thumb file to the simulator:

  1. Delete RazeThumb from the simulator. This is because the simulator will launch RazeThumb upon receiving a thumb file, but RazeThumb doesn’t save files. You’ll reinstall the app after you copy the file onto the simulator.
  2. Drag greenthumb.thumb from Xcode or Finder into the simulator app. This will open the Files app to import the file. Choose to save the file On My iPhone.
  3. Tap Save to return to browsing.
  4. If the Recents tab is selected, tap Browse, followed by On My iPhone to see the file you just added.

Since you deleted RazeThumb, you won’t see a thumbnail, and if you open the file, you won’t see a preview.

In Xcode, build and run RazeThumb to reinstall it onto the simulator. Installing RazeThumb reestablishes the association between thumb files and RazeThumb. This is because RazeThumb includes the preview and thumbnail extensions for thumb files.

Open the Files app in the simulator:

Files app showing thumb file thumbnail

Tap On My iPhone and you’ll see the rendered thumbnail for the thumb file. Tap greenthumb.thumb and the file will render its preview, just as it does when in the RazeThumb app. How cool is that?

Attaching the Debugger to Your Extension

The Quick Look preview extension and thumbnail extension processes run separately from your main app. While they install together, they’re completely isolated, which is what allows the system to efficiently use them within the Quick Look framework to produce previews and thumbnails in other apps installed on the device.

While you’re developing your extension, you may want to set a breakpoint and see what’s going on as it executes, but since the Xcode debugger can only attach to a process once, you’ll have to decide whether to attach the debugger to your app or your extension.

Note: As of the time of writing, the Xcode debugger seems to work inconsistently when setting breakpoints in extensions. Some breakpoints seem to cause a crash in the run loop. Other times, the debugger seems to lose connection to the extension. You may have to try this exercise a few times.

Start by setting a breakpoint in ThumbnailProvider.swift on the guard let thumbFile = ThumbFile(from: request.fileURL) statement at the beginning of provideThumbnail(for:_:).

Breakpoint in provideThumbnail

If you build and run RazeThumb and scroll until greenthumb.thumb is visible, you’ll notice the debugger won’t stop at the breakpoint. Don’t panic. You can fix that.

Click RazeThumb in the scheme selector to see a drop-down with a list of available schemes. Choose ThumbFileThumbnail as the scheme and click Run. When prompted to choose an app to launch, select RazeThumb and scroll until greenthumb.thumb is visible. This time, the debugger should stop at the breakpoint.

Breakpoint in thumbnail extension

For even more fun, re-run the ThumbFileThumbnail scheme instead selecting the Files app to see your code running inside other apps!

Where to Go From Here?

You can download the finished version of the RazeThumb project by using the Download Materials button at the top or bottom of this tutorial.

You’ve now learned how to create a Quick Look thumbnail and preview for supported file types and custom file types.

Here are some key points you covered in the process:

  • Thumbnails are miniature representations of a file’s contents.
  • The QuickLook framework can create thumbnails and previews for various standard file types, such as images, audio, video, text, PDFs and more.
  • Using extensions, you can extend the QuickLook framework to support your own custom file types.
  • Extensions allow all apps on the device to access their functionality.
  • Extensions run separate from the app.
  • You can attach the Xcode debugger to an extension during development.

If you want to learn more, there are many related topics you can explore:

We hope you enjoyed this tutorial. If you have any questions or comments, please join the forum discussion below!