How to Make a Game Like Candy Crush Tutorial: OS X Port
Learn how to take an existing iOS Sprite Kit game and level it up to work on OS X too! By Gabriel Hauber.
Update 04/22/2015: Updated for Xcode 6.3 and Swift 1.2.
If you’ve successfully completed and enjoyed the two-part tutorial How to Make a Game Like Candy Crush with Swift, you’re surely hungry for more cookie adventures! Where could you go from there?
The game makes heavy use of Sprite Kit, and Sprite Kit is available on the Mac as well. Apple has done an excellent job of keeping the Sprite Kit APIs unified across both platforms so if you are planning on developing games with Sprite Kit, why not consider targeting iOS devices and Macs in one project?
This tutorial will show you how to take an existing iOS Sprite Kit game written in Swift – Cookie Crunch – and adapt it to run on OS X. Whether you worked through the Objective-C or Swift version of the iOS tutorial, you’ll find many of the concepts in this tutorial familiar. Still, the Cookie Crunch game presents its own unique challenges.
Getting Started
This tutorial assumes that you have already successfully completed the How to Make a Game Like Candy Crush with Swift Tutorial. For convenience, you can download the completed project from that tutorial here.
Unzip the project and open it in Xcode. Build and run the project and you’ll see the game running in the iOS Simulator:

Add an OS X Build Target
The first thing you need to do to kick off your OS X conversion is to create a new build target for OS X.
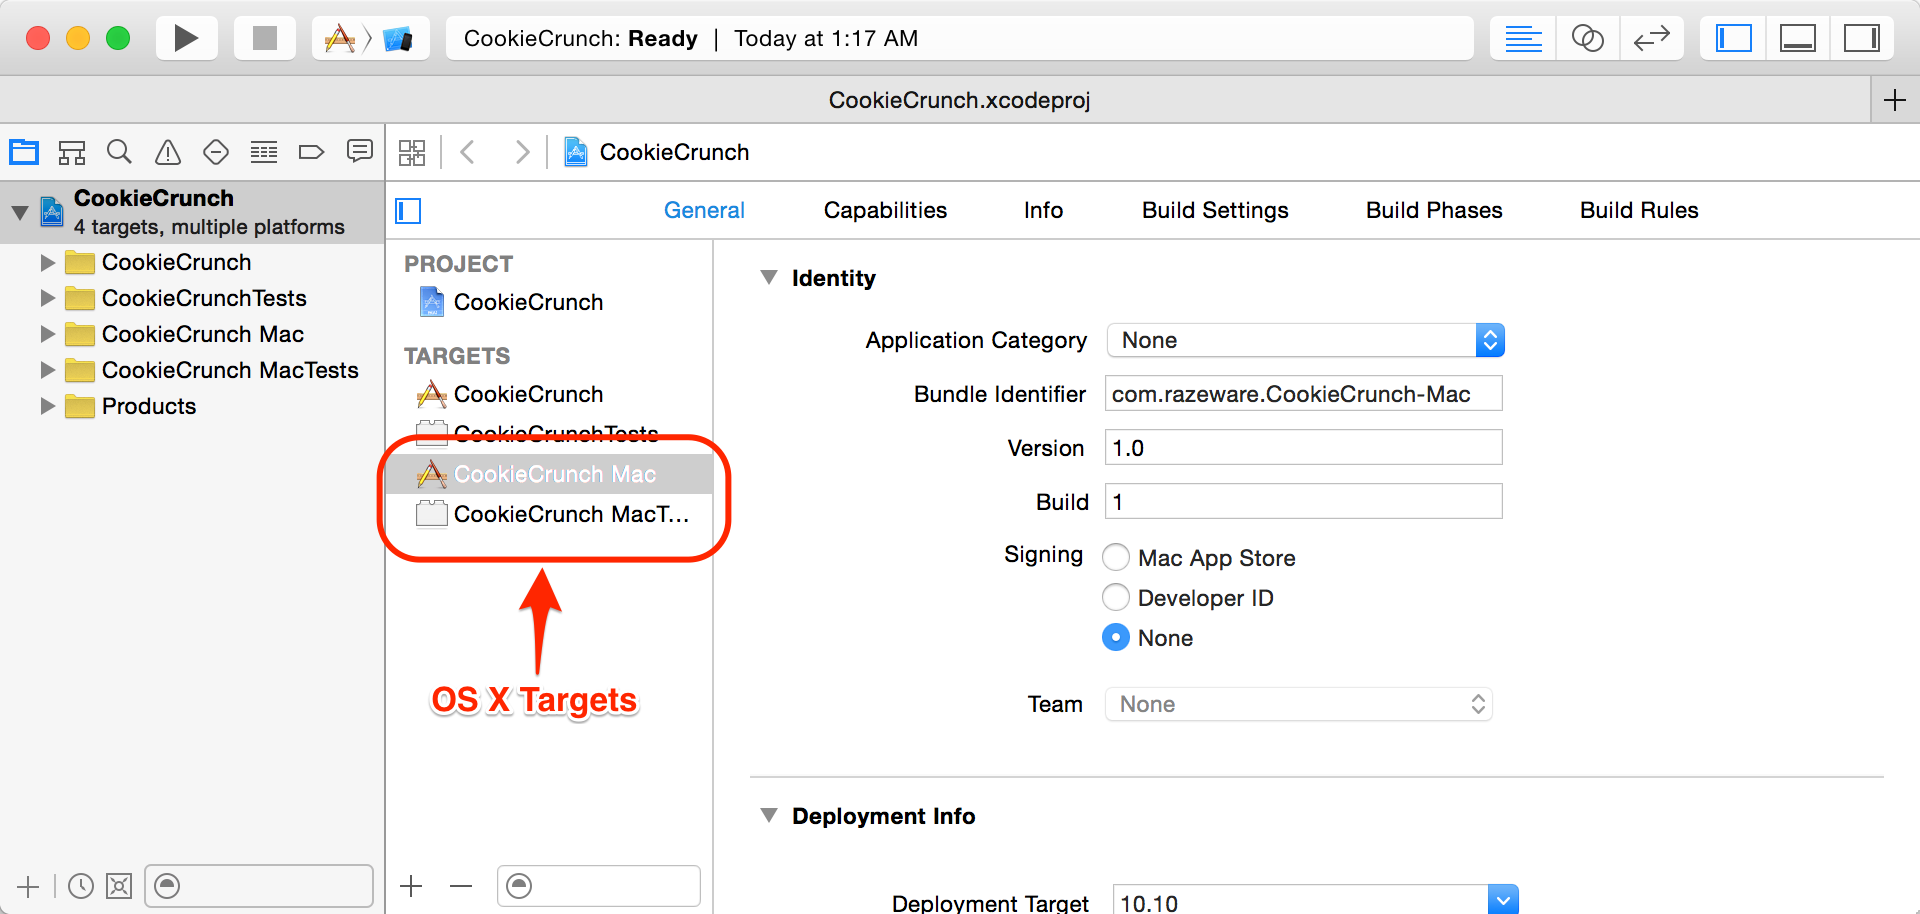
At the top of the Project Navigator, select the CookieCrunch project to display project settings. You’ll see that there are currently only two targets: CookieCrunch and CookieCrunch Tests:

Ensure your Xcode project is the active window and select the File \ New \ Target… menu item. Xcode will prompt you to select a template for the new target. Select OS X \ Application \ Game and click Next, as shown below:

Enter CookieCrunch Mac as the product name and click Finish:

Xcode will create two new targets for you: CookieCrunch Mac and CookieCrunch Mac Tests:
Try running your new app on OS X. First, select CookieCrunch Mac from the scheme list, then select My Mac as shown below:

Build and run. What do you expect to see? Will it be:
- Nothing at all?
- The CookieCrunch game running on Mac?
- Something else?
[spoiler title="Solution"]
What you see running is just the Sprite Kit template project:
Shortly you will strip out everything from the Mac target you don’t need before adding in and adapting the code you already developed for iOS. Adding the Mac target doesn’t affect the iOS target, which will continue to work as usual.
Surveying the work to be done
Before diving in to the work of adapting CookieCrunch for OS X, it is important to first survey what needs to be done. After all, you just never dive into a project without a plan, do you? :]
Sprite Kit on iOS and OS X
Apple has done an excellent job keeping the Sprite Kit framework essentially the same on both iOS and OS X. However, there are a couple of significant differences since the iOS framework is built on top of UIKit and the OS X framework is built on top of AppKit.
On iOS, the SKNode class inherits from UIResponder, and SKView inherits from UIView. On OS X, they inherit from NSResponder and NSView respectively.
If you peruse the documentation for each of the classes, you’ll see many similarities and many more differences between UIResponder and NSResponder, and UIView and NSView. The biggest differences are in event handling. They exist because of different input methods: multi-touch on iOS versus mouse events on the Mac. Apple also took the opportunity with UIKit to learn from the lessons of the past and create much “cleaner” APIs.
Touch events received in an SKNode on iOS are UITouch objects, but on OS X events (whether mouse, keyboard, etc) come through as NSEvent objects.
Sprite Kit even helps you out here. Do you want to know the location of a mouse or touch event in an SKNode? The function locationInNode is available as an extension to both NSEvent and UITouch. This simplifies things for you somewhat, but you’ll still have to do work to make your code truly cross-platform.
Platform-specific UI
In the case of Cookie Crunch, you have another, even larger, porting challenge before you. If you worked through the original tutorial, you may remember that you created a number of UI elements (the score labels, game over images, and shuffle button) in Interface Builder. Unfortunately, these are all UIKit elements and are not available to the OS X target.
You could design a roughly similar OS X interface using AppKit, but there are several problems here:
- The UI elements such as
NSLabelandNSButtondo not have the built-in ability to do things like shadowed text. - Overlaying
NSViewobjects on top of a Sprite Kit scene is possible, but involves tricky things with layers that doesn’t seem to handle the transition between retina and non-retina screens very well. - You end up with lots of similar but not-quite-reusable code in both iOS and OS X targets.
Because of this, to make your game code as platform-agnostic as possible, it will be necessary to first migrate the iOS target to use a pure Sprite Kit-based approach for the UI as well as the game elements. You will do this while keeping the ultimate goal in mind: getting the game running just as well on OS X as it currently does on iOS.
So, first things first, you will rearrange your project files a bit to clearly identify what can be shared between the iOS and OS X targets, and what will remain platform-specific.
Source File Organization
In the Project Navigator, select the CookieCrunch project. Create a new group by selecting File \ New \ Group. Name it CookieCrunch Shared, as shown below:
This group will be the location for all code and resources common to both the OS X and iOS targets.
Now, move (drag and drop) the following source files to the group you just created:
- Array2D.swift
- Chain.swift
- Cookie.swift
- Extensions.swift
- GameScene.swift
- Level.swift
- Swap.swift
- Tile.swift
Also move the assets and subfolders Grid.atlas, Sprites.atlas, Images.xcassets, Levels and Sounds from the CookieCrunch group into the shared group as well.
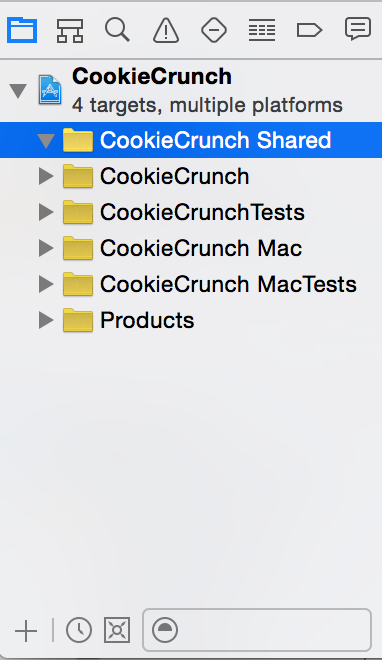
When you’re done, your project navigator should look like this:

Now, for all of the files in the shared group, you need to add them to the Mac target. In Project Navigator, select all the Swift files from the shared group. In the file inspector, make sure that CookieCrunch Mac is selected in Target Membership, as shown below:
Do the same with Grid.atlas, Images.xcassets, Sprites.atlas, and each of the files in the Levels and Sounds groups.
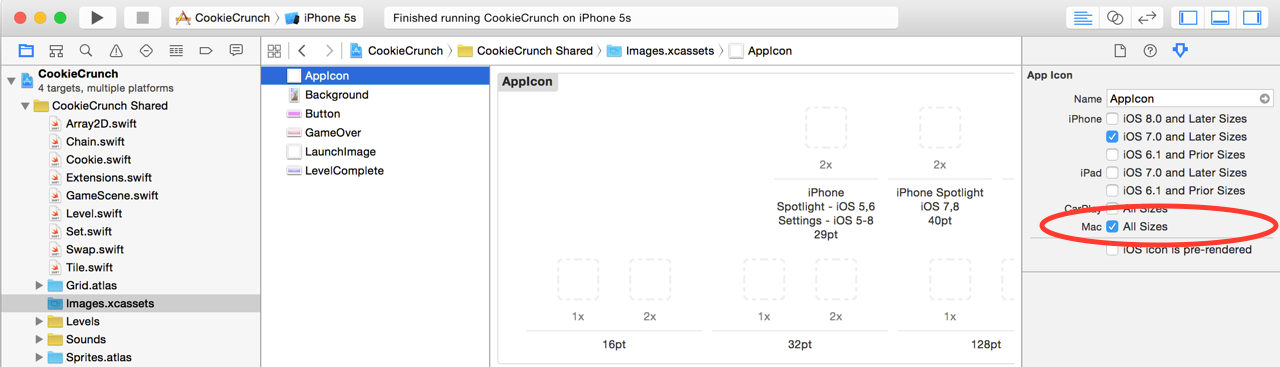
While you’re dealing with the asset catalog, you should also make sure that the app has a Mac icon. Open Images.xcassets, find AppIcon, and in the Inspector, make sure Mac all sizes is checked:
You also need to clean up a few things that Xcode created by default as part of the CookieCrunch Mac target.
From the CookieCrunch Mac group, delete Images.xcassets, GameScene.swift (since there is already a shared GameScene class to reuse), and GameScene.sks.
Replace the contents of the OS X AppDelegate.swift file with the following:
import Cocoa
import SpriteKit

@NSApplicationMain
class AppDelegate: NSObject, NSApplicationDelegate {

  @IBOutlet weak var window: NSWindow!
  @IBOutlet weak var skView: SKView!

  func applicationDidFinishLaunching(aNotification: NSNotification) {
  }

  func applicationShouldTerminateAfterLastWindowClosed(sender: NSApplication) -> Bool {
    return true
  }
}
This is a pretty simple AppDelegate right now. But, later, you’ll come back to this code to add a few important elements. It’s a good idea at this stage to make sure that the iOS target still works. Select an iPhone target and build and run the project. If the game still launches, you are ready to move on to the next step. Otherwise, go back and carefully re-check each step you’ve performed so far.
Now, have a go at building the Mac target. What do you expect to happen?
Whoops – what is that? Xcode is reporting a bunch of errors in the GameScene class. Take a look, and you’ll see several instances of:
Use of undeclared type 'UIEvent'
Use of undeclared type 'UITouch'
Remember what I said earlier about the differences in event handling on iOS vs OS X? Now is the time to deal with that.