UICollectionView Tutorial: Getting Started
Get hands-on experience with UICollectionView by creating your own grid-based photo browsing app using the Flickr API. By Owen L Brown.
Sign up/Sign in
With a free Kodeco account you can download source code, track your progress, bookmark, personalise your learner profile and more!
Create accountAlready a member of Kodeco? Sign in
Sign up/Sign in
With a free Kodeco account you can download source code, track your progress, bookmark, personalise your learner profile and more!
Create accountAlready a member of Kodeco? Sign in
Sign up/Sign in
With a free Kodeco account you can download source code, track your progress, bookmark, personalise your learner profile and more!
Create accountAlready a member of Kodeco? Sign in
Contents
UICollectionView Tutorial: Getting Started
25 mins
- Anatomy of a UICollectionView
- Using the UICollectionViewLayout
- Introducing FlickrSearch
- Starting Your Collection
- Adding Search
- Subclassing Your UICollectionViewController
- Fetching Flickr Photos
- Flickr API Classes
- Preparing Data Structures
- Getting Good Results
- Feeding the UICollectionView
- UICollectionViewDataSource
- UICollectionViewFlowLayoutDelegate
- Creating Custom UICollectionViewCells
- Subclassing UICollectionViewCell
- Where to Go From Here?
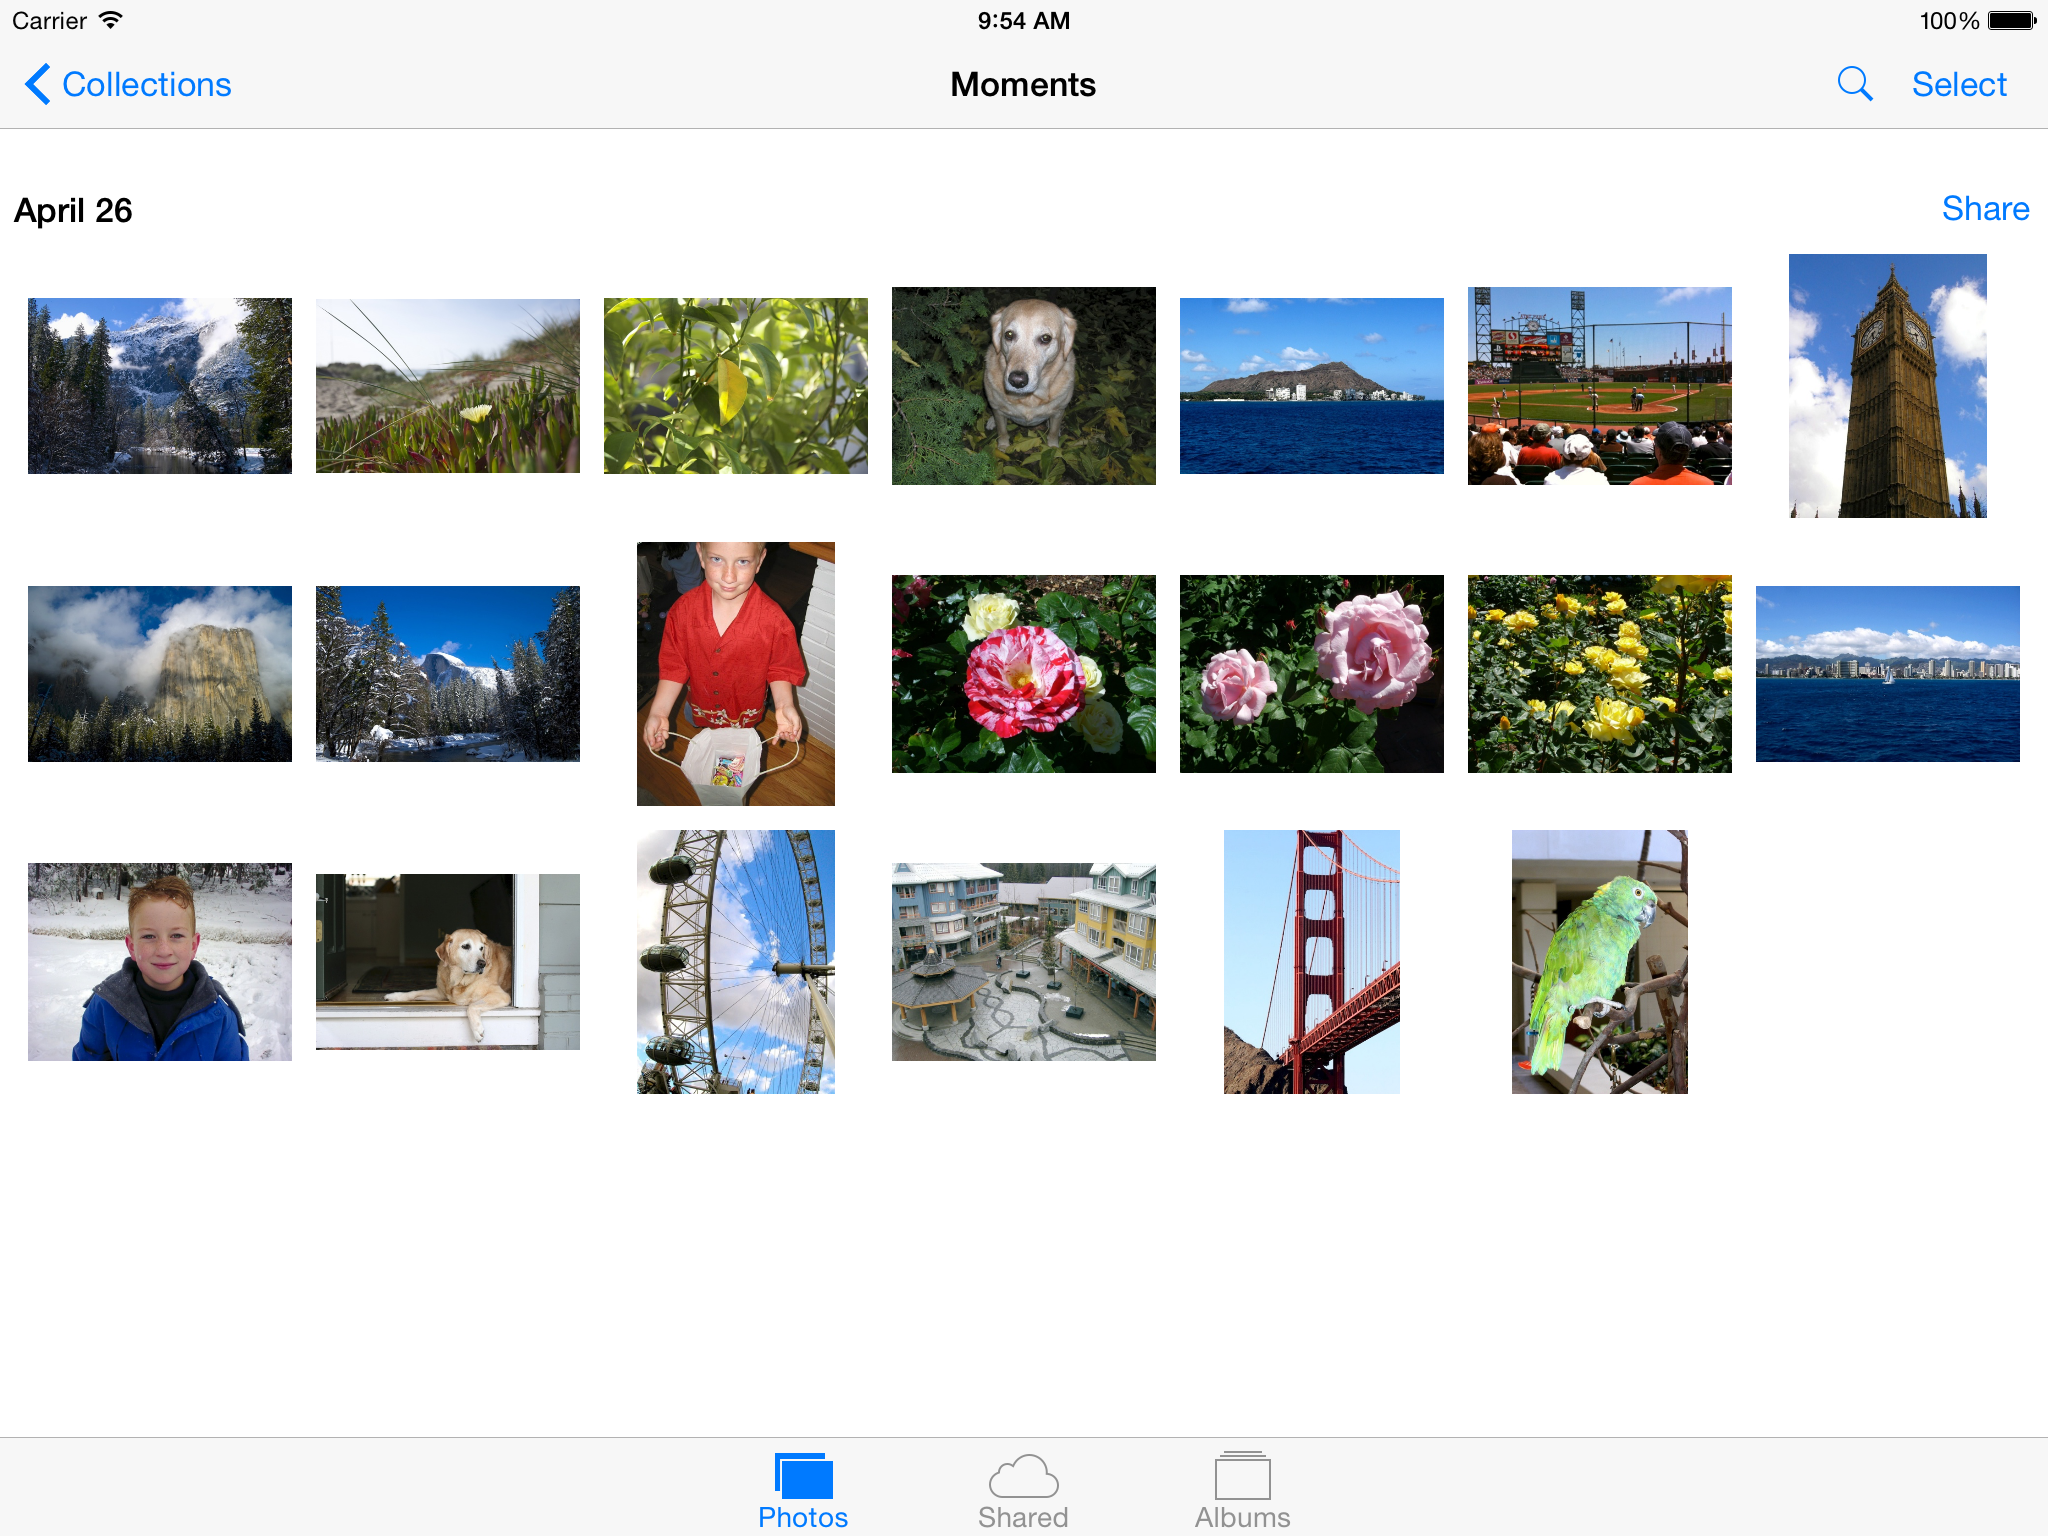
The iOS Photos app has a stylish way of displaying photos via a multitude of layouts. You can view your photos in a grid view:
Or you can view your albums as stacks:
You can even transition between the two layouts with a cool pinch gesture. You’re probably thinking, “Wow, I want my app to do that!”
It can with UICollectionView. UICollectionView
makes adding custom layouts and layout transitions, like those in Photos, simple to build.
You’re not limited to stacks and grids because collection views are customizable. You can use them to make circle layouts, cover-flow style layouts, Pulse news style layouts and almost anything you can dream up!
In this tutorial, you’ll get hands-on experience with UICollectionView by creating a grid-based photo browsing app. Along the way, you’ll learn how to:
- Add custom headers to collection views.
- Easily move cells by dragging them.
- Implement single cell selection to bring up a detail view.
- Implement multi-cell selection.
By the time you finish this tutorial, you’ll be ready to use this amazing technology in your apps!
Anatomy of a UICollectionView
First, look at the finished project. UICollectionView
contains several key components, as you can see below:
Take a look at these components one-by-one:
-
UICollectionView: The main view where the content is displayed, similar to a
UITableView
. Like a table view, a collection view is aUIScrollView
subclass. -
UICollectionViewCell: This is similar to a
UITableViewCell
in a table view. These cells make up the view’s content and are subviews to the collection view. You can create cells programmatically or inside Interface Builder. - Supplementary Views: Use supplementary views when you have extra information to display that should be in the collection view but not in the cells. Developers commonly used them for headers or footers.
Using the UICollectionViewLayout
In addition to the visual components described above, a collection view has a layout object responsible for the content’s size, position and other attributes.
Layout objects are subclasses of UICollectionViewLayout
. You can swap layouts out during runtime. The collection view can even automatically animate switching from one layout to another!
You can subclass UICollectionViewLayout
to create your own custom layouts, but Apple has graciously provided a basic flow-based layout called UICollectionViewFlowLayout
. Elements lay out one after another based on their size, like a grid view. You can use this layout class out of the box or subclass it to get some interesting behavior and visual effects.
You’ll learn more about these elements in-depth throughout this tutorial. Now, it’s time to get your hands into the mix with a project!
Introducing FlickrSearch
In this tutorial, you’ll create a cool photo-browsing app called FlickrSearch. It lets you search for a term on the popular photo-sharing site Flickr then download and display any matching photos in a grid view, as you saw in the screenshot above.
Download the project files by clicking the Download Materials button at the top or bottom of the tutorial. Open the FlickrSearch starter project.
Inside, you’ll find an empty Main.storyboard and some files for interfacing with Flickr. Have a look around before you go any further.
Starting Your Collection
Open Main.storyboard and drag in a Collection View Controller. Go to Editor ▸ Embed in ▸ Navigation Controller to create a navigation controller and automatically set the collection view controller as the root.
You now have a layout like this in the storyboard:
Next, select the Navigation Controller you installed and make it the initial view controller in the Attributes inspector:
Focus on the collection view controller. First, select the UICollectionView
inside. Then change the background color to White Color:
Note: Wondering what Scroll Direction does? This property is specific to UICollectionViewFlowLayout
and defaults to Vertical.
A vertical flow layout means the layout class places items from left to right across the top of the view until it reaches the view’s right edge. At which point, it moves down to the next line. If there are too many elements to fit in the view, the user can scroll vertically to see more.
Conversely, a horizontal flow layout places items from top to bottom across the left edge of the view until it reaches the bottom edge. Users scroll horizontally to see items that don’t fit on the screen. In this tutorial, you’ll stick with the more common Vertical collection view.
Select the single cell in the collection view. Use the Attributes inspector to set the Reuse Identifier to FlickrCell.
This process might also be familiar from table views. The data source uses this identifier to dequeue or create new cells.
Next, you’ll add a search box.
Adding Search
Drag a text field into the center of the navigation bar above the collection view. This is where users enter their search text. In the Attributes inspector, set the search field’s Placeholder Text to Search (with a few spaces after “Search” to help pad the field a little bit) and the Return Key to Search:
Now, control-drag from the text field to the collection view controller and choose delegate:
Next, you’ll subclass your UICollectionViewController
.
Subclassing Your UICollectionViewController
While UICollectionViewController
does a lot, you generally need to make a subclass so you can add additional behavior beyond what UIKit provides for free.
Go to File ▸ New ▸ File. Choose iOS ▸ Source ▸ Cocoa Touch Class template and click Next. Name the new class FlickrPhotosViewController, making it a subclass of UICollectionViewController.
The template has a lot of code. The best way to understand what it does is to start from scratch.
Open FlickrPhotosViewController.swift and replace the code in the file with:
import UIKit
final class FlickrPhotosViewController: UICollectionViewController {
// MARK: - Properties
private let reuseIdentifier = "FlickrCell"
}
Next, add a constant for section insets, which you’ll use later, right below reuseIdentifier:
private let sectionInsets = UIEdgeInsets(
top: 50.0,
left: 20.0,
bottom: 50.0,
right: 20.0)
You’ll fill in the rest of the gaps as you progress through the tutorial.
Go back to Main.storyboard. Then, select the collection view controller. In the Identity inspector, set the Class to FlickrPhotosViewController to match your new class:
Now it’s time to fetch Flickr photos to show in the collection view.
Fetching Flickr Photos
Your first task for this section is to say the section title ten times fast.
OK, just kidding.
Flickr is an image-sharing service with a publicly accessible, and dead-simple, API for developers. With the API, you can search for photos, add photos, comment on photos and much more.
You need an API key to use the Flickr API. If you’re working on a real app, sign up for one at Flickr’s website.
However, for test projects like this, Flickr has a sample key that rotates out every so often. You can use the key without signing up.
Simply perform any search at Flickr’s website and copy the API key from the URL at the bottom. It starts after the &api_key="
goes to the next &
. Paste it in a text editor for later use.
For example, if the URL is:
http://api.flickr.com/services/rest/?method=flickr.photos.search&api_key=6593783efea8e7f6dfc6b70bc03d2afb&;format=rest&api_sig=f24f4e98063a9b8ecc8b522b238d5e2f
then the API key is: 6593783efea8e7f6dfc6b70bc03d2afb
With that settled, it’s time to explore the Flickr API classes.
Flickr API Classes
Since this tutorial is about UICollectionView
and not the Flickr API, the project includes classes that abstract the Flickr search code.
The Flickr support consists of two classes and a struct:
- FlickrSearchResults: A struct which wraps up a search term and the results found for that search.
-
FlickrPhoto: Data about a photo retrieved from Flickr: its thumbnail, image and metadata information such as its ID. There are also some methods for building Flickr URLs and some size calculations.
FlickrSearchResults
contains an array of these objects. -
Flickr: Provides a simple block-based API to perform a search and return a
FlickrSearchResult
.
Feel free to take a look at the code. It’s pretty simple and might inspire you to use Flickr in your projects!
Before you can search Flickr, you need to enter an API key. Open Flickr.swift. Replace the value of apiKey
with the API key you obtained earlier.
It’ll look something like this:
let apiKey = "hh7ef5ce0a54b6f5b8fbc36865eb5b32"
Now, it’s time to do a little prep work before hooking into Flickr.
Preparing Data Structures
In this project, each search you perform displays a new section in the collection view with the results, rather than replacing the previous section. In other words, if you search for ninjas and then pirates, you’ll see a section of ninjas and a section of pirates in the collection view. Talk about a recipe for disaster!
To create these separate sections, you need a data structure to keep each section’s data separate. An array of FlickrSearchResults
will do the trick.
Open FlickrPhotosViewController.swift. Add the following properties below sectionInsets
:
private var searches: [FlickrSearchResults] = []
private let flickr = Flickr()
searches
is an array that keeps track of all the searches made in the app. flickr
is a reference to the object that searches for you.
Next, add the following extension to the bottom of the file:
// MARK: - Private
private extension FlickrPhotosViewController {
func photo(for indexPath: IndexPath) -> FlickrPhoto {
return searches[indexPath.section].searchResults[indexPath.row]
}
}
photo(for:)
is a convenience method that gets a specific photo related to an index path in your collection view. You’ll access a photo for a specific index path a lot, and you don’t want to repeat code.
You’re now ready to get your Flickr search on!
Getting Good Results
When the user taps Search after typing in a query, you want the search to execute. You already connected the text field’s delegate outlet to your collection view controller. Now you can do something about it.
Open FlickrPhotosViewController.swift. Add an extension to hold the text field delegate methods:
// MARK: - Text Field Delegate
extension FlickrPhotosViewController: UITextFieldDelegate {
func textFieldShouldReturn(_ textField: UITextField) -> Bool {
guard
let text = textField.text,
!text.isEmpty
else { return true }
// 1
let activityIndicator = UIActivityIndicatorView(style: .gray)
textField.addSubview(activityIndicator)
activityIndicator.frame = textField.bounds
activityIndicator.startAnimating()
flickr.searchFlickr(for: text) { searchResults in
DispatchQueue.main.async {
activityIndicator.removeFromSuperview()
switch searchResults {
case .failure(let error) :
// 2
print("Error Searching: \(error)")
case .success(let results):
// 3
print("""
Found \(results.searchResults.count) \
matching \(results.searchTerm)
""")
self.searches.insert(results, at: 0)
// 4
self.collectionView?.reloadData()
}
}
}
textField.text = nil
textField.resignFirstResponder()
return true
}
}
Here’s a code breakdown:
- After adding an activity view, you use the Flickr wrapper class to search Flickr asynchronously for photos that match the given search term. When the search completes, you call the completion block with the result set of
FlickrPhoto
objects and any errors. - You log any errors to the console. Obviously, in a production app, you would want to show the user these errors.
- Then, you log the results and add them at the beginning of the searches array.
- Finally, you refresh the UI to show the new data. You use
reloadData()
, which works as it does in a table view.
Build and run. Perform a search in the text box. You’ll see a log message in the console indicating the number of search results like this:
Found 20 matching bananas
Note that the Flickr helper limits the results to 20 to keep load times down.
Unfortunately, you don’t see any photos in your collection view! A collection view doesn’t do much unless you implement the relevant data source and delegate methods, similar to a table view.
You’ll do that in the next section.
Feeding the UICollectionView
When you use a table view, you have to set a data source and delegate to provide the data to display and handle events, like row selection.
Similarly, when you use a collection view, you have to set a data source and delegate as well. Their roles are as follows:
- The data source,
UICollectionViewDataSource
, returns information about the number of items in the collection view and their views. - The delegate,
UICollectionViewDelegate
, gets another notification when events happen, such as when a user selects, highlights or removes a cell.
UICollectionViewFlowLayout
also has a delegate protocol, UICollectionViewDelegateFlowLayout
. It lets you tweak the layout’s behavior to configure things like cell spacing, scroll direction and cell size. You can learn more in this Apple documentation.
In this section, you’ll implement the required UICollectionViewDataSource
and UICollectionViewDelegateFlowLayout
on your view controller, so you’re set up to work with your collection view. The UICollectionViewDelegate
isn’t required for this tutorial, but you’ll use it in UICollectionView: Reusable Views Selection Reordering.
Time to connect the data source!
UICollectionViewDataSource
Open FlickrPhotosViewController.swift. Add the following extension to the file for UICollectionViewDataSource
:
// MARK: - UICollectionViewDataSource
extension FlickrPhotosViewController {
// 1
override func numberOfSections(in collectionView: UICollectionView) -> Int {
return searches.count
}
// 2
override func collectionView(
_ collectionView: UICollectionView,
numberOfItemsInSection section: Int
) -> Int {
return searches[section].searchResults.count
}
// 3
override func collectionView(
_ collectionView: UICollectionView,
cellForItemAt indexPath: IndexPath
) -> UICollectionViewCell {
let cell = collectionView.dequeueReusableCell(
withReuseIdentifier: reuseIdentifier,
for: indexPath)
cell.backgroundColor = .black
// Configure the cell
return cell
}
}
These methods are pretty straightforward:
- There’s one search per section, so the number of sections is the count of
searches
. - The number of items in a section is the count of
searchResults
from the relevantFlickrSearch
. - This is a placeholder method to return a blank cell. You’ll populate it later. Note that collection views require you to register a cell with a reuse identifier. A runtime error will occur if you don’t.
Build and run again. Perform a search. You’ll see 20 new, albeit dull-looking, cells:
Next, you will improve the layout of the cells.
UICollectionViewFlowLayoutDelegate
As mentioned earlier, every collection view has an associated layout. You’ll use the pre-made flow layout for this project since it’s easy to use and gives you the grid-view style you need.
Still in FlickrPhotosViewController.swift, add the following constant below flickr
:
private let itemsPerRow: CGFloat = 3
Next, add UICollectionViewDelegateFlowLayout
to let the view controller conform to the flow layout delegate protocol. Add this extension at the bottom of the file:
// MARK: - Collection View Flow Layout Delegate
extension FlickrPhotosViewController: UICollectionViewDelegateFlowLayout {
// 1
func collectionView(
_ collectionView: UICollectionView,
layout collectionViewLayout: UICollectionViewLayout,
sizeForItemAt indexPath: IndexPath
) -> CGSize {
// 2
let paddingSpace = sectionInsets.left * (itemsPerRow + 1)
let availableWidth = view.frame.width - paddingSpace
let widthPerItem = availableWidth / itemsPerRow
return CGSize(width: widthPerItem, height: widthPerItem)
}
// 3
func collectionView(
_ collectionView: UICollectionView,
layout collectionViewLayout: UICollectionViewLayout,
insetForSectionAt section: Int
) -> UIEdgeInsets {
return sectionInsets
}
// 4
func collectionView(
_ collectionView: UICollectionView,
layout collectionViewLayout: UICollectionViewLayout,
minimumLineSpacingForSectionAt section: Int
) -> CGFloat {
return sectionInsets.left
}
}
Here’s a breakdown:
-
collectionView(_:layout:sizeForItemAt:)
tells the layout the size of a given cell. - Here, you work out the total amount of space taken up by padding. You’ll have
n + 1
evenly sized spaces, wheren
is the number of items in the row. You can take the space size from the left section inset.Subtracting that from the view’s width and dividing by the number of items in a row gives you the width for each item. You then return the size as a square.
-
collectionView(_:layout:insetForSectionAt:)
returns the spacing between the cells, headers and footers. A constant stores the value. - This method controls the spacing between each line in the layout. You want this spacing to match the padding at the left and right.
Build and run again. Perform a search.
Behold! The black squares are bigger than before!
With this infrastructure in place, you’re now ready to display some photos on screen!
Creating Custom UICollectionViewCells
One of the best things about UICollectionView
is, like table views, it’s easy to set up collection views in the Storyboard editor visually. You can drag and drop collection views into your view controller and design your cell’s layout from within the Storyboard editor. Time to see how it works.
Open Main.storyboard and select the collection view. Give yourself room to work by setting the cell size to 200×200 in the Size inspector:
Drag an image view onto the cell and stretch it so it takes up the entire cell. With the image view still selected, open the pin menu. Uncheck Constrain to margins and add constraints of 0 points all the way around:
With the image view still selected, change its Mode to Aspect Fit in the Attributes inspector, so the images aren’t cropped or stretched in any way:
Now it’s time to subclass UICollectionViewCell
.
Subclassing UICollectionViewCell
UICollectionViewCell
doesn’t allow for much customization beyond changing the background color. You’ll almost always want to create a subclass to easily access any content subviews you add.
Choose File ▸ New ▸ File. Then choose iOS ▸ Source ▸ Cocoa Touch Class. Click Next.
Name the new class FlickrPhotoCell, making it a subclass of UICollectionViewCell.
Open Main.storyboard and select the cell. In the Identity inspector, set the cell’s class to FlickrPhotoCell:
Open the Assistant editor, making sure it displays FlickrPhotoCell.swift. Then, Control-drag from the image view to the class to add a new outlet. Name it imageView:
Now you have a custom cell class with an image view. It’s time to put a photo on it!
Open FlickrPhotosViewController.swift. Replace collectionView(_:cellForItemAt:)
with:
override func collectionView(
_ collectionView: UICollectionView,
cellForItemAt indexPath: IndexPath
) -> UICollectionViewCell {
// 1
let cell = collectionView.dequeueReusableCell(
withReuseIdentifier: reuseIdentifier,
for: indexPath
) as! FlickrPhotoCell
// 2
let flickrPhoto = photo(for: indexPath)
cell.backgroundColor = .white
// 3
cell.imageView.image = flickrPhoto.thumbnail
return cell
}
This is a little different from the placeholder method you defined earlier:
- The cell coming back is now a
FlickrPhotoCell
. - You need to get the
FlickrPhoto
representing the photo to display by using the convenience method from earlier. - You populate the image view with the thumbnail.
Build and run. Perform a search, and you’ll finally see the pictures you’ve been searching for!
Yes! Success!
At this point, you have a cool working example of UICollectionView
. Pat yourself on the back!
Where to Go From Here?
You can download the final project using the Download Materials button at the top or bottom of this tutorial.
In this tutorial you learned how to create a brand new UICollectionView
, specify a layout, connect its data source to a remote API, and even create a custom UICollectionViewCell
that shows an image.
You only scratched the surface of what’s possible with UICollectionView
, but there’s more! Check out UICollectionView: Reusable Views Selection Reordering . It enhances the app you built by teaching you how to:
- Add custom headers to collection views.
- Easily move cells by dragging them.
- Implement single cell selection to bring up a detail view.
- Implement multi-cell selection.
If you’re interested in other cool ways to handle UICollectionView
‘s data source and cells, check out:
- UICollectionViewDiffableDataSource
- CellRegistration from WWDC 2020
In the meantime, if you have any questions or comments, please join the forum discussion below!
Collection Views
Learn all about using collection views in iOS to build composable and flexible layouts both in code and using Interface Builder. You’ll learn how to implement custom cells, animate changes and work with different types of data sources
View now