UIKit Dynamics and Swift Tutorial: Tossing Views
Learn how to toss your views around with gestures and realistic physics behavior in this UIKit Dynamics tutorial! By Bjørn Olav Ruud.
Update note: This tutorial was updated to Swift and iOS 8 by Bjørn Ruud. Original post by Tutorial Team member Tony Dahbura.
In this UIKit Dynamics tutorial, you’ll learn how to toss views off-screen with gestures in a natural feeling way.
You may have seen this technique popularized in the popular app Tweetbot.
This tutorial is a good fit for intermediate developers because it covers some neat effects, such as rotation and fly-away animations using the native UIKit framework.
But if you’re completely new to UIKit dynamics, don’t fear – this tutorial will guide you through step by step.
Without further ado, let’s get to tossing!
The Code Team is a group of expert-level coders that spend their waking hours coming up particularly cool demos to demonstrate advanced techniques. The Tutorial Team then converts the best demos into high quality tutorials. If you’re an expert-level iOS developer and joining the Code Team piques your interest, check out the details and get in touch!
The Code Team is a group of expert-level coders that spend their waking hours coming up particularly cool demos to demonstrate advanced techniques. The Tutorial Team then converts the best demos into high quality tutorials. If you’re an expert-level iOS developer and joining the Code Team piques your interest, check out the details and get in touch!
Getting Started
Start up Xcode, select File\New\Project…, choose iOS\Application\Single View Application template, and click Next. Name the project DynamicToss, make sure the selected language is Swift, and set the device family to iPhone.
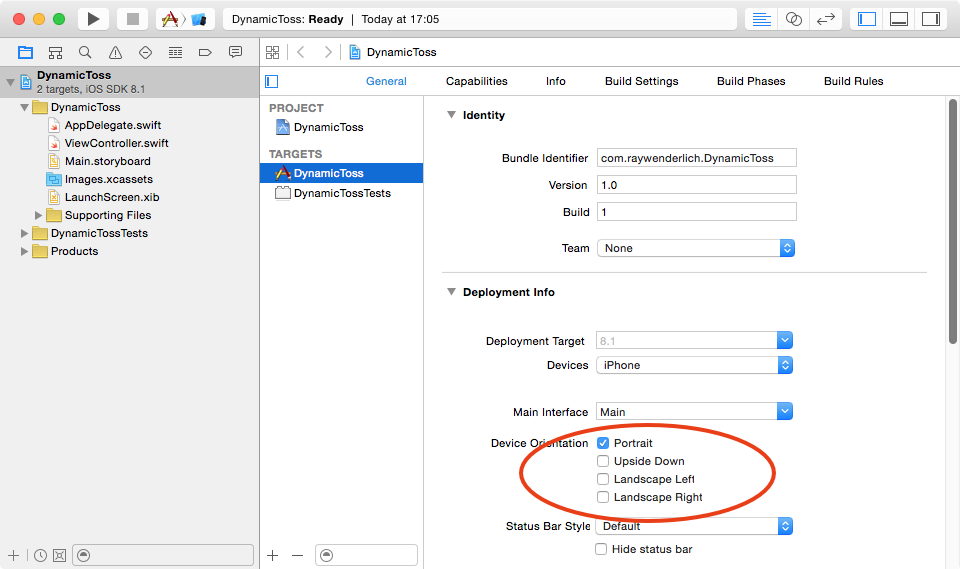
Now select the project name on the left and select the General at the top of the Xcode window. Under Deployment Info/Device Orientation uncheck the Landscape Left and Landscape Right checkboxes, because your app will only run in portrait mode.
Next, download an image that you’ll need for this project, courtesy of gameartguppy.com.

Unzip the file and add it to the Images asset catalog in your project.
Next, select Main.storyboard and go to the File Inspector in the utilities area on the right. To keep the scope of this tutorial small you will not use auto layout and size classes, so untick the Use Auto Layout checkbox. This will also disable size classes. In the dialog box that appears, choose to keep size class data for iPhone and select Disable Size Classes.
In the storyboard, add an image view to the default view controller and set the image to goldfish_feature. In the size inspector for the image view, set the following values: X=33, Y=137, Width=254, Height=172. Also, change the autoresizing mask to disable flexible height, width, right, and bottom margins. That means only the top and left margins stay “selected”.
Your screen should now look like this:

Next, drag two plain Views into your view controller that you will use to help track your gestures. Set them to the following settings:
- View 1: (X=156, Y=219, Width=8, Height=8, Background=red)
- View 2: (X=80, Y=420, Width=8, Height=8. Background=blue)
When done your view should look like this:

That covers the views you’ll need to set up in the storyboard. Next: on to some code!
Touch Handling
Open ViewController.swift and add the following properties to the class:
@IBOutlet weak var imageView: UIImageView!
@IBOutlet weak var redSquare: UIView!
@IBOutlet weak var blueSquare: UIView!

private var originalBounds = CGRect.zeroRect
private var originalCenter = CGPoint.zeroPoint

private var animator: UIDynamicAnimator!
private var attachmentBehavior: UIAttachmentBehavior!
private var pushBehavior: UIPushBehavior!
private var itemBehavior: UIDynamicItemBehavior!
You’ll connect the outlets in a moment. The other properties will control the image view’s movement and keep track of its state as the touch events go on.
Open Main.storyboard and right click (or control-click) on the View Controller. Drag from the circle to the right of the outlet named blueSquare onto the small blue square view and release the mouse. This links the property to the view object.
Do the same for the red square, and finally for the property named imageView, drag onto your jetpack-equipped goldfish. Your three view properties should now be linked, like this:

The red and blue squares will represent points that the UIKit dynamics physics engine uses to animate the image.
The blue square will simply represent where your touch began, i.e., where your finger first made contact with the screen. The red square will track your finger as it moves.
You’ll configure the dynamics so that when you move that point around, the image view physically animates to move in tandem.
There’s one final thing you need to do – set up a gesture recognizer for the view. Open ViewController.swift and add this new method to the file:
@IBAction func handleAttachmentGesture(sender: UIPanGestureRecognizer) {
  let location = sender.locationInView(self.view)
  let boxLocation = sender.locationInView(self.imageView)

  switch sender.state {
  case .Began:
    println("Your touch start position is \(location)")
    println("Start location in image is \(boxLocation)")

  case .Ended:
    println("Your touch end position is \(location)")
    println("End location in image is \(boxLocation)")

  default:
    break
  }
}
You’re going add a gesture recognizer to detect dragging, aka panning, and call this method when panning occurs. For now, this method simply displays the position of your finger in two coordinate systems (the view, and the image view).
To add the gesture recognizer, open Main.storyboard and drag a Pan Gesture Recognizer onto the View. Then control-drag from the Pan Gesture Recognizer up to your View Controller, and connect it to the handleAttachmentGesture: action.
Now build and run. Swipe or drag across the screen and you should see messages coming out on the debug window:
Your touch start position is (125.0,227.0)
Start location in image is (92.0,90.0)
Your touch end position is (195.5,374.0)
End location in image is (162.5,237.0)
Great! You’ve got the basic UI set up – now it’s time to make it dynamic.