Accepting Credit Cards In Your iOS App Using Stripe

In this tutorial, you will to learn how to accept credit cards in iOS using Stripe, a pain-free, developer-centric way to handle purchases in your apps. By Lorenzo Boaro.

Leave a rating/review
Save for later
Share

Update note: This tutorial was updated to iOS 11, Xcode 9, and Swift 4 by Lorenzo Boaro. The original tutorial was written by Pietro Rea.

In this tutorial, you are going to learn how to accept credit cards in an iOS app using an amazing service called Stripe. You will walk through the whole process, from creating your Stripe account to accepting customer payments.

Stripe is an easy way to accept online and mobile app payments from both individuals and businesses.

There are two main features provided by the Stripe service. First of all, it avoids all the bureaucracy of creating a merchant account while still ensuring transaction safety. Also, it allows you to set up a developer account without verifying any business information. You can start accepting credit cards with Stripe’s API after signing up using the test environment. Moving to production is easy. All you need to do is to switch out your test API keys with live ones, and that’s it!

Getting Started: Creating Your Stripe Account

The first step is to get your API keys from Stripe. Head over to stripe.com and click on the green button that says CREATE ACCOUNT. Notice the phrase The new standard in online payments is stamped right on the homepage. So far, so good!

Stripe Landing Page Credit Cards iOS Stripe

At this point, you are going to create a full-fledged Stripe account. It does not require to have your business details handy since we are going to use test data.

Create Your Stripe Account

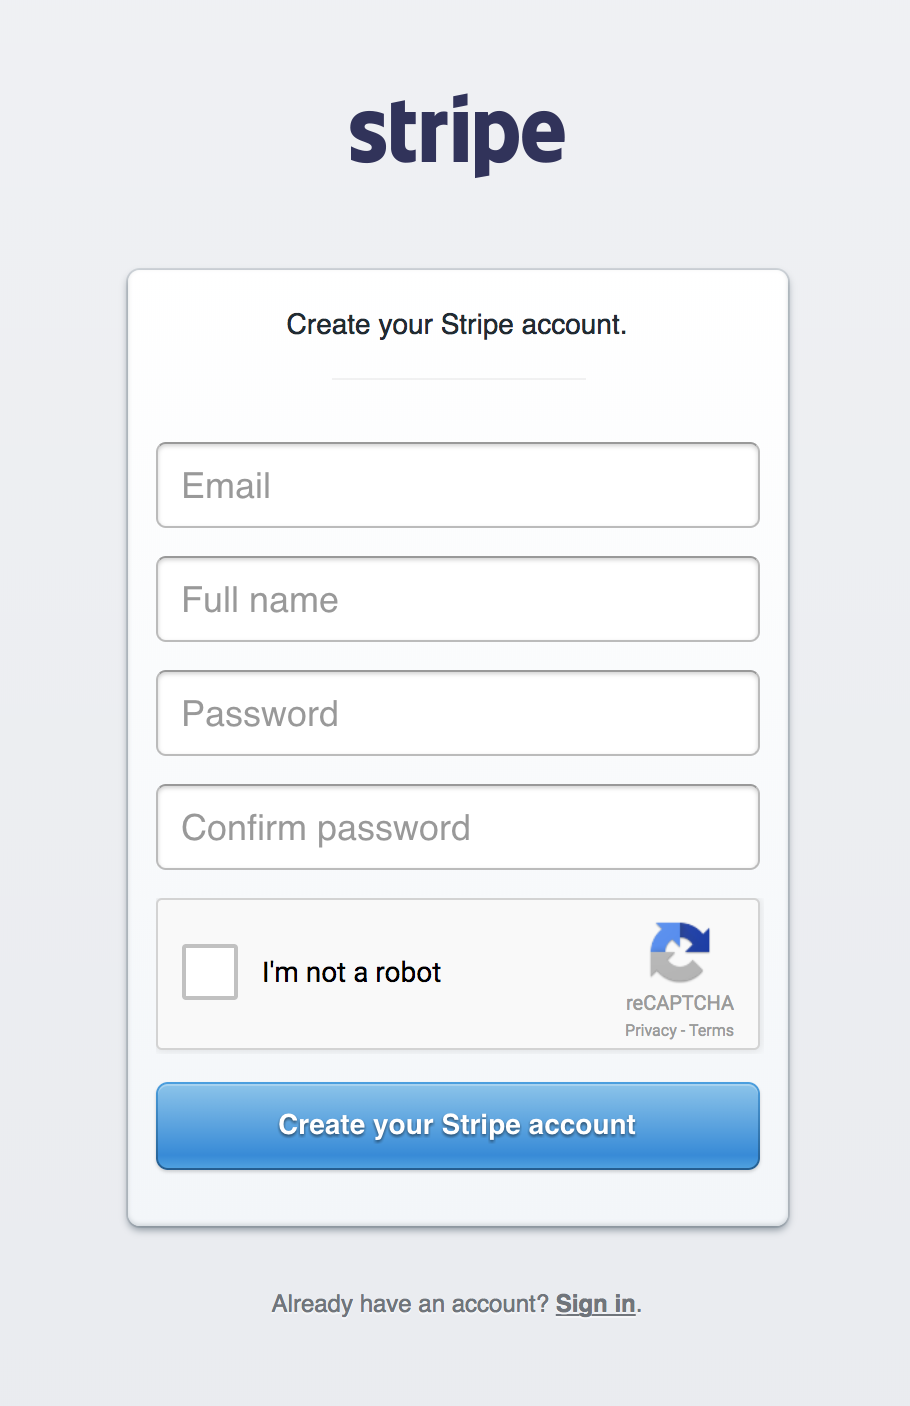
Insert your details (don’t forget to check the Captcha box) and click Create your Stripe account. You will be greeted with a dialog to add a mobile recovery number. If you chose not to do so now, click Skip.

To find your keys, click on API on the dashboard’s left menu.

Stripe Credit Cards Menu

As shown below, Stripe generates a pair of test secret/publishable API keys for your account. You won’t be able to use your live keys until you verify your account with Stripe. For the purposes of this tutorial, and whenever you’re just developing, you want to use the test secret and test publishable keys.

Test Secret and Test Pubishable Keys

Note: Whenever you need your API keys, remember this is where you’ll find them. If your keys ever become compromised, you can reset them using the dotted icons to their right.

RWPuppies: The Stripe Sample Project

Your project for this tutorial is RWPuppies, a fully-functional mobile storefront that sells and ships puppies right to your door and accepts payments using credit cards. Full disclosure: This app will not ship puppies right to your door. Sorry if that’s a disappointment!

Disappointment

The app consists of the following three tabs:

  • Featured Puppy: Displays the puppy of the day. This tab contains the puppy’s detailed information like name, breed and price. There’s even an Add to Cart button right there on the view controller if you decide to buy the featured pup on a whim. :]
  • Inventory: Displays the entire list of puppies on sale in table format. Tapping on any cell takes you to that pup’s details page, which looks very similar to the featured puppy page.
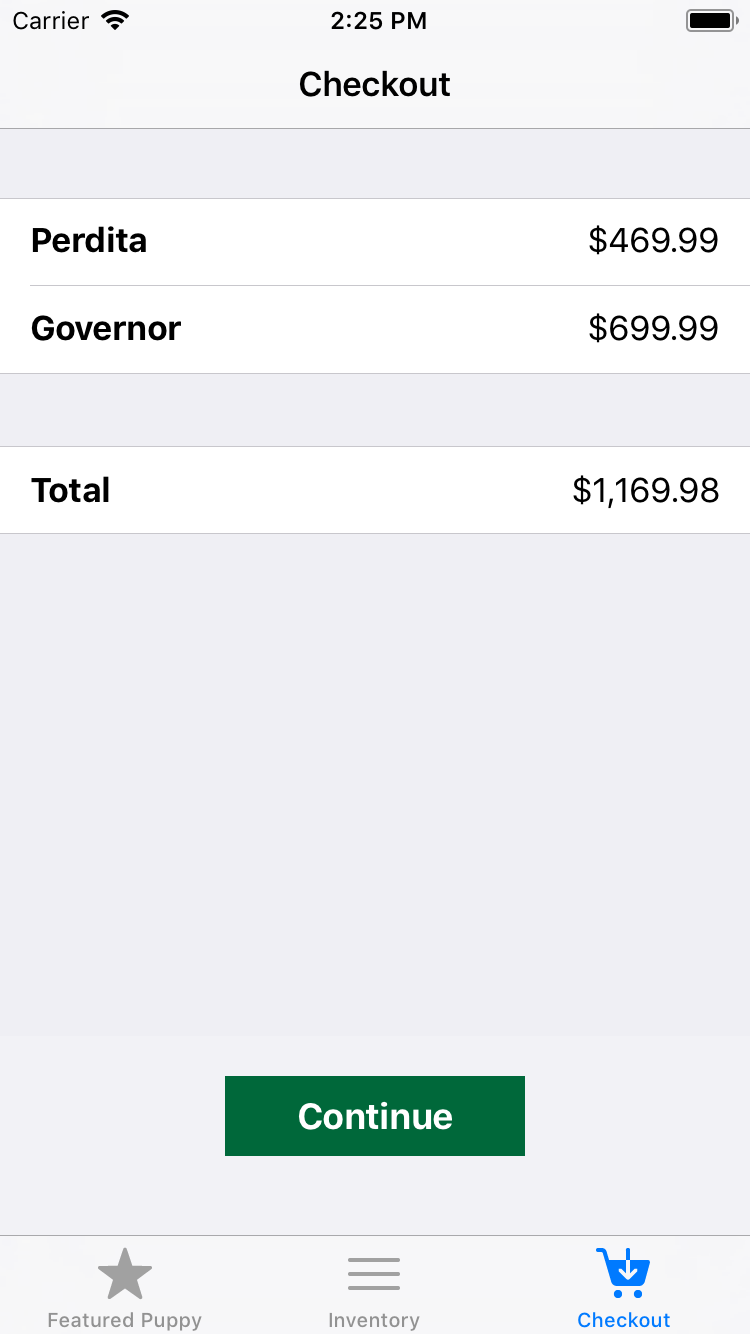
  • Checkout: Shows all the puppies that are currently in your cart, along with a running total for your order. Tapping on Continue takes you to a view controller where you can enter your credit card information and complete your purchase.

You don’t want to waste your time setting up table views or dragging out buttons in Interface Builder when you’re here to learn about Stripe so you’ll be happy to hear this tutorial provides you with a starter project that has everything unrelated to Stripe already implemented for you.

You can download the starter project here.

Open RWPuppies.xcworkspace. Build and run RWPuppies to give it a whirl, and notice that the UI and most of the functionality is already in place.

Featured puppy

Real-world e-commerce apps typically get their inventory data from a remote server. For simplicity, the ten puppies on display, including the featured puppy, are all read from a local file named puppies.json. The contents look something like this:

[

{
 "id" : 12252012,
 "name" : "Penny",
 "breed" : "Dachshund",
 "photo_large" : "http://www.raywenderlich.com/downloads/puppies/dachshund.jpeg",
 "cuddle_factor" : 5,
 "price" : 29999
 },

 ...
]

The checkout cart is implemented as a singleton called CheckoutCart. You can add and remove any number of puppies to and from your cart and all the changes will be reflected automatically in the third tab, which contains your order information.

Checkout Cart Credit Cards

Your primary task is to integrate the logic to collect and send the payment to your simple back-end app that will talk to Stripe.

“But I’m a mobile developer. I don’t do back end!” Fear not. You’ll find it’s pretty straightforward. :]

But Wait A Second, You Might Be Wondering… What About In-App Purchases?

Credit card payments are not to be confused with In-App Purchases. In-App Purchases can only be used to sell digital goods that are going to be consumed within the app. If you are dealing with a physical good or service, not only should you not try to use an In-App Purchase, you must not. Apple will reject your app!

Say you developed a game. If you want to offer more levels for 99 cents a pop, you have to use an In-App Purchase. If, on the other hand, you want to sell official t-shirts inside the app, then you have to handle your own credit card payments with a service like Stripe.

Time To Earn Your Stripes

The sequence of steps leading to a successful credit card charge looks like this:

Stripe Credit Card Transaction Sequence Diagram

  1. The app sends your customer’s credit card information to Stripe using a secure HTTPS POST request. The only required bits of information you need to send to Stripe are the credit card number, the expiration month and the expiration year. Not even the owner’s name is required!

    Sending additional information, such as the card’s CVC number and billing address, is not required but is highly recommended. This extra information helps reduce fraudulent transactions that the merchant (that means you or your client) have to cover.

  2. Stripe processes the credit card information and returns a one-time token to your app. Getting this token from Stripe does not mean that your customer’s card was charged. The actual charge is initiated later from your server.
  3. Assuming the previous step was successful, your app posts the one-time token to your server for the grand finale.
  4. Server-side, you must contact Stripe again using Stripe’s API. Luckily for you, the fine folks at Stripe have provided official libraries in several popular languages that wrap around their underlying HTTP API. You’ll be using Sinatra-based web application for this tutorial.
  5. Stripe’s servers attempt to charge the credit card and send the result, success or failure, back to your server.
  6. In the last step of what seems to be an endless game of telephone, your server notifies your iOS app of the transaction’s final result.

Note: In theory, you could implement everything on the phone without a back end, but for security reasons this is not recommended. Doing so requires you to put both public and private keys in your app – a requirement to submit a charge to Stripe. This means anyone with access to your app could reverse-engineer both keys and would be able to do anything with your Stripe account – ouch!

Getting Acquainted With Stripe’s iOS Library

There are different ways to add Stripe’s library. According to Stripe’s iOS Integration documentation, they support CocoaPods, Carthage, both Static and Dynamic Frameworks, as well as Fabric.

The starter project uses CocoaPods. In order to not lose the focus of this tutorial, all the dependencies have been set up for you. You don’t need to run any CocoaPod commands!

Note: If you haven’t used CocoaPods before, I encourage you to read CocoaPods Tutorial for Swift: Getting Started tutorial by Joshua Greene. It’s a real time-saver.

Now it’s time to start coding! You start by implementing the code for steps 1 and 2 above: submitting the credit card information to Stripe and getting a token.

Open Constants.swift. You will find an enum with a few constants. The first one is for the publishable API key that you got from Stripe when you signed up for an account.

Replace the value of publishableKey with your Test Publishable Key. It should be a random string of numbers and letters that starts with pk_test.

Note: If you accidentally use your secret key instead of your publishable key, the Stripe API methods that you access later will throw exceptions indicating you’ve made an error. Remember to use your test keys, not your live keys at this stage.

Ignore the baseURLString for now. You’ll get to that later.

Open AppDelegate.swift and at the top of the file, add the import below:

import Stripe

Next, replace the existing definition of application(_:didFinishLaunchingWithOptions:) with this:

func application(_ application: UIApplication, 
                 didFinishLaunchingWithOptions launchOptions: [UIApplicationLaunchOptionsKey: Any]?)
                 -> Bool {
  STPPaymentConfiguration.shared().publishableKey = Constants.publishableKey
  return true
}

Here you are configuring Stripe with your publishable key.

Now, your next step is to collect credit card details from the user.

Accepting Credit Cards

At the moment, tapping on the Continue button on the checkout view controller does nothing. Open CheckoutViewController.swift and add this import just below the existing UIKit import at the top:

import Stripe

Then, complete the definition of continueDidTap(_:) Interface Builder action with this:

// 1
guard CheckoutCart.shared.canPay else {
  let alertController = UIAlertController(title: "Warning", 
                                          message: "Your cart is empty", 
                                          preferredStyle: .alert)
  let alertAction = UIAlertAction(title: "OK", style: .default)
  alertController.addAction(alertAction)
  present(alertController, animated: true)
  return
}
// 2
let addCardViewController = STPAddCardViewController()
addCardViewController.delegate = self
navigationController?.pushViewController(addCardViewController, animated: true)

If you build at this point, you’ll find a compilation error. Don’t worry about it; you’ll solve it in the next step.
Here’s what happening in the code above:

  1. Ensure the user has placed at least one puppy in the checkout cart. If not, show a warning message and return.
  2. Create an instance of STPAddCardViewController, set its delegate and present it to the user.

STPAddCardViewController is a view controller class included in Stripe’s framework. It handles both collecting and tokenizing the user’s payment information. Once presented, the user will see a screen to input the credit card details like the number, expiration date and CVC.

Add Card

Since our checkout view controller has been set as a delegate of STPAddCardViewController, you must implement the required methods. In CheckoutViewController.swift, add the following code at the end of the file:

extension CheckoutViewController: STPAddCardViewControllerDelegate {

  func addCardViewControllerDidCancel(_ addCardViewController: STPAddCardViewController) {
    navigationController?.popViewController(animated: true)
  }

  func addCardViewController(_ addCardViewController: STPAddCardViewController, 
                             didCreateToken token: STPToken, 
                             completion: @escaping STPErrorBlock) {
  }
}

You’ve added two different methods.

  • addCardViewControllerDidCancel(_:) is called when the user cancels adding a card.
  • addCardViewController(_:didCreateToken:completion:) is called when the user successfully adds a card and your app receives a token from Stripe.

Next, it’s time to finish the StripeClient component. It’s a singleton class that interacts with your back end.

Open StripeClient.swift. As usual, import Stripe module at the top of the file:

import Stripe

Now, add the following method:

func completeCharge(with token: STPToken, amount: Int, completion: @escaping (Result) -> Void) {
  // 1
  let url = baseURL.appendingPathComponent("charge")
  // 2
  let params: [String: Any] = [
    "token": token.tokenId,
    "amount": amount,
    "currency": Constants.defaultCurrency,
    "description": Constants.defaultDescription
  ]
  // 3
  Alamofire.request(url, method: .post, parameters: params)
    .validate(statusCode: 200..<300)
    .responseString { response in
      switch response.result {
      case .success:
        completion(Result.success)
      case .failure(let error):
        completion(Result.failure(error))
      }
  }
}

Here's the breakdown of the above code:

  1. First, append the charge method path to the baseURL, in order to invoke the charge API available in your back end. You will implement this API shortly.
  2. Next, build a dictionary containing the parameters needed for the charge API. token, amount and currency are mandatory fields.

    The amount is an Int since Stripe API deals only with cents. When displaying amount values, your iOS app uses a currency number formatter.

  3. Finally, make a network request using Alamofire to perform the charge. When the request completes, it invokes a completion closure with the result of the request.

Open CheckoutViewController.swift and locate addCardViewController(_:didCreateToken:completion:). Add the following code to it:

StripeClient.shared.completeCharge(with: token, amount: CheckoutCart.shared.total) { result in
  switch result {
  // 1
  case .success:
    completion(nil)

    let alertController = UIAlertController(title: "Congrats", 
                          message: "Your payment was successful!", 
                          preferredStyle: .alert)
    let alertAction = UIAlertAction(title: "OK", style: .default, handler: { _ in
      self.navigationController?.popViewController(animated: true)
    })
    alertController.addAction(alertAction)
    self.present(alertController, animated: true)
  // 2
  case .failure(let error):
    completion(error)
  }
}

This code calls completeCharge(with:amount:completion:) and when it receives the result:

  1. If the Stripe client returns with a success result, it calls completion(nil) to inform STPAddCardViewController the request was successful and then presents a message to the user.
  2. If the Stripe client returns with a failure result, it simply calls completion(error) letting STPAddCardViewController handle the error since it has internal logic for this.

Build what you've got so far to make sure everything’s implemented correctly.

Note: If you see compiler warnings do not worry since Stripe SDK supports iOS versions back to iOS 8 while in this tutorial you are working with iOS 11.

Well done! Now it's time to set up the back-end script that is going to complete the credit card payment.

Setting Up Your Ruby Back End

Setting up a back-end development environment is beyond the scope of this tutorial, so you'll keep it as simple as possible. The back end is going to be a Sinatra web application that expects you to send the token id returned by STPAddCardViewController, along with a few other parameters.

Note: Sinatra is a free, open source DSL for creating web applications in Ruby with minimal effort. It is an alternative to other Ruby web application frameworks such as Ruby on Rails.

Sinatra requires a Ruby environment greater or equal to 1.9.3. In order to check the version currently installed in your machine, open Terminal and paste the following command:

ruby --version

You should get something like:

ruby 2.4.0p0 (2016-12-24 revision 57164) [x86_64-darwin16]

If you have an older version, you need to update it to the latest. The best way to install a new Ruby version is through RVM, a command line utility tool which allows you to easily install, manage, and work with multiple Ruby environments from interpreters to sets of gems.

In Terminal, paste the following command:

curl -sSL https://get.rvm.io | bash -s stable --ruby

Note: Together with the installation of RVM, --ruby flag will install the newest version of Ruby.

Run ruby --version again. Now you should have all set up correctly.

At this point, you can install the Stripe, Sinatra and JSON gems.

Note: A gem is a pretty simple concept. You can think of a gem as a library or plugin. You can learn about them in What is a gem?.

Switch again to the Terminal and copy the following line:

gem install stripe sinatra json

Here you are instructing Ruby to install three gems into the current Ruby version. If you update your Ruby version, you'll need to repeat this process.

That's it! Now you are able to create your back end.

The Ruby Script

Open your favorite text editor (like Atom or TextEdit) and create a new file.

Paste the following code and save it as web.rb:

#1
require 'sinatra'
require 'stripe'
require 'json'

#2
Stripe.api_key = 'YOUR_TEST_SECRET_KEY'

#3
get '/' do
  status 200
  return "RWPuppies back end has been set up correctly"
end

#4
post '/charge' do
  #5
  payload = params
  if request.content_type.include? 'application/json' and params.empty?
    payload = indifferent_params(JSON.parse(request.body.read))
  end

  begin
    #6
    charge = Stripe::Charge.create(
      :amount => payload[:amount],
      :currency => payload[:currency],
      :source => payload[:token],
      :description => payload[:description]
    )
    #7
    rescue Stripe::StripeError => e
    status 402
    return "Error creating charge: #{e.message}"
  end
  #8
  status 200
  return "Charge successfully created"

end

Following the numbered comments, here’s what this code does:

  1. First, you import several modules the script is going to need.

    Your app's request is going to arrive in JSON format, so you need to import the json module to be able to convert the incoming request into a proper dictionary.

  2. Here, you need to replace YOUR_TEST_SECRET_KEY with your Test Secret Key that Stripe provided earlier. This is the secret part of the secret/publishable pair of keys necessary to complete a transaction. If there is a mismatch between the secret and publishable keys, the charge will fail.
  3. Create the base / route that will print RWPuppies back end has been set up correctly if the back end has been set up correctly. You'll use this to test your server.
  4. Create /charge route. It will listen for requests from the iOS app and send charge requests to Stripe.
  5. Parse the JSON sent by your iOS application.
  6. Create and invoke Stripe::Charge with various POST parameters.
    • amount: The amount in cents that you’ll charge your customer. You don't need to make any conversion here since your iOS app deals already with cents.
    • currency: A short string that identifies the currency used for the transaction. Its value has been set to usd within your iOS app.
    • source: The one-time token that you get back from STPAddCardViewControllerDelegate.
    • description: A descriptive message that you can easily recognize when you log into the Stripe dashboard. This is a good place for an internal transaction ID.
  7. Keep in mind that errors can occur here as well. For example, you might try to charge a token that you already used. Whatever the outcome, you have to notify your app of what happened. You do this by returning the response that you receive from Stripe.
  8. If everything goes as planned, your Stripe account should have more $$. :]

Save the file and try to run the script you've just created.

Go back to Terminal and paste the following command:

ruby web.rb

You should see something like this:

== Sinatra (v2.0.0) has taken the stage on 4567 for development with backup from Thin

Note: If you don't execute the command in the same directory the ruby file is located in, you will get an error. To fix it, just use the absolute path for that file.

The back end is launched and listening for requests in the port 4567. Open your favorite web browser and type http://localhost:4567 in your address bar. You should see something like this:

Backend Running

Back To Your App

With your back end in place, it’s time to test your application.

Only one little thing is missing. You need to configure the back end URL in the application. As you've just seen, your back end runs locally as a Sinatra web application.

Open Constants.swift file and find the static variable called baseURLString. Replace the placeholder string with http://localhost:4567. Your code should look like the following:

enum Constants {
  static let publishableKey = "pk_test_FGACeszCTD2vvtx3rm5xr8rB"
  static let baseURLString = "http://localhost:4567"
  static let defaultCurrency = "usd"
  static let defaultDescription = "Purchase from RWPuppies iOS"
}

defaultCurrency and defaultDescription are set respectively to usd and Purchase from RWPuppies iOS. Obviously in a real world app those values should not be hardcoded but based on customers' information.

Now, build and run. Go through the entire checkout process. Add one or more favorites puppies to your cart and open the Checkout tab. At this point you should be able to see the list of the puppies you are going to buy and the total amount.

Click Continue. Insert the following card details into the credit card view:

  • Credit Card Number: 4242424242424242
  • Expiration Date: Any month and year in the future
  • CVC Number: Any three or four-digit number

Note: Since you can't use genuine card information while testing your app, Stripe makes available some test credit cards numbers and tokens. For further info take a look at Testing.

Tap the Done button in the top right corner. If the payment succeeded, you will get something like the following:

Stripe Payment

More importantly, verify that the charge went through Stripe. Open your Stripe dashboard and go straight to Payments on the left menu. You will find an entry similar to the one below.

Stripe Dashboard

Congratulations!

Well Done!

Where To Go From Here?

You've successfully implemented Stripe checkout in iOS from start to finish and your app can now accept credit cards. Whenever you want to start charging your customers, verify your Stripe account and switch all the test API keys to the live API keys.

Here are the finished iOS project and finished server script.

There are lots of cool things you can do with Stripe's API that this tutorial didn’t cover. For example, if you know you are going to be charging the same person in the future, you may want to create a customer object. If you need to collect shipping details, you can do that as well. Stripe also lets you create subscription plans and invoices if that suits your business model. Furthermore, in live mode, Stripe lets you to send email to charged customers for payment recaps.

I encourage you to peruse Stripe's docs if you're interested in implementing any of the features I mentioned above. If you have any tips or suggestions for using Stripe with iOS, or if you’ve implemented a checkout cart in the past, please share in the comments section.

Lorenzo Boaro

Contributors

Lorenzo Boaro

Author

Ernesto García

Tech Editor

Mike Oliver

Final Pass Editor

Richard Critz

Team Lead

Over 300 content creators. Join our team.