How To Create an Xcode Plugin: Part 1/3
Get started with exploring app internals as you learn about developing Xcode plugins and some LLDB tips in this first of a three-part tutorial series. By Derek Selander.
2 (1) · 1 Review
Customize your Xcode just the way you like it!

Customize your Xcode just the way you like it!
Update note: This tutorial has only been tested with Xcode 6.3.2 — if you’re working with another version of Xcode, your experience might not match up perfectly with this tutorial.
The “one size fits all” paradigm that Apple extends to its products can be a tough pill to swallow. Although Apple has forced its workflows onto iOS/OS X developers, it’s still possible to bend Xcode to your will through plugins!
There isn’t any official Apple documentation on how to create an Xcode plugin, but the development community has put a tremendous amount of work into some pretty useful tools to help aid developers.
From autocompletion for images, to nuking your Derived Data to a vim editor, the Xcode plugin community has pushed the boundaries of what was originally thought capable.
In this epic three-part tutorial, you’ll create an Xcode plugin to prank your co-workers, featuring none other than the best prankster in these parts — Ray himself! And although the plugins are lighthearted in nature, you’ll still learn a lot about tracing through Xcode, how to find the elements you want to modify, and how to swizzle in your own functionality!
You’ll be inspecting undocumented frameworks using your x86 assembly knowledge, code navigating skills, and LLDB skills while exploring private APIs and injecting code using method swizzling. Since there’s a lot to cover, this tutorial will move very quickly. Make sure you’re comfortable in iOS or OS X development before proceeding!
Plugin development with Swift severely complicates an already tricky topic, and the Swift debugging tools are just not up to par with Objective-C yet. For now, that means the best choice for plugin development (and this tutorial!) is Objective-C.
Getting Started
To celebrate Prank Your Co-Worker Day (aka every day!), your Xcode plugin will Rayroll your victim. Wait, what’s Rayrolling? It’s the copyright & royalty free version of Rickrolling, where you bait-and-switch your victims with content that’s different than what was expected. When you’ve completed this series, your plugin will modify Xcode so that it will:

- Replace Ray’s face on the Xcode alerts (i.e. Build Succeeded/Build Failed).

- Replace Xcode’s titlebar contents with lyrics from Ray’s hit song, Never Gonna Live You Up.

- Replace all Xcode documentation requests to a Rayroll’d video.

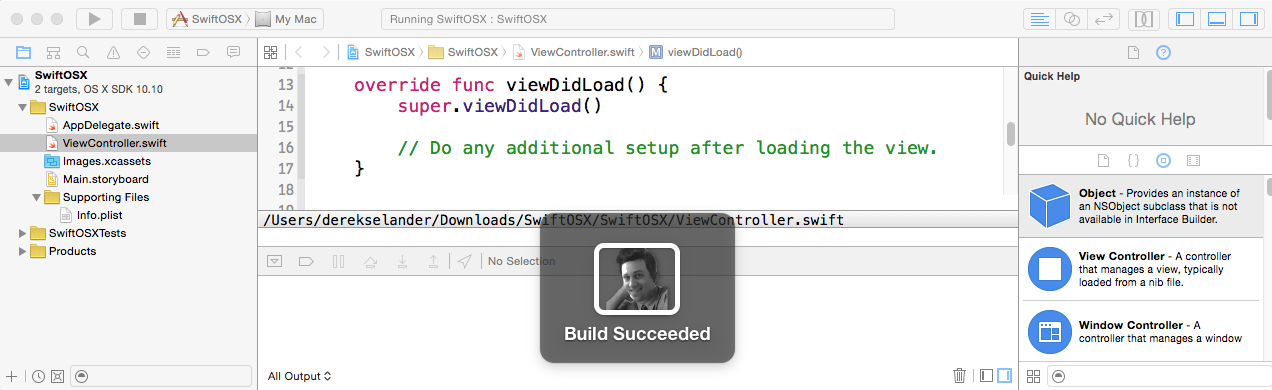
In this first part of the tutorial, you’ll focus on hunting down the class responsible for displaying the “Build Succeeded” alert and modify the image it displays with a good ol’ pic of Ray.
Installing the Alcatraz Plugin
Before you do anything, you’ll need to install Alcatraz. The Xcode plugin Alcatraz acts as a Xcode plugin manager; it’s from the talented developers @kattrali, @_supermarin, and @JurreTweet.
Type the following command into Terminal to install Alcatraz:
curl -fsSL https://raw.github.com/supermarin/Alcatraz/master/Scripts/install.sh | sh
Restart Xcode once the script has finished. You might see an alert warning you of the Alcatraz bundle; go ahead and click Load Bundle to continue. You do want to power-up your Xcode, right?

defaults delete com.apple.dt.Xcode DVTPlugInManagerNonApplePlugIns-Xcode-6.3.2
defaults delete com.apple.dt.Xcode DVTPlugInManagerNonApplePlugIns-Xcode-6.3.2
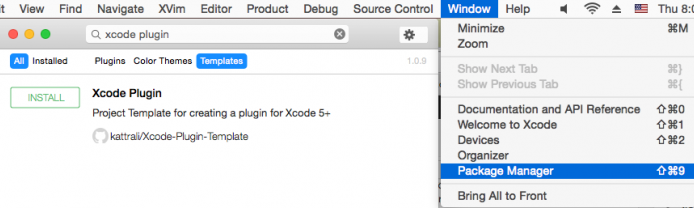
You’ll see a new option in the Xcode Window menu section called Package Manager. Creating an Xcode plugin requires you to muck around with the Build Settings to launch and attach Xcode to another instance of Xcode. Fortunately, @kattrali has already done the work for you and created a plugin, which creates a template…which creates a plugin.
Open the Alcatraz plugin by navigating to Window\Package Manager. In the Alcatraz search dialog, search for Xcode Plugin. Make sure that you have the All and Templates attributes selected on the search window. Once you’ve located the Xcode Plugin Template, click the Install button on the left to install it:
Once Alcatraz has downloaded the plugin, create a new project by navigating to File\New\Project…. Select the new OS X\Xcode Plugin\Xcode Plugin template option and click Next.

Name the Product Rayrolling, set the Organization Identifier as com.raywenderlich (this is important), and choose Objective-C for the Language.. Save the project to whatever directory you desire.

The Hello World Plugin Template
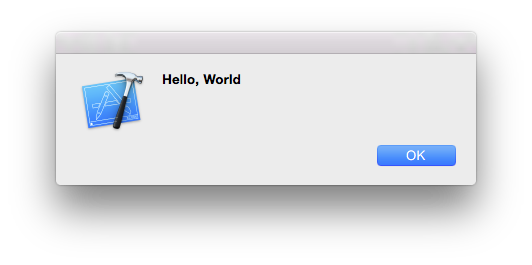
Build and run your new Rayroll project; you’ll see a new child instance of Xcode appear. This child instance has a new option in the Edit menu named Do Action:

Selecting this item will launch a modal alert:
Plugins are tagged to work with specific versions of Xcode. This means that when a new Xcode version comes out, all 3rd party plugins created by the community will fail until they add the UUID specific to that version. If this particular template doesn’t work and you don’t see the new menu action, you may need to add support for your version of Xcode.
To add this, run the following command in Terminal:
defaults read /Applications/Xcode.app/Contents/Info DVTPlugInCompatibilityUUID
This command will output a UUID for your current Xcode. Open the Info.plist of the plugin and navigate to the DVTPlugInCompatibilityUUID key to add the value to the array:

Note: Throughout this tutorial, you’ll be running and making changes to an installed Xcode plugin. This will change the behavior of Xcode, and potentially make Xcode crash! If you want to disable a plugin, you’ll need to manually remove it using Terminal:
…and then restart Xcode.
Note: Throughout this tutorial, you’ll be running and making changes to an installed Xcode plugin. This will change the behavior of Xcode, and potentially make Xcode crash! If you want to disable a plugin, you’ll need to manually remove it using Terminal:
cd ~/Library/Application\ Support/Developer/Shared/Xcode/Plug-ins/
rm -r Rayrolling.xcplugin/
…and then restart Xcode.
cd ~/Library/Application\ Support/Developer/Shared/Xcode/Plug-ins/
rm -r Rayrolling.xcplugin/
Finding the Features to Modify
One tried and true way to get a basic grounding of what’s going on behind the scenes is to have a NSNotification observer that listens to all events fired by Xcode. By using Xcode and observing these notifications as they fire, you will be able to take a peek at the underlying classes.
Open Rayrolling.m and add the following property to the class:
@property (nonatomic, strong) NSMutableSet *notificationSet;
This NSMutableSet stores all the NSNotification names the Xcode console spits out.
Next, add the following code to initWithBundle:, after the if (self = [super init]) { line:
[[NSNotificationCenter defaultCenter] addObserver:self selector:@selector(handleNotification:) name:nil object:nil];

self.notificationSet = [NSMutableSet new];
Using nil in the name parameter, indicates you want to listen for all the notifications that Xcode passes around.
Now implement handleNotification: as shown below:
- (void)handleNotification:(NSNotification *)notification {
  if (![self.notificationSet containsObject:notification.name]) {
    NSLog(@"%@, %@", notification.name, [notification.object class]);
    [self.notificationSet addObject:notification.name];
  }
}
handleNotification: checks that the notification name is in the notificationSet; if it’s not, print the notification’s name and class and add it to the set. This way, you’ll only see each notification reported once.
Next, find and replace the added action menu item declaration to update its title text:
NSMenuItem *actionMenuItem = [[NSMenuItem alloc] initWithTitle:@"Reset Logger"
 action:@selector(doMenuAction) keyEquivalent:@""];
This is a minor modification to the NSMenuItem title so you know that it will reset the NSNotification set when you click on the menu action.
Finally, replace the implementation of doMenuAction with the following:
- (void)doMenuAction {
  [self.notificationSet removeAllObjects];
}
The menu item will now reset all the notifications in the notificationSet property. This will let you examine notifications of interest with less “console noise.”
Build and run the plugin again to relaunch the child Xcode. Make sure you clearly separate the parent Xcode that is running the instance of the debugged child Xcode, because the parent will not have your most recent plugin changes incorporated until you relaunch Xcode into memory.
Play around with the child Xcode; click on buttons, open windows and explore the application while keeping an eye on the parent Xcode’s console as the notifications fire.