iOS 9 App Search Tutorial: Introduction to App Search
Discover how easy it is to make your app’s content searchable through Spotlight with this iOS 9 app search tutorial. By Chris Wagner.
Searching previously viewed records
When implementing app search, NSUserActivity is the first thing to work with because:
- It’s dead simple. Creating an
NSUserActivityinstance is as easy as setting a few properties. - When you use
NSUserActivityto flag user activities, iOS will rank that content so that search results prioritize frequently accessed content. - You’re one step closer to providing Handoff support.
Time to prove how simple NSUserActivity can be to implement!
Implement NSUserActivity
With the EmployeeKit group selected, go to File \ New \ File…. Choose the iOS \ Source \ Swift File template and click Next. Name your new file EmployeeSearch.swift and verify that the target is set to EmployeeKit.
Within the new file, first import CoreSpotlight:
import CoreSpotlight
Next, still in EmployeeSearch.swift, add the following extension to the Employee struct:
extension Employee {
  public static let domainIdentifier = "com.raywenderlich.colleagues.employee"
}
This reverse-DNS formatted string identifies the type of NSUserActivity created for employees. Next, add the following computed property below the domainIdentifier declaration:
public var userActivityUserInfo: [NSObject: AnyObject] {
  return ["id": objectId]
}
This dictionary will serve as an attribute for your NSUserActivity to identify the activity. Now add another computed property named userActivity:
public var userActivity: NSUserActivity {
  let activity = NSUserActivity(activityType: Employee.domainIdentifier)
  activity.title = name
  activity.userInfo = userActivityUserInfo
  activity.keywords = [email, department]
  return activity
}
This property will come into play later to conveniently obtain an NSUserActivity instance for an employee. It creates new NSUserActivity and sets a few properties:
-
activityType: The type of activity that this represents. You’ll use this later to identifyNSUserActivityinstances that iOS provides to you. Apple suggests using reverse DNS formatted strings. -
title: The name of the activity — this will also appear as the primary name in a search result. -
userInfo: A dictionary of values for you to use however you wish. When the activity is passed to your app, such as when the user taps a search result in Spotlight, you’ll receive this dictionary. You’ll use it to store the unique employee ID, allowing you to display the correct record when the app starts. -
keywords: A set of localized keywords that help the user find the record when searching.
Next up, you are going to use this new userActivity property to make employee records searchable when the user views them. Since you added these definitions in the EmployeeKit framework, you’ll need to build the framework so that Xcode is aware they can be used from the Colleagues app.
Press Command-B to build the project.
Open EmployeeViewController.swift and add the following to the bottom of viewDidLoad():
let activity = employee.userActivity

switch Setting.searchIndexingPreference {
case .Disabled:
  activity.eligibleForSearch = false
case .ViewedRecords:
  activity.eligibleForSearch = true
}

userActivity = activity
This retrieves userActivity — the property you just created in the Employee extension. Then it checks the app’s search setting.
- If search is disabled, you mark the activity as ineligible for search.
- If the search setting is set to
ViewedRecords, then you mark the activity as eligible for search. - Finally, you set the view controller’s
userActivityproperty to your employee’s activity.
userActivity property on the view controller is inherited from UIResponder. It’s one of those things Apple added with iOS 8 to enable Handoff.The last step is to override updateUserActivityState(). This ensures that when a search result is selected you’ll have the information necessary.
Add the following method after viewDidLoad():
override func updateUserActivityState(activity: NSUserActivity) {
  activity.addUserInfoEntriesFromDictionary(
    employee.userActivityUserInfo)
}
During the lifecycle of UIResponder, the system calls this method at various times and you’re responsible for keeping the activity up to date. In this case, you simply provide the employee.userActivityUserInfo dictionary that contains the employee’s objectId.
Great! Now when you pull up an employee, that bit of history will be tracked and become searchable, provided the setting is turned on.
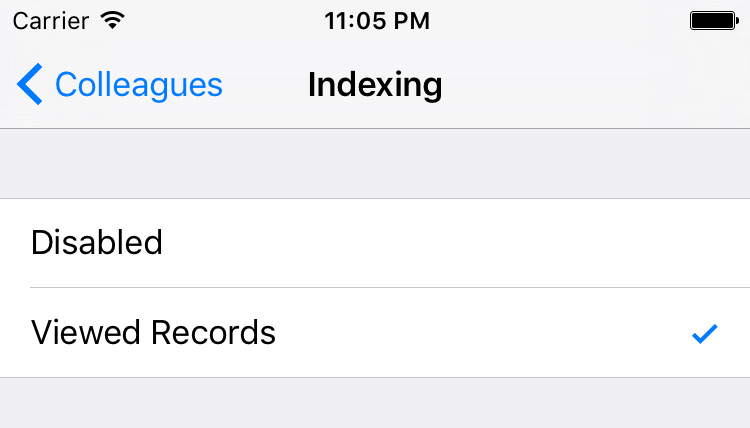
In the simulator or on your device, open the Settings app and scroll down to Colleagues. Change the Indexing setting to Viewed Records.
Now, build and run the app and select Brent Reid.
Okay, so it doesn’t look like anything spectacular happened, but behind the scenes, Brent’s activity is being added to the search index. Exit to the home screen (⇧⌘H) and bring up Spotlight by either swiping down from the middle of the screen or swiping all the way to the left of your home screen pages. Type brent reid into the search.
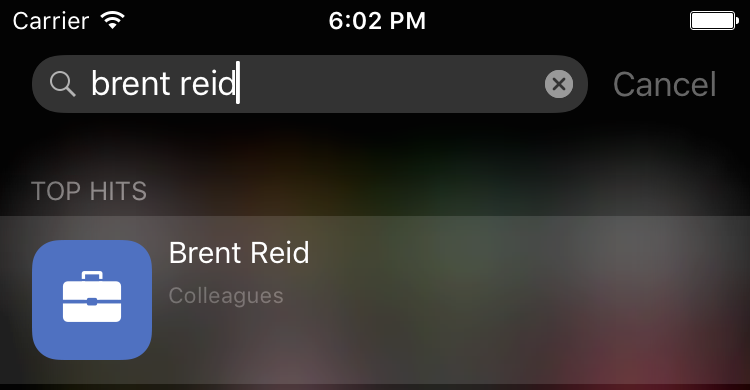
And there’s Brent Reid! If you don’t see him, you may need to scroll past other results. And if you tap on it, it should move up the list next time you perform the same search.

Now, of course this is awesome, but the result is a little…bland.
Surely you can do more than give a name? Time to crack open the Core Spotlight framework and discover how.
Adding more information to search results
NSUserActivity has a property named contentAttributeSet. It is of the type CSSearchableItemAttributeSet, which allows you to describe your content with as many attributes as necessary. Review the CSSearchableItemAttributeSet class reference to see the many ways to describe your content with these attributes.
Below is the desired result, complete with each component’s property name called out:

You’ve already set title on NSUserActivity, and at the moment it’s all you see. The other three, thumbnailData, supportsPhoneCall and contentDescription are all properties of CSSearchableItemAttributeSet.
Open EmployeeSearch.swift. At the top, import MobileCoreServices:
import MobileCoreServices
MobileCoreServices is required for a special identifier that you’ll use to create the CSSearchableItemAttributeSet instance. You’ve already imported CoreSpotlight, which is required for all of the APIs prefixed with CS.
Still in EmployeeSearch.swift, add a new computed property named attributeSet to the Employee extension:
public var attributeSet: CSSearchableItemAttributeSet {
  let attributeSet = CSSearchableItemAttributeSet(
    itemContentType: kUTTypeContact as String)
  attributeSet.title = name
  attributeSet.contentDescription = "\(department), \(title)\n\(phone)"
  attributeSet.thumbnailData = UIImageJPEGRepresentation(
    loadPicture(), 0.9)
  attributeSet.supportsPhoneCall = true

  attributeSet.phoneNumbers = [phone]
  attributeSet.emailAddresses = [email]
  attributeSet.keywords = skills

  return attributeSet
}
When initializing CSSearchableItemAttributeSet, an itemContentType parameter is required. You then pass in kUTTypeContact from the MobileCoreServices framework. (Read about these types on Apple’s UTType Reference page.)
The attribute set contains the relevant search metadata for the current employee: title is the same as the title from NSUserActivity, contentDescription contains the employee’s department, title and phone number, and thumbnailData is the result of loadPicture() converted to NSData.
To get the call button to appear, you must set supportsPhoneCall to true and provide a set of phoneNumbers. Finally, you add the employee’s email addresses and set their various skills as keywords.
Now that these details are included, Core Spotlight will index each and pull the results during a search. This means that your users can now search for coworkers by name, department, title, phone number email and even skills!
Still in EmployeeSearch.swift, add the following line above the return in userActivity:
activity.contentAttributeSet = attributeSet
Here you tell the contentAttributeSet from NSUserActivity to use this information.
Build and run. Open Brent Reid’s record so the index can do its thing. Now go to the home screen pull up Spotlight and search for “brent reid”. If your previous search is still there, you’ll need to clear it and search again.

Voila! Aren’t you amazed with how little code it took to pull this off?
Great work! Now Spotlight can search for colleagues the user previously viewed. Unfortunately, there is one glaring omission…try opening the app from the search result. Nothing.