StoreKit Testing in Xcode 12: Getting Started
Learn to use the new StoreKit testing framework to exercise your in-app purchases right inside Xcode. By Saleh Albuga.
Sign up/Sign in
With a free Kodeco account you can download source code, track your progress, bookmark, personalise your learner profile and more!
Create accountAlready a member of Kodeco? Sign in
Sign up/Sign in
With a free Kodeco account you can download source code, track your progress, bookmark, personalise your learner profile and more!
Create accountAlready a member of Kodeco? Sign in
Sign up/Sign in
With a free Kodeco account you can download source code, track your progress, bookmark, personalise your learner profile and more!
Create accountAlready a member of Kodeco? Sign in
Contents
StoreKit Testing in Xcode 12: Getting Started
30 mins
- Getting Started
- Creating StoreKit Configuration Files
- Adding Salad Recipes
- Adding Healthy Coins
- Adding Newsletter Subscriptions
- Testing in Xcode During Development
- Testing Non-Consumables
- Simulating Ask to Buy
- Testing Consumables
- Simulating Other Storefronts
- Testing Subscriptions
- Deleting Transactions
- Deleting a Subscription
- Simulating Refunds
- Comparing Testing in Xcode to The Sandbox Environment
- Automating StoreKitTest Tests
- Testing Receipt Validation
- Starting Automated Testing
- Testing First Time Purchases
- Testing Interrupted Purchases
- Testing Subscriptions
- Where to Go From Here?
While building iOS apps is a fun process, testing in-app purchases, or IAPs, can be finicky and prone to errors. You used to first create sandbox testers, then log into your testing devices to test purchases in the sandbox environment. A tedious process that often caused unnecessary frustrations.
With Xcode 12, Apple introduced local StoreKit testing in Xcode. Now you can test different IAP scenarios without connecting to the App Store servers! Instead, you only need to set up a local testing environment in Xcode.
In this tutorial, you’ll:
- Work with StoreKit Configuration Files
- Test making different kinds of purchases locally in Xcode
- Manage transactions made in the Xcode environment
- Use the StoreKitTest framework to automate testing common scenarios
For this tutorial, you should be familiar with IAPs and StoreKit.
Getting Started
Download the starter project by clicking the Download Materials button at the top or bottom of the tutorial. Open the project. Build and run.
It doesn’t do much now, but it’s going to be delicious!
You’ll work on a salad recipe app called GreenBar. It lets users purchase salad recipes and award Healthy Coins to the author when they like a recipe.
Switch to the Coins tab.
You don’t have any coins yet but you will soon!
The app has three main views: ProductsView.swift, RecipeView.swift and CoinsView.swift.
-
ProductsView
is the menu where users view and purchase recipes. -
RecipeView
displays a purchased recipe’s content. -
CoinsView
shows the coins balance and bundles available for purchase.
In the GreenBar folder, you’ll also find GreenBarContent.swift and IAPHelper.swift.
-
GreenBarContent
is a simple struct with information about the recipes sold in the app. -
IAPHelper
calls StoreKit methods and implements its delegate methods. It has everything you need to handle IAPs.
Now check out the Receipt folder. You’ll see IAPReceipt.swift, Receipt.swift and ASN1Helpers.swift. They have everything you need to load an IAP receipt, read its content and validate it locally.
You’ll find GreenBar products already defined in the code. Open GreenBarContent.swift and check the definitions at the top.
// Recipes, non-consumables
public static let caesarSalad = "com.raywenderlich.GreenBar.recipes.caesar"
public static let easyPastaSalad =
"com.raywenderlich.GreenBar.recipes.easypasta"
public static let healthyTacoSalad =
"com.raywenderlich.GreenBar.recipes.healthytaco"
public static let tartCherrySalad =
"com.raywenderlich.GreenBar.recipes.tartcherrysalad"
// Coins, consumables
public static let coins10 = "com.raywenderlich.GreenBar.coins.10"
public static let coins20 = "com.raywenderlich.GreenBar.coins.20"
// Subscriptions
public static let greenTimes =
"com.raywenderlich.GreenBar.newsletters.greentimes"
public static let ketoNews = "com.raywenderlich.GreenBar.newsletters.ketonews"
These are the IAP’s product IDs. They’re organized in three groups:
- Recipes, non-consumables
- Coins, consumables
- Subscriptions
With the starter project covered, you’ll move on to creating StoreKit configuration files.
Creating StoreKit Configuration Files
Before you test IAPs in Xcode, you need to set up the local environment where you’ll make purchases without connecting to the App Store servers. StoreKit configuration files contain the IAPs and data you’d enter in App Store Connect when you create an IAP. This data includes name, product ID, price, localizations and subscription duration.
Data in StoreKit configuration files are independent of App Store Connect data. You can also mark non-consumable IAPs for Family Sharing. Additionally, you can set up introductory or promotional offers for auto-renewable subscriptions.
You’ll see more scenarios later. Now, it’s time to add products to the app.
Adding Salad Recipes
Select the GreenBar group in Project navigator. Next, create a new group by selecting File ▸ New ▸ Group. Name your group StoreKit.
This is where you’ll put your StoreKit configuration files.
Now create your first StoreKit configuration. Select your group and choose File ▸ New ▸ File…. Look for StoreKit Configuration File in the menu of file types.
Name the file RecipesAndCoins.storekit. Then, select GreenBar as the target and click Create. Open the file and click + in the bottom left corner to add a new StoreKit item.
Select Add Non-Consumable In-App Purchase. As you can see, Xcode created a new IAP.
The salad recipes are non-consumables because users can purchase them once and restore them later. You’ll start by creating the recipes’ IAPs. Look at the recipes’ product IDs in the first group of definitions in GreenBarContent.swift:
// Recipes, non-consumables
public static let caesarSalad = "com.raywenderlich.GreenBar.recipes.caesar"
public static let easyPastaSalad =
"com.raywenderlich.GreenBar.recipes.easypasta"
public static let healthyTacoSalad =
"com.raywenderlich.GreenBar.recipes.healthytaco"
public static let tartCherrySalad =
"com.raywenderlich.GreenBar.recipes.tartcherrysalad"
GreenBar’s product IDs follow this convention:
com.raywenderlich.GreenBar.[IAPType].[itemID]
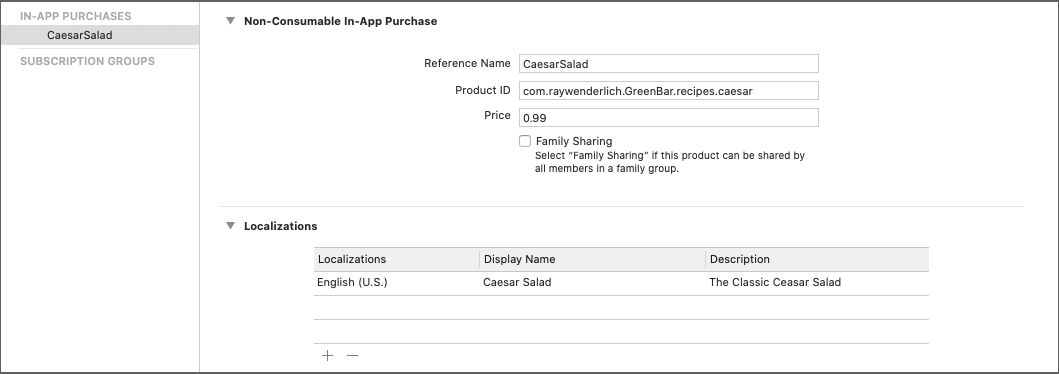
Go to RecipesAndCoins.storekit. Fill the following information for CaesarSalad in your new IAP:
- Reference Name: CaesarSalad
- Product ID: com.raywenderlich.GreenBar.recipes.caesar
- Price: 0.99
- Display Name: Caesar Salad
- Description: The Classic Caesar Salad
Now, one by one, add the rest of the recipes as Non-Consumable In-App Purchases with the following information:
Easy Pasta Salad
- Reference Name: EasyPastaSalad
- Product ID: com.raywenderlich.GreenBar.recipes.easypasta
- Price: 0.99
- Display Name: Easy Pasta Salad
- Description: Light and Easy!
Healthy Taco Salad
- Reference Name: HealthyTacoSalad
- Product ID: com.raywenderlich.GreenBar.recipes.healthytaco
- Price: 0.99
- Display Name: Healthy Taco Salad
- Description: A Healthy and Delicious Taco in a Bowl
Tart Cherry Salad
- Reference Name: TartCherrySalad
- Product ID: com.raywenderlich.GreenBar.recipes.tartcherrysalad
- Price: 0.99
- Display Name: Tart Cherry Salad
- Description: Sweet, Refreshing and Finely Chopped!
With the recipes in place, you’ll now add healthy coins.
Adding Healthy Coins
Check the second group of product IDs in GreenBarContent.swift:
// Coins, consumables
public static let coins10 = "com.raywenderlich.GreenBar.coins.10"
public static let coins20 = "com.raywenderlich.GreenBar.coins.20"
GreenBar users can purchase ten Coins for $4.99 or 20 coins for $8.99. They can give recipe authors coins if they like a recipe.
In RecipesAndCoins.storekit, add the following Consumable IAPs:
10 Coins
- Reference Name: 10Coins
- Product ID: com.raywenderlich.GreenBar.coins.10
- Price: 4.99
- Display Name: 10 Healthy Coins
20 Coins
- Reference Name: 20Coins
- Product ID: com.raywenderlich.GreenBar.coins.20
- Price: 8.99
- Display Name: 20 Healthy Coins
You’ve now added both recipes and coins to RecipesAndCoins.storekit. Next, you’ll add the last purchase type: a subscription.
Adding Newsletter Subscriptions
You’ll add the subscriptions in a separate StoreKit configuration file. This makes testing the app’s IAP logic easier.
First, create a new StoreKit configuration file in the same StoreKit group. Name it Subscriptions.storekit. As before, select GreenBar as the target.
Go back to GreenBarContent.swift and check the third group of product IDs:
// Subscriptions
public static let greenTimes =
"com.raywenderlich.GreenBar.newsletters.greentimes"
public static let ketoNews = "com.raywenderlich.GreenBar.newsletters.ketonews"
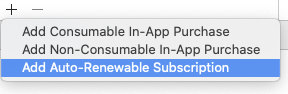
These are newsletters GreenBar offers users. Click + in the bottom left corner and select Add Auto-Renewable Subscription.
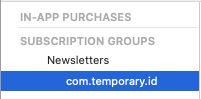
Xcode prompts you to add a subscription group the first time you add an auto-renewable subscription.
Name the group Newsletters and click Done. Now, Xcode will create a group with a new subscription item.
Select it and fill the GreenTimes newsletter details below:
- Reference Name: GreenTimes
- Product ID: com.raywenderlich.GreenBar.newsletters.greentimes
- Price: 11.99
- Subscription Duration: 1 Month
- Display Name: GreenTimes
- Description: The lovely curated monthly newsletter
Add another auto-renewable subscription in the same subscription group for the KetoNews newsletter:
- Reference Name: KetoNews
- Product ID: com.raywenderlich.GreenBar.newsletters.ketonews
- Price: 6.99
- Subscription Duration: 1 Month
- Display Name: KetoNews
- Description: KetoNews Newsletter
With all the products in place, it’s time to start testing in Xcode.
Testing in Xcode During Development
You added all the products in StoreKit configuration files. Before testing, you need to learn a couple of settings.
First, click the scheme GreenBar ▸ Edit Scheme. In the Scheme window, select Run on the left. Then select Options at the top.
See the new StoreKit Configuration option. That’s where you’ll set the StoreKit configuration file you want to test with. Click its combo box.
You’ll see the StoreKit configuration files you created!
Once you set a configuration file, StoreKit uses the data in that file when your app calls StoreKit APIs instead of communicating with the App Store servers. For now, leave the option as None.
Close the scheme editor.
Then, open one of the StoreKit configuration files and click Editor.
Here you can configure the local environment to test different IAP scenarios like:
- Test with a different storefront to see how your app looks and behaves with prices in different currencies.
- Test with a different localization to see how the description and title look in other localizations.
- Simulate Ask to Buy when purchasing from a family subscription with parental approval.
- Simulate different StoreKit transaction errors and how your app handles them.
- Change subscriptions expiry time rate.
- Simulate interrupted purchases. These are transactions that require users to perform an action related to their Apple ID before making a purchase.
Finally, go to Debug ▸ StoreKit ▸ Manage Transactions….
This is the transaction manager where you’ll see all the transactions made in Xcode. You can use the transaction manager to:
- Delete transactions: Made a transaction and found a bug in your code? Delete and purchase again it like it never happened.
- Refund transactions
- Approve or decline transactions when Ask to Buy is enabled.
- Resolve transactions: Simulate users resolving an interrupted purchase.
Testing Non-Consumables
Set RecipesAndCoins.storekit as the active StoreKit Configuration in the scheme as you saw above.
Now build and run.
You can see the recipes you’ve added! StoreKit now uses RecipesAndCoins.storekit as the back end instead of the sandbox environment.
Now, buy the Easy Pasta Salad.
Then, tap Confirm.
You got the confirmation, have the recipe and the app made it available for you! Note the alert is showing Xcode as the environment. Tap the recipe to open it.
To see the transaction, open the transaction manager from Debug ▸ StoreKit ▸ Manage Transactions…
The transaction manager shows the purchase you made as well as its type and time.
You successfully tested your first purchase in Xcode! Because you were able to access the recipe content, you now know GreenBar is handling purchases as it should.
Next, you’ll add a useful feature for parents.
Simulating Ask to Buy
With the introduction of Ask to Buy, family organizers can control Family Sharing for any non-adult family members. When kids want to buy a new item, they send a request to their family organizer who then approves or declines the requests. When testing your app, you should consider this a scenario.
First, open RecipesAndCoins.storekit. Then select Editor ▸ Enable Ask to Buy from the menu.
Next, build and run. Buy the Healthy Taco Salad and tap Confirm in the App Store sheet.
You got the alert kids would see when buying items if they have Ask to Buy enabled. Tap Ask and open the transactions manager again.
The transaction shows as Pending Approval. Look at the transaction controls at the top right:
These controls let you manage transactions in Xcode. They’re enabled or disabled based on the transaction state.
For example, Approve Transactions and Decline Transactions are enabled because this transaction is pending approval. But Refund Purchases and Resolve Issues are disabled because this transaction isn’t complete yet. Delete Transactions is also enabled.
Since this is a testing environment, you can approve your requests. :] Click Approve Transactions and switch back to the simulator.
The app received the notification about the completed transaction and unlocked the recipe!
Take a moment to appreciate how easy it was to test this otherwise complex flow. Awesome, right?
Next, you’ll test consumables by buying and awarding coins.
Testing Consumables
Did you like the healthy taco salad? Then it’s time to support giving the author some coins for their hard work!
First, you need to disable Ask to Buy. Open the configuration file and select Editor ▸ Disable Ask to Buy.
Then build and run. Next, switch to the Coins tab.
You don’t have any coins at the moment so buy 10 Healthy Coins.
The app updates the Coins Balance to show you now have ten coins! Note how you can buy the same IAP several times since it’s a consumable.
Switch to the Products tab and open the Healthy Taco Salad recipe.
Tap Give 5 Coins to give the author five healthy coins!
Now, switch back to the Coins tab.
You have five coins left. Now you know the app is appropriately handling coin purchases. When you give coins, the app deducts them from your balance and displays the new balance.
Open the transaction manager to see this transaction.
Next, you’ll learn how to simulate other storefronts to test the experience of purchasing in different countries.
Simulating Other Storefronts
When you added the products to StoreKit configuration files, you entered the prices without selecting a currency. That’s because the price is a testing value that’s not connected to price tiers in the App Store or real pricing information. However, StoreKit displays the correct currency symbols for the storefront you’re testing.
You can change the default storefront in the local environment.
Open RecipesAndCoins.storekit and select Editor ▸ Default Storefront. Select Spain (EUR). Build and run.
The prices now display in Euros.
Before continuing, change it back to United States (USD) again.
Next, you’ll focus on testing subscriptions.
Testing Subscriptions
First, change the active StoreKit configuration file in the scheme to Subscriptions.storekit.
Then, build and run.
The app now shows the newsletter subscriptions instead of the recipes because you changed the configuration file.
Now, subscribe to GreenTimes.
Tap Confirm.
You’ve subscribed to the GreenTimes newsletter! Open the transaction manager to see the transaction. From here you can also see Subscription Options to further debug subscription flows.
Next, you’ll learn how to delete transactions.
Deleting Transactions
During development, you often need to perform a new purchase of a non-consumable or subscription item to test a scenario or find a bug. The sandbox environment required a new sandbox tester and email address each time. The process was inconvenient.
Sandbox treated repeated purchases using the same sandbox tester as restoring an already purchased item. As a result, code specific to new purchases didn’t execute.
Fortunately, testing this in the local environment is much easier!
First, open IAPHelper.swift. In the SKPaymentTransactionObserver
extension, add the following code below paymentQueue(_:updatedTransactions:)
:
public func paymentQueue(
_ queue: SKPaymentQueue,
didRevokeEntitlementsForProductIdentifiers productIdentifiers: [String]
) {
for identifier in productIdentifiers {
purchasedProductIdentifiers.remove(identifier)
UserDefaults.standard.removeObject(forKey: identifier)
deliverPurchaseNotificationFor(identifier: identifier)
}
}
paymentQueue(_:didRevokeEntitlementsForProductIdentifiers:)
is a delegate method introduced in iOS 14. StoreKit calls it whenever App Store, or the local environment in this case, revokes IAPs for the user. In Xcode, an IAP is revoked when the transaction is deleted or refunded from the transaction manager.
Here, the method removes the revoked product from purchasedProductIdentifiers
and UserDefaults
. Then, it posts a notification to subscribers that reflects the changes. ProductsView
reloads the products and locks the revoked product content as if it wasn’t purchased.
paymentQueue(_:didRevokeEntitlementsForProductIdentifiers:)
is not called in either of those versions when deleting or refunding a transaction in the local environment. I’ve reported the issue and it was acknowledged. It appears to be fixed in iOS 14.4.
Deleting a Subscription
In a previous section, you bought a subscription to GreenTimes. By default, the subscription Time Rate is Real Time which means the one month subscription you bought will auto-renew in a month!
Unless you have the time to wait, change it to a more realistic testing value. :]
Open Subscriptions.storekit. Then choose Editor ▸ Time Rate from the menu and select 1 Second is 1 Day.
Build and run.
Now open the transaction manager and select the GreenTimes subscription in your transaction manager log. Next, click delete transaction in the top right corner. Click Delete in the confirmation alert.
You removed the transaction from the transactions manager. Even better, you canceled your subscription and the app interface updated accordingly!
You can now re-subscribe as if you never subscribed in the first place. Give it a try by clicking Subscribe for GreenTimes.
Now that you’ve resubscribed, you’ll see a new transaction in the transaction manager. Not only that, you’ll see an auto-renewal transaction every 30 seconds!
You can tell it’s a renewal transaction because it refers to the original subscription purchase Transaction ID, in this case 4. This way, you can test if your app is handling the subscription logic properly.
Of course, not every recipe is a winner, so you’ll learn how to simulate refunds next.
Simulating Refunds
In addition to deleting transactions, you can also refund them. Change the active StoreKit configuration file to RecipesAndCoins.storekit. Build and run.
To simulate a refund, open the transaction manager. Then, find and select your previous transaction for Easy Pasta Salad.
You’ll see an enabled option for a purchased non-consumable is refunding. Click Refund Purchases.
The transaction state changed from Purchased to Refunded. In this case, paymentQueue(_:didRevokeEntitlementsForProductIdentifiers:)
is also called. GreenBar removes it from the app data and shows the content as available for purchase.
Comparing Testing in Xcode to The Sandbox Environment
In no time, you’ve tested almost all the common scenarios! Instead of starting from App Store Connect, now you can start from Xcode.
Testing from Xcode certainly takes less effort than testing in the sandbox environment. Here are some other important differences between testing in Xcode and Sandbox:
- Unlike Sandbox, Xcode signs receipts in the local environment, not by App Store.
- You can’t select App Store price tiers in StoreKit configuration files.
- If you want to test repurchasing non-consumables, you have to use Xcode.
- You can only test purchasing non-renewing subscriptions in Sandbox.
As you can see, you still need to test in the sandbox environment before releasing your app. You can only test server-to-server scenarios, like production receipt validation, in the sandbox environment.
Automating StoreKitTest Tests
Many developers find manual testing useful in the early stages of development. But when working on updates, manually testing all scenarios can be time-consuming.
In addition to StoreKit testing in Xcode, Apple also introduced the StoreKitTest framework with iOS 14. StoreKitTest lets you create and automate tests for your app’s IAP transactions. In this tutorial, you’ll write tests for four common scenarios:
- Receipt validation
- First time purchases
- Interrupted purchases
- Subscriptions
You’ll work with receipt validation first.
Testing Receipt Validation
Receipt validation is different in Xcode. While Apple’s root certificate signs receipts in Sandbox, a certificate local to Xcode signs receipts in Xcode.
To use the local Xcode certificate, you must first retrieve and store it in your Xcode project. Then you have to tell Xcode to use the certificate when locally validating receipts.
To get the certificate, first open a StoreKit configuration file. Then select Editor ▸ Save Public Certificate from the menu. Save the certificate in the provided Certificates folder.
Next, you’ll change the validation code to use that certificate. Receipt
is a helper class with an initializer that loads, reads and validates an IAP receipt.
Open Receipt.swift. Right before validateSigning(_:)
, you’ll find the certificate
definition:
let certificate = "AppleIncRootCertificate"
Replace the definition with:
#if DEBUG
let certificate = "StoreKitTestCertificate"
#else
let certificate = "AppleIncRootCertificate"
#endif
With this code, you told Xcode to use the local certificate when building the app in debug mode and Apple’s root certificate when building otherwise.
Next, in validateSigning(_:)
look for verificationResult
:
let verificationResult = PKCS7_verify(receipt, nil, store, nil, nil, 0)
And replace it with:
#if DEBUG
let verificationResult = PKCS7_verify(
receipt, nil, store, nil, nil, PKCS7_NOCHAIN
)
#else
let verificationResult = PKCS7_verify(receipt, nil, store, nil, nil, 0)
#endif
Here, you told Xcode there’s no certificate chain to validate in debug mode because the StoreKit test certificate is a root certificate.
Now with your local certificate in place, you’re ready to start automated testing! You’ll start with a simple test that reads an IAP receipt and validates it after purchasing a recipe.
Starting Automated Testing
Open GreenBarTests.swift and add the following line below import XCTest
:
import StoreKitTest
@testable import GreenBar
This code imports the StoreKitTest framework and your app so you can run tests against it.
Next, add the following test method inside GreenBarTests
:
func testReceiptValidation() throws {
// 1
let session = try SKTestSession(configurationFileNamed: "RecipesAndCoins")
session.resetToDefaultState()
session.disableDialogs = true
// 2
let identifier = GreenBarContent.tartCherrySalad
let expectation = XCTestExpectation(description: "Buy Content")
// 3
GreenBarContent.store.requestProductsAndBuy(
productIdentifier: identifier
) { _ in
// 4
let receipt = Receipt()
if let receiptStatus = receipt.receiptStatus {
let validationSucceeded = receiptStatus == .validationSuccess
XCTAssertTrue(validationSucceeded)
} else {
XCTFail("Receipt Validation failed")
}
expectation.fulfill()
}
wait(for: [expectation], timeout: 60.0)
}
Here’s a code breakdown:
- First, you create a
SKTestSession
and configure it with the ReceiptsAndCoins configuration file. You also reset the session to its default state and disable any UI dialogs that might trigger during the session. - Next, you establish the product you want to test buying by using the Tart Cherry Salad’s product ID. You also create an expectation you’ll wait for because the test will run asynchronously.
- Then, you execute a purchase of the Tart Cherry Salad using
requestProductsAndBuy(productIdentifier:completionHandler:)
fromIAPHelper
instancestore
. It talks to StoreKit, persists the purchase and updates the app content accordingly. - Finally, after the purchase, you check the receipt validating the purchase was successful.
SKTestSession
‘s initializer.
Those two actions serve the same purpose: Telling Xcode which set of products you want to load into the test environment. In fact, all the StoreKit configuration settings you saw in Editor are configurable in code using SKTestSession
‘s properties.
Run your test by clicking the diamond test indicator located to the left of testReceiptValidation()
. Alternatively, you can also run the test by pressing Command-U. Your test passes!
Next, you’ll test first time purchases.
Testing First Time Purchases
It’s important to test first-time purchases to ensure sure your app correctly handles users purchasing new content.
Replace testReceiptValidation()
with:
func testNonConsumablePurchase() throws {
// 1
let session = try SKTestSession(configurationFileNamed: "RecipesAndCoins")
session.resetToDefaultState()
session.disableDialogs = true
session.clearTransactions()
// 2
let identifier = GreenBarContent.caesarSalad
let expectation = XCTestExpectation(description: "Buy Content")
GreenBarContent.store.requestProductsAndBuy(
productIdentifier: identifier
) { _ in
// 3
let contentAvailable = GreenBarContent.store.receiptContains(identifier)
let contentSaved = GreenBarContent.store.isProductPurchased(identifier)
XCTAssertTrue(
contentAvailable,
"Expected \(identifier) is present in receipt")
XCTAssertTrue(
contentSaved,
"Expected \(identifier) is stored in PurchasedProducts")
expectation.fulfill()
}
wait(for: [expectation], timeout: 60.0)
}
This test is similar to the last. Here’s what your code does:
- Like previous test, this test starts by preparing a
SKTestSession
. However, you’re testing first time purchases so you callclearTransactions()
to delete all past transactions and start from scratch. - You set
identifier
to the Caesar Salad product ID. - Finally, you make sure the receipt contains the product ID. You also make sure the product ID appears in your purchased products list.
Run your test by pressing Command-U. Like before, the green diamond with a checkmark indicates your test passes!
Now, you’ll test interrupted purchases.
Testing Interrupted Purchases
Interrupted purchases are transactions that ask users to perform an action related to their Apple ID before completing. For example, a user might have to update payment information.
To test an interrupted purchase, replace testNonConsumablePurchase()
with:
func testInterruptedPurchase() throws {
let session = try SKTestSession(configurationFileNamed: "RecipesAndCoins")
session.resetToDefaultState()
session.disableDialogs = true
// 1
session.interruptedPurchasesEnabled = true
session.clearTransactions()
let identifier = GreenBarContent.healthyTacoSalad
let expectation = XCTestExpectation(description: "Buy Content")
GreenBarContent.store.requestProductsAndBuy(
productIdentifier: identifier
) { _ in
let contentAvailable = GreenBarContent.store.receiptContains(identifier)
let contentSaved = GreenBarContent.store.isProductPurchased(identifier)
// 2
XCTAssertFalse(
contentAvailable,
"Expected \(identifier) is not present in receipt")
XCTAssertFalse(
contentSaved,
"Expected \(identifier) is not stored in PurchasedProducts")
expectation.fulfill()
}
wait(for: [expectation], timeout: 60.0)
}
This test is almost identical to the previous one, except for two key differences:
- You set
SKTestSession
‘sinterruptedPurchasesEnabled
totrue
to simulate an interrupted purchase. - Because it’s an interrupted purchase you expect the product isn’t in the receipt or your previous purchases.
Run your test with Command-U and watch for the green checkmark.
Finally, it’s time to test subscriptions.
Testing Subscriptions
Your final test exercises GreenBar’s ability to create and expire subscriptions. Replace testInterruptedPurchase()
with:
func testSubscription() throws {
// 1
let session = try SKTestSession(configurationFileNamed: "Subscriptions")
session.resetToDefaultState()
session.disableDialogs = true
session.clearTransactions()
// 2
let identifier = GreenBarContent.greenTimes
let expectation = XCTestExpectation(description: "Buy Content")
GreenBarContent.store.requestProductsAndBuy(
productIdentifier: identifier
) { _ in
// 3
let contentAvailable = GreenBarContent.store.receiptContains(identifier)
var contentSaved = GreenBarContent.store.isProductPurchased(identifier)
XCTAssertTrue(
contentAvailable,
"Expected \(identifier) is present in receipt")
XCTAssertTrue(
contentSaved,
"Expected \(identifier) is stored in PurchasedProducts")
// 4
var hasExpired = GreenBarContent.store.checkSubscriptionExpiry(identifier)
XCTAssertFalse(hasExpired, "Expected \(identifier) has not expired")
// 5
try? session.expireSubscription(productIdentifier: identifier)
hasExpired = GreenBarContent.store.checkSubscriptionExpiry(identifier)
contentSaved = GreenBarContent.store.isProductPurchased(identifier)
XCTAssertTrue(hasExpired, "Expected \(identifier) has expired")
XCTAssertFalse(
contentSaved,
"Expected \(identifier) is not stored in PurchasedProducts")
expectation.fulfill()
}
wait(for: [expectation], timeout: 90.0)
}
subscriptionExpirationDate
does not change in the local receipt after calling expireSubscription(productIdentifier:)
in later iOS versions. This appears still to be a problem in iOS 14.4.
This test looks a little longer but it’s simple! Here’s how it works:
- First, you create a new
SKTestSession
. However, this time you initialize it with your Subscriptions. - Next, you set the product you want to purchase to the Green Times newsletter product ID.
- After you purchase the subscription, you check if the receipt shows the Green Times newsletter ID. You also check if the newsletter is available in your purchased products.
- Then, you make sure the subscription you set up hasn’t expired.
- Last, you expire the subscription and make sure its no longer in your purchased products.
Run your last test and see that it passes.
Where to Go From Here?
You can download the final project using the Download Materials button at the top or bottom of this tutorial.
In a short time, you tested the basic IAP scenarios in Xcode. You also automated those tests with the StoreKitTest framework. Now testing IAPs during development is easier than ever!
For more about receipt validation, see In-App Purchases: Receipt Validation Tutorial. Apple also has a Receipt Validation Programming Guide.
Here are more resources to check from Apple’s documentation:
I hope you enjoyed this tutorial. If you have any questions or comments, please join the forum below!
All videos. All books.
One low price.
A Kodeco subscription is the best way to learn and master mobile development — plans start at just $19.99/month! Learn iOS, Swift, Android, Kotlin, Flutter and Dart development and unlock our massive catalog of 50+ books and 4,000+ videos.
Learn more