CallKit Tutorial for iOS
Learn how your app can use CallKit for system-level phone integration and how to build a directory extension for call blocking and identification. By Andrew Kharchyshyn.
Sign up/Sign in
With a free Kodeco account you can download source code, track your progress, bookmark, personalise your learner profile and more!
Create accountAlready a member of Kodeco? Sign in
Sign up/Sign in
With a free Kodeco account you can download source code, track your progress, bookmark, personalise your learner profile and more!
Create accountAlready a member of Kodeco? Sign in
Sign up/Sign in
With a free Kodeco account you can download source code, track your progress, bookmark, personalise your learner profile and more!
Create accountAlready a member of Kodeco? Sign in
Contents
CallKit Tutorial for iOS
30 mins
- Getting Started
- What is CallKit?
- CXProvider
- CXCallController
- Incoming Calls
- ProviderDelegate
- CXProviderDelegate
- Test Flight
- Ending the Call
- CXProviderDelegate
- Requesting Transactions
- Other Provider Actions
- Handling Outgoing Calls
- Starting the Call
- Managing Multiple Calls
- Creating a Call Directory Extension
- Settings Setup
- Where to Go From Here?
Life on iOS wasn’t always perfect for VoIP (Voice over IP) app developers. In particular, delivering notifications was tough. With your app in the background, a user’s only option was a regular notification, which is easy to miss. Without a rich, built-in call UI, your app wouldn’t feel very integrated.
Fortunately, Apple introduced CallKit in iOS 10!
In this tutorial you’ll get a glimpse of CallKit’s power by building an app that:
- Uses system services to report incoming and outgoing calls.
- Manages a call directory to identify or block incoming calls.
Getting Started
Download the starter project using the Download Materials button at the top or bottom of this tutorial. Then, set up code signing to debug the project on your device. Open the project file in Xcode and select Hotline in the Project navigator.
Start by changing the bundle identifier. With the project selected, go to the General tab and find the Identity section. Change the bundle identifier to something unique:
Next, look for the Signing section. Select your preferred development team (in my case, it’s my personal team) in the drop-down next to Team. Be sure to check Automatically manage signing. This allows Xcode to automatically create the provisioning profile for the app.
To test your setup, build and run the app on your iPhone.
Currently the app won’t do much, but you’ll notice that there are several source files in the starter project. Those files are mostly responsible for setting up the UI and handling user interactions. There are two main classes worth a look before moving on:
-
Call
represents a phone call. The class exposes properties for identifying calls (such as its UUID, or handle) as well as lifecycle callbacks indicating when the user starts, answers or ends a call. -
CallManager
currently maintains the list of ongoing calls in the app and has methods for adding or removing calls. You’ll expand this class further throughout the tutorial.
What is CallKit?
CallKit is a framework that aims to improve the VoIP experience by allowing apps to integrate with the native phone UI. By adopting CallKit, your app will be able to:
- Use the native incoming call screen in both the locked and unlocked states.
- Start calls from the native phone app’s Contacts, Favorites and Recents screens.
- Interplay with other calls in the system.
In this section, you’ll get more familiar with the CallKit architecture. The diagram below shows all the key players:
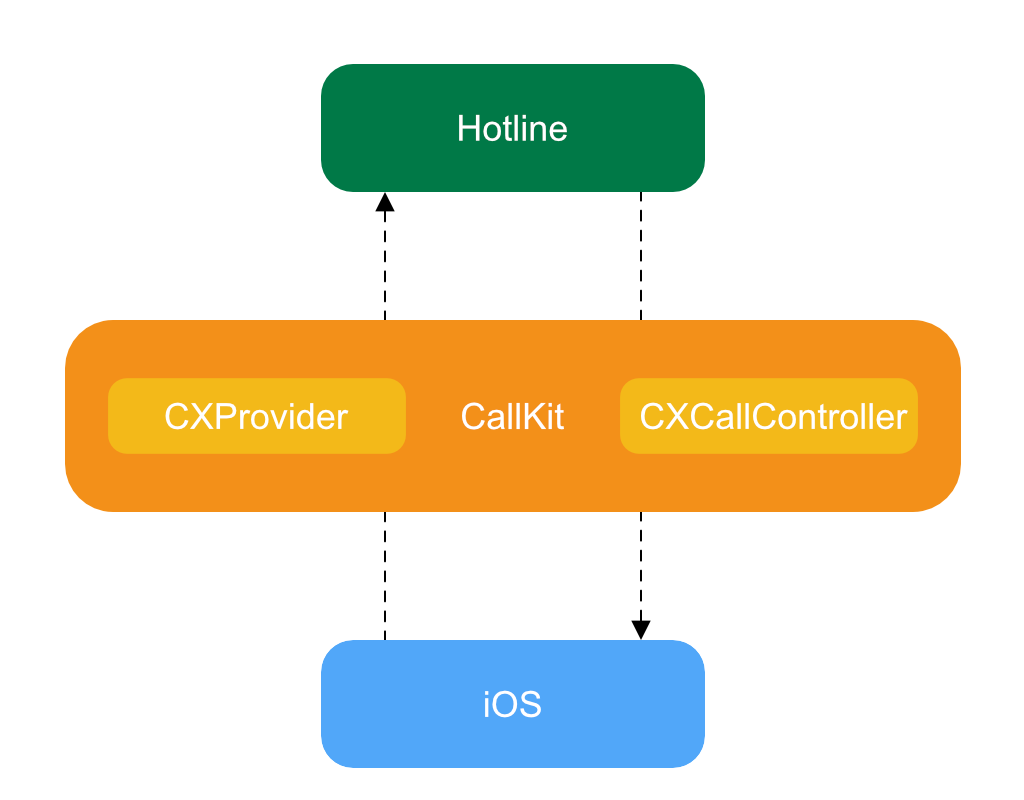
When working with CallKit, there are two primary classes you’ll interact with: CXProvider
and CXCallController
. Time to dive in!
CXProvider
Your app will use CXProvider
to report any out-of-band notifications to the system. These are usually external events, such as an incoming call.
When such an event occurs, CXProvider
creates a call update to notify the system. Call updates encapsulate new or changed call-related information. They are of the CXCallUpdate
class, which exposes properties such as the caller’s name or whether a call is video or audio-only.
When the system wants to notify the app of events, it usesCXAction
instances. CXAction
is an abstract class representing telephony actions. For each action, CallKit provides a different concrete implementation of CXAction
. For instance, CXStartCallAction
represents initiating an outgoing call, while CXAnswerCallAction
answers an incoming call. A unique UUID identifies each action, which can fail or fulfill.
Apps can communicate with CXProvider
through the CXProviderDelegate
protocol, which defines methods for provider lifecycle events and incoming actions.
CXCallController
The app will use CXCallController
to inform the system of user-initiated requests, such as a Start call action. This is the key difference between the CXProvider
and the CXCallController
: The provider reports to the system whereas the call controller makes requests from the system on behalf of the user.
The call controller uses transactions to make these requests. Transactions, represented by CXTransaction
, contain one or more CXAction
instances. The call controller sends transactions to the system. If everything is in order, the system responds with the appropriate action to the provider.
What does this look like in practice?
Incoming Calls
The diagram below shows a high-level overview of an incoming call flow:
- In response to an incoming call, the app constructs a
CXCallUpdate
and uses the provider to send it to the system. - The system publishes this as an incoming call to all of its services.
- When the user answers the call, the system sends a
CXAnswerCallAction
instance to the provider. - The app answers the call by implementing the appropriate
CXProviderDelegate
method.
ProviderDelegate
First, create the delegate for the provider. Head back to Xcode, and with the App group highlighted in the Project navigator, create a new file called ProviderDelegate.swift.
Add the following code to the file:
import AVFoundation
import CallKit
class ProviderDelegate: NSObject {
// 1.
private let callManager: CallManager
private let provider: CXProvider
init(callManager: CallManager) {
self.callManager = callManager
// 2.
provider = CXProvider(configuration: ProviderDelegate.providerConfiguration)
super.init()
// 3.
provider.setDelegate(self, queue: nil)
}
// 4.
static var providerConfiguration: CXProviderConfiguration = {
let providerConfiguration = CXProviderConfiguration(localizedName: "Hotline")
providerConfiguration.supportsVideo = true
providerConfiguration.maximumCallsPerCallGroup = 1
providerConfiguration.supportedHandleTypes = [.phoneNumber]
return providerConfiguration
}()
}
This is what’s happening in the code above:
- Store references to both the provider and the call controller. The provider delegate will interact with both of them.
- Initialize the provider with the appropriate
CXProviderConfiguration
, stored as a static variable below. A provider configuration specifies the behavior and capabilities of the calls. - Set the delegate to respond to events coming from the provider. This line will cause a build error, as
ProviderDelegate
doesn’t conform toCXProviderDelegate
yet. - In the case of Hotline, the provider configuration allows video calls and phone number handles and restricts the number of call groups to one. For further customization, refer to the CallKit documentation.
Just below the configuration, add the following helper method:
func reportIncomingCall(
uuid: UUID,
handle: String,
hasVideo: Bool = false,
completion: ((Error?) -> Void)?
) {
// 1.
let update = CXCallUpdate()
update.remoteHandle = CXHandle(type: .phoneNumber, value: handle)
update.hasVideo = hasVideo
// 2.
provider.reportNewIncomingCall(with: uuid, update: update) { error in
if error == nil {
// 3.
let call = Call(uuid: uuid, handle: handle)
self.callManager.add(call: call)
}
// 4.
completion?(error)
}
}
This helper method allows the app to call the CXProvider
API to report an incoming call. Here’s what’s going on:
- Prepare a call update for the system which will contain the relevant call metadata.
- Invoke
reportNewIncomingCall(with:update:completion)
on the provider to notify the system of the incoming call. - The completion handler will be called once the system processes the call. Assuming no errors, you create a
Call
instance and add it to the list of calls via theCallManager
. - Invoke the completion handler if it’s not
nil
.
Other classes in the app can invoke this method in order to simulate incoming calls.
CXProviderDelegate
The next step is to ensure protocol conformance. Still in ProviderDelegate.swift, declare a new extension to conform to CXProviderDelegate
:
// MARK: - CXProviderDelegate
extension ProviderDelegate: CXProviderDelegate {
func providerDidReset(_ provider: CXProvider) {
stopAudio()
for call in callManager.calls {
call.end()
}
callManager.removeAllCalls()
}
}
CXProviderDelegate
specifies only one required method, providerDidReset(_:)
. The provider invokes this method when reset, giving your app the opportunity to clean up any ongoing calls and revert to a clean state. In this implementation, you’ll terminate the ongoing audio session and dispose of any active calls.
Now that ProviderDelegate
offers a way to report incoming calls, it’s time to use it!
Open AppDelegate.swift and start by adding a new property to the class:
var providerDelegate: ProviderDelegate!
Add the following to application(_:didFinishLaunchingWithOptions:)
before the return
:
providerDelegate = ProviderDelegate(callManager: callManager)
The provider delegate is ready for use! Add the following method to AppDelegate.swift:
func displayIncomingCall(
uuid: UUID,
handle: String,
hasVideo: Bool = false,
completion: ((Error?) -> Void)?
) {
providerDelegate.reportIncomingCall(
uuid: uuid,
handle: handle,
hasVideo: hasVideo,
completion: completion)
}
This method lets other classes access the provider delegate’s helper method.
The final piece of the puzzle is hooking up this call to the user interface. Open CallsViewController.swift, which is the controller for the main screen of the app. Find the empty implementation of unwindForNewCall(_:)
and replace it with the following code:
// 1.
guard
let newCallController = segue.source as? NewCallViewController,
let handle = newCallController.handle
else {
return
}
let videoEnabled = newCallController.videoEnabled
// 2.
let backgroundTaskIdentifier =
UIApplication.shared.beginBackgroundTask(expirationHandler: nil)
DispatchQueue.main.asyncAfter(deadline: .now() + 1.5) {
AppDelegate.shared.displayIncomingCall(
uuid: UUID(),
handle: handle,
hasVideo: videoEnabled
) { _ in
UIApplication.shared.endBackgroundTask(backgroundTaskIdentifier)
}
}
The snippet does the following:
- Extracts the properties of the call from
NewCallViewController
, which is the source of this unwind segue. - The user can suspend the app before the action completes, so it should use a background task.
Test Flight
Now, build and run the application, and do the following:
- Tap the plus button (+) in the top right-hand corner.
- Enter any number, making sure to select Incoming in the segmented control, and tap Done.
- Lock the screen. This step is important since it’s the only way to access the rich, native in-call UI.
Within a few seconds, you’ll see the native incoming call UI:

It’s working!
However, as soon as you answer the call, you’ll notice that the UI remains stuck in the following state:

Or is it?
This is because you still have to implement the piece responsible for answering the call. Go back to Xcode, return to ProviderDelegate.swift, and add the following code to the class extension:
func provider(_ provider: CXProvider, perform action: CXAnswerCallAction) {
// 1.
guard let call = callManager.callWithUUID(uuid: action.callUUID) else {
action.fail()
return
}
// 2.
configureAudioSession()
// 3.
call.answer()
// 4.
action.fulfill()
}
// 5.
func provider(_ provider: CXProvider, didActivate audioSession: AVAudioSession) {
startAudio()
}
Here is the step-by-step breakdown:
- A reference comes from the call manager, corresponding to the UUID of the call to answer.
- The app configures the audio session for the call. The system activates the session at an elevated priority.
-
answer()
indicates that the call is now active. - When processing an action, it’s important to either fail or fulfill it. Assuming no errors during the process, you can call
fulfill()
to indicate success. - Once the system activates the provider’s audio session, the delegate is notified. This is your chance to begin processing the call’s audio.
Build and run the app, and start an incoming call again. When you answer the call, the system will successfully transition into an ongoing call state.

That’s more like it!
If you unlock your phone, you’ll notice that both iOS and the app now reflect the correct ongoing call state.

The ongoing call shown on the home screen, and the main screen of Hotline.
Ending the Call
Answering a call reveals a new problem: There’s currently no way to end a call. The app will support two ways of ending calls — from the native in-call screen and from within the app.
The diagram below shows what’s going on in both cases:
Notice the difference between steps 1a and 1b. When the user ends the call from the in-call screen (1a), the system automatically sends a CXEndCallAction
to the provider. However, if you want to end a call using Hotline (1b), it’s your job to wrap the action into a transaction and request it from the system. Once the system processes the request, it will send the CXEndCallAction
back to the provider.
CXProviderDelegate
However it supports ending calls, your app has to implement the necessary CXProviderDelegate
method for it to work. Open ProviderDelegate.swift and add the following implementation to the class extension:
func provider(_ provider: CXProvider, perform action: CXEndCallAction) {
// 1.
guard let call = callManager.callWithUUID(uuid: action.callUUID) else {
action.fail()
return
}
// 2.
stopAudio()
// 3.
call.end()
// 4.
action.fulfill()
// 5.
callManager.remove(call: call)
}
Here’s what’s going on:
- Start by getting a reference to the call from the call manager.
- As the call is about to end, it’s time to stop processing the call’s audio.
- Invoking
end()
changes the status of the call, allowing other classes to react to the new state. - At this point, you’ll mark the action as fulfilled.
- Since you no longer need the call, the call manager can dispose of it.
This takes care of the in-call UI. In order to end calls from the app, you’ll need to extend CallManager
.
Requesting Transactions
The call manager will communicate with CXCallController
, so it needs a reference to an instance. Add the following property to CallManager.swift:
private let callController = CXCallController()
Now add the following methods to the class:
func end(call: Call) {
// 1.
let endCallAction = CXEndCallAction(call: call.uuid)
// 2.
let transaction = CXTransaction(action: endCallAction)
requestTransaction(transaction)
}
// 3.
private func requestTransaction(_ transaction: CXTransaction) {
callController.request(transaction) { error in
if let error = error {
print("Error requesting transaction: \(error)")
} else {
print("Requested transaction successfully")
}
}
}
Here’s what’s happening:
- Create an End call action. Pass in the call’s UUID to the initializer so it can be identified later.
- Wrap the action into a transaction so you can send it to the system.
- Invoke
request(_:completion:)
from the call controller. The system will request that the provider perform this transaction, which will in turn invoke the delegate method you just implemented.
The final step is to hook up the action to the user interface. Open CallsViewController.swift and write the following call just below the tableView(_:cellForRowAt:)
implementation:
override func tableView(
_ tableView: UITableView,
commit editingStyle: UITableViewCell.EditingStyle,
forRowAt indexPath: IndexPath
) {
let call = callManager.calls[indexPath.row]
callManager.end(call: call)
}
When the user invokes swipe-to-delete on a row, the app will ask CallManager
to end the corresponding call.
Build and run the project on your device, and perform the following steps:
- Tap the plus button (+) in the right-hand corner.
- Enter any number, making sure to select Incoming in the segmented control, and tap Done.
- Within a few seconds, you’ll get an incoming call. Once you answer, you should see it listed as active on the UI.
- Swipe left on the row representing the active call and tap End.
At this point, your call will end. Neither the lock and home screens nor the app will report any ongoing calls.

Hanging up now!
Other Provider Actions
The documentation page of CXProviderDelegate shows that there are many more actions that the provider can perform, including muting and grouping or setting calls on hold. The latter sounds like a good feature for Hotline. Why not implement it now?
When the user wants to set the held status of a call, the app will send an instance of CXSetHeldCallAction
to the provider. It’s your job to implement the related delegate method. Open ProviderDelegate.swift and add the following implementation to the class extension:
func provider(_ provider: CXProvider, perform action: CXSetHeldCallAction) {
guard let call = callManager.callWithUUID(uuid: action.callUUID) else {
action.fail()
return
}
// 1.
call.state = action.isOnHold ? .held : .active
// 2.
if call.state == .held {
stopAudio()
} else {
startAudio()
}
// 3.
action.fulfill()
}
This code does the following:
- After getting the reference to the call, update its status according to the
isOnHold
property of the action. - Depending on the status, start or stop processing the call’s audio.
- Mark the action fulfilled.
Since this is also a user-initiated action, you’ll need to expand the CallManager
class as well. Open CallManager.swift and add the following implementation just below end(call:)
:
func setHeld(call: Call, onHold: Bool) {
let setHeldCallAction = CXSetHeldCallAction(call: call.uuid, onHold: onHold)
let transaction = CXTransaction()
transaction.addAction(setHeldCallAction)
requestTransaction(transaction)
}
The code is very similar to end(call:)
. In fact, the only difference between the two is that this one will wrap an instance of CXSetHeldCallAction
into the transaction. The action will contain the call’s UUID and the held status.
Now it’s time to connect this action to the UI. Open CallsViewController.swift and find the class extension marked with UITableViewDelegate
at the end of the file. Add the following implementation to the class extension, just below tableView(_:titleForDeleteConfirmationButtonForRowAt:)
:
override func tableView(
_ tableView: UITableView,
didSelectRowAt indexPath: IndexPath
) {
let call = callManager.calls[indexPath.row]
call.state = call.state == .held ? .active : .held
callManager.setHeld(call: call, onHold: call.state == .held)
tableView.reloadData()
}
When the user taps a row, the code above will update the held status of the corresponding call.
Build and run the application and start a new incoming call. If you tap the call’s cell, you’ll notice that the status label will change from Active to On Hold.
Handling Outgoing Calls
The final user-initiated action you’ll implement is making outgoing calls. Open ProviderDelegate.swift and add the following implementation to the CXProviderDelegate
class extension:
func provider(_ provider: CXProvider, perform action: CXStartCallAction) {
let call = Call(uuid: action.callUUID, outgoing: true,
handle: action.handle.value)
// 1.
configureAudioSession()
// 2.
call.connectedStateChanged = { [weak self, weak call] in
guard
let self = self,
let call = call
else {
return
}
if call.connectedState == .pending {
self.provider.reportOutgoingCall(with: call.uuid, startedConnectingAt: nil)
} else if call.connectedState == .complete {
self.provider.reportOutgoingCall(with: call.uuid, connectedAt: nil)
}
}
// 3.
call.start { [weak self, weak call] success in
guard
let self = self,
let call = call
else {
return
}
if success {
action.fulfill()
self.callManager.add(call: call)
} else {
action.fail()
}
}
}
The provider will invoke this delegate method when an outgoing call request is made:
- After creating a
Call
with the call’s UUID from the call manager, you’ll have to configure the app’s audio session. Just as with incoming calls, your responsibility at this point is only configuration. The actual processing will start later, whenprovider(_:didActivate)
is invoked. - The delegate monitors the call’s lifecycle. It’ll initially report that the outgoing call has started connecting. When the call is connected, the provider delegate will report that as well.
- Calling
start()
on the call triggers its lifecycle changes. Upon a successful connection, the call can be marked as fulfilled.
Starting the Call
Now that the provider delegate is ready to handle outgoing calls, it’s time to teach the app how to make one. Open CallManager.swift and add the following method to the class:
func startCall(handle: String, videoEnabled: Bool) {
// 1
let handle = CXHandle(type: .phoneNumber, value: handle)
// 2
let startCallAction = CXStartCallAction(call: UUID(), handle: handle)
// 3
startCallAction.isVideo = videoEnabled
let transaction = CXTransaction(action: startCallAction)
requestTransaction(transaction)
}
This method will wrap a Start call action into a CXTransaction
and request it from the system.
- A handle, represented by
CXHandle
, can specify the handle type and its value. Hotline supports phone number handles, so you’ll use it here as well. - A
CXStartCallAction
receives a unique UUID and a handle as input. - Specify whether the call is audio-only or a video call by setting the
isVideo
property of the action.
It’s time to hook up the new action to the UI. Open CallsViewController.swift and replace the previous implementation of unwindForNewCall(_:)
with the following:
guard
let newCallController = segue.source as? NewCallViewController,
let handle = newCallController.handle
else {
return
}
let videoEnabled = newCallController.videoEnabled
let incoming = newCallController.incoming
if incoming {
let backgroundTaskIdentifier =
UIApplication.shared.beginBackgroundTask(expirationHandler: nil)
DispatchQueue.main.asyncAfter(deadline: .now() + 1.5) {
AppDelegate.shared.displayIncomingCall(
uuid: UUID(),
handle: handle,
hasVideo: videoEnabled
) { _ in
UIApplication.shared.endBackgroundTask(backgroundTaskIdentifier)
}
}
} else {
callManager.startCall(handle: handle, videoEnabled: videoEnabled)
}
There’s one subtle change in the code: When incoming
is false, the view controller will ask the call manager to start an outgoing call.
That’s all you’ll need to make calls. It’s time to start testing! Build and run the app on your device. Tap the plus button in the right-hand corner to start a new call, but this time make sure that you select Outgoing from the segmented control.
At this point, you should see the new call appear in your list. You’ll also see different status labels based on the current stage of the call:
Managing Multiple Calls
What if a Hotline user receives multiple calls? You can simulate this by placing first an outgoing and then an incoming call and pressing the Home button before the incoming call comes in. At this point, the app presents the user with the following screen:
The system lets the user decide how to resolve the issue. Based on the user’s choice, it will combine multiple actions into a CXTransaction
. For example, if the user chooses to end the ongoing call and answer the new one, the system will create a CXEndCallAction
for the former and a CXStartCallAction
for the latter. Both actions will be wrapped into a transaction and sent to the provider, which will process them individually. If your app already knows how to fulfill the individual requests, your work is done!
You can test it by resolving the scenario above. The list of calls will reflect your choice. The app will only process one audio session at a time. If you choose to resume a call, the other will be put on hold automatically.
Creating a Call Directory Extension
The directory extension is a new extension point offered by CallKit. It allows your VoIP app to:
- Add phone numbers to the system’s block list.
- Identify incoming calls by their phone number or other uniquely identifying information such as email address.
When the system receives a call, it will check the address book for a match. If it doesn’t find one, it can also check in app-specific directory extensions. Why not add a directory extension to Hotline?
In Xcode, go to File ▸ New ▸ Target… and choose Call Directory Extension. Name it HotlineDirectory and click Finish. Xcode will automatically create a new file, CallDirectoryHandler.swift. Locate it in the Project navigator and see what’s inside.
The first method you’ll find is beginRequest(with:)
. Initializing your extension will invoke this method. In case of any errors, the extension will tell the host app to cancel the extension request by invoking requestFailed(for:withError:)
. It relies on two other methods to build the app-specific directory.
addAllBlockingPhoneNumbers(to:)
will collect all the phone numbers that should be blocked. Replace its implementation with the following:
let phoneNumbers: [CXCallDirectoryPhoneNumber] = [ 1234 ]
for phoneNumber in phoneNumbers {
context.addBlockingEntry(withNextSequentialPhoneNumber: phoneNumber)
}
Invoking addBlockingEntry(withNextSequentialPhoneNumber:)
with a given phone number will add it to the block list. The system telephony provider won’t display calls from a blocked number.
Now, take a look at addAllIdentificationPhoneNumbers(to:)
. Replace the method body with the code below:
let phoneNumbers: [CXCallDirectoryPhoneNumber] = [ 1111 ]
let labels = [ "RW Tutorial Team" ]
for (phoneNumber, label) in zip(phoneNumbers, labels) {
context.addIdentificationEntry(
withNextSequentialPhoneNumber: phoneNumber,
label: label)
}
Invoking addIdentificationEntry(withNextSequentialPhoneNumber:label:)
with a specified phone number and label will create a new identification entry. When the system receives a call from this number, the call UI will display the label that matches the user.
Settings Setup
It’s time to test your new extension. Build and run Hotline on your device. At this point your extension may not yet be active. To enable it, do the following steps:
- Go to the Settings app
- Select Phone
- Select Call Blocking & Identification
- Enable Hotline
Testing a blocked call is easy. Launch Hotline and simulate an incoming call from the number 1234. You’ll notice that the system doesn’t report anything. In fact, if you put a breakpoint in the implementation of reportIncomingCall(uuid:handle:hasVideo:completion:)
in ProviderDelegate
, you’ll notice that reportNewIncomingCall(withupdate:completion:)
will even report an error.
To test identifying calls, launch Hotline again and simulate a new call. This time, enter the number 1111. You’ll see the following call UI:
![FYI: That's not a real number. :]](https://koenig-media.raywenderlich.com/uploads/2019/02/IMG_0713-281x500.png)
FYI: That’s not a real number. :]
Congratulations! You’ve created an app which leverages CallKit to provide a first-party VoIP experience! :]
Where to Go From Here?
Download the completed project using the Download Materials button at the top or bottom of this tutorial.
If you wish to learn more about CallKit, check out Session 230 from WWDC 2016.
I hope you enjoyed this CallKit tutorial. If you have any questions or comments, please join the forum discussion below!