Getting Started with Cloud Firestore and SwiftUI

In this tutorial, you’ll learn how to use Firebase Cloud Firestore to add persistence to a SwiftUI iOS application with Swift. By Libranner Santos.

4.8 (11) · 2 Reviews

Download materials
Save for later
Share

Firebase, Google’s mobile back end as a service, offers app developers capabilities that go from Analytics to Distribution, all the way to Databases and Authentication. In this tutorial, you’ll learn about Cloud Firestore, a part of this suite of services, and how you can use it in conjunction with SwiftUI.

Cloud Firestore is a flexible NoSQL cloud database that lets developers store and sync app data in real time. You’ll use it to power FireCards, an app that helps users memorize concepts by creating cards.

Along the way, you’ll learn how to:

  • Set up Firestore.
  • Use MVVM to structure an scalable code base.
  • Manipulate data using Combine and Firestore.
  • Use anonymous authentication.

Getting Started

Download the starter project by using the Download Materials button at the top or bottom of this tutorial.

Firecards is a simple tool that lets users create cards by providing questions and answers. Later, they can test their memory by reading the questions and tapping over the cards to see if they answered correctly.

Currently, the app doesn’t have persistence, so users can’t do much with it. But you’ll solve that by adding Firestore to this SwiftUI app.

You won’t use it for a couple of steps, but open FireCards.xcodeproj in Xcode.

Note: This project uses Swift Package Manager to manage dependencies. Since the Firebase SDK is rather large, it’s recommended to open the project and let it fetch and resolve all dependencies, in the background, as you read this tutorial.

Setting Up Firebase

Before you can use Cloud Firestore, you need to create a Firebase account. Go to the Firebase website. On the top right corner, click Go to console. Then provide your Google account credentials or create one if you don’t have one already.

Next, click + Add project. A modal will appear asking for the name of your project. Type FireCards:

Firebase - Add New Project

The next step asks you to enable Google Analytics for your project. Since this tutorial doesn’t cover Analytics, disable it by clicking the toggle at the bottom. Then click Create project:

Firebase - Analytics Configuration

After a few seconds, you’ll see a message saying Your new project is ready. Click Continue, and you’ll see the project’s dashboard:

Firebase Dashboard

Here you can access all the Firebase services. Select the circle iOS button above Add an app to get started. Enter com.raywenderlich.firecards in the iOS Bundle ID field, and click Register app:

Setting Up Firebase

Download GoogleService-Info.plist and drag it into to the FireCards Xcode project, by following the outlined instructions:

Firebase - Download Configuration File

When prompted by Xcode, make sure Copy Items if needed is checked.

The next step asks you to add the Firebase SDK to your iOS app, which was already done for you. Click Next to move to the Add initialization code step.

Open AppDelegate.swift. Make sure you include Firebase by adding this import statement:

import Firebase

Next, add this code before the return statement in application(_:didFinishLaunchingWithOptions:):

FirebaseApp.configure()

On your Firebase project’s web page, click Next and then Continue to console:

Firebase - Final Step

This sends you back to your project’s overview page:

Firebase - Project Overview

You finished setting up Firebase and gave your app access to all the Firebase services. Next, you’ll configure Cloud Firestore.

Setting Up Cloud Firestore

On the left side menu, under Develop, click Cloud Firestore. Then, click Create database:

Firebase - Create Database

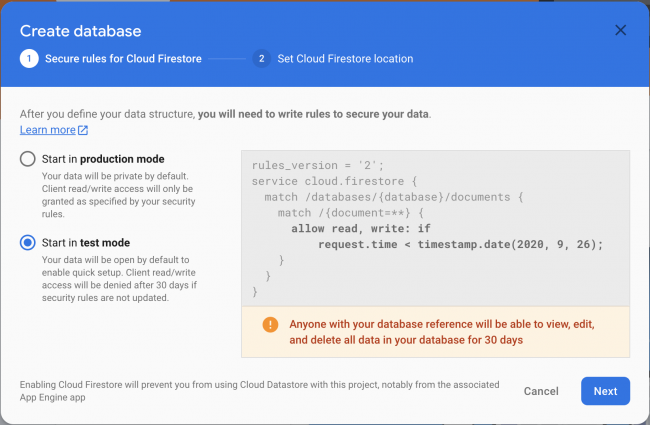
A modal will appear that shows you the next steps:

  • Set the Secure rules for Cloud Firestore.
  • Set Cloud Firestore location.

Firebase uses secure rules to handle authorization for data access. Select Start in test mode, which will make your data accessible for 30 days without authorization.

While this is OK for test projects, you should always set proper Security Rules. Fortunately, you’ll cover that later in Adding Authorization Using Security Rules.

Firebase - Secure Rules in Test Mode

Click Next. Now the assistant will ask you where you want to store the data.

Keep in mind, the location can affect your billing and can’t be changed later. For now, select nam5(us-central), and click Enable.

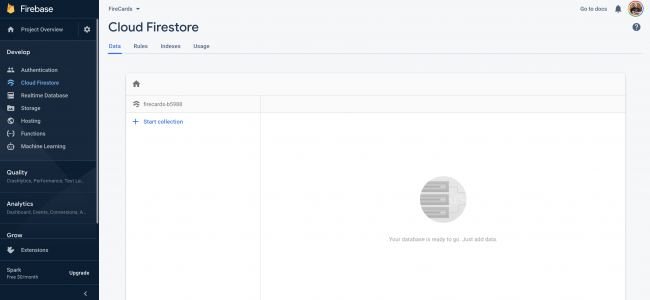
Now, Firebase will configure everything for you. Then, it’ll send you to the Cloud Firestore section of the Firebase project:

Firebase - Database Dashboard

Here, you’ll see how to insert, remove or update your data in real time. You can also manipulate it manually, if necessary.

Architecting the App Using MVVM

For this project, you’ll use Model-View-View Model, or MVVM, to architect the app’s components.

MVVM is a structural design pattern that separates the elements that compose the app into Views, View Models and Models. This design pattern helps developers separate business logic from the view and maintain the necessary separation of concerns to keep views and models agnostic from data sources and business logic.

Since you’ll use Cloud Firestore for data persistence, you’ll add a layer that handles the logic required to interact with the data source. For this project, you’ll use the repository pattern. This diagram shows the final representation of the app architecture:

App Architecture Diagram

  • Models hold app data. They’re a representation of the entities your app needs to manage.
  • Views constitute the visual elements that make up your app and are responsible for displaying the data in your models.
  • View Model makes the relationship between your models and your views possible by transforming the data in your models so it can be displayed in your views.
  • Repository represents the abstraction that handles the data source communication. In this case, the data source is Cloud Firestore. The View Model communicates with the Repository when it needs to do any operation with the data, and also notifies views about changes in the data.

Thinking in Collections and Documents

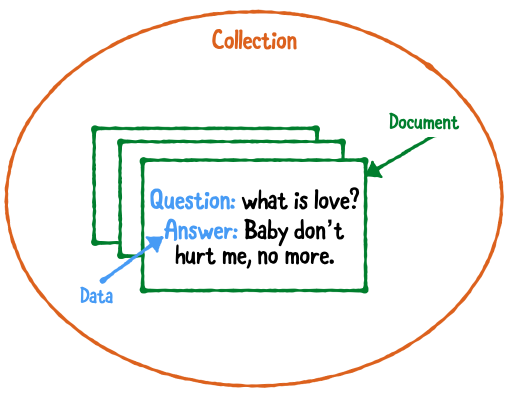
Cloud Firestore is a NoSQL database. It uses collections and documents to structure data.

Collections hold documents. These documents have fields that constitute the entities of your app, in this case, cards. So, a card is a document, and a group of cards is a collection.

Here’s a visual representation of the app’s data structure:

App's Data Structure

You can write queries to fetch data from the collection, or insert, update or remove documents. To accomplish this, you need to create a reference to the collection or a specific document using a unique identifier. When creating a new document, you can manually pass this identifier, or Cloud Firestore will create one for you.

Enough talk, time to code!

Adding New Cards

Start by creating the Repository to access the data.

In the Project navigator, right-click Repositories and click New file…. Create a new Swift file called CardRepository.swift and add the following code to it:

// 1
import FirebaseFirestore
import FirebaseFirestoreSwift
import Combine 

// 2
class CardRepository: ObservableObject {
  // 3
  private let path: String = "cards"
  // 4
  private let store = Firestore.firestore()

  // 5
  func add(_ card: Card) {
    do {
      // 6
      _ = try store.collection(path).addDocument(from: card)
    } catch {
      fatalError("Unable to add card: \(error.localizedDescription).")
    }
  }
}

Here you:

  1. Import FirebaseFirestore, FirebaseFirestoreSwift and Combine. FirebaseFirestore gives you access to the Firestore API and Combine provides a set of declarative APIs for Swift.

    FirebaseFirestoreSwift adds some cool functionalities to help you integrate Firestore with your models. It lets you convert Cards into documents and documents into Cards.

  2. Define CardRepository and make it conform to ObservableObject. ObservableObject helps this class emit changes, using a publisher, so other objects can listen to it and react accordingly.
  3. Then, declare path and assigned the value cards. This is the collection name in Firestore.
  4. Declare store and assign a reference to the Firestore instance.
  5. Next, you define add(_:) and use a do-catch block to capture any errors thrown by the code. If something goes wrong while updating a document, you terminate the app’s execution with a fatal error.
  6. Create a reference to the cards collection using path, and then pass card to addDocument(from:encoder:completion:). This adds a new card to the collection.

With the code above, the compiler will complain that addDocument(from:encoder:completion:) requires that Card conforms to Encodable. To fix this, open Card.swift and change the class definition to this:

struct Card: Identifiable, Codable {

By adding Codable, Swift can seamlessly serialize and deserialize Cards. This includes Encodable, which caused the error, and Decodable, which you’ll use when converting documents from Firestore documents to Swift objects.

Adding the View Model

You need a view model to connect your model with your views. In the Project navigator, under the ViewModels group, create a new Swift file called CardListViewModel.swift.

Add this to the new file:

// 1
import Combine

// 2
class CardListViewModel: ObservableObject {
  // 3
  @Published var cardRepository = CardRepository()

  // 4
  func add(_ card: Card) {
    cardRepository.add(card)
  }
}

Here’s a breakdown:

  1. Combine gives you the APIs to handle asynchronous code.
  2. You declare CardListViewModel and make it conform to ObservableObject. This lets you listen to changes emitted by objects of this type.
  3. @Published creates a publisher for this property so you can subscribe to it.
  4. You pass card to the repository so you can add it to the collection.

Open NewCardForm.swift and add a property for the view model you created, right after the other properties in NewCardForm:

@ObservedObject var cardListViewModel: CardListViewModel

The previous changes will make the Xcode Preview stop working, because now NewCardForm expects a CardListViewModel. To fix this, update NewCardForm_Previews:

static var previews: some View {
  NewCardForm(cardListViewModel: CardListViewModel())
}

Add the following addCard() method at the bottom of NewCardForm:

private func addCard() {
  // 1
  let card = Card(question: question, answer: answer)
  // 2  
  cardListViewModel.add(card)
  // 3
  presentationMode.wrappedValue.dismiss()
}

This code:

  1. Creates a Card using the question and answer properties already declared at the top.
  2. Adds the new card using the view model.
  3. Dismisses the current view.

Then, call this new method as the action for Add New Card, by replacing Button(action: {}) { with:

Button(action: addCard) {

Finally, open CardListView.swift, find the .sheet modifier and fix the compiler error by passing a new view model instance for now. You’ll use a shared instance later.

.sheet(isPresented: $showForm) {
  NewCardForm(cardListViewModel: CardListViewModel())
}

Build and run.

Tap + on top right corner. Fill the question and answer fields, and tap Add New Card.

New Card Form Screen

Hmm, nothing happens. :( The cards don’t appear in the main screen:

No Cards Screen

Open the Firebase Console in your web browser and go to the Cloud Firestore section. Firestore created the cards collection automatically. Click the identifier to navigate into your new document:

Card Document in Cloud Firestore

Your data is stored in Firebase, but you still haven’t implemented the logic to retrieve and display the cards.

Retrieving and Displaying Cards

Now it’s time to show your cards! First, you’ll need to create a view model to represent a single Card.

In the Project navigator, under ViewModels, create a new Swift file called CardViewModel.swift.

Add this to the new file:

import Combine

// 1
class CardViewModel: ObservableObject, Identifiable {
  // 2
  private let cardRepository = CardRepository()
  @Published var card: Card
  // 3
  private var cancellables: Set<AnyCancellable> = []
  // 4
  var id = ""

  init(card: Card) {
    self.card = card
    // 5
    $card
      .compactMap { $0.id }
      .assign(to: \.id, on: self)
      .store(in: &cancellables)
  }
}

Here you:

  1. Declare CardViewModel and make it conform to ObservableObject, so it can emit changes, and Identifiable, which guarantees you can iterate over an array of CardViewModels.
  2. This holds a reference to the actual card model. @Published creates a publisher for this property so you can subscribe to it.
  3. cancellables is used to store your subscriptions so you can cancel them later.
  4. id is a property required to conform to Identifiable. It should be a unique identifier.
  5. Set up a binding for card between the card’s id and the view model’s id. Then store the object in cancellables so it can be canceled later on.

Setting Up the Repository

Your repository needs to handle the logic for getting the cards. Open CardRepository.swift and add the following code at the top, below the property definitions:

// 1
@Published var cards: [Card] = []

// 2
init() {
  get()
}

func get() {
  // 3
  store.collection(path)
    .addSnapshotListener { querySnapshot, error in
      // 4
      if let error = error {
        print("Error getting cards: \(error.localizedDescription)")
        return
      }

      // 5
      self.cards = querySnapshot?.documents.compactMap { document in
        // 6
        try? document.data(as: Card.self)
      } ?? []
    }
}

In the code above, you:

  1. Define cards. @Published creates a publisher for this property so you can subscribe to it. Every time this array is modified, all listeners will react accordingly.
  2. Create the initialization method and call get().
  3. Get a reference to the collection’s root using path and add a listener to receive changes in the collection.
  4. Checks if an error occurred, prints the error message and returns.
  5. Use compactMap(_:) on querySnapshot.documents to iterate over all the elements. If querySnapshot is nil, you’ll set an empty array instead.
  6. Map every document as a Card using data(as:decoder:). You can do this thanks to FirebaseFirestoreSwift, which you imported at the top, and because Card conforms to Codable.

Setting Up CardListViewModel

Next, open CardListViewModel.swift and add these two properties to CardListViewModel:

// 1
@Published var cardViewModels: [CardViewModel] = []
// 2
private var cancellables: Set<AnyCancellable> = []

In this code, you:

  1. Define cardViewModels with the @Published property wrapper, so you can subscribe to it. It’ll contain the array of CardViewModels.
  2. Create a set of AnyCancellables. It’ll serve to store your subscriptions so you can cancel them later.

While still in the view model, add the following initializer:

init() {
  // 1
  cardRepository.$cards.map { cards in
    cards.map(CardViewModel.init)
  }
  // 2
  .assign(to: \.cardViewModels, on: self)
  // 3
  .store(in: &cancellables)
}

The code you added:

  1. Listens to cards and maps every Card element of the array into a CardViewModel. This will create an array of CardViewModels.
  2. Assigns the results of the previous map operation to cardViewModels.
  3. Stores the instance of this subscription in cancellables so it is automatically canceled when CardListViewModel is deinitialized.

Setting Up CardView

Open CardView.swift and make the following changes.

Replace var card: Card with:

var cardViewModel: CardViewModel

This lets the view use a view model instead of a Card model directly.

Then, in frontView, replace card.question with:

cardViewModel.card.question

Next, in backView, replace card.answer with:

cardViewModel.card.answer

Finally, change CardView_Previews, to this:

struct CardView_Previews: PreviewProvider {
  static var previews: some View {
    let card = testData[0]
    return CardView(cardViewModel: CardViewModel(card: card))
  }
}

With these changes, you’re now passing the expected CardViewModel instead of the Card model directly. But, you need one more update before previews work again.

Setting Up CardListView

You’ll also need to change the wrapping list view so it works with the card view model.

Open CardListView.swift and replace the cards array property with:

@ObservedObject var cardListViewModel = CardListViewModel()

With this change, CardListView now expects a CardListViewModel instead of an array of Cards. @ObservedObject will subscribe to the property so it can listen to changes in the view model.

Look for a ForEach statement inside body, and change it to look like this:

ForEach(cardListViewModel.cardViewModels) { cardViewModel in
  CardView(cardViewModel: cardViewModel)
    .padding([.leading, .trailing])
}

You’ll now iterate over cardListViewModel‘s individual card view models and create a CardView for each of them.

Since CardListView now expects a CardListViewModel instead of an array of Cards, change CardListView_Previews to:

CardListView(cardListViewModel: CardListViewModel())

Build and run.

Displaying Cards

Add as many cards as you want and see how they immediately appear on the main screen.

Updating Cards

The app lets users mark when they get the correct answer. If that’s not the case, a message pops up telling them they failed the last time they tried.

Open Card.swift and modify the id so it looks like this:

@DocumentID var id: String?
Note: Doing this will change your data model, since the id won’t be part of it. The next time you run the app, your previous models won’t show.

Add this import statement at the top:

import FirebaseFirestoreSwift

With this code, you ensure when Firebase’s SDK converts the document to a Card, the Document Id used in Cloud Firestore is mapped to id. To execute operations on a single document, you need to reference it using its document id.

Open CardRepository.swift and add the next method to CardRepository:

func update(_ card: Card) {
  // 1
  guard let cardId = card.id else { return }

  // 2
  do {
    // 3
    try store.collection(path).document(cardId).setData(from: card)
  } catch {
    fatalError("Unable to update card: \(error.localizedDescription).")
  }
}

This code:

  1. Checks that card.id has a value.
  2. Captures any exceptions generated by the code. If something goes wrong while updating a document, the app terminates with a fatal error.
  3. Using path and cardId, it gets a reference to the document in the cards collection, then updates the fields by passing card to setData(from:encoder:completion:).

Now you need update your view model. Open CardViewModel.swift and add the following method to CardViewModel:

func update(card: Card) {
  cardRepository.update(card)
}

Open CardView.swift. Add the following code after the second Spacer() in frontView:

if !cardViewModel.card.successful {
  Text("You answered this one incorrectly before")
    .foregroundColor(.white)
    .font(.system(size: 11.0))
    .fontWeight(.bold)
    .padding()
}    

This code shows a message if the property successful of the card is equal to false.

Before proceeding, add the following three methods to CardView:

// 1
private func markCardAsUnsuccesful() {
  var updatedCard = cardViewModel.card
  updatedCard.successful = false
  update(card: updatedCard)
}

// 2
private func markCardAsSuccesful() {
  var updatedCard = cardViewModel.card
  updatedCard.successful = true
  update(card: updatedCard)
}

// 3
func update(card: Card) {
  cardViewModel.update(card: card)
  showContent.toggle()
}

This code provides two methods to take care of the successful and unsuccessful answer cases, as well as a method to take care of updating the card.

Here’s what each method does:

  1. Copies cardViewModel.card to updatedCard and sets successful to false. Then it calls update(card:).
  2. Copies cardViewModel.card to updatedCard and sets successful to true. Then it calls update(card:).
  3. Passes the updated card to update(card:), so the view model can update the model. Then calls toggle() on showContent to trigger the flip animations.

Next, replace backView with the following:

var backView: some View {
  VStack {
    // 1
    Spacer()
    Text(cardViewModel.card.answer)
      .foregroundColor(.white)
      .font(.body)
      .padding(20.0)
      .multilineTextAlignment(.center)
      .animation(.easeInOut)
    Spacer()
    // 2
    HStack(spacing: 40) {
      Button(action: markCardAsSuccesful) {
        Image(systemName: "hand.thumbsup.fill")
          .padding()
          .background(Color.green)
          .font(.title)
          .foregroundColor(.white)
          .clipShape(Circle())
      }
      Button(action: markCardAsUnsuccesful) {
        Image(systemName: "hand.thumbsdown.fill")
          .padding()
          .background(Color.blue)
          .font(.title)
          .foregroundColor(.white)
          .clipShape(Circle())
      }
    }
    .padding()
  }
  .rotation3DEffect(.degrees(180), axis: (x: 0.0, y: 1.0, z: 0.0))
}

Here you added two new buttons so the user can indicate if they answered the question correctly.

Build and run.

Tap any of your cards and tap the thumb-down icon. At the bottom, the front view displays a message that says You answered this one incorrectly before:

Updated Card Screen

Removing Cards

The user should be able to remove cards when needed.

Open CardRepository.swift and define remove(_:) at the bottom of CardRepository, as follows:

func remove(_ card: Card) {
  // 1
  guard let cardId = card.id else { return }

  // 2
  store.collection(path).document(cardId).delete { error in
    if let error = error {
      print("Unable to remove card: \(error.localizedDescription)")
    }
  }
}

This code:

  1. Checks that card.id has a value and stores it in cardId.
  2. Gets a reference to the document in the Cards collection using path and cardId and then calls delete. This deletes the document from the collection in Cloud Firestore.

    delete(completion:) also provides a closure where you can handle any errors. The code inside the closure checks if there’s an error and prints it to the console.

Open CardViewModel.swift and add this method to it so your view model can call remove(_:) on CardRepository, passing the actual Card:

func remove() {
  cardRepository.remove(card)
}

Finally, open CardView.swift and add cardViewModel.remove() in the trailing closure for the primaryButton inside the Alert, so it looks like this:

Alert(
  title: Text("Remove Card"),
  message: Text("Are you sure you want to remove this card?"),
  primaryButton: .destructive(Text("Remove")) {
    cardViewModel.remove()
  },
  secondaryButton: .cancel())

This calls remove() on the cardViewModel. The view model then executes the logic to remove the card from the database.

Build and run.

Drag any of your cards to the top. An alert appears asking you to confirm the action. Tap Remove and your card will disappear.

Removing Card Screen

Securing the Data

Security is essential to any app. Firebase provides a set of authentication methods you can use to let users authenticate into your app. For this project, you’re going to implement Anonymous Authentication.

Anonymous Authentication is an authentication type that lets you create temporary accounts for users who haven’t signed up for your app, giving them a layer of security. Combined with Security Rules, Anonymous Authentication provides enough security for this app.

To activate this authentication mode, go to Firebase Console, select Authentication on the left sidebar and then Sign-in method on the top navigation bar. Go to the bottom of the Providers List, select Anonymous and enable it by clicking the toggle on the right. Finally, click Save.

Enabling Firebase Anonymous Authentication

Note: If you don’t see the top navigation bar, click Get Started to move past the introductory screen.

Now you’ll need to create an Authentication Service.

Creating an authentication service

In the Project navigator, create a new Swift file under Services and name it AuthenticationService.swift.

Add the code below to the new file:

import Firebase

// 1
class AuthenticationService: ObservableObject {
  // 2
  @Published var user: User?
  private var authenticationStateHandler: AuthStateDidChangeListenerHandle?

  // 3
  init() {
    addListeners()
  }

  // 4
  static func signIn() {
    if Auth.auth().currentUser == nil {
      Auth.auth().signInAnonymously()
    }
  }

  private func addListeners() {
    // 5
    if let handle = authenticationStateHandler {
      Auth.auth().removeStateDidChangeListener(handle)
    }

    // 6
    authenticationStateHandler = Auth.auth()
      .addStateDidChangeListener { _, user in
        self.user = user
      }
  }
}

This code:

  1. Declares AuthenticationService and conforms it to ObservableObject.
  2. Defines user which will contain the User object when the authentication process happens. It also defines an authenticationStateHandler property to catch changes in the user object, such as when the user signs in or out.
  3. Implements init() and calls addListeners() so it’s called when the class is instantiated.
  4. Adds signIn() which takes care of signing in to Firebase. Auth stores the Firebase user object in currentUser.

    By checking if it’s nil, you avoid unnecessary calls. This value stores locally, so after the first time, the app uses the same user.

  5. Checks if there’s already a handler instantiated and, if so, removes it.
  6. Assigns addStateDidChangeListener(_:) listener to authenticationStateHandler.

Nice, you have your Authentication Service all set up!

Using the authentication service

Open AppDelegate.swift and add the following line after FirebaseApp.configure() in application(_:didFinishLaunchingWithOptions:):

AuthenticationService.signIn()

This code ensures the user is signed in when the app starts.

Next, open CardRepository.swift and add these properties at the top of the class:

// 1
var userId = ""
// 2
private let authenticationService = AuthenticationService()
// 3
private var cancellables: Set<AnyCancellable> = []

This code:

  1. Declares userId, which you’ll use to store the current user id generated by Firebase.
  2. Creates an instance of AuthenticationService.
  3. Creates a set of AnyCancellables. This property stores your subscriptions so you can cancel them later.

Next, change init() to this:

init() {
  // 1
  authenticationService.$user
    .compactMap { user in
      user?.uid
    }
    .assign(to: \.userId, on: self)
    .store(in: &cancellables)

  // 2
  authenticationService.$user
    .receive(on: DispatchQueue.main)
    .sink { [weak self] _ in
      // 3
      self?.get()
    }
    .store(in: &cancellables)
}

Here you:

  1. Bind user‘s id from AuthenticationService to the repository’s userId. It also stores the object in cancellables so it can be canceled later.
  2. This code observes the changes in user, uses receive(on:options:) to set the thread where the code will execute and then attaches a subscriber using sink(receiveValue:). This guarantees that when you get a user from AuthenticationService, the code in the closure executes in the main thread.
  3. Call get(), like in your original initializer.

Change add(_:) to this:

func add(_ card: Card) {
  do {
    var newCard = card
    newCard.userId = userId
    _ = try store.collection(path).addDocument(from: newCard)
  } catch {
    fatalError("Unable to add card: \(error.localizedDescription).")
  }
}

Here, you make a copy of card and mutate its userId to the value of the repository’s userId. Now, every time you create a new card it’ll contain the actual user id generated by Firebase.

Finally, add the following line before .addSnapshotListener(_:) on get():

.whereField("userId", isEqualTo: userId)

This code lets you filter cards by userId.

Adding Authorization Using Security Rules

Open your Firebase project in your web browser. Then go to Cloud Firestore, and click Rules on the top horizontal navigation bar. You’ll see something similar to this:

Configuring Security Rules

This JavaScript-like code is the Firestore Security Rules. These rules define if a user is authorized to access or modify a document. Replace the existing code with this:

// 1
rules_version = '2';
// 2
service cloud.firestore {
  // 3 
  match /databases/{database}/documents {
    // 4
    match /{document=**} {
      allow read, write: if request.auth != null;
    }
  }
}

Here what this does:

  1. Sets the rules_version to '2'. This is, at the moment, the latest version, and determines how to interpret the following code.
  2. Indicates which service these rules apply to. In this case, Cloud Firestore.
  3. Specifies rules should match any Cloud Firestore database in the project.
  4. Specifies only authenticated users can read or write into the document.

These rules determine the authorization part of the app. With authentication, you get to know who the user is. With authorization, you determine what this user can do.

Click Publish to save the changes. Then go back to the project and build and run.

Displaying Cards Filtered by User

The app won’t display any cards since it’s now filtering by userId. If you add a new one, it’ll appear. You can even close and re-open the app, and only cards created from now on will appear.

Understanding Firestore Pricing

Understanding Cloud Firestore pricing can save you from spending too much money. Keep the following in mind:

  • Cloud Firestore charges you for the number of operations you perform: reads, writes and deletes.
  • The pricing varies from one location to another.
  • You also have to pay for the storage your database uses and the network bandwidth.
  • If you change a single field or a complete document it counts as an operation.
  • The number of reads is the number of records returned. So, if your query returns ten documents, you’ll have ten reads. When possible, use limit to restrict the number of documents your queries can return.
  • You can monitor your current budget using Alerts. You can configure it using Google Cloud Console which will also let you check your previous invoices and set your desired daily spending.
  • Google Cloud Operation lets you monitor performance and get metrics which can also help your budget plan.

When possible, you should also cache data locally to avoid requesting data from Firestore.

You can find more information in the the Firestore documentation.

Where to Go From Here?

You can download the completed project using the Download Materials button at the top or bottom of the tutorial. Remember, you still have to add your own GoogleService-Info.plist after downloading the final project.

In this tutorial, you learned how to use Cloud Firestore to persist your data and use MVVM to integrate it with your SwiftUI views. You also learned how to implement Anonymous Authentication using Firebase from scratch.

Firebase and Cloud Firestore have much more to offer. If you want to dive deeper into Cloud Firestore, look into the official Cloud Firestore documentation. Or check out Firebase Tutorial: Getting Started, Firebase Tutorial: Real-time Chat or Video Tutorial: Beginning Firebase.

I hope you enjoyed this tutorial. If you have any questions or comments, please join the forum below.