GraphQL Using the Apollo Framework: Getting Started

In this Apollo Framework for iOS tutorial, you will learn how to consume GraphQL APIs in a simple and type-safe way. By Felipe Laso-Marsetti.

4.4 (27) · 5 Reviews

Download materials
Save for later
Share
Update note: Felipe Laso-Marsetti updated this tutorial for iOS 13, Xcode 11 and Swift 5. It also runs on Xcode 12b5/iOS 14b5. Nikolas Burk and Nick Bonatsakis wrote the original tutorials this one is based on.

Do you ever feel frustrated when working with a REST API? Do endpoints sometimes not give you the data you need for your app? Do you have to make multiple requests, or change your back end, to get the right information from the server? Well, worry no more! It’s GraphQL and the Apollo Framework to the rescue!

GraphQL is an open-source API design paradigm. Facebook introduced GraphQL in 2012, and it’s been powering Facebook’s mobile apps ever since. In contrast to REST, a GraphQL API exposes only a single endpoint, and the consumers of the API can specify the data they need via a query language.

GraphQL has been open-source since 2015. As its popularity has increased, a robust open-source community has grown around it. This community has developed client libraries and IDE tools. One of the most popular of these projects is Apollo. Apollo is a type-safe caching implementation of GraphQL, available on multiple platforms.

Using the Apollo Framework, you’ll find it simple to:

  • Consume a GraphQL schema.
  • Auto-generate code from the model specification.
  • Fetch data for any GraphQL endpoint.

As you work through the exercises in this tutorial, you’ll focus on setting up a local GraphQL development environment and fetching data from it. In the process, you’ll learn how to use the Apollo Framework to generate Swift code based on server queries and data schema. And you’ll use it to communicate with your server to fetch the data you need.

Getting Started

In this tutorial, you’ll build an app to display information about the films in the Star Wars universe. Download the starter project by clicking the Download Materials button at the top or bottom of the tutorial. Go to the Starter folder and open JediArchives.xcodeproj inside the Jedi Archives folder.

Now take a look at the project structure.

Xcode project

This project has three view controllers:

  • FilmsViewController contains the list of movies.
  • FilmDetailsViewController contains the movie information, such as the director and release date.
  • CharacterDetailsViewController contains information about the characters in the selected movie.

The project also includes some interesting files needed for Apollo and GraphQL. You’ll see how they work as you go through the exercises in the tutorial:

  • Apollo.swift: You’ll create a client to interface with the Apollo framework here.
  • Queries.graphql: Your GraphQL queries will go here.
  • API.swift: The Apollo Framework will automatically generate the model and API Swift code here.

Now, build and run. You’ll see the application — but you won’t see any films in the list!

Starter Project

The app’s user interface is complete, but empty. You’ll use Apollo to read the information from a server and display all the awesome Star Wars movies in the app. To do that, you’ll need a GraphQL server to provide the data. You’ll set up that server next.

Running Your GraphQL Server

You’re going to use the Star Wars API to get the movie information for the application. This API uses REST services. And, unfortunately, that means you can’t access it using GraphQL.

Fortunately, though, there’s an open-source project for this! The SWAPI GraphQL wrapper uses GraphQL to access the Star Wars API.

In the tutorial materials, you’ll find a SWAPI GraphQL folder which contains a pre-configured Node.js project that creates a local server. It then uses the SWAPI GraphQL wrapper to serve the information to your app using GraphQL.

To run the server, you need to make sure you have Node.js installed. If you don’t have it, visit Node.js for installation instructions.

Note: This tutorial uses Node.js version 14.2.0.

With Node.js ready, it’s time to install Yarn. You’ll use Yarn to build and run the server. Open a terminal window and run the following command:

sudo npm install -g yarn

Next, you’ll build and run your GraphQL server. This is the server your app will connect to.

Note:First, though, you may want to install Homebrew to suppress an Xcode warning when you build your project. You can install Homebrew by running the following command in your terminal window:
/bin/bash -c "$(curl -fsSL https://raw.githubusercontent.com/Homebrew/install/master/install.sh)"

Then, to complete your Homebrew installation, run the following command to install pkg-config:

brew install pkg-config

Now go to the tutorial materials. You’ll find the server in the SWAPI GraphQL folder. Navigate to that folder. In your terminal window, type the following command:

cd

Be sure to add a space following the cd command. Then, drag the SWAPI GraphQL folder and drop it into the terminal. This will write the folder location in the terminal, and you won’t need to type it. Press Enter to change to the new directory.

Now, to build the server, run this command:

yarn

Wait for the command to finish, and then run the following command to start your GraphQL server:

yarn start

After you run this last command, your terminal window will display a localhost URL as well as a port, like this:

$ node lib/server
Listening at http://localhost:57881

Make a note of the port number. You’ll need it later for your app to communicate with the local server.

Great work! Now you’re all set up on the server side, and you’re ready to work on your app.

Installing the Apollo Framework

With your server up and running, it’s time to install the Apollo Framework. You’ll use the Swift Package Manager for this.

Adding Apollo as a Swift Package

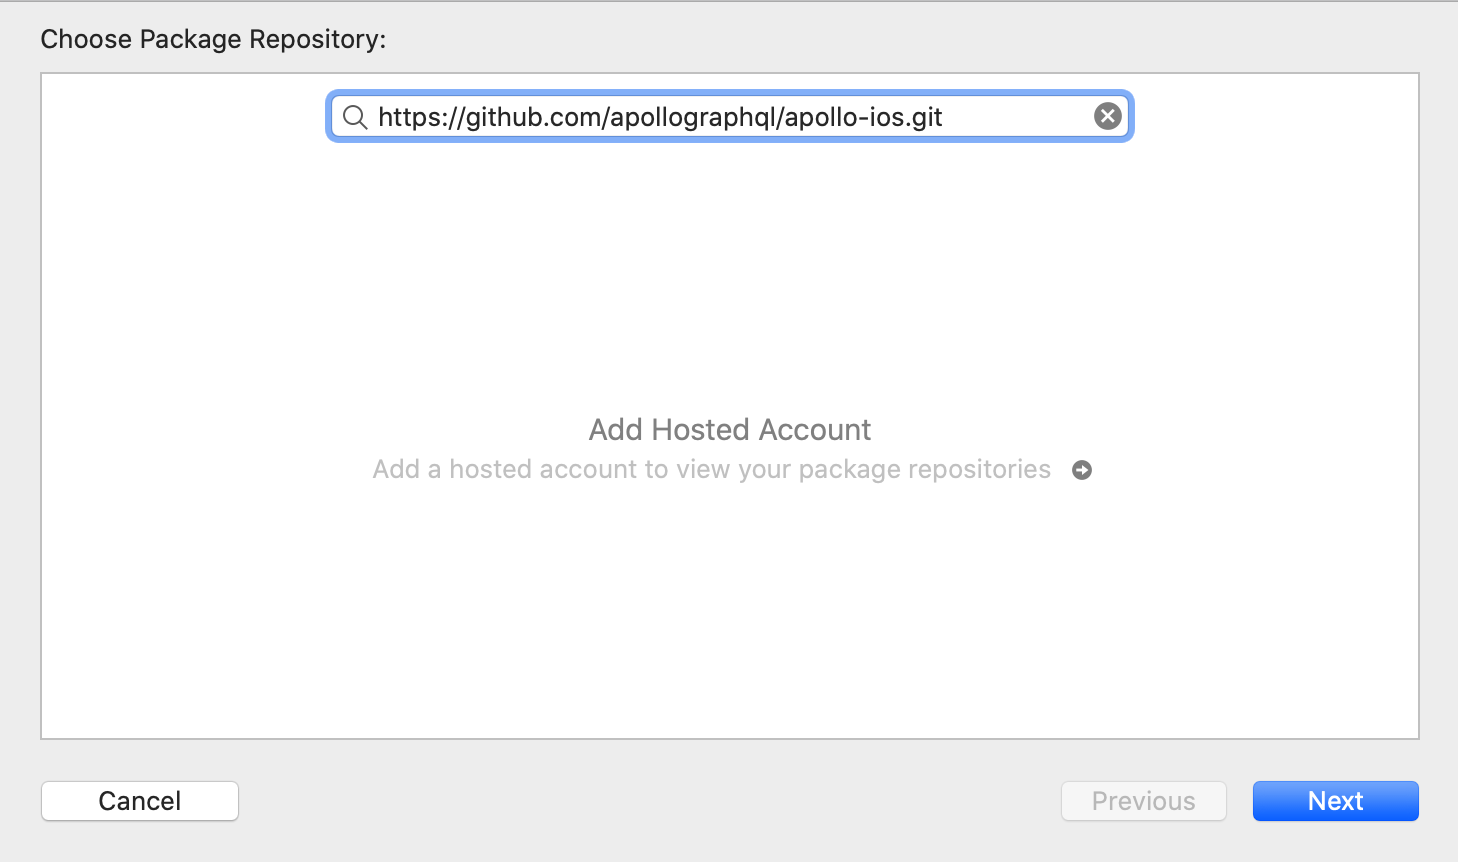
Go back to Xcode, and select File ▸ Swift Packages ▸ Add Package Dependency….

Adding Swift Package

In the next screen, paste https://github.com/apollographql/apollo-ios.git into the Choose Package Repository search box. Click Next. This will add Apollo as a Swift package.

Pasting The GitHub URL

Now, select Up To Next Minor and click Next.

Swift Package Options

In the next screen, select the Apollo package and click Finish.

Adding The Necessary Library

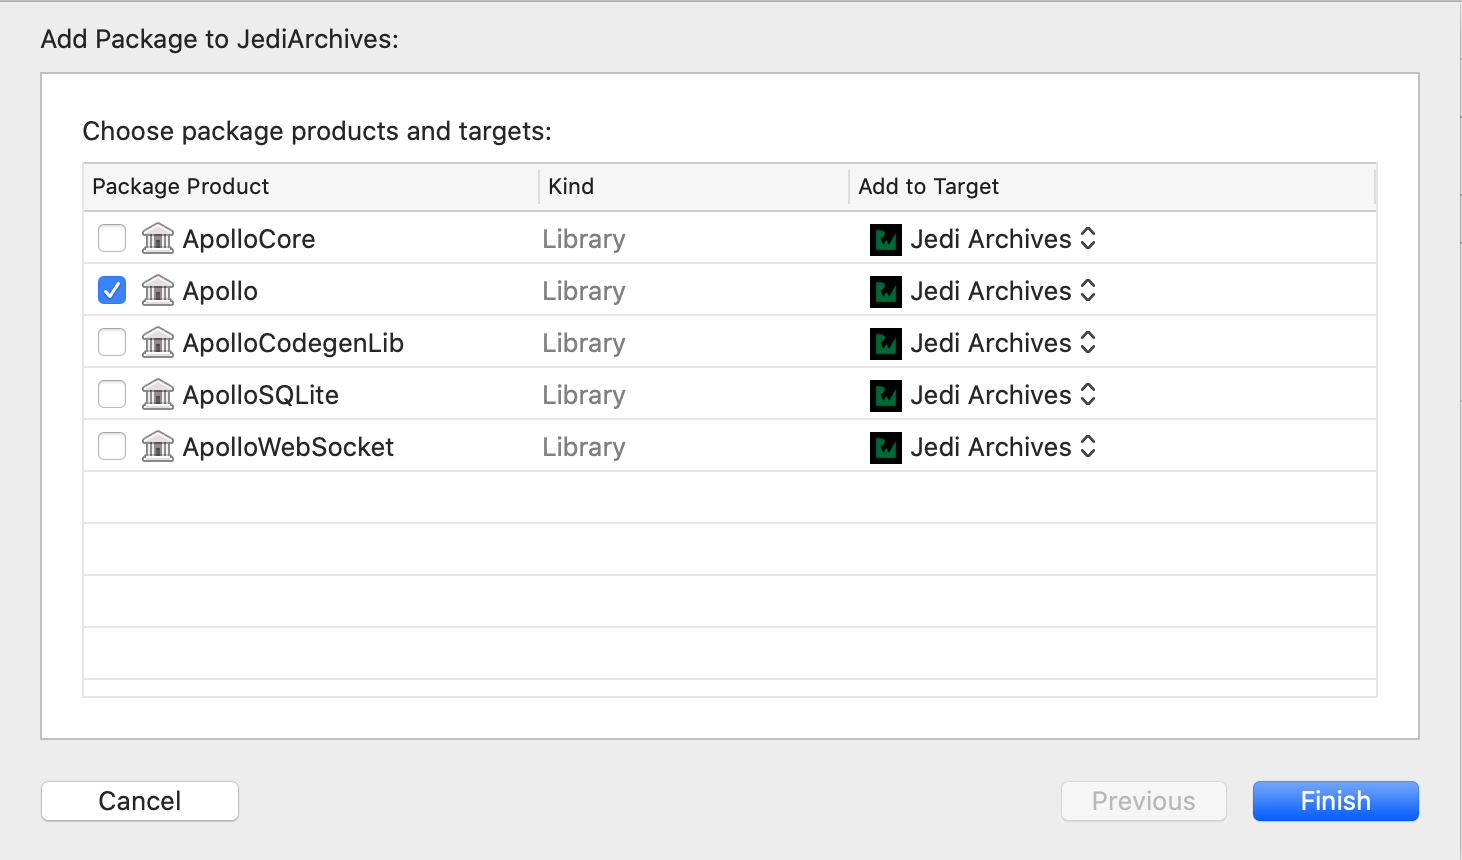
Xcode will download the necessary packages and add the dependencies to your project.

Awesome! You’ve added Apollo as a Swift package, but there are still a few more steps needed to get it all working.

Adding a Code Generator Script

Apollo requires a GraphQL schema file to generate the code. This schema is a JSON file that contains information from an introspection query. The schema describes the types and fields you can query. It also includes any relationships between those types. The file is usually called schema.json. You can find it inside the Jedi Archives folder of your project.

Now you need to add the script that will generate the code for your queries. Select your project in the Project navigator. Then select the Jedi Archives target, and click Build Phases:

Build Phases Project Tab

Click the + button and select New Run Script Phase.

Adding New Run Script

Paste the following script into the window to let Apollo work its code-gen magic:

# Go to the build root and search up the chain to find the 
# Derived Data Path where the source packages are checked out.
DERIVED_DATA_CANDIDATE="${BUILD_ROOT}"

while ! [ -d "${DERIVED_DATA_CANDIDATE}/SourcePackages" ]; do
  if [ "${DERIVED_DATA_CANDIDATE}" = / ]; then
    echo >&2 "error: Unable to locate SourcePackages directory from BUILD_ROOT: '${BUILD_ROOT}'"
    exit 1
  fi

  DERIVED_DATA_CANDIDATE="$(dirname "${DERIVED_DATA_CANDIDATE}")"
done

# Grab a reference to the directory where scripts are checked out
SCRIPT_PATH="${DERIVED_DATA_CANDIDATE}/SourcePackages/checkouts/apollo-ios/scripts"

if [ -z "${SCRIPT_PATH}" ]; then
    echo >&2 "error: Couldn't find the CLI script in your checked out SPM packages; make sure to add the framework to your project."
    exit 1
fi

cd "${SRCROOT}/${TARGET_NAME}"
"${SCRIPT_PATH}"/run-bundled-codegen.sh codegen:generate --target=swift --includes=./**/*.graphql --localSchemaFile="schema.json" GraphQL/API.swift

This script sets up all the environment variables needed by Apollo’s code generator. It then launches the code generator, using schema.json as a reference to generate the code. The generated code will be saved in API.swift.

Note: You can change the file where Apollo generates the API or the path to your schema. To do this, just modify the last line of the script to point to the desired location.

Now, click the title of your new build phase, and rename it to Generate Apollo GraphQL API. Then, drag and drop it below the Dependencies build phase. This is what your build phases will look like after that:

Final Build Phases

If you try to build your project right now, you’ll get an error. This is because you haven’t written any GraphQL queries, and the script will fail. You’ll take care of that in the next step!

Populating the Films Screen

Now it’s time to write your GraphQL queries. But how do you know what to write? How do you even know what a GraphQL query can do? Fortunately, the SWAPI GraphQL wrapper has a cool GraphQL playground. You can use this playground to experiment all you want with GraphQL queries!

Writing Your Query Definition

You’re going to write a query to retrieve data for all the Star Wars films. You need the film names and information associated with each film. And you need the characters in those films.

Open Queries.graphql and paste the following queries:

# 1
query AllFilms {
  # 2
  allFilms {
    # 3
    films {
      # 4
      id
      director
      episodeID
      title
      releaseDate
      
      #5
      characterConnection(first: 10) {
        # 6
        characters {
          # 7
          id
          name
          birthYear
          eyeColor
          hairColor
          
          # 8
          homeworld {
            # 9
            name
          }
        }
      }
    }
  }
}

Here’s what you’re doing in this code:

  1. You define a query called AllFilms. The query will fetch the desired films along with information about them.
  2. You specify that you want all the films available.
  3. For each film within your collection, what attributes and values do you want to get? This is how you define the scope of data to fetch for an individual film.
  4. You want the ID, director, episode ID, title, and release date for each film.
  5. For an individual film, you also want to fetch the first ten characters associated with it.
  6. For each character, you specify what information to retrieve.
  7. You want the ID, name, birth year, eye color, and hair color of each character.
  8. You also want the homeworld for the character.
  9. And, for that homeworld, you need its name.

As you can see, it looks a bit Swift-y or JSON-y. Feel free to experiment with the GraphQL playground for SWAPI. Add or remove things in the query, run it, and check out the results.

Build and run. Now API.swift contains some generated models and the Swift API!

Open API.swift, but don’t modify it. This is the generated code and models your app will use. Feel free to look at the code and see what Apollo generated for you. The most important are these:

  • AllFilmsQuery: This is the query class you’ll use to access the server data.
  • Film: This structure contains the data for every movie. It includes the fields you specified in the query file generated by Apollo.
  • Character: This structure contains the character information. It has the properties you defined in the query.

You’ll use the data structures in the API to display the movie information in the app. But first, you need to implement the network client so that you can retrieve your data.

Implementing Your Network Client

Open Apollo.swift and add an import for the Apollo framework at the top of the file:

import Apollo

Then, add the following code inside Apollo:

// 1
static let shared = Apollo()
// 2
let client: ApolloClient
// 3
init() {
  client = ApolloClient(url: URL(string: "http://localhost:49241")!)
}

This is what your code does:

  1. You define Apollo as a singleton, since you only want one instance of the Apollo client for the app.
  2. You define a property to store the actual ApolloClient provided by the Apollo Framework.
  3. You instantiate a new ApolloClient with the location of your GraphQL server. You’ll need to replace 49241 with your local server port. This is the port your local GraphQL server returned after you ran the yarn start command, above.
Note: The project has App Transport Security settings modified to permit plain HTTP calls to localhost.

Now you’re ready to start working with Star Wars data!

Retrieving Films Data

Switch to FilmsViewController.swift. Replace the whole line where you declare the films property with the following:

var films: [AllFilmsQuery.Data.AllFilm.Film] = []

Here you change films from an array of strings to an array of Film objects. Apollo automatically generated that structure from the information in the queries file. Notice how Film resides inside AllFilmsQuery, within its Data and AllFilm structures.

Moving on, add the following code inside loadData():

// 1
let query = AllFilmsQuery()
// 2
Apollo.shared.client.fetch(query: query) { result in
  // 3
  switch result {
  case .success(let graphQLResult):
    if let films = graphQLResult.data?.allFilms?.films?.compactMap({ $0 }) {
      // 4          
      self.films = films
      self.tableView.reloadData()
    }
        
  case .failure(let error):
    // 5
    print("Error loading data \(error)")
  }
}

In this code, you do the following:

  1. First, you create an AllFilmsQuery object.
  2. Then you use the Apollo client you created earlier to fetch the data. You use the AllFilmsQuery query to do this.
  3. In the closure, you check whether the query succeeded or failed.
  4. If the query succeeded, you retrieve the result list into films.
  5. If the query failed, you print an error to the console so you can find out what went wrong.

Next, you’ll display your data in the main table view.

Displaying a List of Films

To display your films list, you’ll start by going to tableView(_:cellForRowAt:). Add the following code just before the return statement:

let film = films[indexPath.row]
cell.textLabel?.text = film.title

Here you fetch the Film for the given row. You set the label text for the cell to the film’s title. This is all pretty standard table view and cell work. :]

Build and run, and admire the list of movies you created:

Viewing Films in Jedi Archives

Sweet! You’re now fetching data, via GraphQL, and displaying it within a table view in your app. Great work!

Note: If you get a network error at this point, double-check that the port number in Apollo.swift matches the port number of the server. This is the port number returned from your yarn start command, above.

Populating the Film Details Screen

At this point, if you tap one of the film cells, the app will crash. That’s OK! You’re going to focus on this next.

Accessing Film Details Data

Again, go to FilmsViewController.swift. Replace the code in showFilmDetails(_:sender:) with the following:

guard
  let cell = sender as? UITableViewCell,
  let indexPath = tableView.indexPath(for: cell)
  else { 
    return nil
}
return FilmDetailsViewController(film: films[indexPath.row], coder: coder)

This code retrieves the index of the cell that was tapped. It returns a new FilmDetailsViewController for the specified Film. If a problem occurs and it can’t get the desired value, then it returns nil.

If you try to build now, you’ll get an error on the last sentence. This is because you previously changed the type of the film, which is now a type generated by Apollo. To fix it, go to FilmDetailsViewController.swift. At the beginning of the class, replace the film declaration with the following:

private let film: AllFilmsQuery.Data.AllFilm.Film

This is the same concept as when you created a property for your films array. This one, though, is for a single film.

Now you need to change the class initializer to accept this new type. Delete init?(film:coder) and replace it with this code:

init?(film: AllFilmsQuery.Data.AllFilm.Film, coder: NSCoder) {
  self.film = film
    
  super.init(coder: coder)
}

This new initializer receives a Film instead of a String.

Displaying Film Details

Now go to viewDidLoad() and add the following code:

title = film.title

This displays the film’s title in the navigation bar.

Next, you need to display the right number of rows, depending on the number of characters this film has. Scroll down to tableView(_:numberOfRowsInSection:). Replace the line that reads return 0 with the following:

return film.characterConnection?.characters?.count ?? 0

Here you return the number of characters associated with the current film. Notice how you access the characters count. The count comes from the characters array in the Film‘s characterConnection. Since characters is optional, you must allow for the case where there are no characters. If this happens, you return zero.

Now you’re ready for the last step. You need to display the movie information in the table’s cells. Go to tableView(_:cellForRowAt:) and locate this block of code:

if indexPath.row == 0 {
  cell.textLabel?.text = "Episode"
} else if indexPath.row == 1 {
  cell.textLabel?.text = "Released"
} else if indexPath.row == 2 {
  cell.textLabel?.text = "Director"
}

Replace it with this:

if indexPath.row == 0 {
  cell.textLabel?.text = "Episode"  
  if let episodeNumber = film.episodeId {
    cell.detailTextLabel?.text = "\(episodeNumber)"
  }
} else if indexPath.row == 1 {
  cell.textLabel?.text = "Released"
  cell.detailTextLabel?.text = film.releaseDate
} else if indexPath.row == 2 {
  cell.textLabel?.text = "Director"
  cell.detailTextLabel?.text = film.director
}

This code retrieves the film’s episode number, release date and director. It then assigns the information to the text fields of the appropriate cells based on the row number.

Now build and run, and tap one of the films.

Showing The Right Number of Cells For Characters

Great! You’re displaying the film details!

But, if you look closely, the characters list is just a bunch of repeated cells. The good news is that you’re showing the correct number of cells for the characters in this film. But now you need to update the code to display the characters’ names.

Displaying the Characters List

Again, go to tableView(_:cellForRowAt:) Add the following code just before the last return statement of the method:

cell.textLabel?.text = film.characterConnection?.characters?[indexPath.row]?.name

This sets the name of the character in the cell’s text field.

Build and run one more time, and check out the results:

Showing The Character Names In The List

Yay! The characters list is looking much, much better. :]

Lovely Looking List

Populating the Character Details Screen

Earlier you found that tapping a film cell caused the app to crash. Now, tapping a character cell will now crash your app! And as you did for the film details, you’ll correct this by passing along the character to the character details screen.

Accessing Character Details Data

Go back to FilmDetailsViewController.swift. Replace the code in showCharacterDetails(_:sender:) with the following:

guard 
  let cell = sender as? UITableViewCell,
  let indexPath = tableView.indexPath(for: cell),
  let character = film.characterConnection?.characters?[indexPath.row] 
  else {    
    return nil
}
   
return CharacterDetailsViewController(character: character, coder: coder)

Here you retrieve the index of the selected row. You use it to initialize CharacterDetailsViewController with the selected character.

If you try to build now, you’ll see an error because the character’s type has changed. To fix it, open CharacterDetailsViewController.swift. Inside the class implementation, replace the line declaring character with the following:

let character: AllFilmsQuery.Data.AllFilm.Film.CharacterConnection.Character

This will look very familiar to you. It’s similar to what you did for an array of films, and for a single film. Here you create a property of type Character. You’ll use this property to populate the character details screen.

And, as you saw before, an error occurs. This is because the initializer expects a different type for the character.

Delete init?(character:coder:) and replace it with the following:

init?(
  character: AllFilmsQuery.Data.AllFilm.Film.CharacterConnection.Character, 
  coder: NSCoder
) {
  self.character = character
    
  super.init(coder: coder)
}

This initializer uses the new Character type and sets the value of character.

Almost There!

Displaying Character Details

Now, go to viewDidLoad() and add the following code at the end:

title = character.name

This displays the name of the character in the navigation bar.

Next, go to tableView(_:cellForRowAt:). Replace the existing block of if and else if statements with the following:

if indexPath.row == 0 {
  cell.textLabel?.text = "Birth Year"
  cell.detailTextLabel?.text = character.birthYear
} else if indexPath.row == 1 {
  cell.textLabel?.text = "Eye Color"
  cell.detailTextLabel?.text = character.eyeColor
} else if indexPath.row == 2 {
  cell.textLabel?.text = "Hair Color"
  cell.detailTextLabel?.text = character.hairColor
} else if indexPath.row == 3 {
  cell.textLabel?.text = "Home Planet"
  cell.detailTextLabel?.text = character.homeworld?.name
}

This code inserts the appropriate text into each cell, using the row number to populate the cells correctly.

Your code is now complete! Woohoo!

Build and run. Check out the results by navigating to a film’s detail screen and then selecting a character. You’ll now see the character’s information in the screen.

Showing a Character's Details

Awesome work completing the tutorial! Congratulations!

Swift Yay!

Where to Go From Here?

You can download the completed version of the project using the Download Materials button at the top or bottom of this tutorial.

You’ve now seen the power of GraphQL. You’ve written queries that are very easy to understand and interpret. Apollo generated the necessary Swift API code for you. Then you called your queries via code to get the data you need.

If you want to dive further into GraphQL and Apollo, you can read the Introduction to GraphQL and Apollo’s docs. Try expanding Jedi Archives to make additional queries and return different data. Or experiment with other GraphQL servers! You can use their APIs to retrieve completely different data.

I hope you enjoyed this tutorial as much as I did. If you have any questions or comments, please join the discussion below. May the code be with you!