Swift Algorithm Club: Swift Tree Data Structure
Learn how to implement a Swift Tree data structure through this hands-on tutorial! By Kelvin Lau.

The Swift Algorithm Club is an open source project to implement popular algorithms and data structures in Swift.
Every month, Chris Pilcher and I will write a tutorial showing you how to make a cool algorithm or data structure from the project.
This series will be a great way to learn more about algorithms and data structures, and to level up your Swift skills along the way.
In this first tutorial, you’ll learn how to implement a Swift Tree data structure. This is one of the most common and useful data structures, and is a great way to get started!
Tree Data Structure
The easiest way to understand the tree data structure is through a picture:
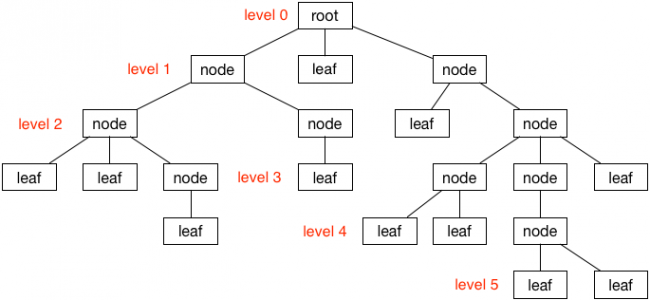
The above diagram shows a tree with 5 levels. The root is level 0, and as you move down the depth of the tree, the level increases by 1.
Trees can help you solve many important problems, including:
- representing a hierarchical relationship between objects
- making searches quick and efficient
- providing a sorted list of data
- powering prefix matching in text fields
Terminology
First, let’s cover some important terminology you should understand about trees.
Root
The root of a tree refers to the 0th level’s node of a tree. You can also think of it as the entry point to your tree data structure.

Node
A node is a block of data in the tree structure. The data that a node contains depends on the type of tree you’re making. The root is also a node.

Leaf
Sometimes referred as a terminal node, a leaf is simply a node with no children.

Tree Implementation in Swift
In this section, you’ll implement a general-purpose tree. This is a fancy way of saying a tree without any kind of restrictions (like how many children each node may have, or the order of nodes).
Remember that a tree is made up of nodes. So to start, let’s create a basic node class. Create a new Swift playground and add the following empty class:
class Node {

}
Value
Of course, a node isn’t much use without a value associated with it.
For simplicity, you’ll specialize this tree to manage string data. Update your current implementation of the Node to the following:
class Node {
  var value: String

  init(value: String) {
    self.value = value
  }
}
You’ve declared a property named value of type String. You’ve also declared an initializer, which is required for initializing all non-optional stored properties for your class.
Children
In addition to a value, each node needs to have a list of children.
Update your class definition to the following:
class Node {
  var value: String
  var children: [Node] = [] // add the children property

  init(value: String) {
    self.value = value
  }
}
You simply declare children as an array of nodes. Each child represents a node that is 1 level deeper than the current node.
Parent
Sometimes it’s handy for each node to have a link to its parent node as well. Children are the nodes below a given node; the parent is the node above. A node may only have one parent, but can have multiple children.
Update the implementation of your Node class to the following:
class Node {
  var value: String
  var children: [Node] = []
  weak var parent: Node? // add the parent property

  init(value: String) {
    self.value = value
  }
}
Note that you’ve made parent an optional. This is because not all nodes have parents – such as the root node in a tree. You’ve also made it weak to avoid retain cycles.
Insertion
To handle insertion to your tree, you’ll declare an add(child:) method in your Node class. Update the implementation of your class to the following:
class Node {
  var value: String
  var children: [Node] = []
  weak var parent: Node?

  init(value: String) {
    self.value = value
  }

  func add(child: Node) {
    children.append(child)
    child.parent = self
  }
}
It’s best to understand how add(child:) works by using it in a live playground. Outside the implementation of your class, write the following into your playground:
let beverages = Node(value: "beverages")

let hotBeverages = Node(value: "hot")
let coldBeverages = Node(value: "cold")

beverages.add(child: hotBeverages)
beverages.add(child: coldBeverages)
Hierarchical structures are natural candidates for tree structures, so here you’ve defined 3 different nodes and organized them into a logical hierarchy. This corresponds to the following structure:

Challenge: Beverage City
Ready for a quick test of knowledge?
Try writing the code to extend your tree to match the following diagram:

The solution is provided in the spoiler section down below, but try it yourself first!
[spoiler title="Solution"]
let beverages = Node(value: "beverages")

let hotBeverage = Node(value: "hot")
let coldBeverage = Node(value: "cold")

let tea = Node(value: "tea")
let coffee = Node(value: "coffee")
let cocoa = Node(value: "cocoa")

let blackTea = Node(value: "black")
let greenTea = Node(value: "green")
let chaiTea = Node(value: "chai")

let soda = Node(value: "soda")
let milk = Node(value: "milk")

let gingerAle = Node(value: "ginger ale")
let bitterLemon = Node(value: "bitter lemon")

beverages.add(child: hotBeverage)
beverages.add(child: coldBeverage)

hotBeverage.add(child: tea)
hotBeverage.add(child: coffee)
hotBeverage.add(child: cocoa)

coldBeverage.add(child: soda)
coldBeverage.add(child: milk)

tea.add(child: blackTea)
tea.add(child: greenTea)
tea.add(child: chaiTea)

soda.add(child: gingerAle)
soda.add(child: bitterLemon)
[/spoiler]
Printing Trees
Verifying a large tree structure can be hard without any console logging. After defining your tree structure, try to log your result in the console by printing the tree:
print(beverages) // <- try to print it!
You can bring up the console by pressing the following keys in combination: Command-Shift-Y. You should see the name of your class printed onto the console.
Node
How silly! Unfortunately the compiler doesn't know the best way to print your custom Swift object, unless you tell it.
To aid the compiler, you'll need to make Node adopt the CustomStringConvertible protocol. To do this, add the following just below the implementation of your Node class:
// 1
extension Node: CustomStringConvertible {
  // 2
  var description: String {
    // 3
    var text = "\(value)"

   // 4
    if !children.isEmpty {
      text += " {" + children.map { $0.description }.joined(separator: ", ") + "} "
    }
    return text
  }
}
This code is relatively straight forward:
- You've declared an extension to your Node class, and you've adopted the CustomStringConvertible protocol. This protocol expects you to implement a computed property with the name
description, with theStringtype. - You've declared the
descriptionproperty. This is a computed property, a read only property that returns aString. - You've declared a
textvariable. This will hold the entire string. For now, you've given it the current node's value. - In addition to printing the current value of the node, you'll also need to print the children, children of children, and so on. To do so, you'll recursively append your children's description, whilst adding some braces to give the string some context in regards to the structure of the children.
Now, when you call the print your Node classes, you'll get a nice representation of your tree structure like this:
"beverages {hot {tea {black, green, chai} , coffee, cocoa} , cold {soda {ginger ale, bitter lemon} , milk} } \n"
Note: If the mapping syntax confuses you, here's what you could have written instead:
map is a method that acts on a collection of objects, such as arrays. Defined by types that adopt the Sequence protocol, map allows you to perform operations on every element of the array. In your case, you're iterating through the children and performing a string append operation.
To learn more about map, you can read about it in this tutorial: Introduction to Functional Programming in Swift.
Note: If the mapping syntax confuses you, here's what you could have written instead:
if !children.isEmpty {
  text += " {"
  for child in children {
    if children.last?.value != child.value {
      text += child.description + ", "
    } else {
      text += child.description
    }
  }
  text += "} "
}
map is a method that acts on a collection of objects, such as arrays. Defined by types that adopt the Sequence protocol, map allows you to perform operations on every element of the array. In your case, you're iterating through the children and performing a string append operation.
To learn more about map, you can read about it in this tutorial: Introduction to Functional Programming in Swift.
if !children.isEmpty {
  text += " {"
  for child in children {
    if children.last?.value != child.value {
      text += child.description + ", "
    } else {
      text += child.description
    }
  }
  text += "} "
}